All Activity
- Today
-
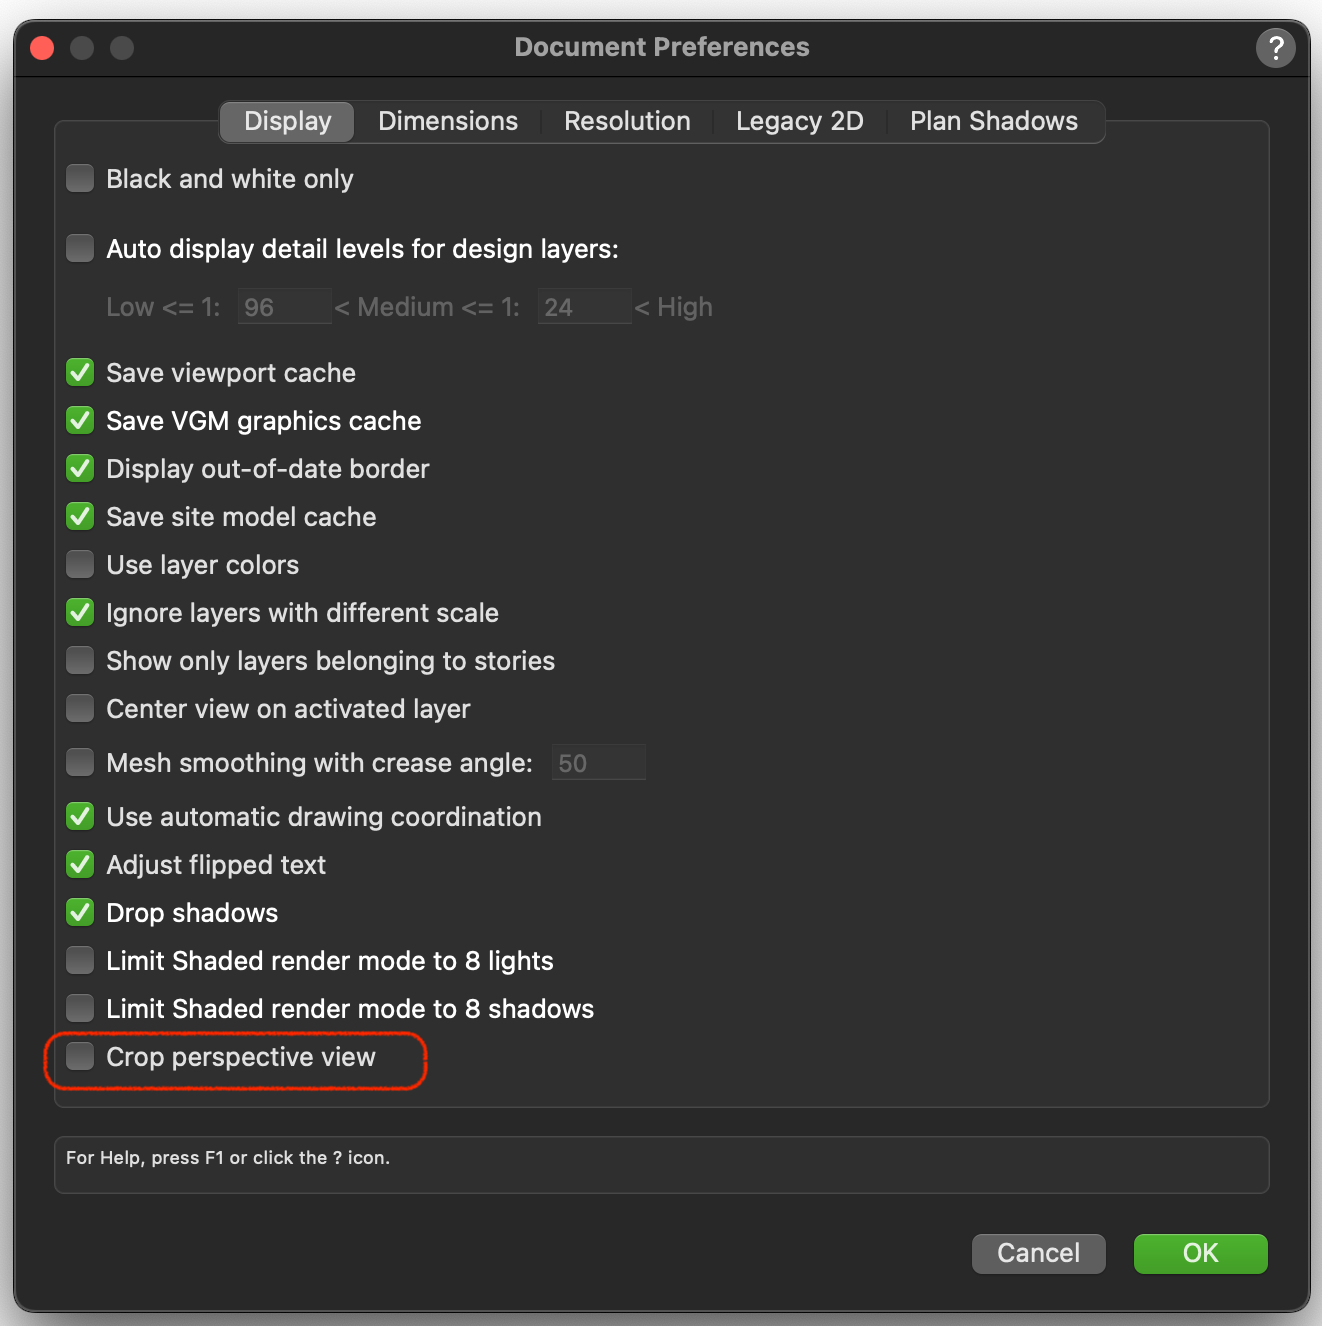
Perhaps it's this setting: Go into Document Preferences and uncheck "Crop Perspective View." This option is only even available if Legacy 2D Features are turned on in the 4th tab.

-
This this is a bit of an issue if you realise 5 issues later that one drawing wasn't included. You need to delete the 5 issues and their revisions, include the missing drawing, then redo all the possibly myriad drawing issues/revisions complete with revision notes etc. You would either spent potentially hours doing this to get an accurate drawing register, or just do it manually. This has happened to me several times and it would be good if this could somehow be improved.
-
 Nakamura joined the community
 - Yesterday
-
Hi Andy, thanks. I just found that and it "worked", I could see from the audience. But then when I got out of that camera mode that weird thing that was happening with Command>0 happened, which is when I go to Flyover tool after using Command>0 or now the camera tool, everything disappears. I opened an older drawing I was working on and if I use Command>0 or the Camera tool, and then get out of it and use the Flyover tool, no problems. There is something built into this original dwg I think.
-
Could you drop in a Renderworks Camera placed on a chosen seat, then activate the Camera? Then you could use the Walkthrough Tool's "Look Around Mode" to check sightlines without unintentionally moving around in 3D space.
-
I usually do Command>0 and it allows a view from the audience to the stage and you can input seating height and "look to" height. However, the original dwg that I'm working from (my assumption) is not letting that command work properly in this drawing. So, what other way is there to view the stage from my chosen seat in the audience. Not looking for replies on why Command>0 isnt working, looking for alternate methods.
-
Still no answer to this question. I got a "response" from VW on a related thread but they just suggested I submit a support ticket, which I have done. Here is the related thread:
-

Problem with controlling wall texture by class in VW 2024
billtheia replied to EliM's question in Troubleshooting
Thanks, Juan. It's been a while since I used this forum. In the past, it seemed like VW was more engaged here. It is unfortunate that we are now forced to go through the cumbersome process of filing a support ticket for each and every problem we encounter with VW. Also seems like a missed opportunity for VW to engage with its users. I have submitted a support request. BTW, the link you posted does not seem to work. I had to copy and paste the text to get it to work. -
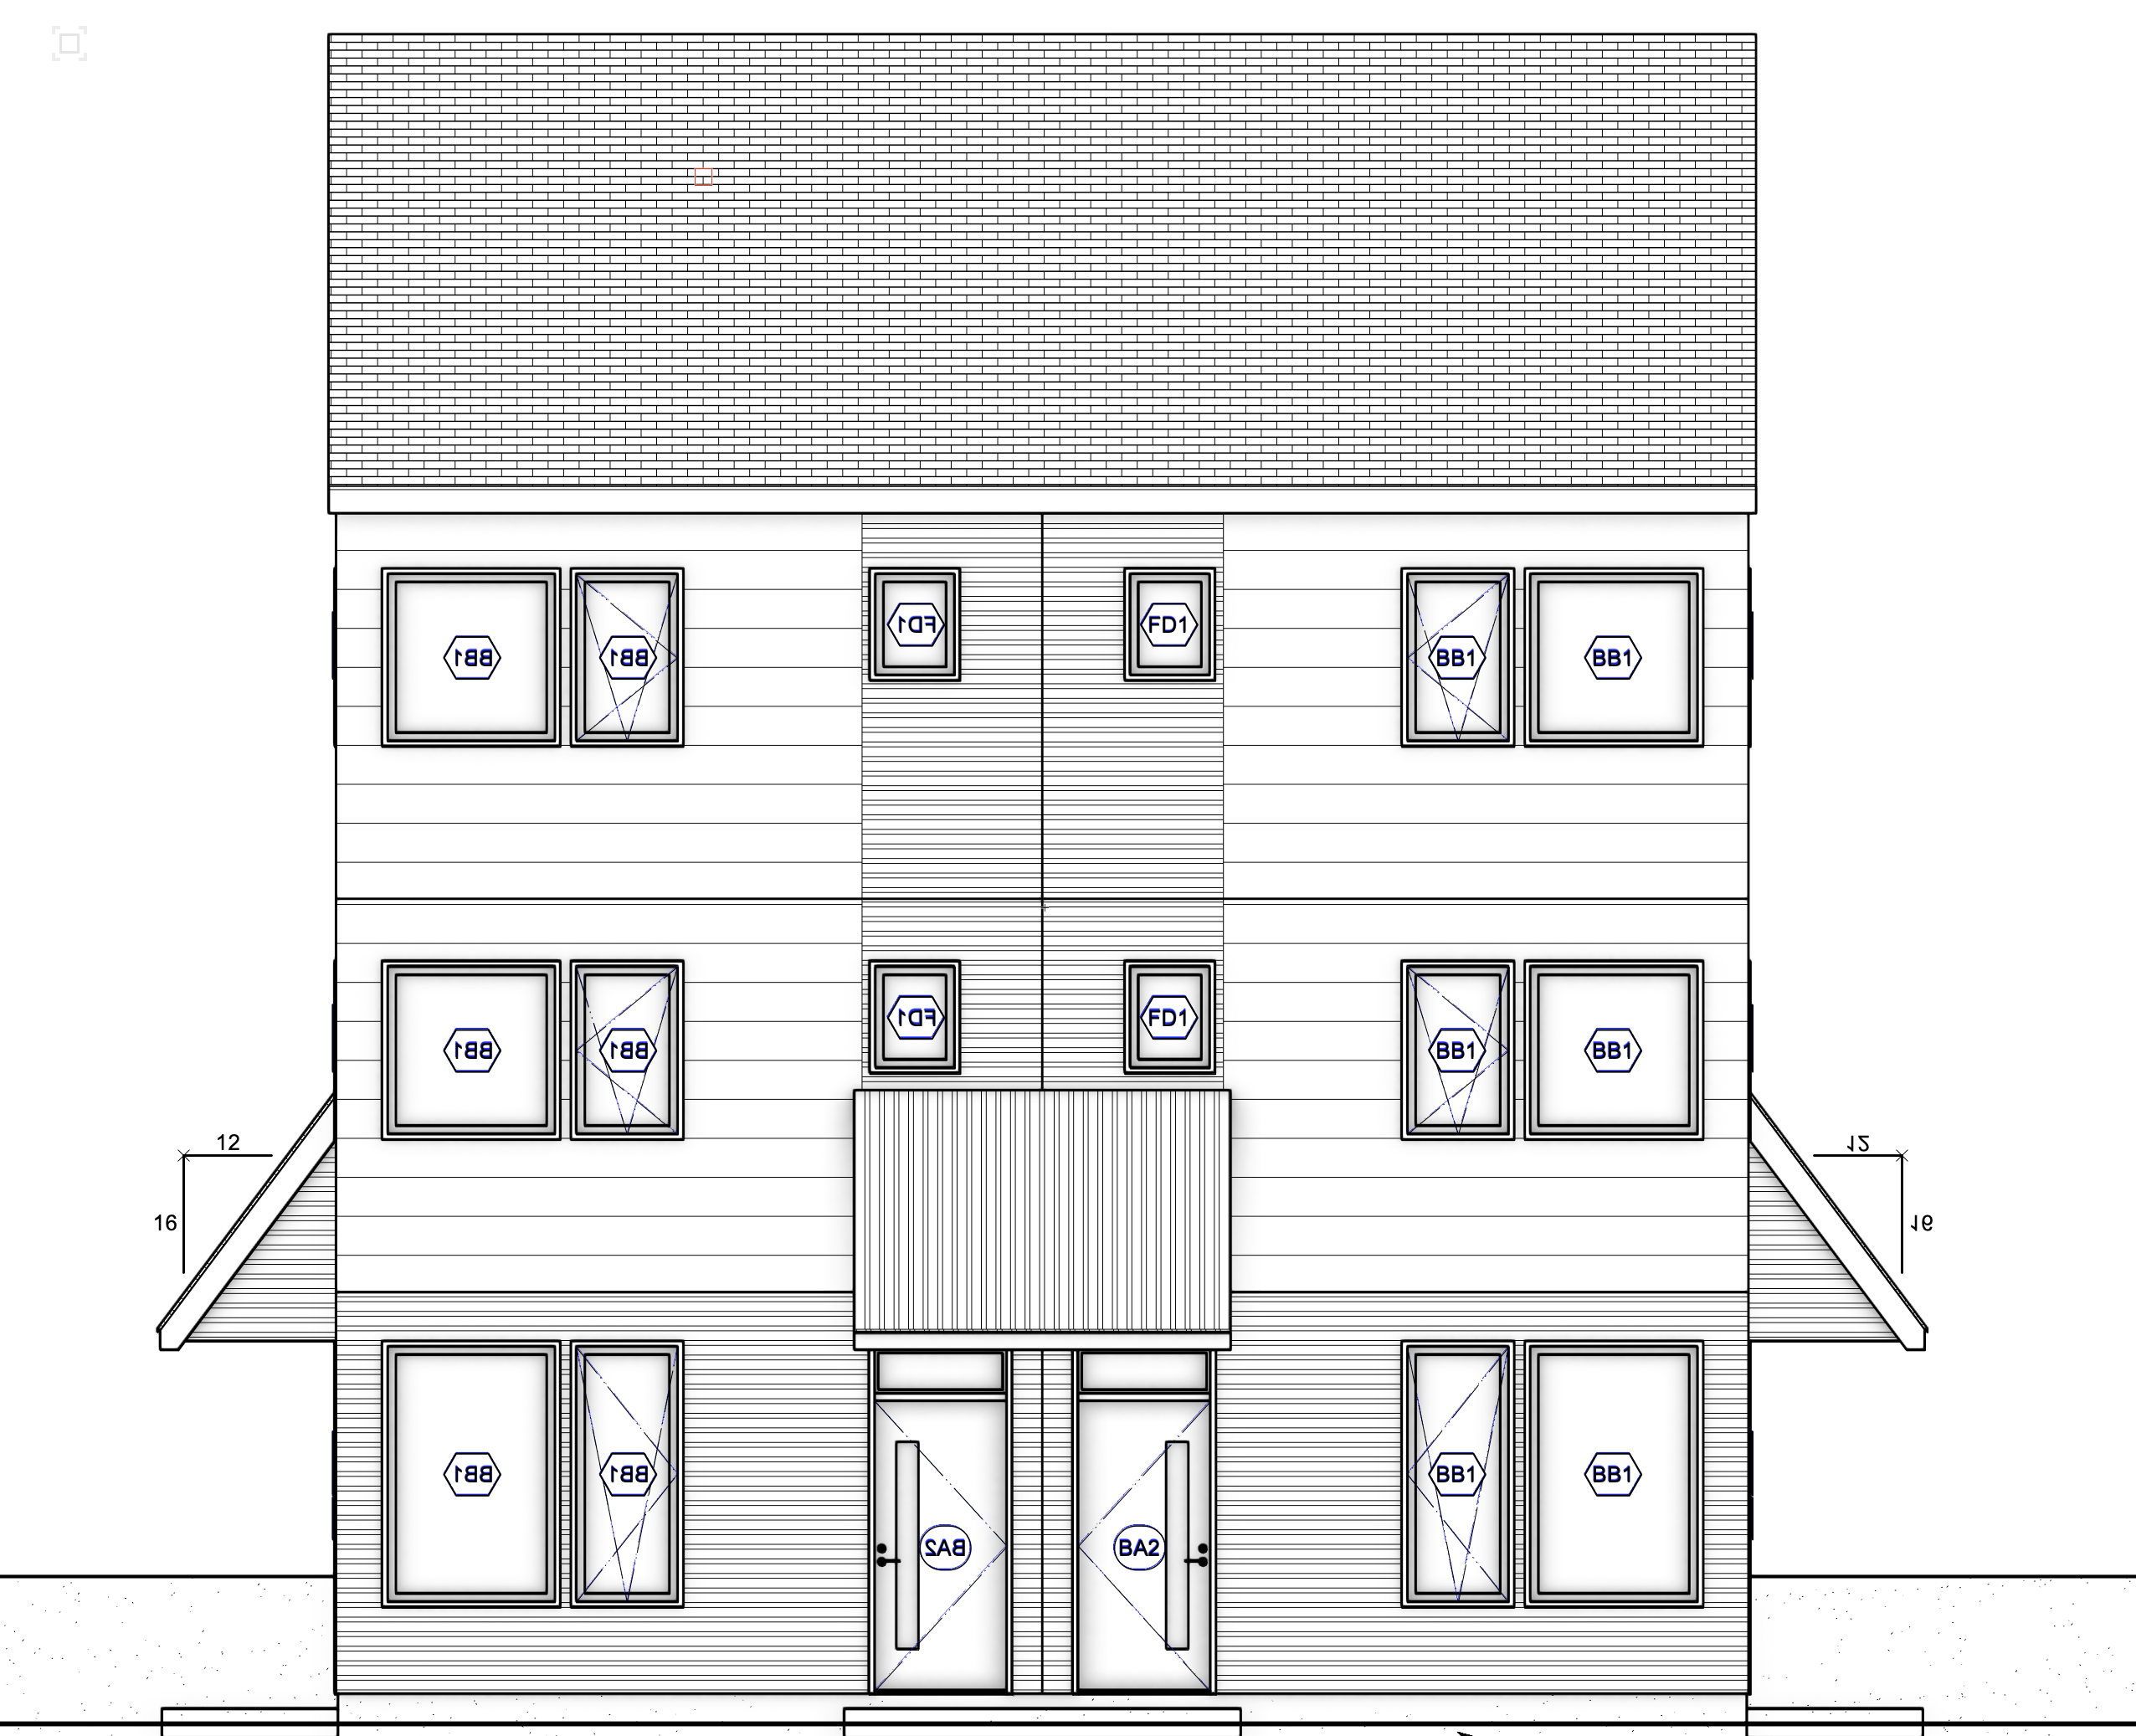
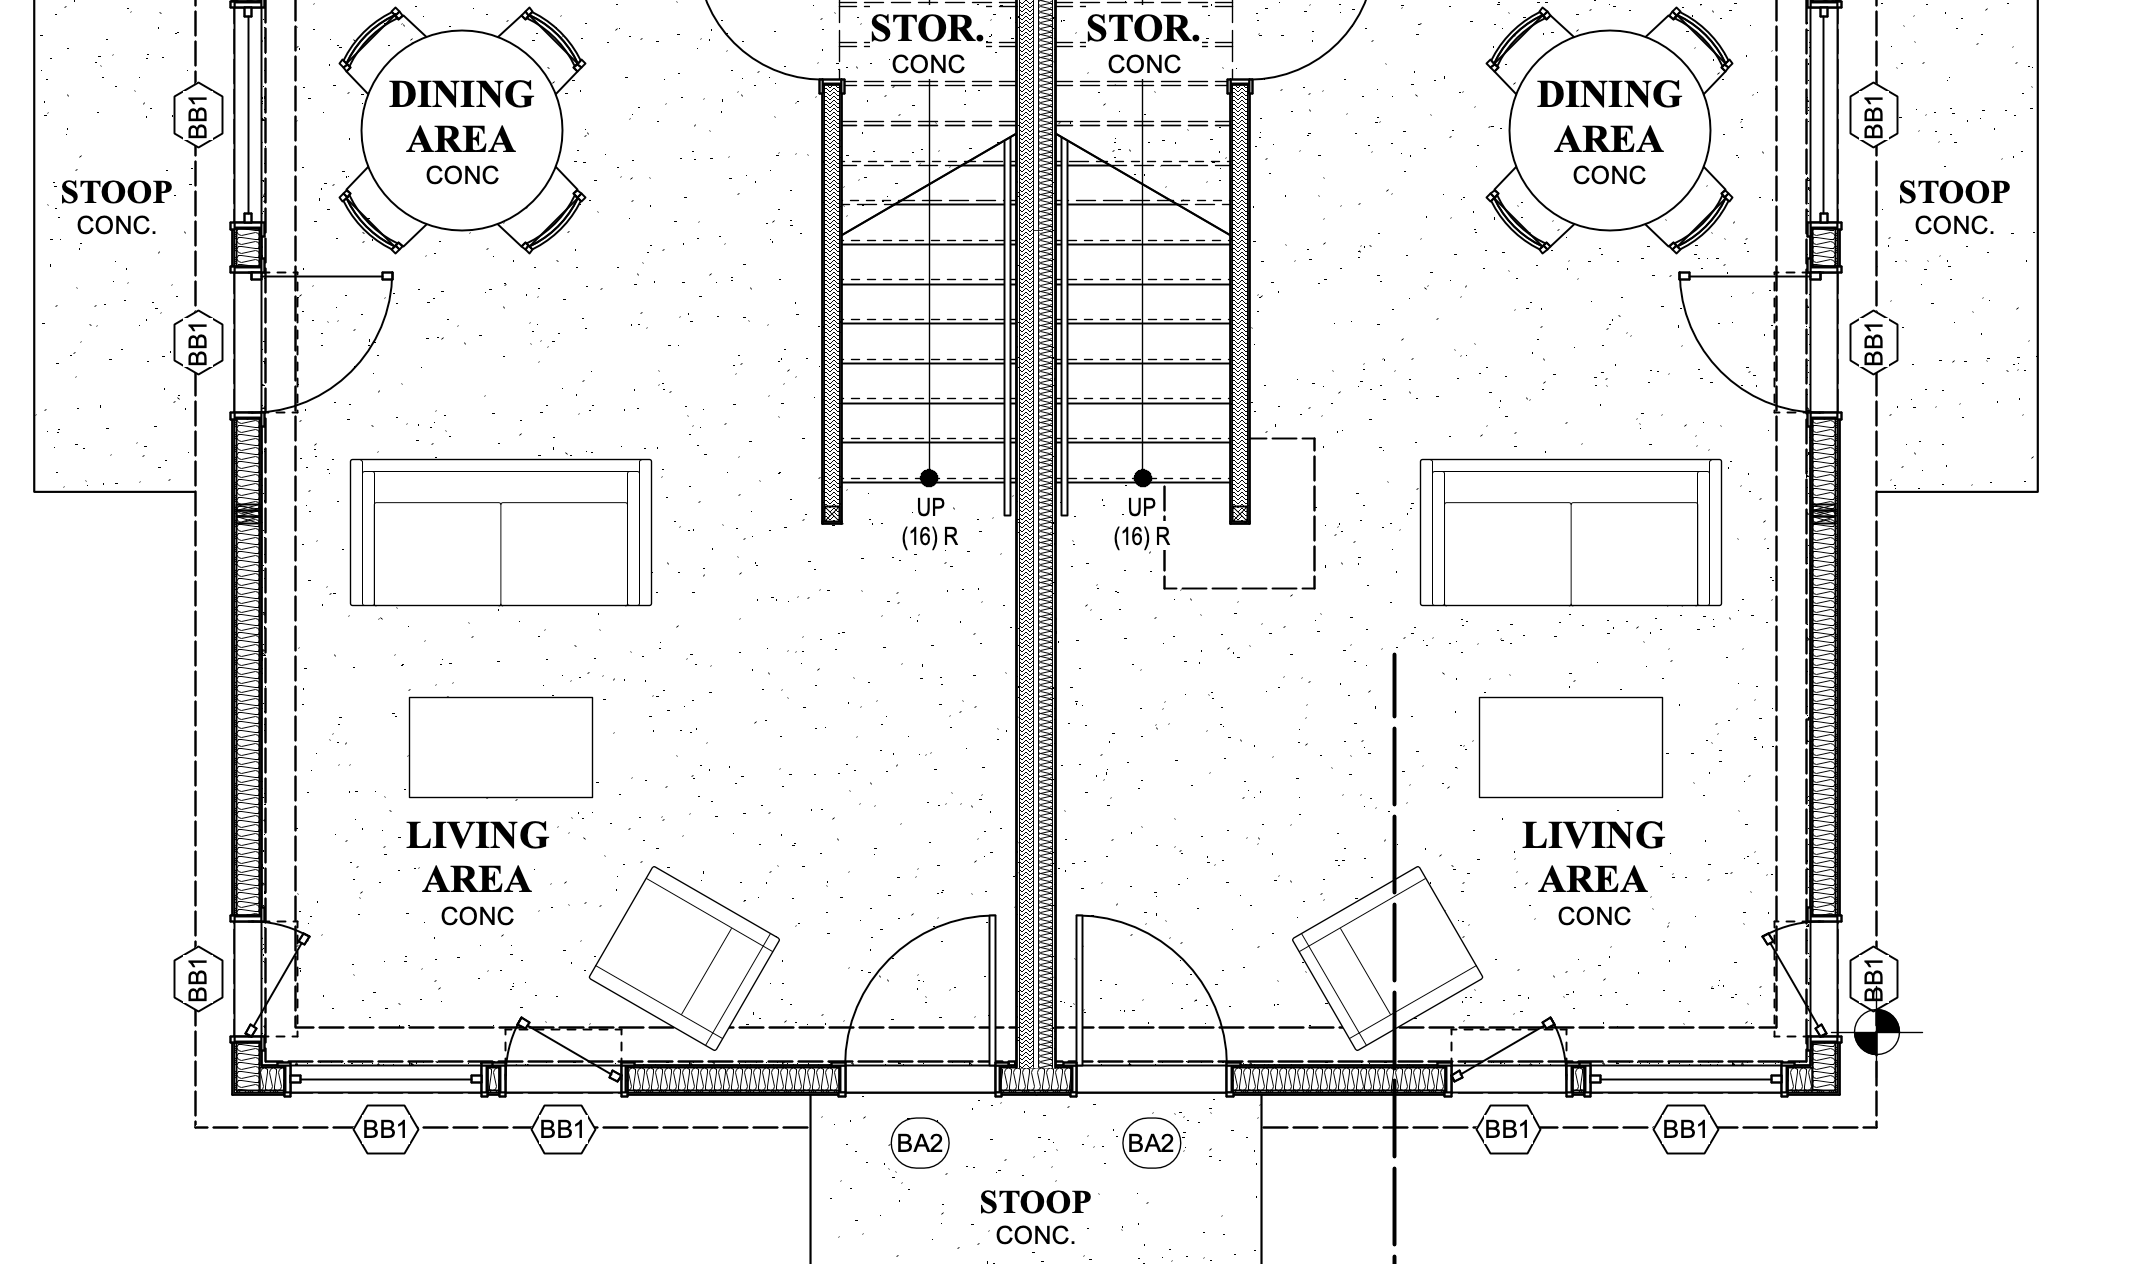
I think my question is similar to this, but different enough to start different thread (partly because I don't go full-BIM and have never used data tags and records. I'm designing a 3-story simple duplex residence with mirrored floor plans. I created a symbol of each floor plan so I only have to make changes on one side of the duplex. While in plan view door and window tags along with room labels and notes will flip properly (i.e. the text is not mirrored), but the door and window tags do flip so they read backwards. I've checked every setting I could think of to no avail. What am I missing?


-

How Do I pull the Patch for my GDTF Fixtures into Vision
Phoxyr replied to Phoxyr's question in Troubleshooting
It's still not working. When i merge the MVR it just moves all of my fixtures from the Sendtovision patch to the merged file in my scene graph. Otherwise (as far as i've noticed) nothing changes and my patch window is still empty. Any advice? And yes, I can confirm the MVR has been fully patched in Spotlight using the DMX patch command. -
Have you tried to completely delete your RM Cache and then perform a hard refresh of the Resource Manager through the gear icon?
-
@avase as an FYI I have learned (the hard way ?) to think of a Sheet Layer Viewport as a modifiable photo of what is on the Design Layer (...or Layers). Here is one take on this ... 1. Set up the Design Layer so you see exactly what you would like in the Viewport. 2D or 3D - Iso or Perspective - wireframe or rendered. 2. Next, put a shape onto what you see in the Design Layer to frame it. A rectangle for example. Outside this shape should NOT show in the Viewport. No issue with Color & Pen for this shape as it should initially disappear from the Design Layer and be invisible on the Sheet Layer. 3. With this shape selected, pick Create Viewport from the drop down menu. VW should ask to use the selected shape as the Crop - Click Yes The rest is up to you - New Sheet Layer ? - Name and such ...etcetera Select this newly created viewport in the OIP and click the Update. Always remember to Click Update ... The viewport should look like the Design Layer set up it originated on. Rotation, render mode, etcetera, cropped by the shape you placed on top Setting up the Design Layer(s) is key as this equates to what the Viewport will look like. Don't fret some of the Viewport details as they are easily changed Viewport not the right size ? you can scale a viewport like most objects... Updated / rendered Viewport is dark ? Adjust the Viewport lighting in the OIP (its down towards the bottom...) The key may be knowing where the Post Creation Viewport controls are. One Design Layer and many Classes for control of what is visible is a common workflow here. This limits where a Viewport comes from and puts control of what is seen in the Viewport to Classes selected, either... A. When the Viewport was created or B. Changes made to the Viewport Settings in the OIP Workflow should also look at what is needed in the Design Layer ie: in many Viewports and what should only be on a single Sheet Layer or in a specific Viewports as annotations. Work Smarter ! ... and that Viewport Crop? While a rectangle is typical, it can be any single closed shape. This shape will be the boundary to the Viewport when you see the Viewport on a Sheet Layer. Try a circle or even a convoluted polygon (Hint: The Polygon could dance around oddities on the Design Layer to get a better image in the Viewport) You say you want to see the Crop ? - One of several tiny boxes in the OIP See attached Peter Viewport Quick.mov
-

Door Transom alignment
Archistyles replied to Amelia S's question in Wishlist - Feature and Content Requests
Hi @Matt Panzer Any insight on door transom alignment? thx
-
 Drafting is my happy place! My portfolio is available on my Archinect profile. As a Vectorworks Specialist I consult on a project by project basis. I offer drafting and design services ranging in project type from residential to large scale event productions. As a project designer and project manager I have successfully completed high end custom residential whole house remodels, small commercial projects and large scale event production documentation. These are a few project types I have drafted, designed and/or collaborated on: Full home remodels Kitchens, baths, interior and exterior finishes: Historic homes, Midcentury, Modern Small Commercial; interior and exterior finishes Large scale event productions What type of projects do you need help with? I look forward to connecting with you! Thank you, Elly Positive Space Design
 -
 Preston joined the community
 -
I have a user that opens project files, checks out all layers and objects, makes needed changes and then saves and commits but the changes only save to the working file and do not update the project file. Other users can open the same project file and save and commit with out any issues. We have tried reinstalling VW and it still did not solve the issue. Any troubleshooting suggestions or help would be appreciated.
-

macOS 14.4 Compatibility Issues with Vectorworks
Tom Macie commented on JuanP's article in Tech Bulletins
As far as my situation is con After updating both the OS 14.5 and SP 5 it is very stable in my situation. No issues whatsoever. -
With the Custom Stair selected in a 3D view <Control U> (PC) <Command U> (Mac) > OK converts to 3d objects Extrudes and 3D Polygons, this allows to edit the individual pieces. HTH
-

macOS 14.4 Compatibility Issues with Vectorworks
zeno commented on JuanP's article in Tech Bulletins
Good morning Can we consider the problem over with update 14.5? Thanks -

Exporting to Old Version without Access to New Version
michaelk replied to EmilyArch's question in Troubleshooting
CASA ALE v2025b223 v2020.vwx -
Hmm, you might need to be a little more specific. If your Sheet Layer View Port(SLVP) is linked to a camera, it usually hides the camera on the Design Layer. However, you can right-click on the viewport to bring up an "Edit Camera . . ." option - that will bring you back to the (now hidden) Renderworks Camera. You get the "Click to aim Camera" option in the OIP. Select "Return to Viewport" and "Update Viewport"( if needed) I thought you could change the SLVP to a different camera, but It's not working how I expected. Instead, Edit the SLVP camera as above, Activate the camera, refocus as needed, and Return to Viewport. What I was expecting: Edit Camera, Activate Camera, use the Visualization Palette to select an alternate Camera, and Return to Viewport. - But this just preserves the SLVP camera view
-
I was searching for a solution to this, and I realized I could use "component join" and click 2 walls together, then the joint line would disappear. I am currently using vw2016, I am sure the later version will have the same function too.
-
Did you create a viewport on a Design Layer with the Source being the referenced file? That sounds like the missing step
-

textures not showing in sections after converting objects to auto-hybrid
skeyshubber replied to grant_PD's question in Troubleshooting
Having the same issue! Whether I make it an auto hybrid or a symbol no fill, no texture, nothing. Super frustrating! -

Plate Truss Support in Truss Tool
JustinVH replied to Shai Vera's question in Wishlist - Feature and Content Requests
The ModTruss is already present in the Vectorworks libraries and has been setup with Truss Magnets to allow for snapping at any valid connection point along the section of truss. There is no cross section data because ModTruss has not provided that to us. -
 lesley joined the community
 -
Thank you so much!! It seems like I can't edit the stairs with a double click and ungrouping makes it disappear straight away...
-
No - have not solved it. Been on deadline - and so have not had the headspace to do all the recommended fixes - so just living with the frustration...