Search the Community
Showing results for tags 'texture'.
-
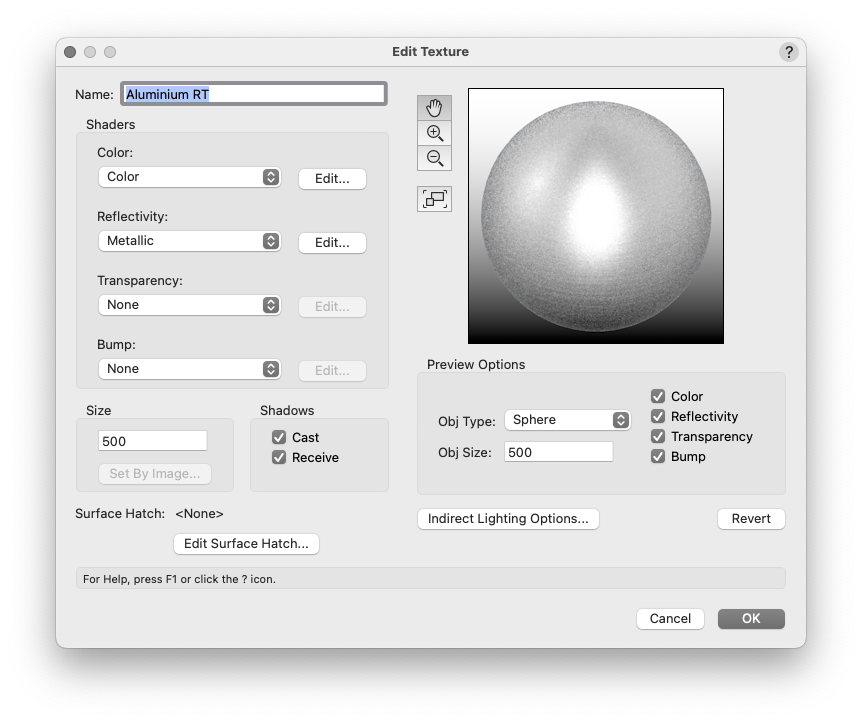
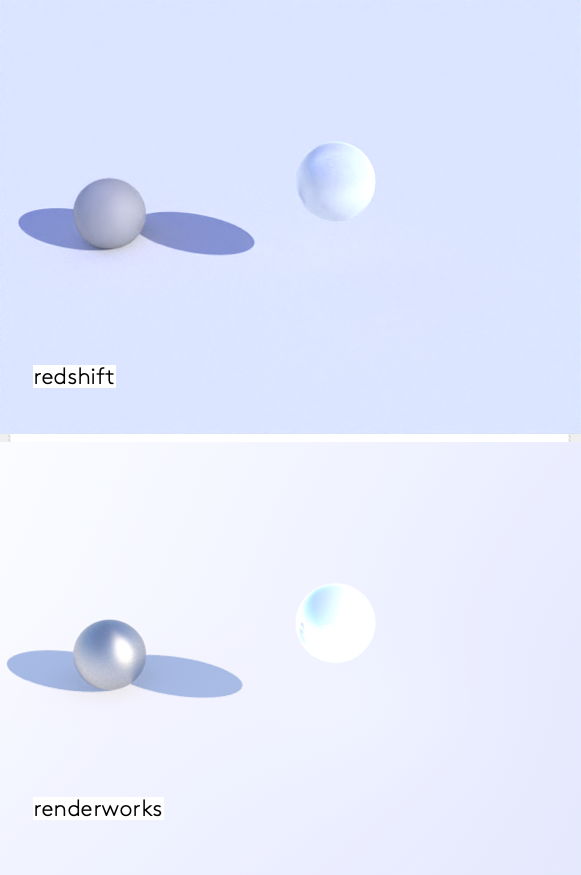
Hi ! I’m trying to use Redshift, because there are so much improvements with the last versions, that is starting to be really great. I’ve got one big issue : the metallic textures. I don’t manage to make the metallic textures working with redshift. The preview in the "edit texture" window is so much different with how it is rendered . With Renderworks it is OK, bus the redshift, it looks like a mate painting. Did I miss something ? Is there a way to make a metallic texture with Redshift ? VW-Redshift metal comparisons.vwx
-
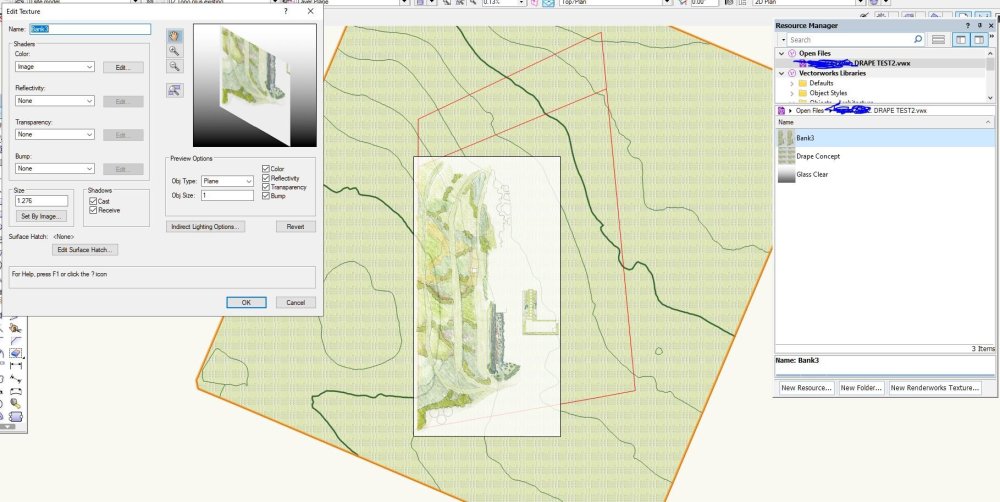
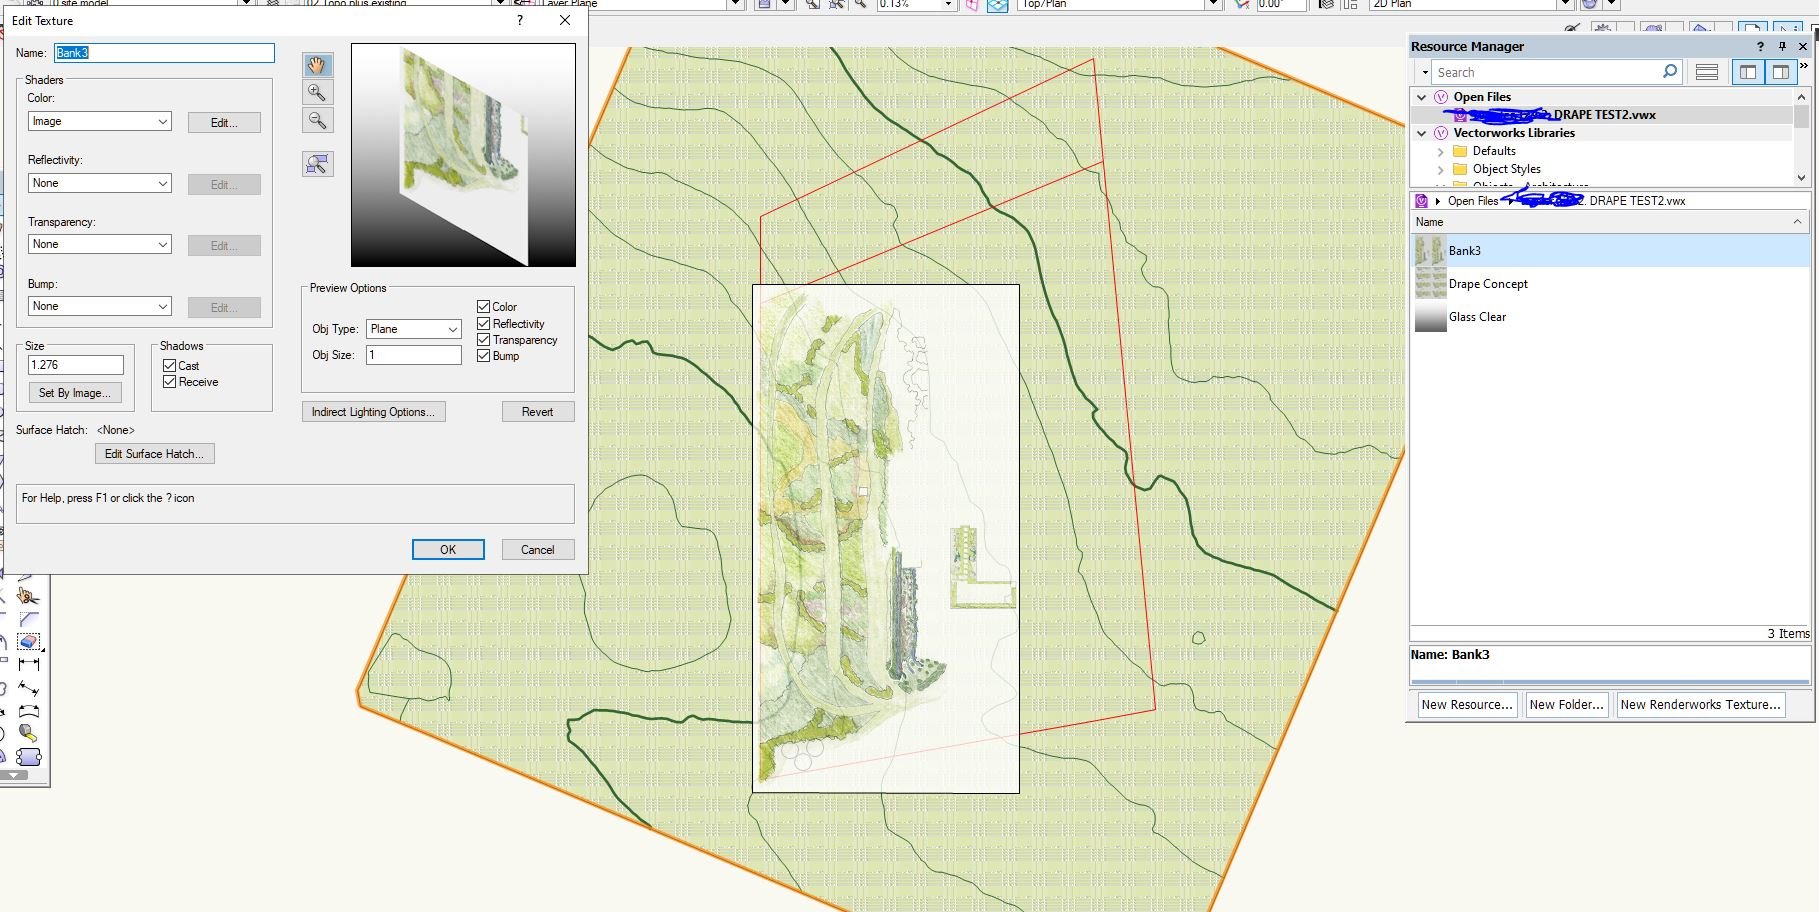
How do I drape an image over terrain/ a site model? My image is a jpg with a pencil concept The image in the space is a texture in a rectangle I'm using as a visual guide at the size, orientation and position that I want the surface to be at. My site model is built from 3D polygons contours. Red poly is my referance object to orint image position I've tried the texture mapping route but get repeated crashes when I try and chhange the I and J dimensions - or the image size reverts just after it display at a larget size. I don't do a lot of 3D in VW and there seem to be a lot of possible ways to do this and a lot of ways that are a waste of time. So has anyone got a workflow that has a useful outcome? For the purposes of this I've centred my drawing on the origin.
-
 I'm trying to apply an image to a surface. I got all the code I need except for how to apply the image I just imported... I've tried vs.SetFPat() and vs.SetTextureRefN() with no luck. ### getting handle (h) from eariler in code texture_image = vs.ShowCreateImageDialog() if texture_image != 0: newtex_name = f"QR_CODE_{datetime.datetime.now()}" vs.SetName(texture_image, newtex_name) ledtext = vs.Name2Index(newtex_name) vs.SetObjectVariableLongInt(h, 695, -10) ### vs.whateverapplysanimage() haha vs.SetObjectVariableBoolean(h,79,False) vs.SetObjectVariableReal(h,70,-((vs.HWidth(h)/2)*25.4)) # X pos vs.SetObjectVariableReal(h,71,-((vs.HHeight(h)/2)*25.4)) # Y pos vs.SetObjectVariableReal(h,72,(vs.HWidth(h))*25.4) #width vs.SetObjectVariableReal(h,73, (vs.HHeight(h))*25.4) #height vs.SetObjectVariableReal(h,74,0) #rotate vs.SetObjectVariableBoolean(h,75,False) vs.SetObjectVariableBoolean(h,76,False) vs.SetObjectVariableBoolean(h,77,False) vs.SetObjectVariableBoolean(h,697,False) vs.SetObjectVariableBoolean(h,1160,True)
 -
Hey everyone, I am currently building a tool that creates an Extrude along a path and attaches a texture to this. However, on some sides of the extrude the texture is rotated 90 degrees, while on others it has the correct rotation. def create3DLine(objectHand, path): vs.RectangleN( 0,0,1,0, 1, params().bambooHeight) profile = vs.LNewObj() offsetPath = vs.OffsetPolyN(vs.CreateDuplicateObjN(path, objectHand, True), offset3D, False) vs.SetPlanarRefIDToGround(offsetPath) offsetNurbs = vs.ConvertToNURBS(offsetPath, False) extrude = vs.ExtrudeAlongPath(offsetNurbs, profile) vs.DelObject(profile) texPartID = 3 texLayerID = 0 texture = vs.Name2Index("Bamboo Prop Texture") vs.SetTextureRefN(extrude, texture , texPartID, texLayerID) Does anybody know how to fix this?
-
 Hi vectorworks community, I have been wondering for quite long time, without finding solution, if there is a direct way to target any texture applied in 3D model with data visualization? We typically work with materials and we have 'starting' selection of generic materials for concept/sketch design stage. These generic materials have only solid color texture (typically light gray and of course real glass texture for glazing) and are just fine for showing black/white result for this stage of project. For example external wall objects throughout whole 3D model have only three different materials: exterior finish, core, interior finish. Same applies to slabs, roof, hardscape.... Then we have materials for objects columns, structural members, railings and also one for furnishing, sanitary, kitchen etc. So at this early stage of project it is sufficiently enough structured and we dont need to be more specific because of black/white/glass result. But as we move forward and design evolves we start to introduce color/material texture and we normally go through whole model and through 'render' tab we override materials texture with real texture on individual object basis (main texture and also parts/subparts). This create first set of color/material selection for building design ...and now back to the question: Do we have direct way to target and control these textures through data visualization without need to introduce record format or have it classed (actually none of these would work without breaking model into individual pieces that can be targeted individually and have specific 'address') or any other middle-part step. So looking for way to directly target applied textures without additional step. These would give us freedom to create color/material texture variations using data visualization. This would be really really amazing and very much welcomed!
 -
Does anybody know if it is possible to apply a texture to a lighting fixture? I have a 3D polygon that has a texture within Vectorworks. I have then turned this into a Lighting Fixture using the GDTF builder. When importing into Vision, it drops the texture that is applied to the 3D polygon and just renders as black. Within settings, i have fixture render set to on as opposed to black.
-
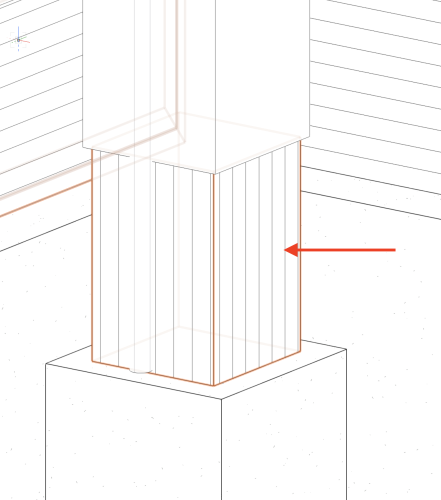
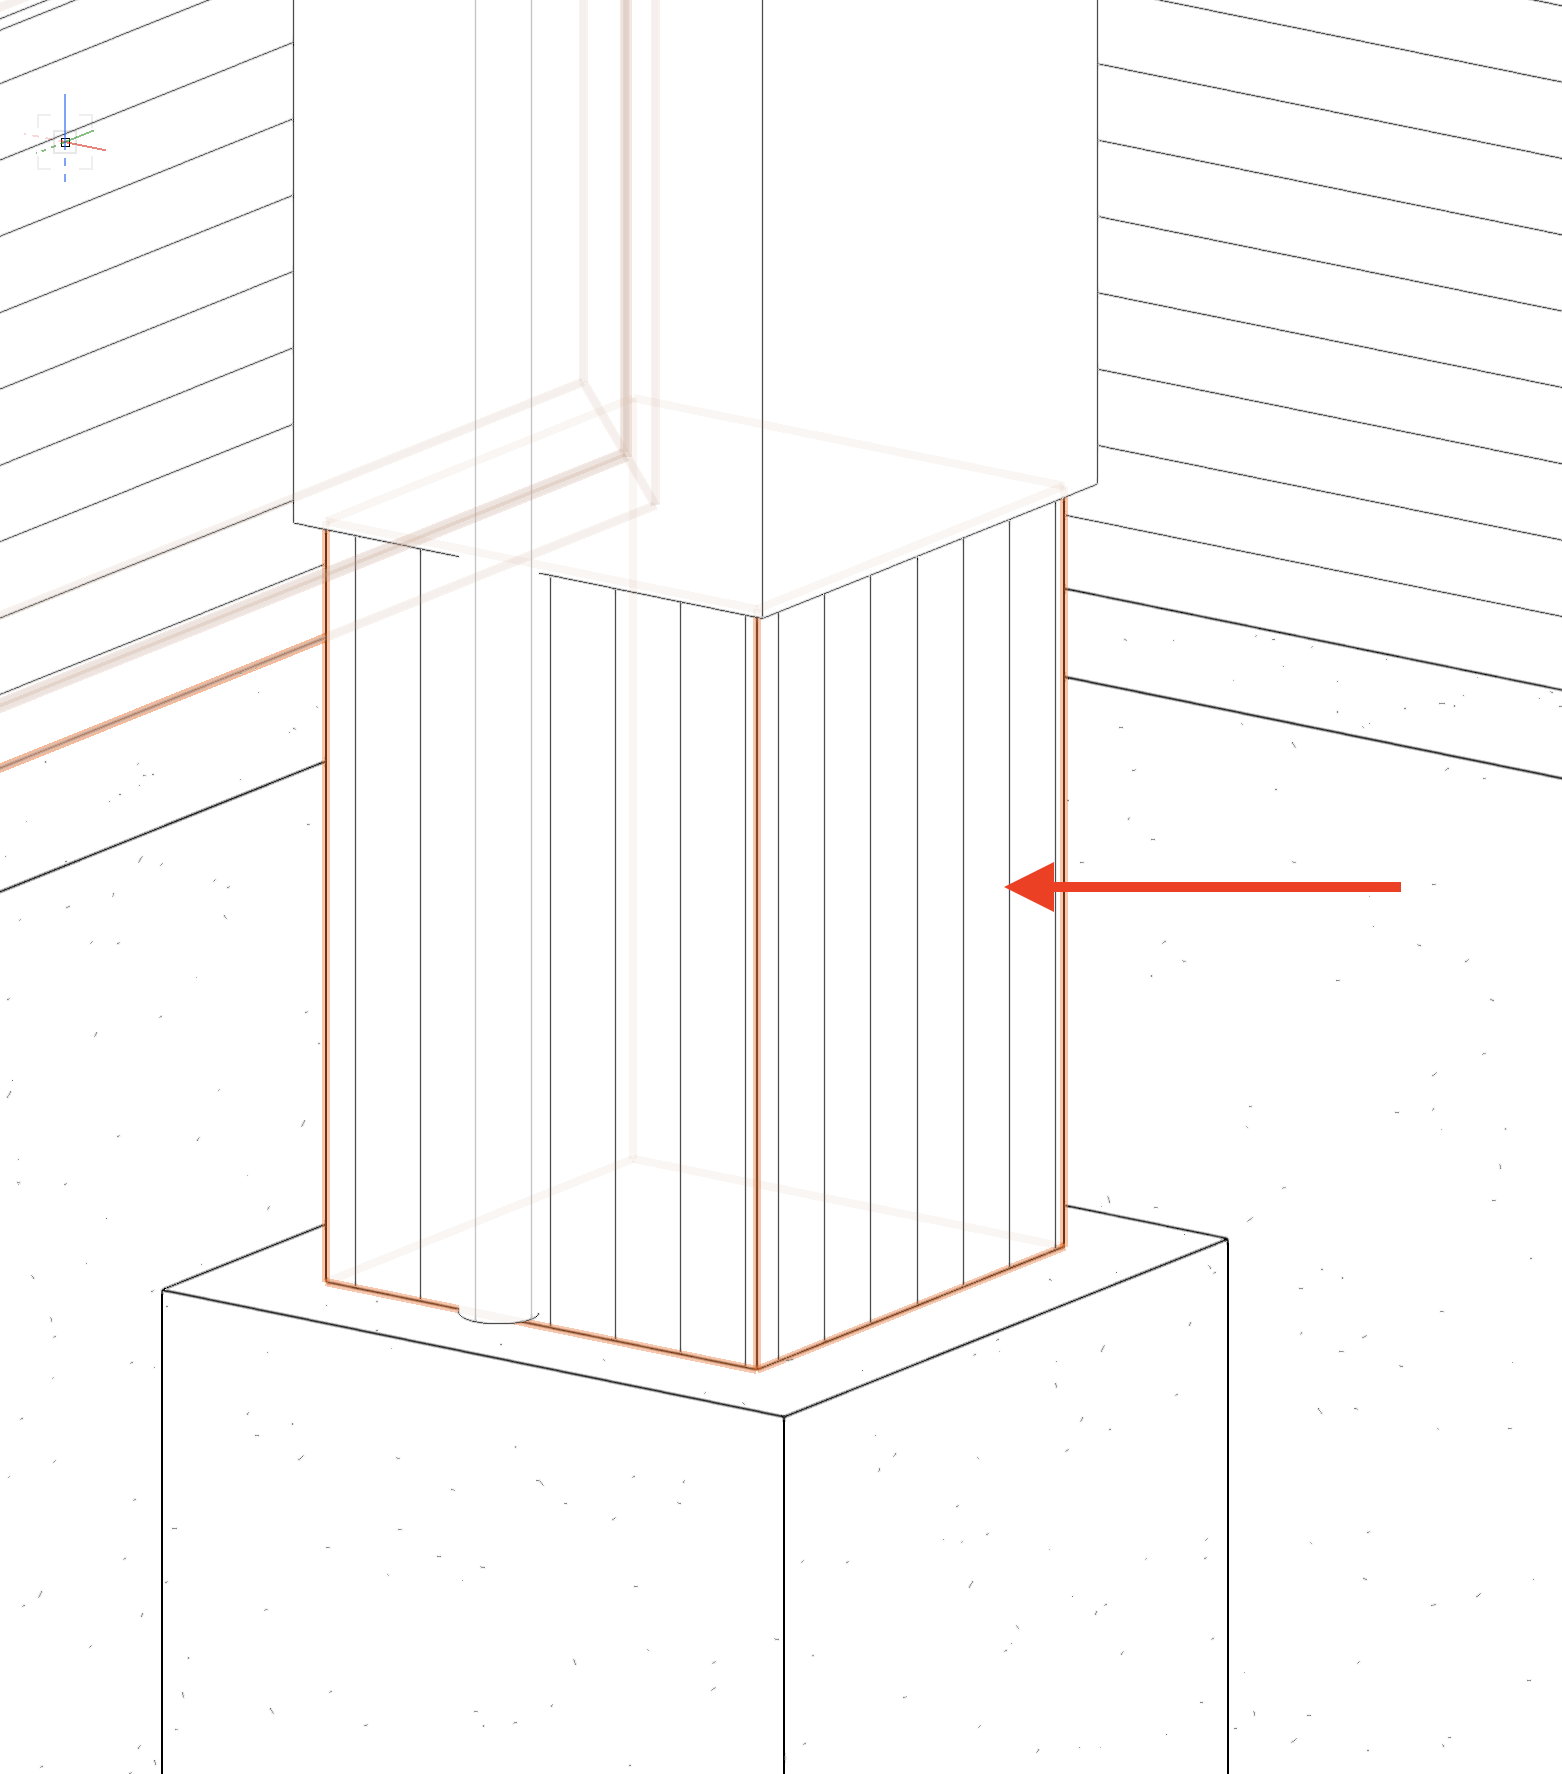
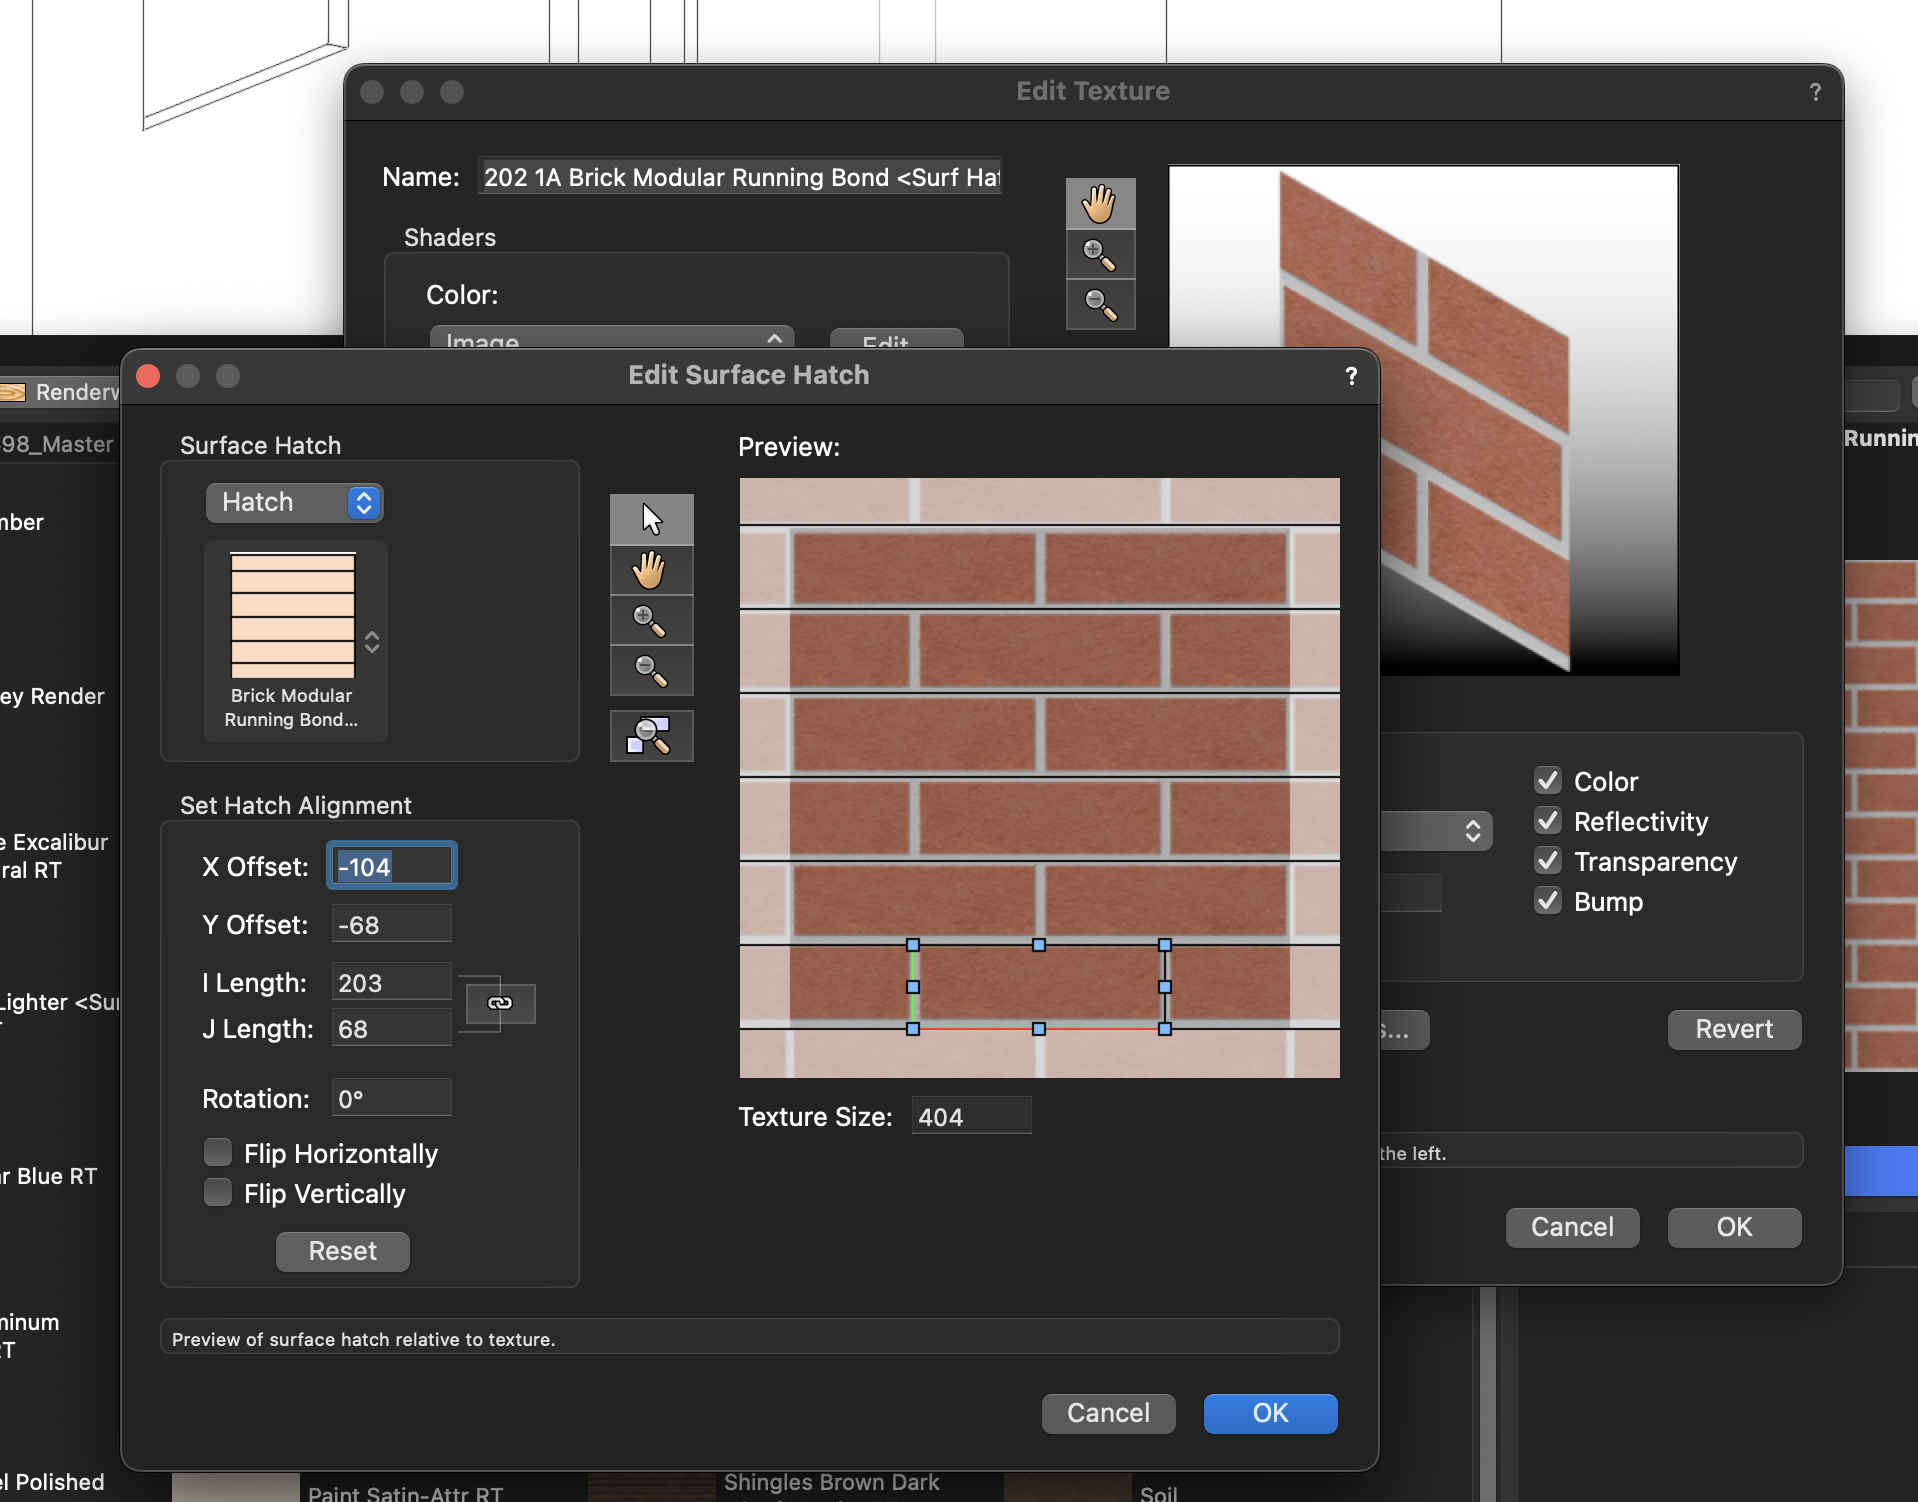
 Hi all, Would it be possible for any Masters in VW to help me with this, please? I have a brick texture to which I have also attached a hatch line to work on hidden line, In walls is working fine but when I apply this texture to a column it turns the Hatch vertically but the texture is horizontal as it should. Is there a way to turn the hatch to the correct position without creating a new texture to edit the hatch alone? See attached pictures for reference,
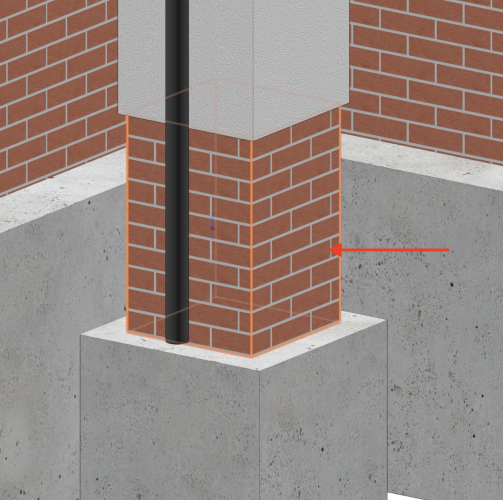

-
 I have some custom plants intermixed with stock VW plants(the ones in the rightmost rectangle) When I export them to TwinMotion using C4D, note how some of the object have a black background where it should be transparent. The image props were constructed by masking a photograph in Photoshop and/or Affinity Photo to create a texture and saved as PNG with a transparent background. The imageprops were created in VW by using the aforementioned texture file with the options shown in these dialog boxes. Everything behaves as expected in VW, but the black in place of alpha rears its head when VW is exporting the textures. Note the image below. On the left is how my plant with alpha appears outside of VW, as created by me. The same plant as it appears as a texture exported from VW, either via extract image or C4D export. The tree on the right is a default VW tree image prop exported via C4D. I suspect something is slightly different with the alpha channel or image definition, I just can't figure out why the images I am creating are behaving this way. I'm beyond frustrated by this mystery. Any help is appreciated.
 -
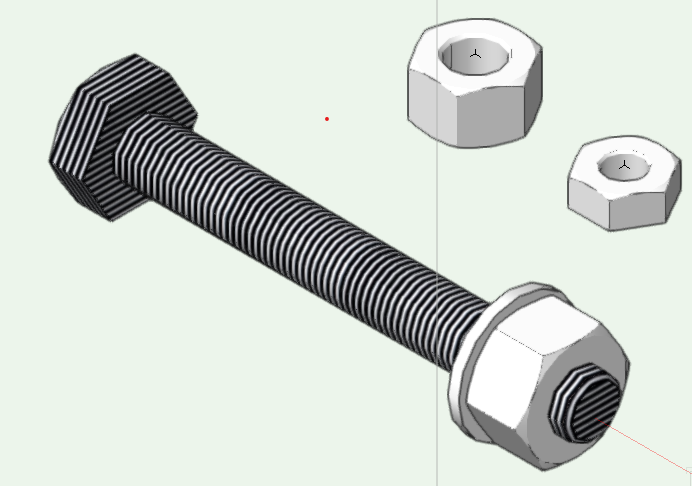
I'm definitely starting from square one here when using textures. Any suggestions for or against embedding a texture into a plugin object? Any examples of the technique? Are there any improvements in memory use or rendering speed by using a texture in lieu of actually carving out surface details such as threads? How does one prevent parts of a solid from being textured? Like the circular end of this solid modeled to look like a bolt.
-
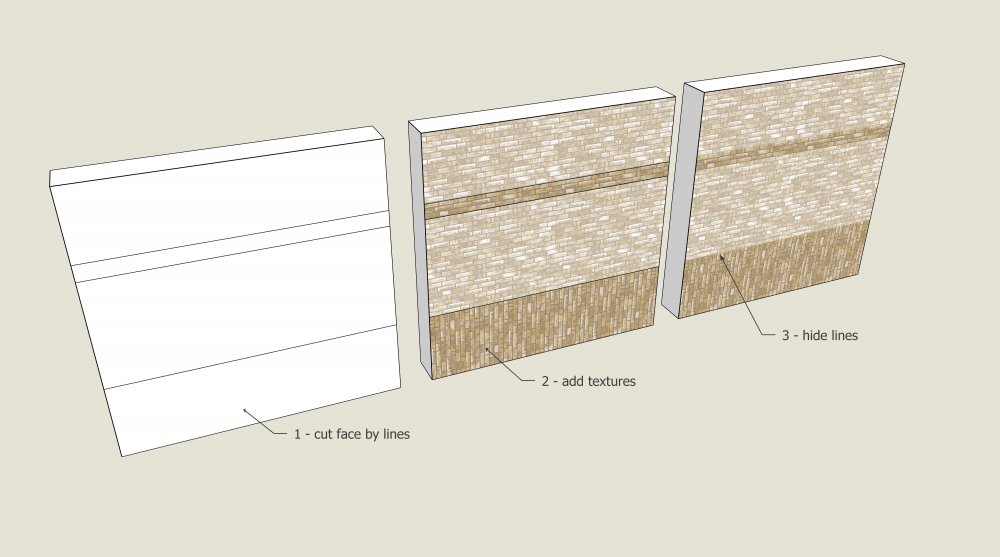
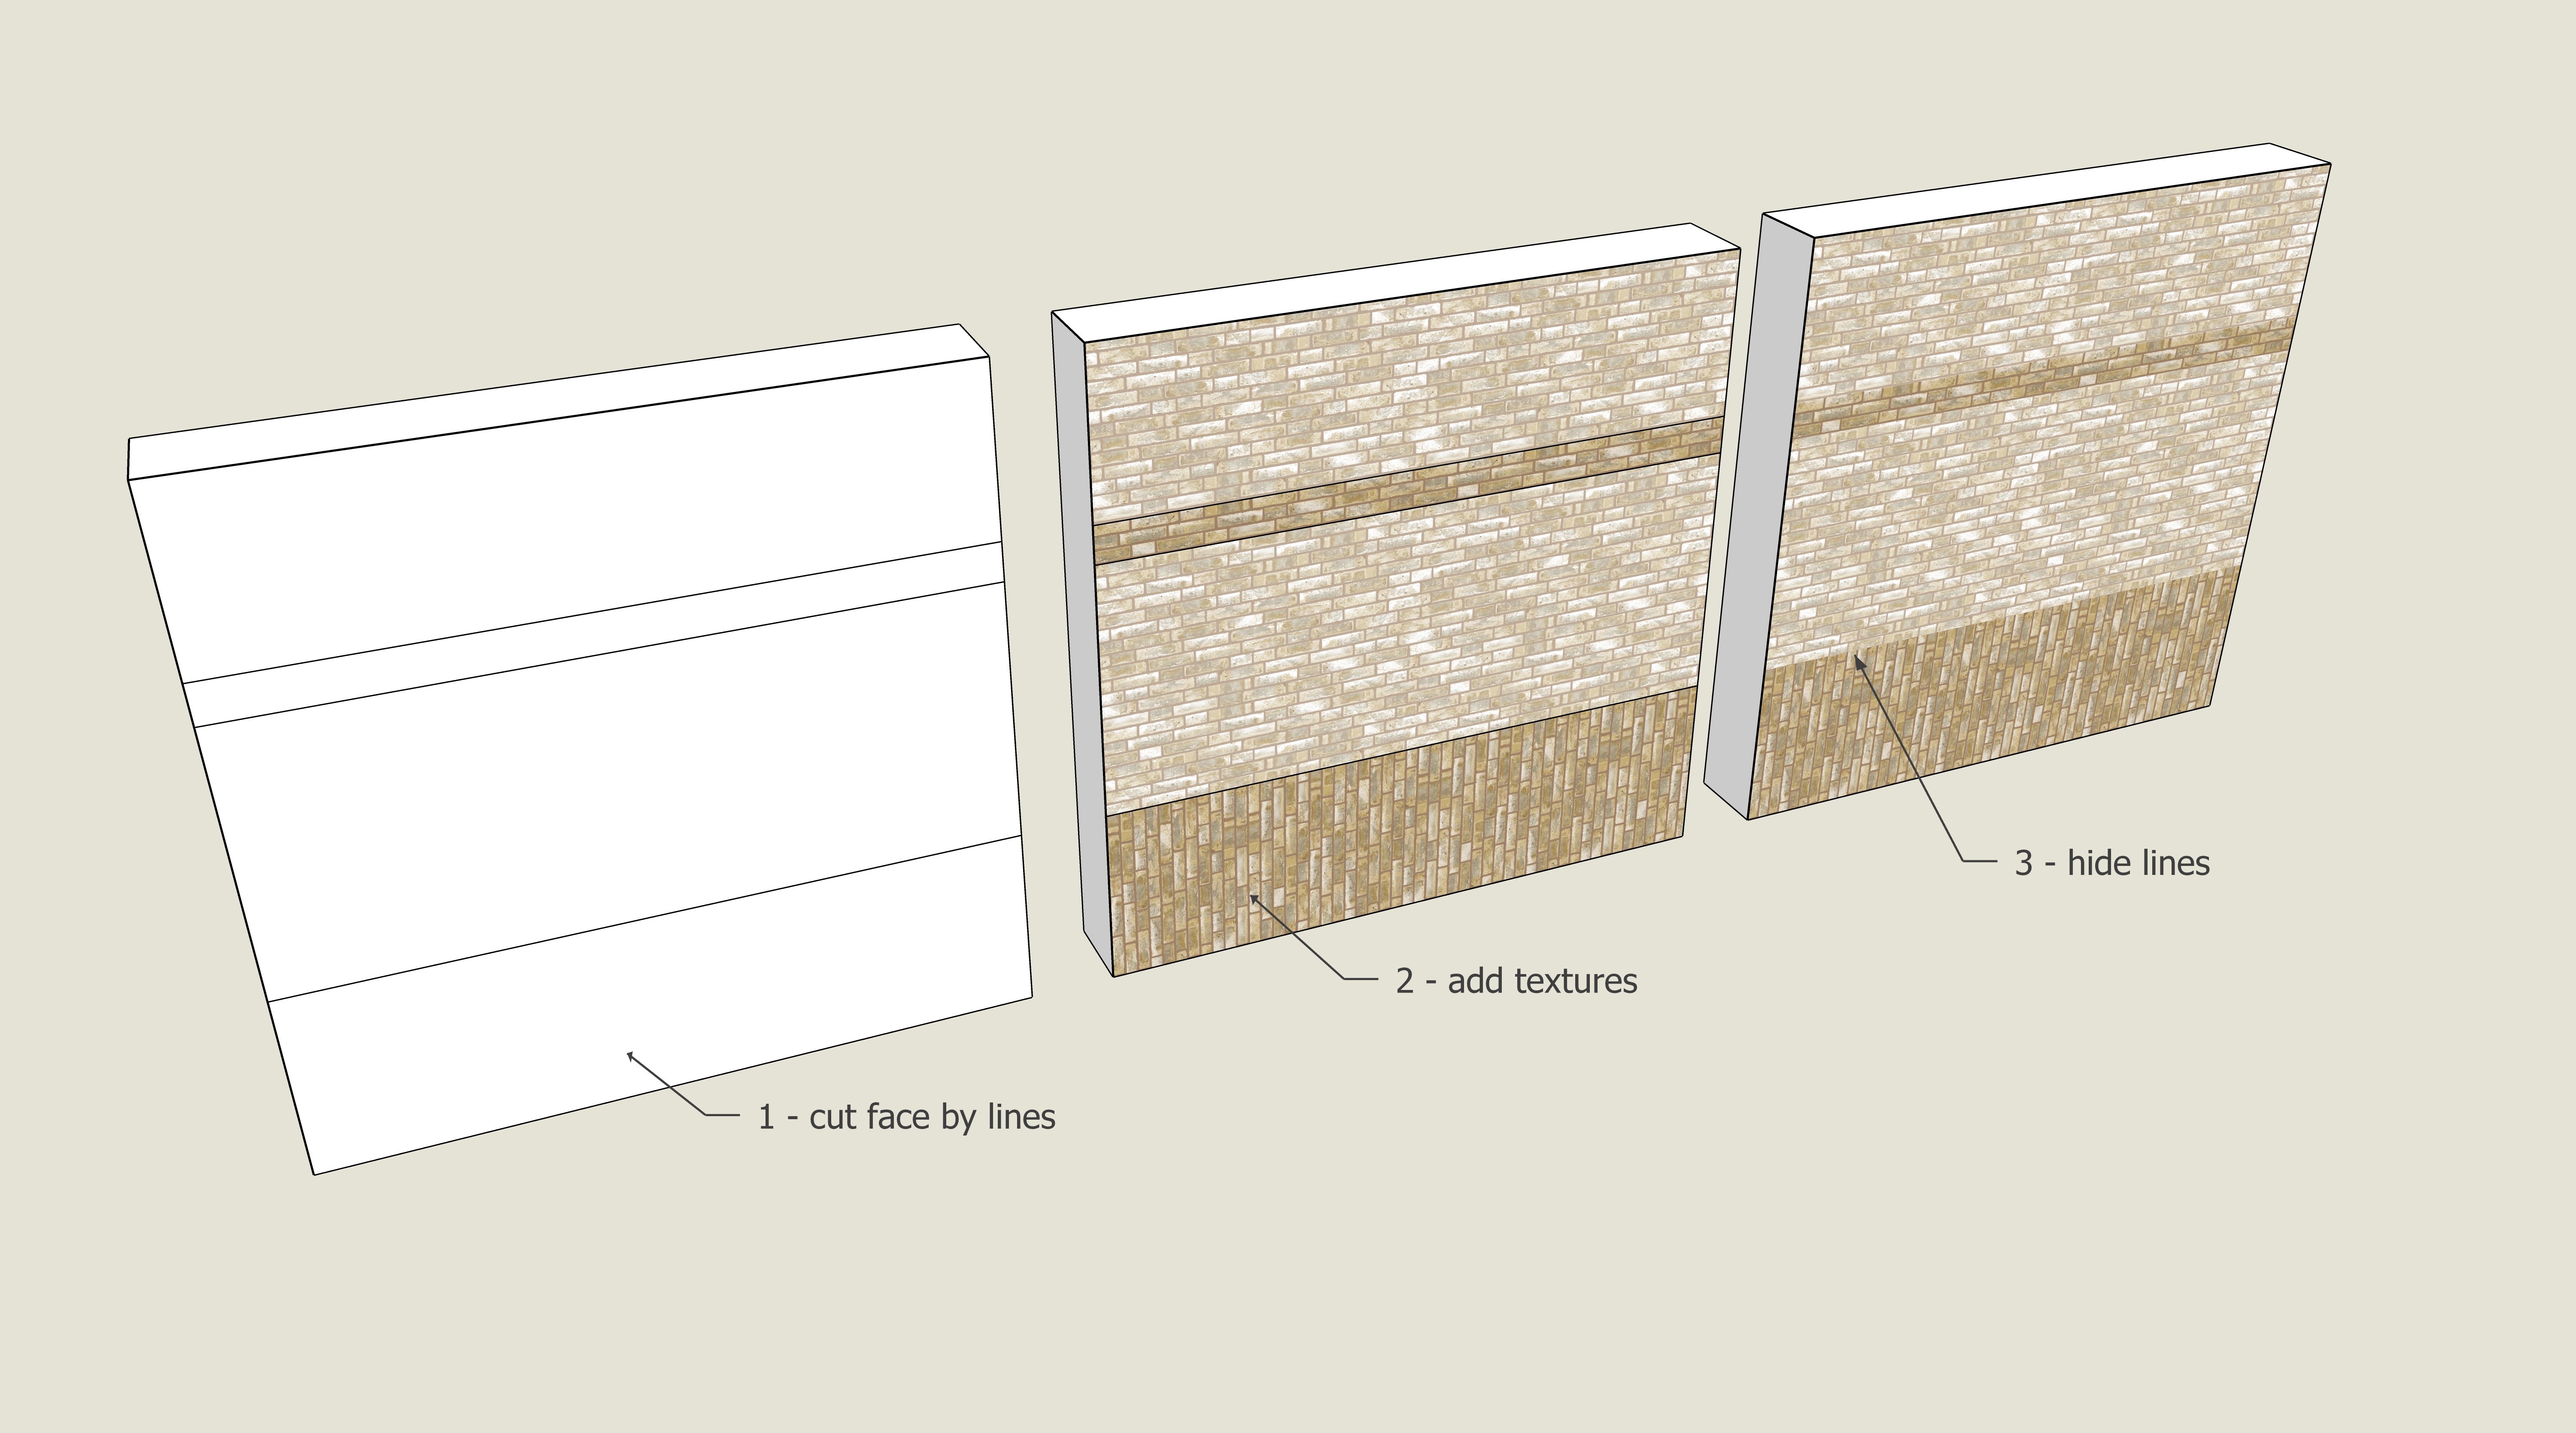
With VW 2022 it's great that we are able to texture individual faces. However I'm missing the possibility to split a face so I can only texture a part of the face. We do our concept design with SketchUp. There we can easily add lines to split the face and paint those new faces individual. After this action we hide the lines, giving the model a clean look. With VW the only way to split the face is by extruding. This gives two problems. First it results in lines that we don't want to see in the model. Second it makes editing the shape afterward more complex and result in unwanted depth of the mass were in reality everything is in the same plane. How we work now in SketchUp: Hope VW implement this function so we can say goodbye to SketchUp.
- 1 reply
-
- 2
-

-
- texture
- 3d modeling
- (and 1 more)
-
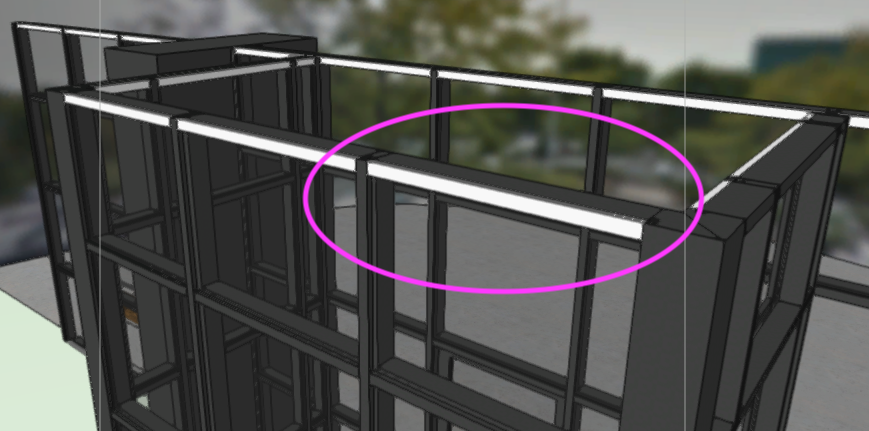
Hi all, anyone know where I can find the properties of this particular part of a curtain wall? I'm able to change the texture/properties of all elements except this piece at the tops and bottoms. Any help would be appreciated.
-
Dear community, I would like to know if there is any way I could do a Green Wall? I've tried (with no success) applying a texture, but the result is far from what I want. I've tried do create a grass texture, but when applied, it just appears to be flat green... I don't know if I could use the curtain wall or if I should do it on other way. I've attached the file. Regards. Parede Verde.vwx
.thumb.png.59a1fcf2b6ab5a3389db66634c5698f7.png)
-
Hi, at one point randomly my render tab with the texture mapping settings has greyed out and I cannot seem to get it back to work again, do any of you have an idea? ive tried many things but it stays greyed out and all the textures are scaled way to high..

-
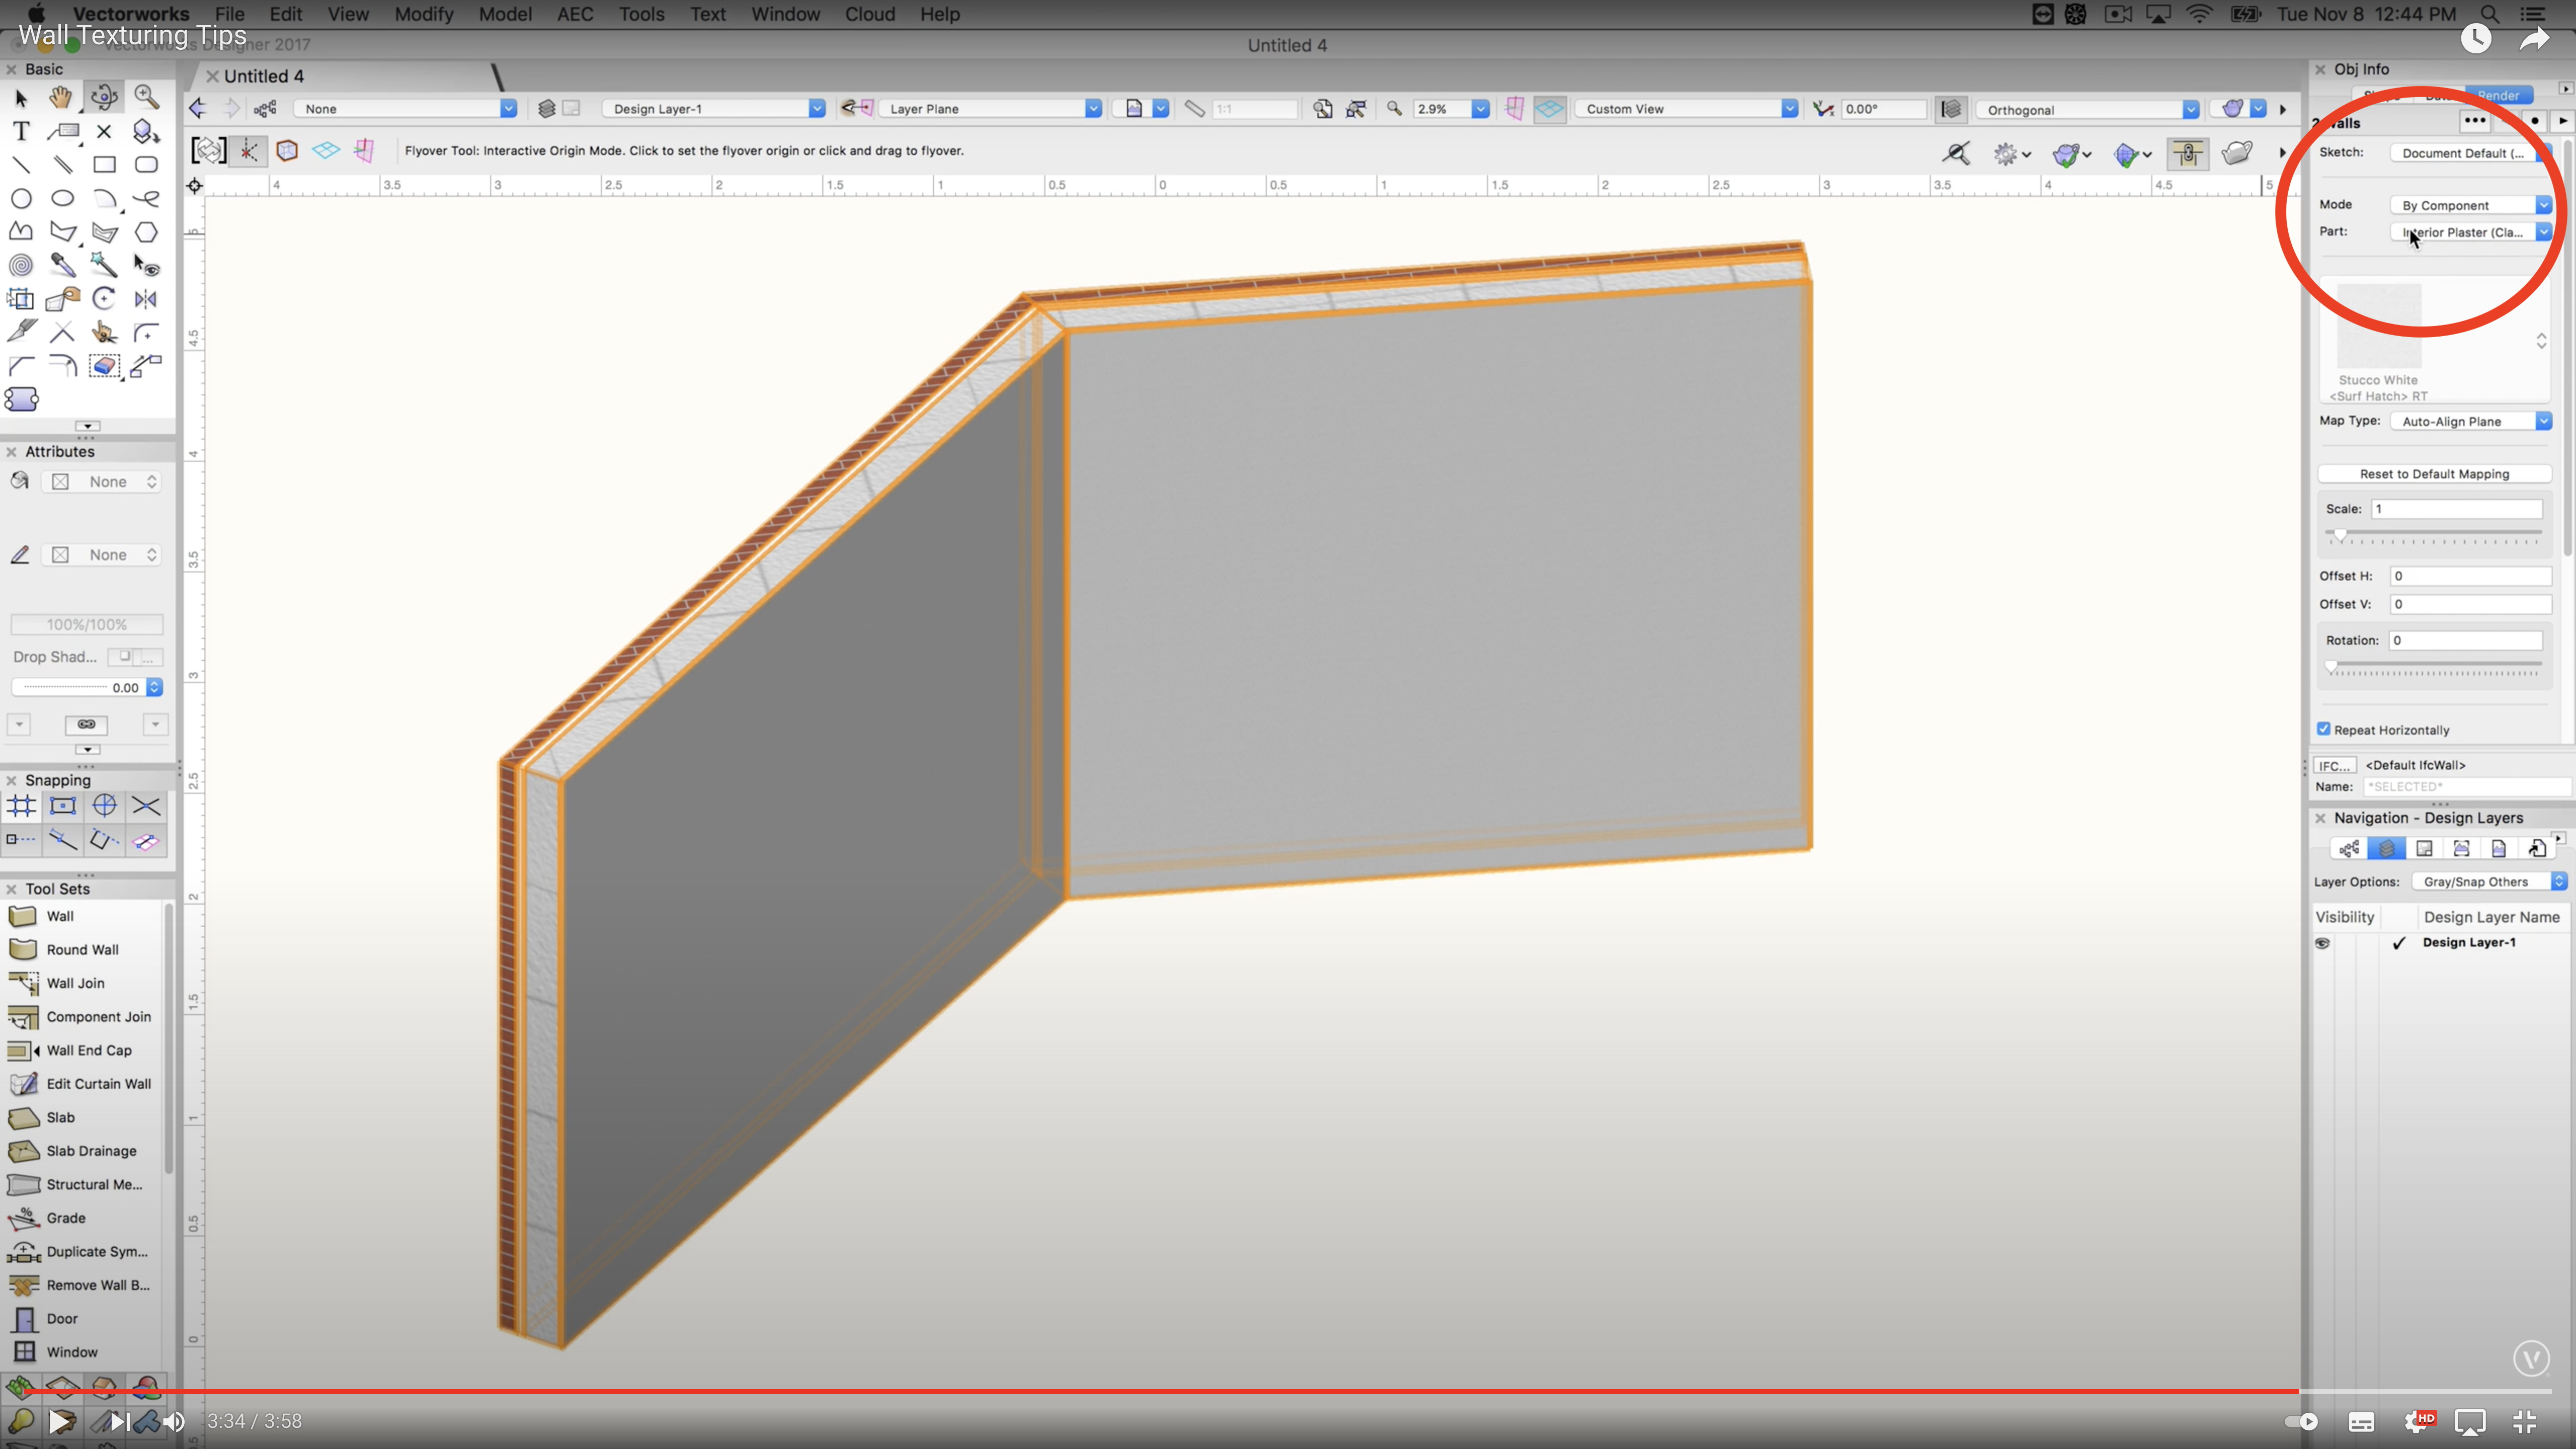
Hello, - My issue : I would like to customize the texture of one part of one styled wall's instance. In other words, is it possible to set the texture of a styled wall "by instance" instead of "by style" on one component only ? - What I found on the Internet : It seems to be possible as shown below. In my case, the "Part" button is greyed out which prevent me to modify the texture. Please, find a file with my styled wall attached. Styled wall test.vwx

-

Apply Different Textures to Extrudes
Sky posted a question in Wishlist - Feature and Content Requests
In previous versions of VW, I could covert text to polylines, extrude and apply a different texture to the front, back and sides. This allowed me to easily create channel letter signage on buildings. VW2022 only allows on texture for the entire extrude, making it impossible to to create this same effect. -
If this isn't in the right place let me know. When I map a texture the section under mapping is greyed and nothing is functional. I don't know if this is part of the new functionality or a bug. I can't change the scale, rotate, or anything under "mapping" on the pallet. Am I doing something wrong?
- 3 replies
-
- 1
-
-
- 2022
- object info pallet
- (and 2 more)
-
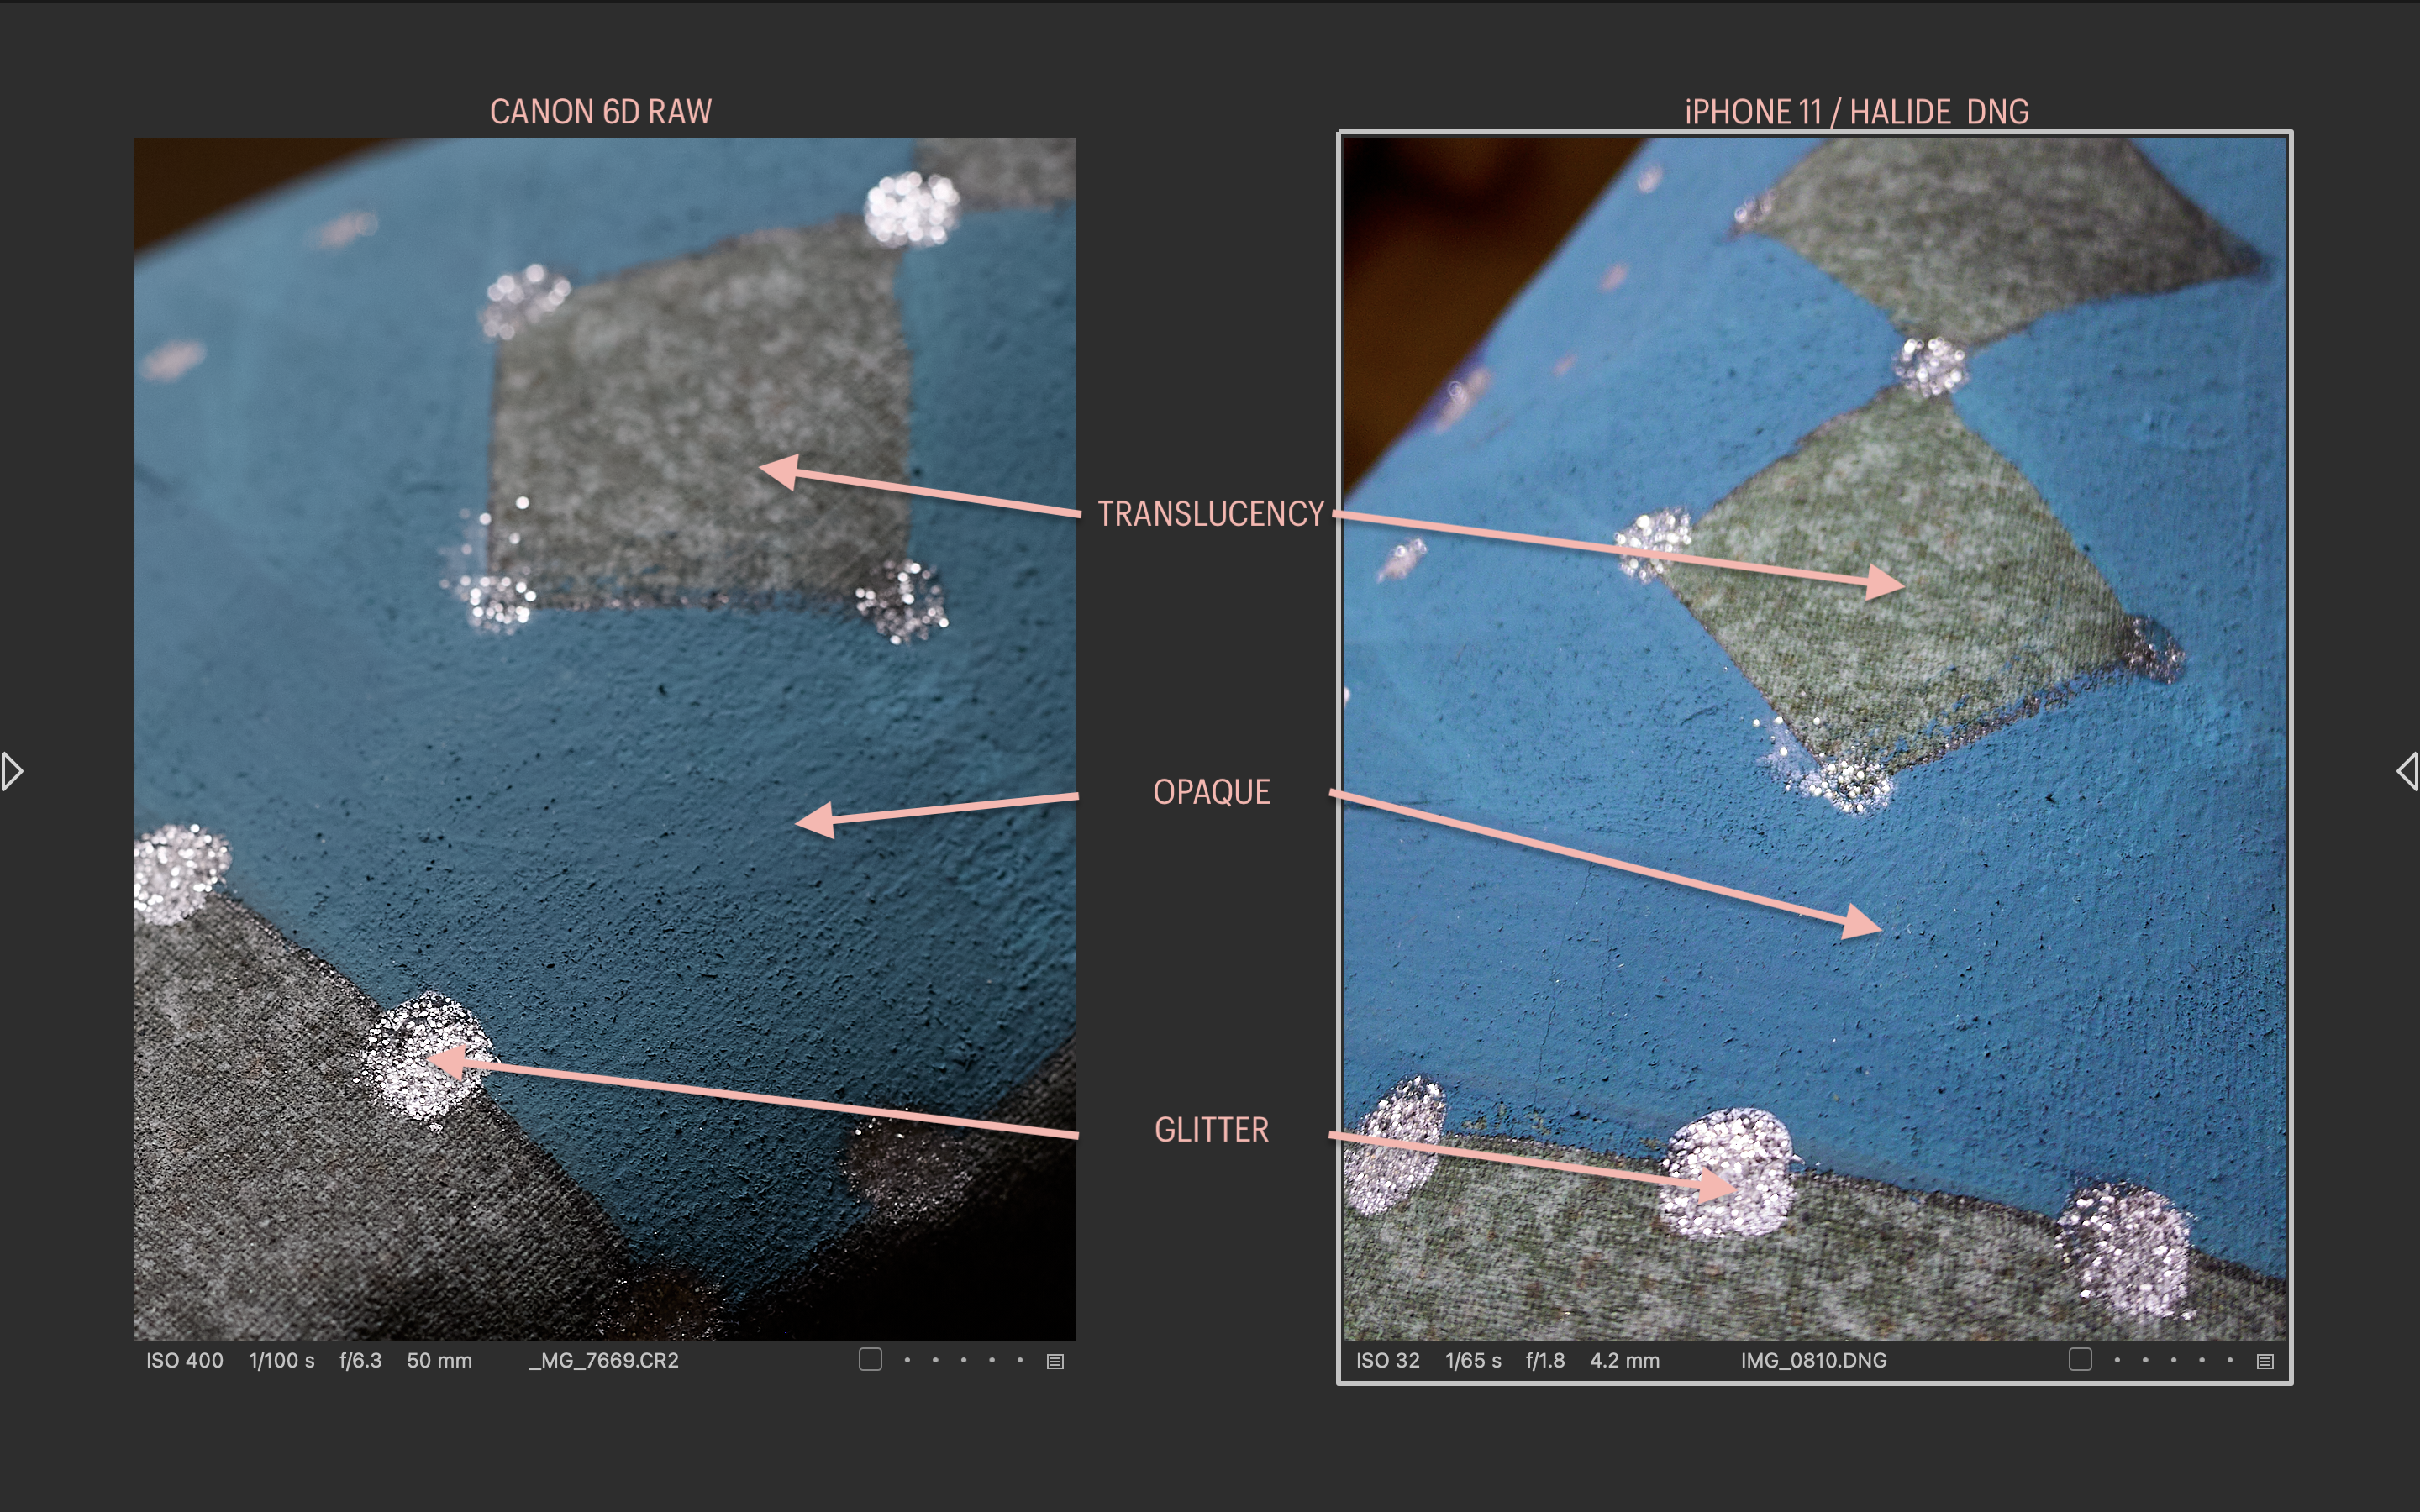
Alrighty then; I have a scenic drop to light, quite traditionally executed, to my general delight. Got all wound up in the idea of previz-ing a few ideas in Renderworks (def not Vision) for the client. The few times I have executed this idea in the past, the drops have been either simpler in execution or I knew less then or both. This time the drop has the following attributes: opacity varied translucency specular highlights (glitter paint) My solve so far has been: image prop for the overall drop, with translucency determined by luminosity in PS translucent cyc behind that this covers all but the specular bit. Help? The attached image shows a close-up of the paint sample. The drop overall is a sub tropical cityscape. [The side-by-side is just because I got suddenly interested in who's interpretation compared to IRL worked best. The Canon (2012) for color accuracy's sake kicked the iPhone 11/Halide Raw's ass all over the kitchen floor to my eye, as it was shot in daylight and directly compacted to the paint sample. Punchy as the iPhone/Halide version is, it's much livelier (& plain wrong) than the reality.]

-
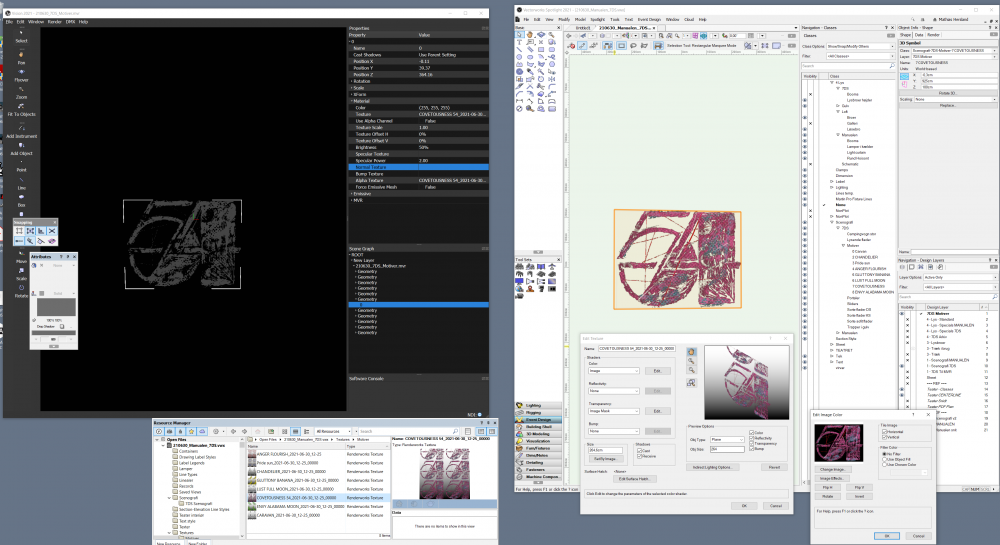
Hi I seem to run into a problem when exporting some set-elements from Spotlight, to Vision. My worksflow is to export to MVR, and then import the MVR to vision. But my textures seem to loose all color when exported to MVR. I use the alpha channel of the texture, as alpha channel in vision. Does any of you experience this behavior? Here are screenshots of my settings. I found that the textures in the vision texture folder is Black and white as well, like both are alpha textures. See the screenshot: Best from Mathias

-
Hi, is there in the meanwhile a good solution for the GetTexture problem where previously selected Textures where locked to the index of the PopupList not the Name/ID of the texture itself ? In the end the applied textures got kind of randomizes as soon as new materials got imported in the file and sorted near enough at the top of the list to affect the indexing of the list Is there a good solution for that ? See here: JH
-
Heya Team, I'm feeling like a real noob. Id like to know how to colour the 3D component of truss made with the straight truss tool without changing the 2D fill colour. I also cant add a texture to the 3D model, like chrome. Can anyone point me in the right direction? Thanks in advance.
-
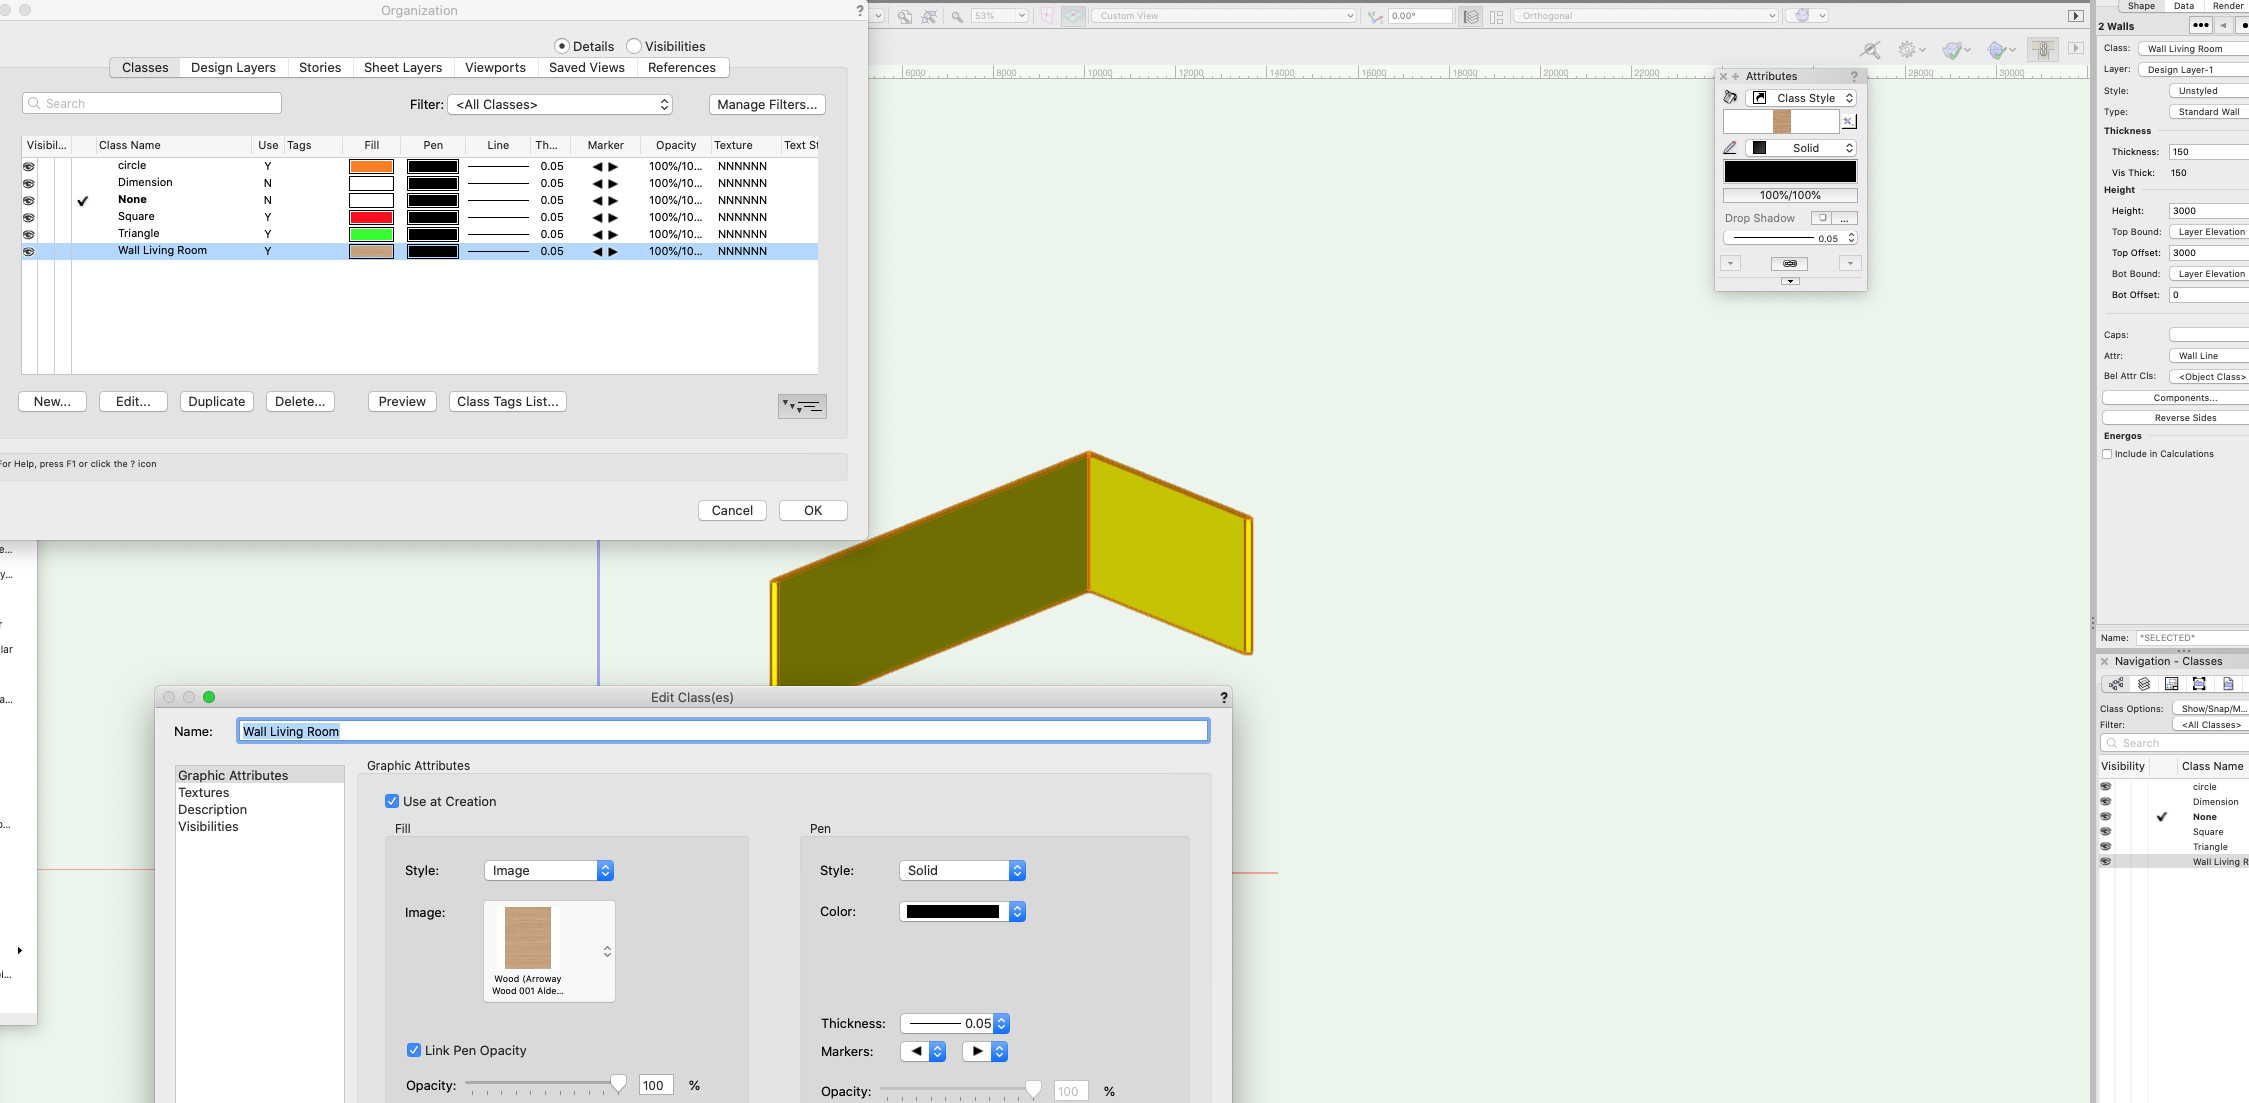
HI, I can't seem to apply a class (image) to a wall. I have no issue applying a solid colour but for some reason If I need to apply an image this does not work and defaults back to a colour. The wall is classed but I have no idea where the yellow comes from. I can render a wall with whatever image but when I apply class texture this does not work, even though the class is set (as it works with any color fills but not image fills). Photo attached. Anyone has any idea as this must be a simple thing which I did not grasp! Thank you,

-
Hi, I'm in the situation that I need to create around 1000 objects with a mapped texture each. Now I'm doing it manually and, as you can imagine it takes a long time. I've tried to automate the process by creating a python script but it just happens that python doesn't have the functions to load an image file (png, jpg, etc.), create a texture/material and set up the correct aspect ratio for a right object mapping. My question is: Is there a way to archive the functionality described above using the VW SDK? Thanks in advance. Carles
-
Hi, I am currently looking into creating a script to import a folder of images and create image probs from them. I found a completely undocumented function vs.CreateImageProp(...). But as it is takes in a texture, i got lost trying to create the corresponding texture object from the images loaded. Anyone having some scripts which could help me on my path? Thanks in advance. Cheers Jonas
-
Displacement bump/ Grass will penetrate through an overlying object. Eg - grass through a paving stone It would be convenient if the texture of the overlying texture could negate this effect or if the grass/displacement bump could be set to react to all objects it interferes with.
-
- 1
-
-
- texture
- displacement mapping
- (and 2 more)
-

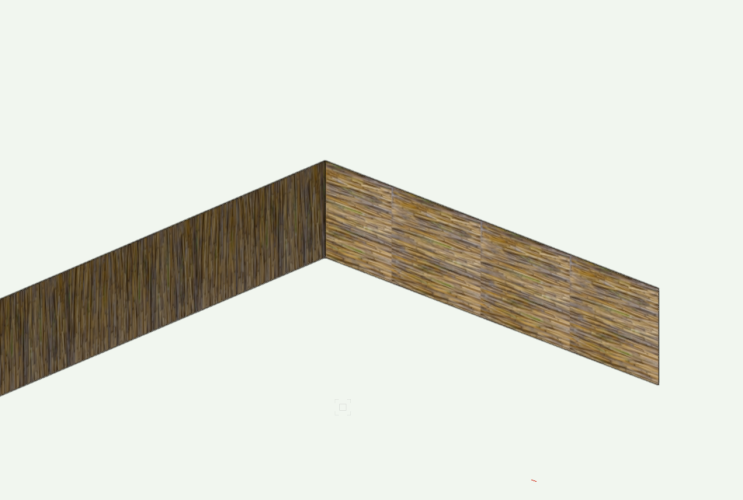
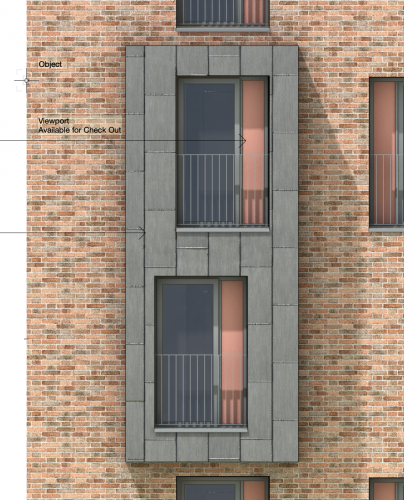
Texture mapping offset in reference file vs model file
Christiaan posted a question in Troubleshooting
The first image on the left is a Design Layer view of my model. Note that the mapping of the grey texture has an equal module each side of the bay. This is an Autohybrid containing an extrude and looks like this in OpenGL or RenderWorks. The second image on the right is a Sheet Layer Viewport in a Workgroup Reference file rendered with RenderWorks. Note that the texture mapping is offset slightly and doesn't match my model. Any ideas how to fix this and synchronise them?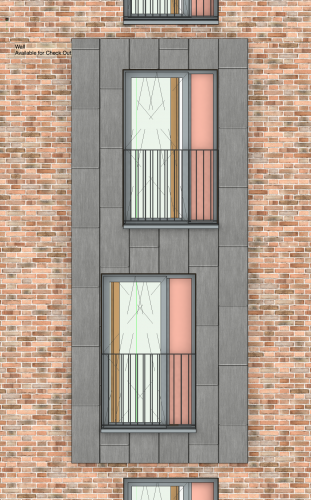


.png.143656db0249e8cec955918606d1d9a5.png)