All Activity
- Past hour
-
I've drafted a lighting plot using primarily hanging positions but a few simple lighting pipes as well. In creating a top/plan view in a viewport, it looks great. My hanging positions, lighting pipes and lighting device symbols show up as desired in a wireframe rendering. In an ideal world, I'd like to use the same model to create a side view in on a second sheet. In doing so, everything shows up as 3D models. Not unexpected, this is what how it's worked for every other thing I've modeled and plotted. In recognizing this eventuality, I ended up coming across a webinar for Schematic Views. It seems like eventually, I would want to figure it all out and be able to use one master 3D model/LX Plot to create every viewport I need. In the meantime, is there a "shortcut" or a few direct steps I could take to use what I have as a side view in a viewport and preserve the depictions of lighting devices, lighting pipes, etc that I see in a top/plan view? Without totally figuring out the Schematic Views, my temporary solution might be to draft a secondary "side" view of my model on another layer in top/plan. Essentially as if you would sketch two separate plots on paper. Perhaps this is the way it would be done without using Schematic Views?
- Today
-
 Hi Scott, Understood! Thanks for getting back to me! Might you have some recommendations; perhaps I could make a marionette command that could do something like what I want? Thanks!
 -
@Jeff Prince Well Jeff, the architect wants to control the stair details and the contractor is a guy who can build anything but does not make shop drawings. Otherwise, you have a point.
-
@twk I used Roof Faces a lot initially but after I noticed I was push/pulling and cutting and trimming them so much to make things work that we finally just ended up creating our own rafter profiles to save time. Roof faces will work for a lot but I kept running into limitations with bells and hips, also it was hard to get corners to match up right with 2 different pitches. I guess it helps that we don't use any roof data to create worksheets though. These are screenshots of my most recent project and also some of my rafter profiles. (The elevation pic is actually a 18/12 above the garage with a 12/12 bell, in the middle of making some changes at the moment.)
.thumb.png.6d7fbb13428849ed1f0eac202df981eb.png)
.png.c24a9488c427b0788384bb18e47b9917.png)
.png.5dacc0801c23b3accc1d3c29793d77b9.png)
-
I personally would go this route but the office I'm working for would not understand it.
-
@line-weight stellar! Thanks
-
 Matthew Richardson joined the community
 -

AI Visualizations-Thougthful discussions
Claes Lundstrom replied to Luis M Ruiz's topic in AI Visualizer
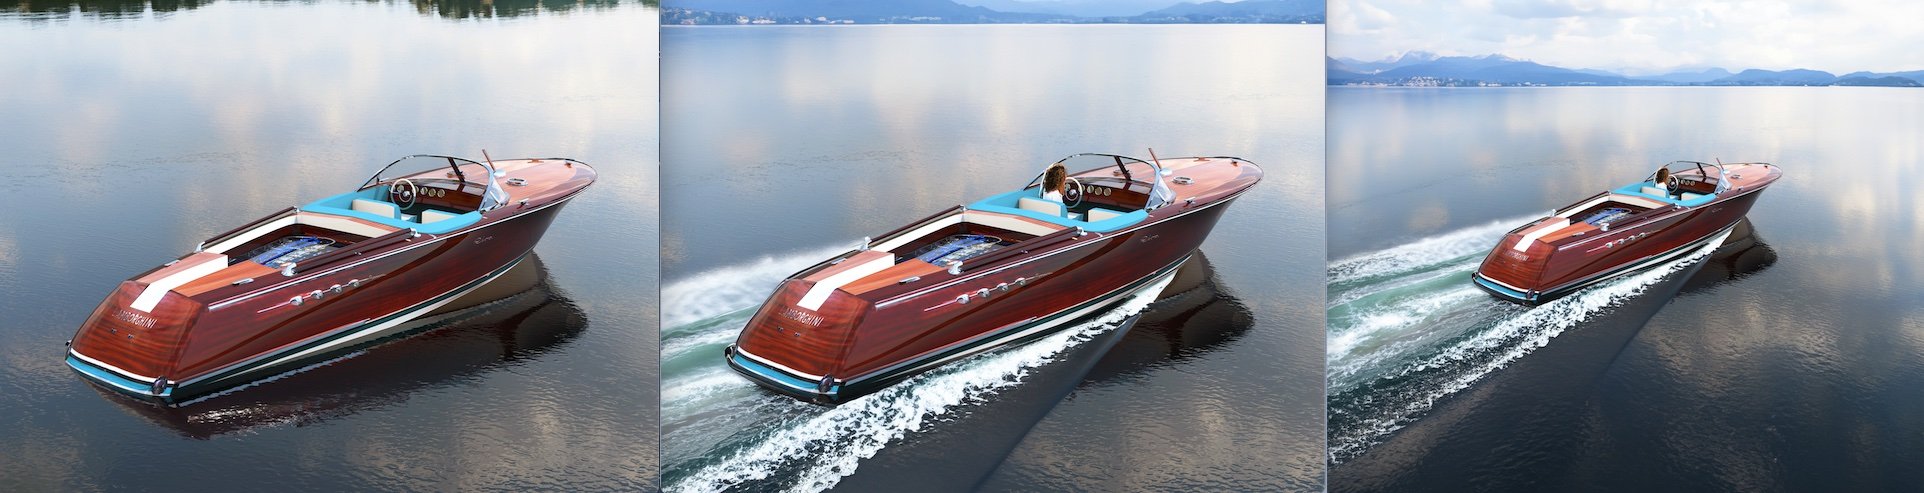
It's based on a 1968 Riva Aquarama, specifically based on Lamborghini founder Ferruccio Lamborghini's private Riva powered by twin Lamborghini V12 engines. The textures are UV-mapped from a series of pictures of the real boat. Here is a link for those interested; On product renderings of boats, you typically use comparatively flat water as too much drama on the surrounding tends to distract more than it adds to the picture. I guess the message is that it's something pleasant, not something dangerous. -

Urgent conversion from .vw to .dwg for autocad use? can anyone help?
michaelk replied to Juulie's question in Troubleshooting
Convert2DWG.zip -

Window Glazing Pane Options for Windows
Tom Klaber posted a question in Wishlist - Feature and Content Requests
I would love better graphics for windows - including single, double, and triple glazed options. It would be good to show the glazing panes. -
Grouping of Layers - PLEASE
Tom Klaber replied to bjoerka's question in Wishlist - Feature and Content Requests
I think we have all taken turns asking for this... Its another one of those super frustrating ones - because the technical challenge is not obvious. You tell me you need a few years to develop a new stair tool to work with the new modeling engine blah blah... I understand - that sounds more difficult. Instituting a folder system for classes, layers, and sheets - its just a organizational overlay.... Should not take 20 years to get that working. -
Thanks. I will give that a try.
-
@MGuilfoile would you show a screen shot of this offset arc ? - Here it shows 8 handles when viewed as a Polyline and 8 different control points when double clicked to edit Offset and "Close open curves" gets this arc to a polyline Peter Polyline control points_01.mov
-
 oschroth joined the community
 -

Editing braceworks connection points/loci on symbols
Scott C. Parker replied to Kenickety's topic in Entertainment
Please post a sample file so we can play with it. -

AI Visualizations-Thougthful discussions
VIRTUALENVIRONS replied to Luis M Ruiz's topic in AI Visualizer
Very nice images.. Is that boat one of your design Claes? The lake is very calm, always nice, but have you ever tried to get a wavy or rough water scenario? -
 PMD joined the community
 -

Content of Viewport in Sheet Layer Not Showing or Disappearing
Michal Zarzecki replied to Michal Zarzecki's question in Troubleshooting
In my case all sorts of things tend to disappear randomly - even the title block! I will have to get in touch with the Technical Support because I cannot work like that. -
I would appreciate if anyone could point me in the right direction. I'm trying to understand the equipment item, cable lengths and cable pull report available in ConnectCAD. I made a basic file with 2 rooms (control and event), the control room has one computer and the event room has one projectors connected with two cables (CAT6a and HDMI fiber). I created some cable routes with ceiling drops and wallboxes. Here are my questions: When creating a new equipment item and using the name of an existing device (name is PJ in my file), I choose to [Link device name] but the equipment item does not take on any of the characteristics of the device (make, model, physical, etc...) and if I create a Current Layer Device Report, I am not able to update from the worksheet (it says that the selected paramater is defined by the object style) If I use the automatic cable length, it seems to work well but I try to use stock cable length that are shorter than the actual run (50ft for an 89ft run) it shows the cable length as 50ft in the report instead of 2x50ft If I add cable slack in the ceiling drops (10ft) and wallboxes (6ft) the overall length of cable doesn't change when it should add 32ft to the overall length of cable in this case If I try to move a drop point, the cable routes goes from being a polyline to being a bezier and I'm not seeing a setting for controlling this behavior (in the attached file, I moved the ceiling drops in the Event room The Cable Pull report doesn't give any details when I run it. When using the Equipment Item and trying to use symbols from the Entertainment library, there is only a limite number of symbols available and if I want to use one that's not available, I need to make it active in the document in order to use it. Thank you, Frédéric "Oaktown" CC Test File.vwx
-
@MullinRJ, thanks so much! It worked like a charm. Such a time-saver, even without changing where the view is adjusted in the code (although I understand that it currently repeats this process with every object selected). @Pat Stanford, I believe I understand. Thanks for your insight!
-

Editing braceworks connection points/loci on symbols
Kenickety replied to Kenickety's topic in Entertainment
Unfortunately it does not, even with snapping disabled and it set to multiple hoists, it still only snaps to an existing red set of loci (which I think corresponds to the generic bumper catalog item). Is there anyway to modify these loci? -
Hi all, To carry out our costing I made a table which contains a good part of what we need, the table is between 1000 and 2000 lines depending on the projects. I can't post the original but I made a file that shows the method. It works quite well but I was looking for a quick way to check everything that was found and quantified in the worksheet, not finding a function I made a script which will select everything that was found in the worksheet, that allows you to check what is not quantified, either by removing the selection or inverting the selection. The scenario is as follows: - duplicate the relevant worksheet - name it, checking if the name exists - create a WorksheetImage and place it at (0;0) - add a column and write the formula there which will execute a Runscript which will select the DatabaseRow objects I'm posting this thinking that it might interest some in the same situation and if regulars have comments or improvements on the script they are of course welcome. Below is the "main" script: PROCEDURE SelectAllObjectOfDataBaseWS; { Thomas Wanner - 17/05/2024 : this script will select all the objects found by the database rows of the Worksheet concerned } CONST CR = C_hr(13); { take the underscore out } VAR H1, H2, DuplicateWS, DuplicateWSImage :HANDLE; i, n, numRows, numColumns, NewColumns :INTEGER; WorksheetName, S2, DuplicateWSName, DuplicateWSNameN :STRING; Formula, Formula1, Formula2 :DYNARRAY OF CHAR; request, default :STRING; BEGIN IF YNDialog(CONCAT('Do you already have a Worksheet placed at (0, 0)?', CR, 'If yes click on YES, move it and restart the script', CR, 'If no, click NO to continue')) = FALSE THEN { 'This is to avoid having 2 Worksheet on top of each other' } BEGIN request := 'Name of Worksheet to duplicate'; { User prompt string } default := 'Tableau-1'; { Default value } WorksheetName := StrDialog(request, default); H1 := GetObject(WorksheetName); H2 := GetParent(H1); S2 := GetName(H2); DuplicateWSName := 'tmpName'; n := 0; DuplicateWSNameN := Concat(DuplicateWSName, '-', Num2Str(0, n)); IF H1 <> NIL THEN BEGIN WHILE GetObject(DuplicateWSNameN) <> NIL DO { Function GetObject returns a handle to a named object. If the name does not exist, NIL is returned. } BEGIN n := n+1; DuplicateWSNameN := Concat(DuplicateWSName, '-', Num2Str(0, n)); END; END; DuplicateWS := CreateDuplicateObject(H1, GetParent(H1)); { Duplicates the specified object and inserts the new object into the container } SetName(DuplicateWS, DuplicateWSNameN); { Procedure SetName assigns a name to the referenced object } IF GetWSImage(DuplicateWS) = NIL THEN BEGIN DuplicateWSImage := CreateWSImage(DuplicateWS, 0, 0); RecalculateWS(DuplicateWS); { Recalculates all formulas for the referenced worksheet. } SetWSAutoRecalcState(DuplicateWS, FALSE); { Sets the AutoRecalc flag for the specified worksheet. } GetWSRowColumnCount(DuplicateWS, numRows, numColumns); { Returns the number of rows and columns in the referenced worksheet. } { AlrtDialog(Concat('numRows = ', numRows, CR, 'numColumns = ', numColumns)); } NewColumns := IntDialog('New column insertion number', '3'); { Function IntDialog displays a dialog box which requests the user to enter an integer value. } InsertWSColumns(DuplicateWS, NewColumns, 1); { Inserts columns into the referenced worksheet. } Formula1 := '=RUNSCRIPT'; Formula2 := 'WSScriptGetObject'; Formula := Concat(Formula1, '(', '''', Formula2, '''', ')'); For i := 1 TO numRows DO { in our case we want to select the objects found from database row 13 } BEGIN IF IsWSDatabaseRow(DuplicateWS, i) THEN { Returns whether a row in the referenced worksheet is a database row. } BEGIN SetWSCellFormulaN(DuplicateWS, i, NewColumns, i, NewColumns, Formula); { Inserts a formula into a cell of the referenced worksheet. } END; END; RecalculateWS(DuplicateWS); { Recalculates all formulas for the referenced worksheet. } SetDSelect(DuplicateWSImage); { Procedure SetDSelect deselects the referenced object. } { SetWSAutoRecalcState(DuplicateWS, TRUE); } { If you need it, sets the AutoRecalc flag for the specified worksheet. } DoMenuTextByName('Fit to Objects', 0); { SetZoom(100); } END; END; END; Run(SelectAllObjectOfDataBaseWS); And the Runscript code which must be in the Vectorworks file: PROCEDURE WSScriptGetObject; VAR H1 :HANDLE; BEGIN H1 := WSScript_GetObject; SetSelect(H1); END; Run(WSScriptGetObject); You will find attached a vectorworks file which contains everything and allows you to test and see how it works. (I had to compress the file otherwise I had an Error code: -200) By running the SelectAllObjectOfDataBaseWS script all objects found in the worksheet will be selected. Have a great day, ThomasSelectAllObjExemple sélection objets tableau.vwxSelectAllObjectOfDataBaseWS dans fichier vierge.vwxectOfDataBaseWS dans fichier vierge.vwxSelectAllObjectOfDataBaseWS dans fichier vierge.vwx Exemple 01.zip
-

Editing braceworks connection points/loci on symbols
jcogdell replied to Kenickety's topic in Entertainment
Try setting the hanging support dropdown (in either the tool preferences or the preoperties) to multiple hoists, this should enable you to attach the hoists wherever you want of the bumper -
I have another vectorworks file referenced with a mis of layers and classes on and off. You can see here in the screen recording that it is still snapping to objects/lines that are on classes that have been turned off. Screen Recording 2024-05-21 at 08.46.13.mov
-
AI Visualizations-Thougthful discussions
Claes Lundstrom replied to Luis M Ruiz's topic in AI Visualizer
On the subject of AI, I played around a bit with AI in Photoshop. Generating full images generates very mixed results. Some ok, some terrible. It does however better when adding elements to the picture, and for extending a picture beyond the borders of the picture. In this example, I started with the rendering to the left, added some motion waves about the boat and a coast line far behind. In the right image, I extended the image on all sides to get more of an overview. The waves probably took 5-10 attempts to get the effect I wanted (Photoshop generates suggestion in batches of three). The coast line was ok within one try. The same applied to the extensions, though Photoshop seems to prefer extending in one direction at the time.
-
 Juulie joined the community
 -
Urgent conversion from .vw to .dwg for autocad use? can anyone help?
Juulie posted a question in Troubleshooting
Hello, would it be possible for someone to convert this vw file for me into .dwg to use on autocad? https://we.tl/t-qTOGnzcOXM I would very much appreciate it! Thank you! -
The problem seems to be with Materials which use Tiles as the fill... Edit the 'Gravels Pebbles (Deco Gold) MT' Material + change the fill to a Hatch or Solid colour + the Texture will display... 🤷♂️ I have had issues with Tiles in other contexts + have filed bugs on it
-
 focalpointld joined the community
 -
No you're bang on Kevin - I was just hoping for an obvious quick fix. 🤞 So, deadlines made me find a work around for the file I used in my original post. However, it happens regularly so I created this simple file to demonstrate what happens. Once again, I get complete black rendering once I switch to anything but a Top/Plan view. I'm fairly sure I've followed what you suggested Jeff. Most of the Hardscape Styles are simply pulled from the Vectorworks library rather than ones I have created myself. However, I am looking to start creating more of my own Hardscape Styles so I'll definitely have to be more organised as I move forward. Any help is greatly appreciated 🖖 Render Troubleshooting.vwx


.png.8606bf911ac19d238eb15490835ea01e.png)