Pat Stanford
-
Posts
12,711 -
Joined
-
Last visited
Content Type
Profiles
Forums
Events
Articles
Marionette
Store
Everything posted by Pat Stanford
-
VW 2024 Update 3 crashing when not on home network
Pat Stanford replied to ChollyO's question in Troubleshooting
@JuanP? -
Guesses here. I have not tried the code. And it is always hard to debug a code snippet as often the problem is not where you think it is. Is the SetClass call setting the attributes of the object to be ByClass so you are actually not getting the color you picked, but rather the Class Color? Also, I can never remember if you need to use FillFore or FillBack without trying them both.
-
VW best settings for GPU / Performance?
Pat Stanford replied to DSmith2300's question in Troubleshooting
The next step should probably be to contact Technical Support directly. They have far more experience in trouble shooting this type of issue than we do here. The Forum is basically a User to User support. If you ask the right question or if you happen to ask a question that someone else has had the exact problem and solved it it works great. But for complex issues of the program not running smoothly, especially if it may be interaction with the OS or other software, the time you spend with Tech Support can often provide a much quicker solution that the slow back and forth of guesses on the forum. Good Luck. -
The Camera is buried relatively deeply in the Aux list of the Viewport. There is no "simple" way to get it using standard VS functions. If you really need to get it, we can probably work out a way to pull the name (and maybe the handle) out of the Aux list. Easier if you are using Python than if you are using VS. Going to require a fair amount of spelunking and experimentation to make something that works consistently. Let me know if you you want help in figuring this out.
-
TBB Places a Border, but no titleblock
Pat Stanford replied to carl_coddington_'s question in Troubleshooting
Any chance the Class that the Title block is in is set to Invisible? -
Create a Worksheet with a Database row of Title Blocks. I am going to assume you use Row 3 for the database. Set the formula in Cell A3 to: ='Title Block Revision Data-1'.'Number' Set the formula in Cell B3 to: ='Title Block Revision Data-1'.'Date' Set the formula in Cell B4 to: ='Title Block Revision Data-1'.'Note' You should now have a worksheet that will show the most current revision of every title block in the drawing set. If you only want some of the sheets, edit the Database Criteria to only show those sheets (like maybe Active Title Blocks only). If you want other fields, just add formulas for them in other columns. I think the part you were missing is the 'Title Block Revision Data-1' record always contains the most recent revision for that title block. When a new revision is added each Title Block Revision Data record gets an incremented number and the latest is added as 'Title Block Revision Data-1' HTH
-
holes in walls show wrong texture - cant change
Pat Stanford replied to nikihoops's question in Troubleshooting
Could it be your Wall Closures might not be set correctly and are wrapping the wrong components into your jambs? -
Lighting tutorial NOT related to Spotlight
Pat Stanford replied to MGuilfoile's topic in General Discussion
It is an old (ancient) features called Cropped Perspective. In order to activate it you have to go to Document Preferences and activate Legacy 2D and exit Document Preferences. You can then re-enter Document Preferences and turn on Cropped Perspective from the bottom of the Display pane. Once it is turned on, you can go back and turn off the Legacy 2D if you want. If has been removed from the basic workflow because on a Sheet Layer you can accomplish this with just a cropped viewport. Maybe someone else can speak more on the limitations that caused it to be removed. @Matt Panzer? -
Take a Look at GetViewMatrix and SetViewMatrix. They can get the. view of a viewport, but they don't seem to return the same info as a camera.
-
Resize handles are not showing
Pat Stanford replied to rozeman architects's question in Troubleshooting
If you are on an Intel Mac, there is a setting in System Preferences:Display named something like Automatic Graphics Switching. Make sure this is off so that VW is using the maximum graphics capability of the machine. -
I recommend NEVER importing into an active file. Specifically because it will change to many settings. Your Import to a new file and then copy/paste is one way around that problem. Have you looked at using a Referenced DWG instead? Or what we used to (still?) refer to as the shuttle method where you import into a blank document and them Reference that into the actual document? Then when you get an update you either delete the data in the referenced file and import the new data there or import into a new file and edit the reference link to point to the new file? I have not needed to do either of these, so not sure how to recommend what might be best for you.
-
after update, solid objects not obscuring lines anymore
Pat Stanford replied to iswope's question in Troubleshooting
I think you will have to post a file for us to look at to be able to help you. I can't tell from your screen shots what is supposed to be transparent and what is supposed to be solid. -
The easiest way would be to create a VW Worksheet Database that shows all the doors. If your "labels" are actually records that are attached to the door or a Data Tag object then it is relatively simple to pull the information into the worksheet. If you actually need it in Excel instead of just in a table you can export it or even create a live link. If you labels are just text your typed into the drawing then you will have a harder time unless you have a way (class maybe) which text is door labels instead of something else. Take a look at the VW Help on Worksheets and ask again if you need more help.
- 1 reply
-
- 1
-

-
Anyone else seeing this Save As Bug.
Pat Stanford replied to VIRTUALENVIRONS's topic in General Discussion
I am not seeing that, but I am not using dark mode. Try in light mode and see what you get. -
convert String to Number in worksheets
Pat Stanford replied to halfcoupler's topic in General Discussion
The results you got were exactly what I expected. It is a good quick and dirty way to get a number. But only if your data is formatted properly. "Text Mangling" is not worksheet strong point (or Vectorscript for that matter), but if you have a fairly uniform data format we might be able to extract just the numeric part out to use Value on. Something like =Value(Mid(A1, 2, 6)) where A1 contains '€345,67 per meter' would return a number of 345,67. Much harder to do if you don't have a prefix and a length or suffix of fixed lengths or if you need to remove thousands separators inside the number string. Ask If you need help. -
Put the name of the class you want to be active for the tool in the NameClass line in single quotes in place of 'PTS'. In the script above with the Push/PopAttrs (Effectively Save Attributes and Restore Attributes) the class in the script will only be used for the one object. If you go to the version without Push/Pop then the class will be switched and you will have to change it manually or with another script if you don't want that class active any longer.
-
Question on DomC's "Extrude along Path with Ref point" Network
Pat Stanford replied to HebHeb's topic in Marionette
I am going to wait and see if @DomC can answer this before I dig too deeply into this. Sorry. -
Can we do this in Vectorscript instead of in Python? The following script will temporarily (for the time it takes to draw one object) make the document attributes to be By Class, switch the active class to 'PTS' (edit to whatever you want), and activate the polygon tool. Once you finish drawing the polygon it will revert to the previous tool and document attributes. Procedure CustTool; VAR Name:STRING; Result:BOOLEAN; BEGIN PushAttrs; {Saves the attribute settings so we can get them back after using the tool} FillColorByClass; {These lines set attributes to By Class. More may be needed} FPatByClass; LSByClass; LWByClass; PenColorByClass; NameClass('PTS'); {set the class named PTS as active. Creates if it doesn't exist} CallTool(-207); {Makes the Polygon tool active} PopAttrs; {Restores the attributes from before the command was run} END; Run(CustTool); To make it change the settings so you can draw more than one polygon at a time, delete the PushAttrs and PopAttrs lines and change CallTool to SetTool. The script will then change the attributes and just activate the Polygon tool. If you want other attributes (Opacity, markers, etc.) to by ByClass you will need to add the appropriate additional lines above the NameClass. Search for ByClass in the Vectorsorscirpt function reference or ask again. This thread has information about making a script into a Menu Command and adding that command to your workspace and giving it a keyboard shortcut. https://forum.vectorworks.net/index.php?/topic/103512-saved-views/&do=findComment&comment=451792 Ask again if you need more help.
-
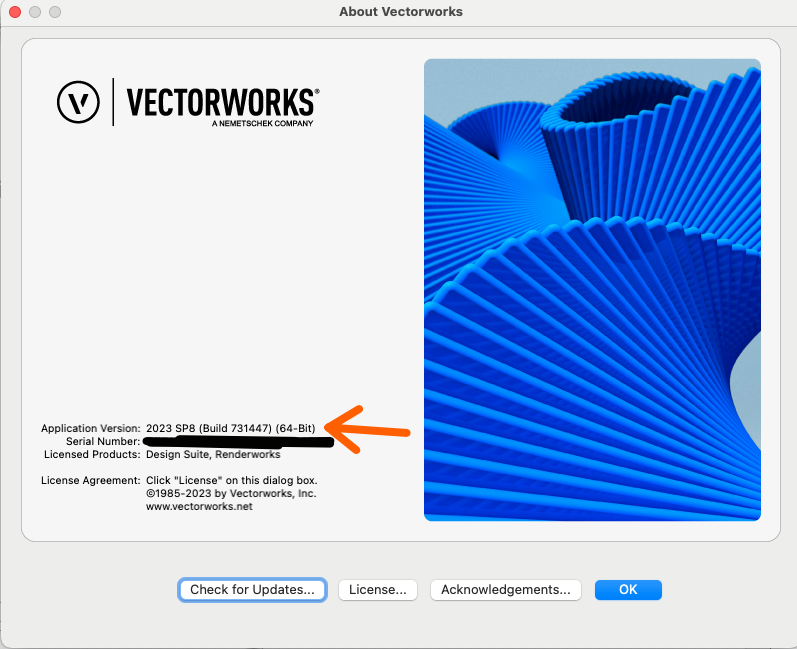
I have not been able to replicate this on Mac. I have copied text from 2024 from a design layer, from a Rotated Plan design layer, from a sheet layer, from a viewport annotation and pasted each version into a VW2023 Design Layer, Rotated Plan Design Layer, Sheet Layer, and Viewport Annotation. None of the combinations resulted in separation of the letters to different text blocks. I don't even have any idea on how to do that if you wanted to in VW. Ungroup, Convert to Group don't do it. Maybe Convert Text to Polylines? But I think that would leave you a group. If you can show this in a simple file, please submit a bug with both the 2024 and 2023 files and the exact versions of each you are running, including the Build Number (available in the About VW window).
-
It looks like it can be surface fighting. Did you accidentally duplicate the objects? The render engine has a hard time deciding between two objects with identical surfaces and will choose different object at different points. Do an Option-Select or marquee around and make sure you have the number of objects you expect.
-
Worksheet extremely slow following the latest 2024 update 3
Pat Stanford replied to Steve Murray's question in Troubleshooting
Update 3 is the current version. Numerous bug fixes and enhancements. Unless there is a known deal killer with the latest update you should probably consider staying current. -
Question on DomC's "Extrude along Path with Ref point" Network
Pat Stanford replied to HebHeb's topic in Marionette
The profile object is stored in the Profile Group of the extrude. The path is stored in the Path Group of the extrude. These have "local" coordinates like symbols. The (0,0) point of the Profile group is what runs along the Path. So if you need an offset, calculate how far from the local origin you need to be and move the objects in the Profile group. HTH -
To get a script to show values in the OIP you need to create a Plug-in Object. PIOs have two parts, a script and a Parameter Record. The Parameter Record items show (optionally hidden) in the OIP. So when the user changes the value in the OIP the PIO will regenerate with the new value. Parameters are "semi-constants" in the script. Their value does not change during a specific script run. So if you need to adjust the value while the script is running you need to store the value into a variable and then back into the parameter at the end of the script. You access parameters inside the script by prefixing the name with a letter P. So if you have a parameter named Height, to use that in the script would be pHeight. This post has information on making a Plug-in Menu Command. Similar to a PIO but without the parameter record. HTH
-
convert String to Number in worksheets
Pat Stanford replied to halfcoupler's topic in General Discussion
Just to be clear, that non-numerical includes things like unit marks and thousands separators. So 1000.01 will work in the US. I believe it will fail in a region using the comma as the decimal point. These will all fail to convert to numbers 1,000.01 1000.01 mm $1000.01 -
Worksheet Criteria for =OBJECTDATA('EXTERIOR')
Pat Stanford replied to The Hamma's topic in General Discussion
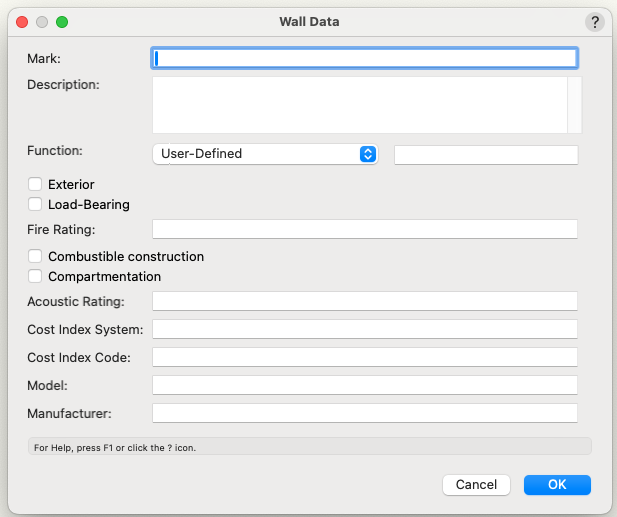
That data should be available. ObjectData('Acoustic Rating') ObjectData('Combustible Construction') ObjectData('Compartmentation') ObjectData('Component Name') Returns the name of the wall, slab or roof component. ObjectData('Cost Index Code') ObjectData('Cost Index System') ObjectData('Description') ObjectData('Exterior') ObjectData('Fire Rating') ObjectData('Function') ObjectData('Lambda') Returns the Lambda value of the object. ObjectData('Load Bearing') ObjectData('Manufacturer') ObjectData('Mark') ObjectData('Model') ObjectData('Path Type') Returns the path type of a wall. 0 is line, and 1 is arc. ObjectData('RValue') Returns the R-Value of the object. ObjectData('UValue') Returns the U-Value of the object.