


Mike Rock
-
Posts
45 -
Joined
-
Last visited
-
I needed to add a custom bit of truss to my company's library, in order to get the new symbol to play nicely with the rest of them I had to remove the cross section UID from 21 objects in order to make the system work in any configuration. I understand the reasoning for locking the factory symbols to a cross section but this is a major effort work around. Please consider adding a way to streamline the process or provide the resources for 48 hour turn around on VW created objects.
-
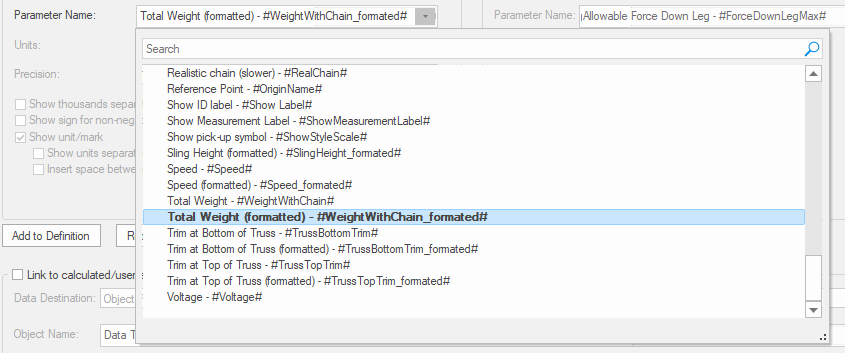
Try using Total Weight (formatted) for the tag
-

Corner Block Woes - Allow Extra Roll Angle not working as expected.
Mike Rock replied to Mike Rock's topic in Entertainment
Making a bunch of customish symbols is what I was afraid of. Glad to know I wasn't missing an easy option. -
Corner Block Woes - Allow Extra Roll Angle not working as expected.
Mike Rock replied to Mike Rock's topic in Entertainment
I'm trying to have the corner block and truss maintain specific orientations while snapping together. In the PDF I've called out what is important orientation wise to me, and then how it changes once I snap it together. I get frustrated when I set a specific hang and roll angle to a piece and then it flips to another orientation when it joins another stick of truss. Being able to temporarily turn off the magnet effect while getting things lined up would be helpful. CB Example w and wo magnets.pdf -
Corner Block Woes - Allow Extra Roll Angle not working as expected.
Mike Rock replied to Mike Rock's topic in Entertainment
I might not have made my point clear. I can get the truss placed in the correct orientation, the issue is connection it to the corner block either rotates the truss or CB out of the assigned roll angle. Attached is a file with a truss structure not snapped together with magnets. How would I be able to use magnets to arcuately position the truss without having any pieces rotate? CB Example.vwx -
I've been drawing a few goal post style ground support systems and I've been pulling my hair our trying to get the drawing to reflect the correct orientation of the corner blocks and the connected truss. The nuclear option is to have several copies of each style of CB and adjust the magnets something like CB 5 Way - Tubes Vert Blank Side Top, CB 5 Way - Tubes Horz Blank Side Top and so on. but that feels like a lot to accommodate all the orientations of the corner block and how it would connect to the truss on each face. I was hopeful changing allow extra roll angle would let trusses connect with the magnets offset 90 degrees but that does not seem to be the case. Any suggestions to get more flexibility out of corner blocks or a better workflow? CB Woes.vwx
-
More options for folders in the resource manager
Mike Rock replied to livespace josha's question in Wishlist - Feature and Content Requests
Bringing up this thread for the issue of wanting to put a worksheet in the same folder as a symbol. I am currently building out a workgroup library for my department and would like to include a worksheet with inventory counts several symbol folders deep, where the information will be most relevant, but am unable to mix and match types. -
Thanks for the file, so to avoid the cross section mismatch I will need to remove the Cross Section UID for all components of the system?
-
Bringing back the thread for the same issue in VW 2024. I'm trying to get an XSF 6 way corner block play nicely with some Tomcat 12" truss. I've tried to follow the instructions SCParker posted but was unable to have success. I'd like to be able to set the Cross Section UID tag manually but can't figure out where that info is stored. Truss Cross Section Issue.vwx
-
Mike Rock changed their profile photo
-
You need to provide the value for if the IF statement was false. It will go between the last comma and ) In the formula I supplied I used an empty string ' ' You could also put some text there. To learn more with the worksheet open click Insert>Function and select If and it will tell you how to structure the formula.
-
Try this formula in C2 '=IF(('BrxHoist'.'OriginX'<=0), 'BrxHoist'.'OriginX', ' ')' As for your Y values not sorting correctly it looks like you might be using Origin y (formatted) try changing that to Origin Y.
-
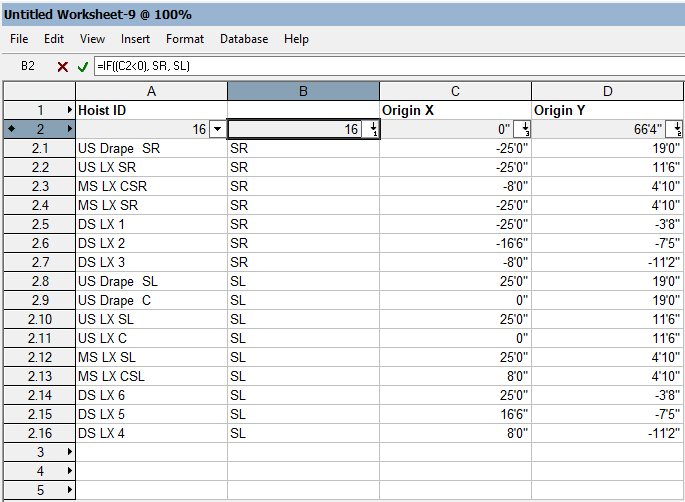
I can be more clever... I inserted column B and put '=IF((C2<0),SR,SL)' in cell B2, that assigned each point to SR or SL without taking up the position field on the record. The edge case for points on the center line getting assigned to SL doesn't seem too bad for the ease of implementation...
-
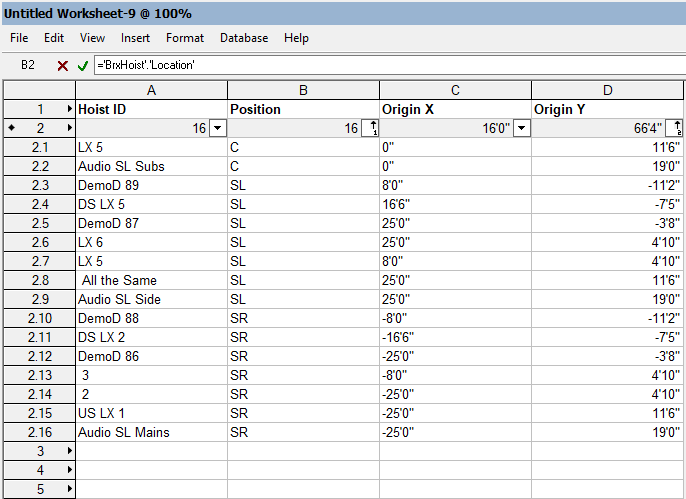
One way to achieve this would be to sort by a 2nd value. I filled in the Position field with SL, C, or SR to allow me to do all the points on center first, then all the SL points in order according to the origin Y value, I didn't bother but in theory you could filter the Origin X row to make sure you have the point closest to center first. Notice the small 1 under the filter arrow for position and the small 2 under the Origin Y filter. this tells you in what order the filtering is applied. Someone a little more clever might have another solution...
-
Were you able to solve this issue? I'm having the same problem with the Popup being blank after selecting an entry. I've included "result := SetObjPropVS(53, TRUE);" in the case for kObjOnInitXProperties:
-
As Mark said - Spotlight numbering could save you some trouble. I made a simple 12 X 12 grid of chairs and was able to get the tool to number them pretty quickly. Using letters for rows and then running the tool again using numbers for the seat number. Now if your arena is like most and some sections have uneven row lengths the spotlight numbering tool won't be able to easily account for those edge cases.
