


Pat Stanford
-
Posts
12,626 -
Joined
-
Last visited
Content Type
Profiles
Forums
Events
Articles
Marionette
Store
Everything posted by Pat Stanford
-
Or if you want to keep it as a Poly, Convert a copy to Nurbs, find the point, then delete the Nurbs. Or walk the vertices summing the distance. When the distance is greater than your distance you know you have gone one vertex too far. Step back and calculate the remaining distance as your total distance minus the pervious vertex. Use that last vertex and the next vertex to get the unit vector of the edge and the remaining distance to find the point of the distance. Not especially clear, but it should be a pretty short subroutine. Let me know if you need more help.
-
I don't think you want to use Material as part of the criteria. Set the criteria to be Object Type is Slab. Then use a column formula to list the materials.
-
It depends on how you imported the DWG and what you have done since then. For the future, the best way do do something like this is to import the DWG into a new VW file. Then Reference that VW file into your working file. Then when you need to update the DWG you just import the reference. If you did not do the above, you can still start with the updated DWG, but you will have to delete all of the DWG information out of the existing file. If you have not changed the Classes of the objects, they should still be the same as the DWG Layers. If you Delete those classes and tell VW to delete the classes you should be able to get a relatively clean file without a lot of work. Good luck.
-
2D/3D Workflow question
Pat Stanford replied to hollister design Studio's topic in General Discussion
No, that is not the general practice at all. The basic objects in VW (Walls, Doors, Windows, Roofs, Slabs and many others) are "Hybrid Objects." That means that they can have a different appearance in Top/Plan (2D) than they do in any other view. This means that you can use a much more schematic view of a door which is made of "Screen Plane" (2D) objects that will show in the Top/Plan view while having a different appearance in other views. Screen Plane objects can be used in any view. 3D only objects will display as outlines only in Top/Plan view, like they would in a wireframe render mode in other views. If you need to create a custom 3D object, you can use the Auto Hybrid option to "automagically" add a screen plane representation that will show as a filled poly in Top/Plan view. There are a lot more details, but that is the basic idea. Everything in a single file.- 1 reply
-
- 1
-

-
Is there an easy way to create a Sheet Layer List?
Pat Stanford replied to Jim Smith's topic in General Discussion
Try this. You got lucky I didn't want to do real work on a Friday afternoon. ;-) Procedure SheetLayers_to_Worksheet; {Make a worksheet listing all of the sheet layers in a VW file} {Lists both used and unused layers} {The worksheet is named "Layers:"with and appended date} {Sorts layers in alphabetical order prior to storing in worksheet} {November 17, 2017} {Based on a script originally written} {March 19, 2015} {November 6, 2020 - Modified to include Sheet Name as well as Sheet Number} { copyright 2020, 2017,2015,2010, 2008, Pat Stanford pat@coviana.com} {Licensed under the GNU Lesser General Public License} Type PTS = Structure LayerNum, LayerName :String; End; var H1, H2: Handle; N1, N2: LongInt; LayerSort : Array[1..1024] of PTS; Begin H2:=FLayer; N2:=1; While H2 <> nil do Begin If GetObjectVariableInt(H2,154)= 2 then Begin LayerSort[N2].LayerNum:=GetLName(H2); LayerSort[N2].LayerName:=GetObjectVariableString(H2,162); N2:= N2 + 1; End; H2:=NextLayer(H2); End; {Add Curly Braces (comment out) the next line to not sort the layers by name} SortArray(LayerSort,N2-1,1); H1:=CreateWS(Concat('Layers:',date(2,1)),N2,2); For N1:= 1 to N2-1 do Begin SetWSCellFormula(H1,N1+1,1,N1+1,1,LayerSort[N1].LayerNum); SetWSCellFormula(H1,N1+1,2,N1+1,2,LayerSort[N1].Layername); End; SetWSCellFormula(H1,1,1,1,1,'Layers in File'); ShowWS(H1,True); End; Run(SheetLayers_to_Worksheet); -
Or you could put the images of the doors into a worksheet that could be on a different layer. What do you want to do with the door once you get it on the other layer?
-
Objects going invisible almost always have some relation to Layer or Class visibilities and/or Layer or Class Settings. Make sure you have the class the object is going to be placed in visible. Some objects can be specified to be in a class other than the active class so when you place them they might not be visible. If you can produce a small sample file that shows the problem post it here and someone will try to see what is happening.
-
Kind of. You need to tell us more about what you actually want. R0.1, R1.1, R2.1, etc. Or RO.1, RO.2, R0.3, R0,4..... R1.1, R1.2, R1.3..... R2.1, R2.2, etc. How often are the R numbers going to change? If not very often, take one of the Number Stamp styles of Data Tag and duplicate the style. Add a new text block for the R0. part. Select it and in the OIP click the Use Dynamic Text check box and hit the Define Dynamic Text button. Set it to a User Entered Value with a type of Text. OK your way out. Now if you Edit Tag Data you will get a dialog box that will let you change the R portion and the number will increment as you put tags on different objects. I probably haven't been clear enough, so ask again if you need more help.
-
Another option would be to make a virtual machine out of your Mojave machine and run it under Parallel or VMWare or similar on your new Mac. The substantially higher speed of the new Mac might make Mojave, even virtualized, run really quickly.
-
Things that were once simple and efficient are no longer in 2021?
Pat Stanford replied to MartinFahrer's question in Troubleshooting
It is actually part of the Edit Viewport dialog box. If you right click on a viewport and choose Edit you will get the Edit Viewport dialog box. You can set the options for each mode there as well as setting what happens when you double click the viewport.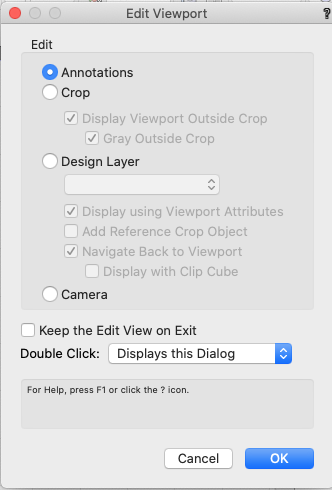
-
The OS compatibility list is below:
-
Things that were once simple and efficient are no longer in 2021?
Pat Stanford replied to MartinFahrer's question in Troubleshooting
A. Uncheck the Display Using Viewport Settings check box when you Edit the Design Layer from the viewport. -
@JuanP Didn't you solve a problem like this for a customer at MacWorld in San Francisco about 2003? ;-) Or was that just Hebrew reading backwards due to Adjust Flipped Text?
-
Quit and restart VW. Shutdown and restart computer. If you are on PC update your video card drivers.
-
Hopefully here. :-)
-
And even better with sketch in that you draw the lines straight and get all the snap points, but you can use different sketch styles from really rough to pretty smooth. And turn sketch off and you have a good line drawing. The only issue would be is you need the wiggles to remain exactly the same Sketch Mode is random and will change when you turn it off and back on.
-
create a TUNNEL through the site model
Pat Stanford replied to yasin2ray's question in Troubleshooting
As far as I know, the VW DTM can not support any undercuts or tunnels. If you really need a tunnel, you could make a trench and them make a second DTM to act as a "roof". Could you fake it by putting some kind of image prop or image texture on a 3D poly at the entrance to the tunnel? -
We talked about this back in April of 2017. Where were you? ;-) It takes a worksheet script to make it happen. This thread covers it pretty well. Ask again if you need more help.
- 1 reply
-
- 1
-
-
What version of VW? Major changes to Reference markers between VW2020 and VW2021.
-
Make sure you are using "N-dashes" entered from the keyboard by hitting the dash key with no modifiers. If you use an "M-dash" instead (Option and dash on Mac), then you will not get a sub-class. M and N dashes are old time typographical conventions where an N-dash (used here) is the same width as a lower case letter n while the M–dash (used here) is the same width as a lower case letter m. In conventional usage an n-dash is used to separate a range (2018-2020) while and m-dash is used to mark a break in a sentence–and don't forget there is a hyphen which is even shorter than the n-dash. ;-)
-
If you just use #Area# do you get the unit marks? If so, then it is probably returning a string instead of a number and math only works on numbers. For many of the PIOs, there are fields that are the numeric version and fields that are the string version including the units. I don't know if there is a numeric version of the Area function.
-
Toggle for editing options?
Pat Stanford replied to hollister design Studio's topic in General Discussion
"If you see a little triangle in VW (either open or filled), it means they are hiding something from you. You probably want to click it and see what it is." -Pat Stanford, Every Los Angeles Users Group Meeting since time immemorial. ;-) -
Toggle for editing options?
Pat Stanford replied to hollister design Studio's topic in General Discussion
2021 Designer, but it should be in Fundamentals also. Click the down pointing Disclosure Triangle to right of the icons and you can choose which Quick Prefs to show. -
Toggle for editing options?
Pat Stanford replied to hollister design Studio's topic in General Discussion
Yes, in the Quick Prefences section of the mode bar. It is the last icon (Rounded Rectangle with the eye). You can choose what Quick Preferences to show by using the disclosure triangle just to the right of the icons. If you want to create something to be able to use a keyboard shortcut it is a one line script that you can use in a PlugIn Menu Item and then add to your workspace. SetPref(14, Not(GetPref(14)));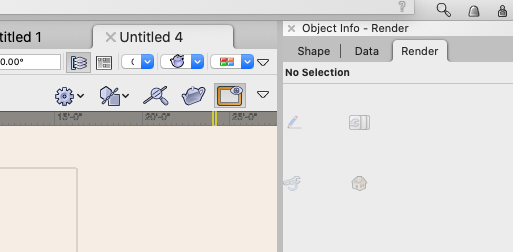
-
Some of the ConnectCAD tools are missing in VW2021
Pat Stanford replied to sbecraft's topic in ConnectCAD
Or if you added the Connect Cad tools to your custom workspace edit it, delete the Connect Cad items and add the 2021 items again.

