

Elite Exhibits
-
Posts
583 -
Joined
-
Last visited
Content Type
Profiles
Forums
Events
Articles
Marionette
Store
Posts posted by Elite Exhibits
-
-
Look at this
Will post an example when time allows
Run the script on the offending item (assume it is a mirrored item)
3D components - only one item at a time
These items should then stay where they are when you double click them to edit
Peter
-
 2
2
-
-
-
My 2¢ on VW Videos ...
@rDesign URL video link is a good example (see above)
What I find with some VW training is a level of sugar coating that might still leave some uses in a quandary.
Example in this case: The demo file in the video is set up and complete...
(¿ with the assumption is that you look for and use items from the VW Libraries ?).
As someone with a work flow that utilizes FAVORITE files for most all designs and edits, understanding how to start from scratch and load the Resource Manager would be an important key
Peter
-
2
-
-
@Tracey Andrews as Tom mentioned - you need to tell the RM what to look for as well as where to look - Typically the RM looks in one place at a time - unless ...
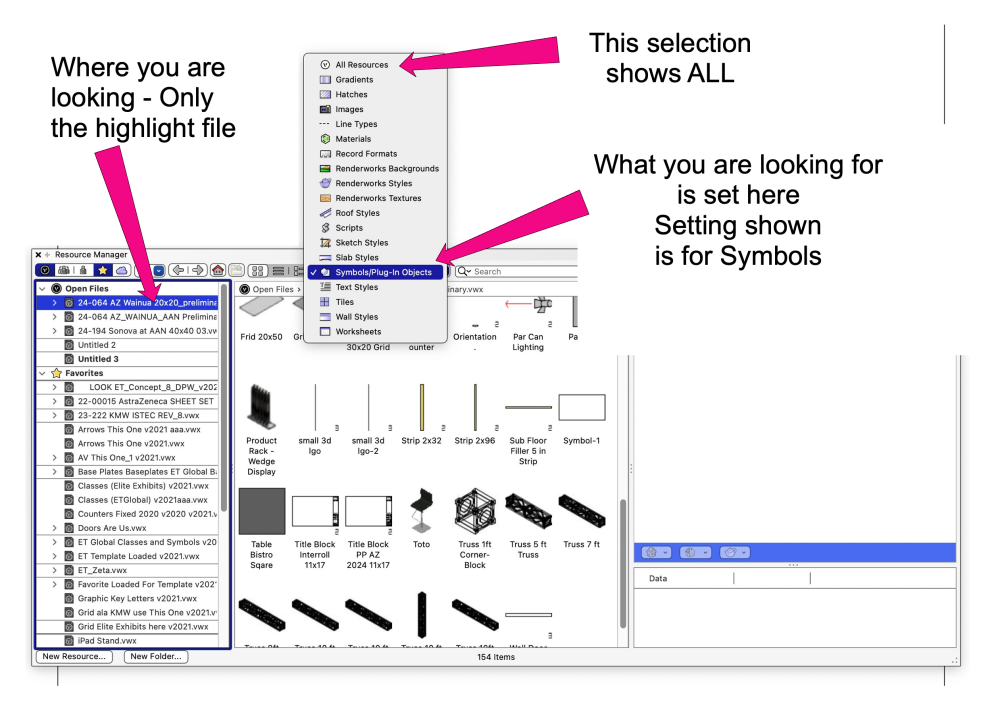
If you tell the RM to show Symbols, for example. Click in the right column highlighting the top most drawing. Make sure the left side carets pointed down on each header. (Open, Favorites etcetera (as shown above)
Now use the down arrow on the keyboard and the RM will show the next drawing and the Symbols (in this example) it contains - easy way to buzz thru you Favorite Drawings.
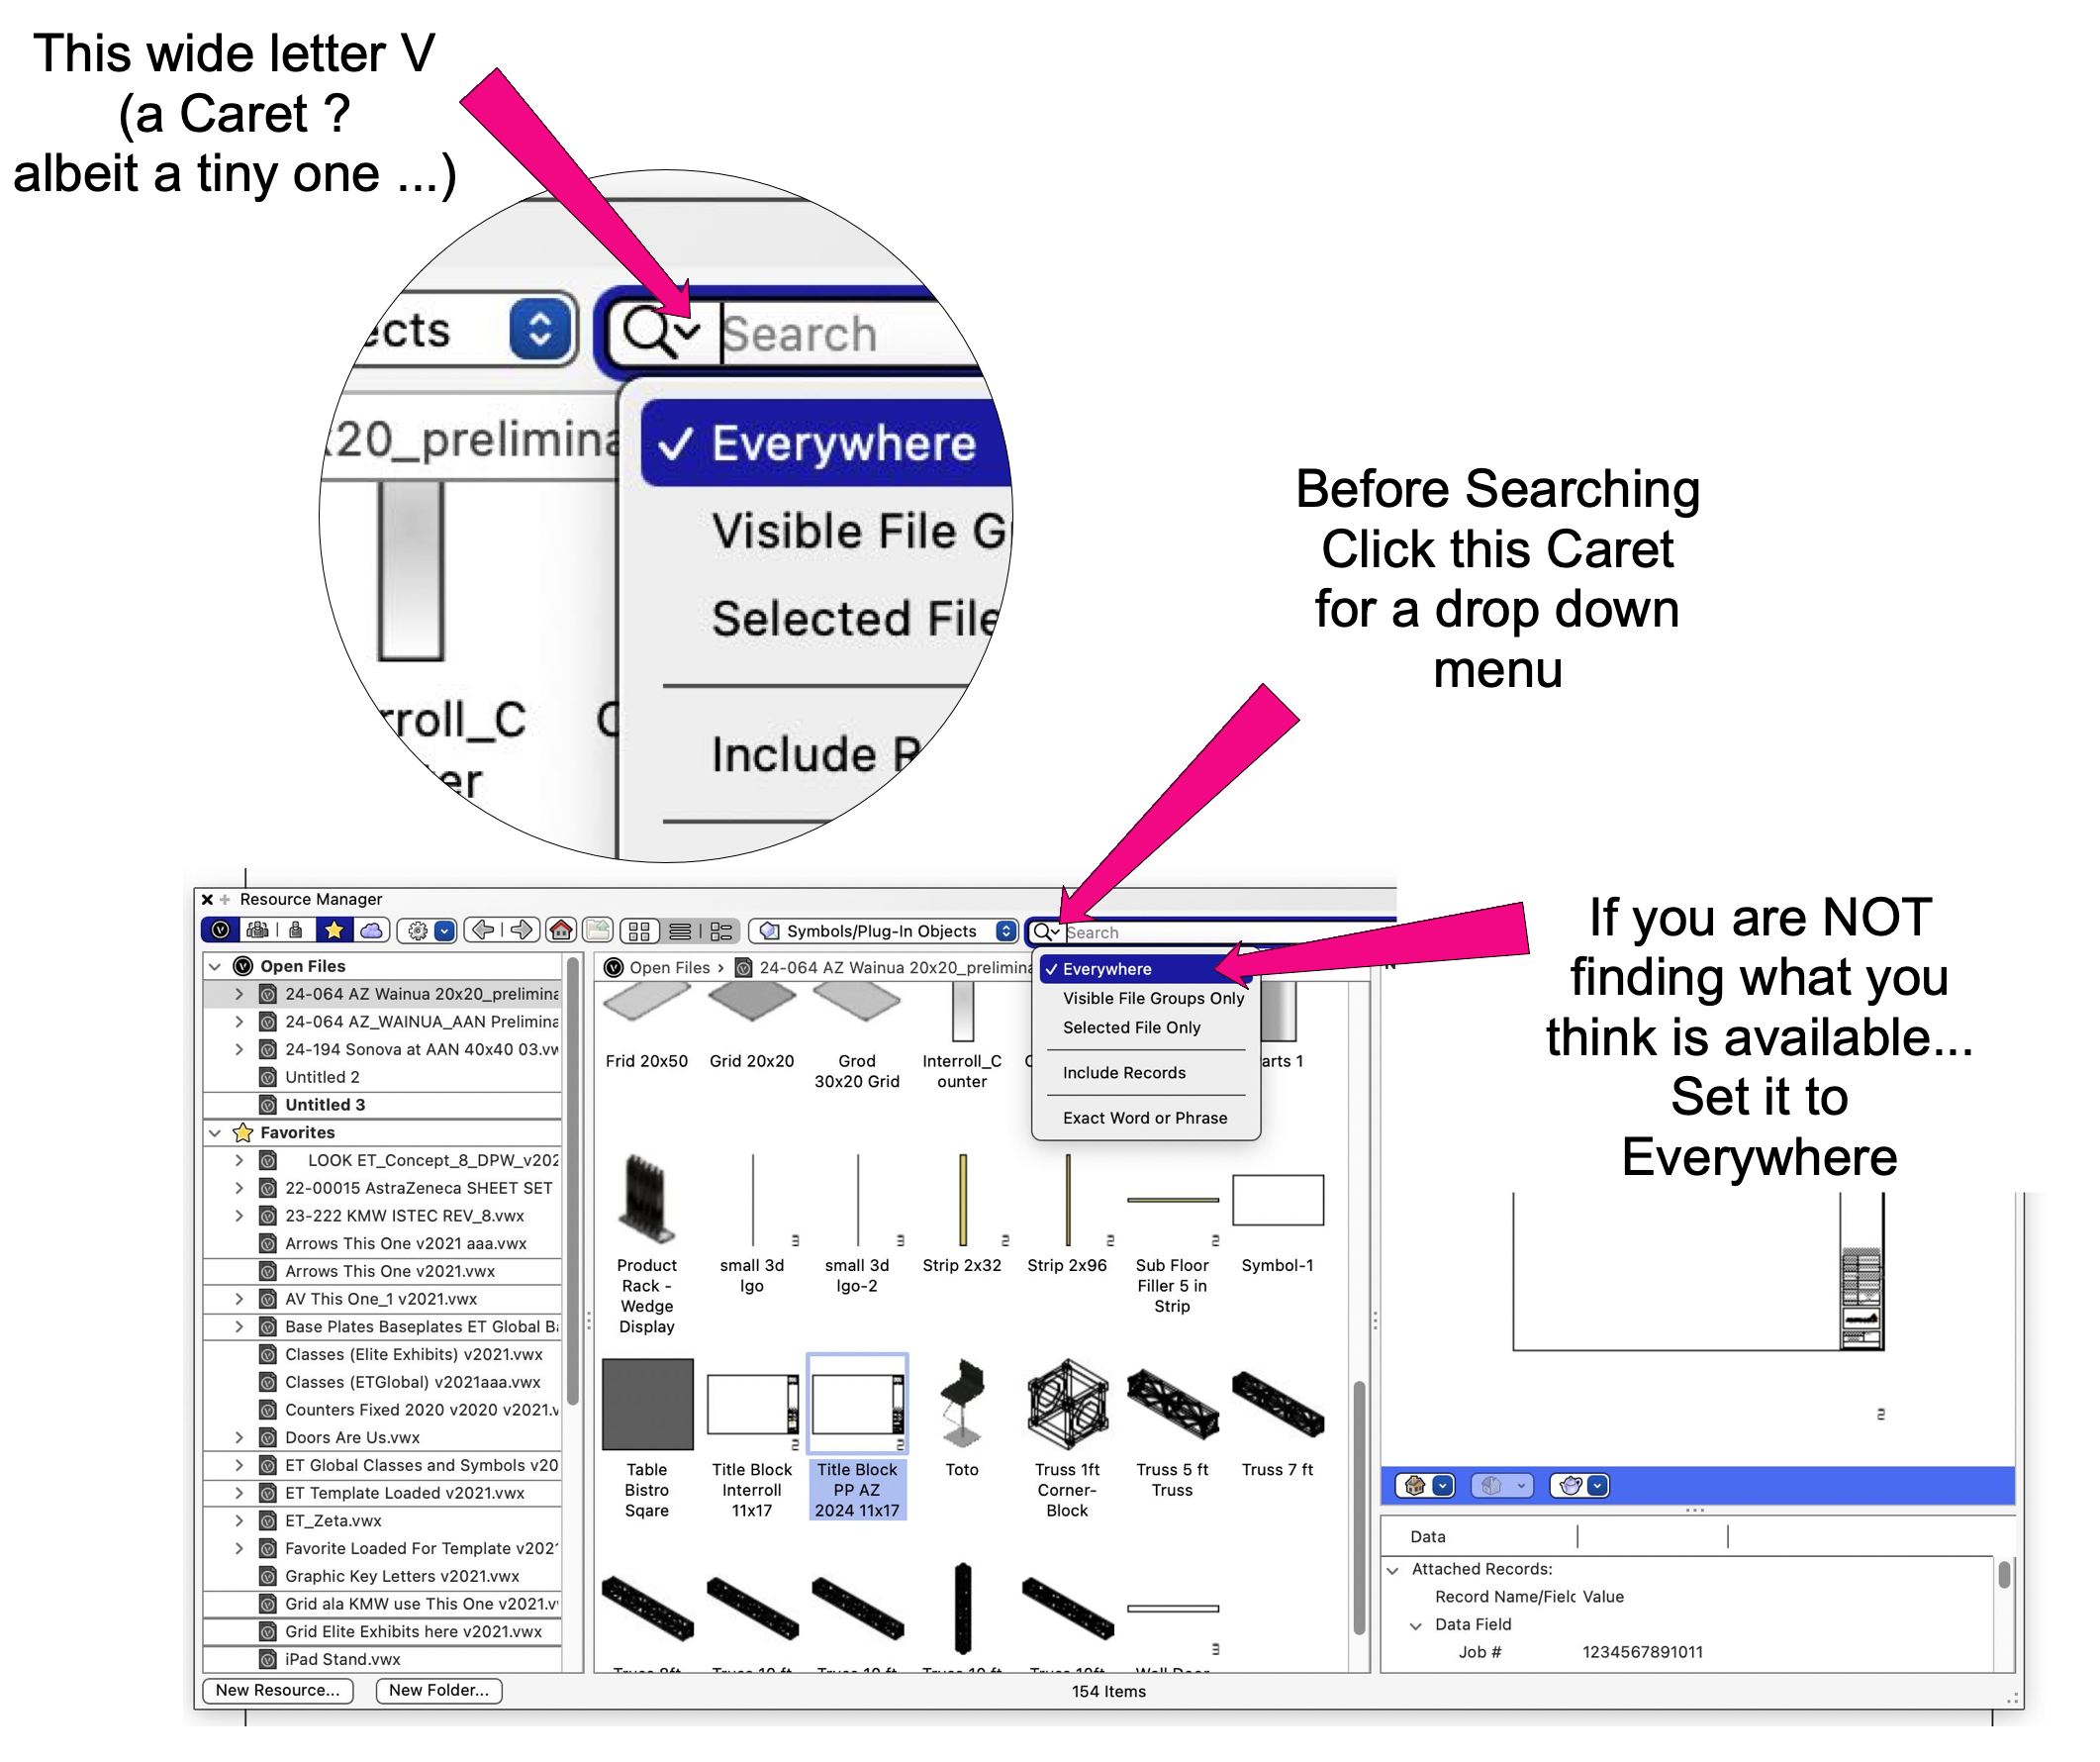
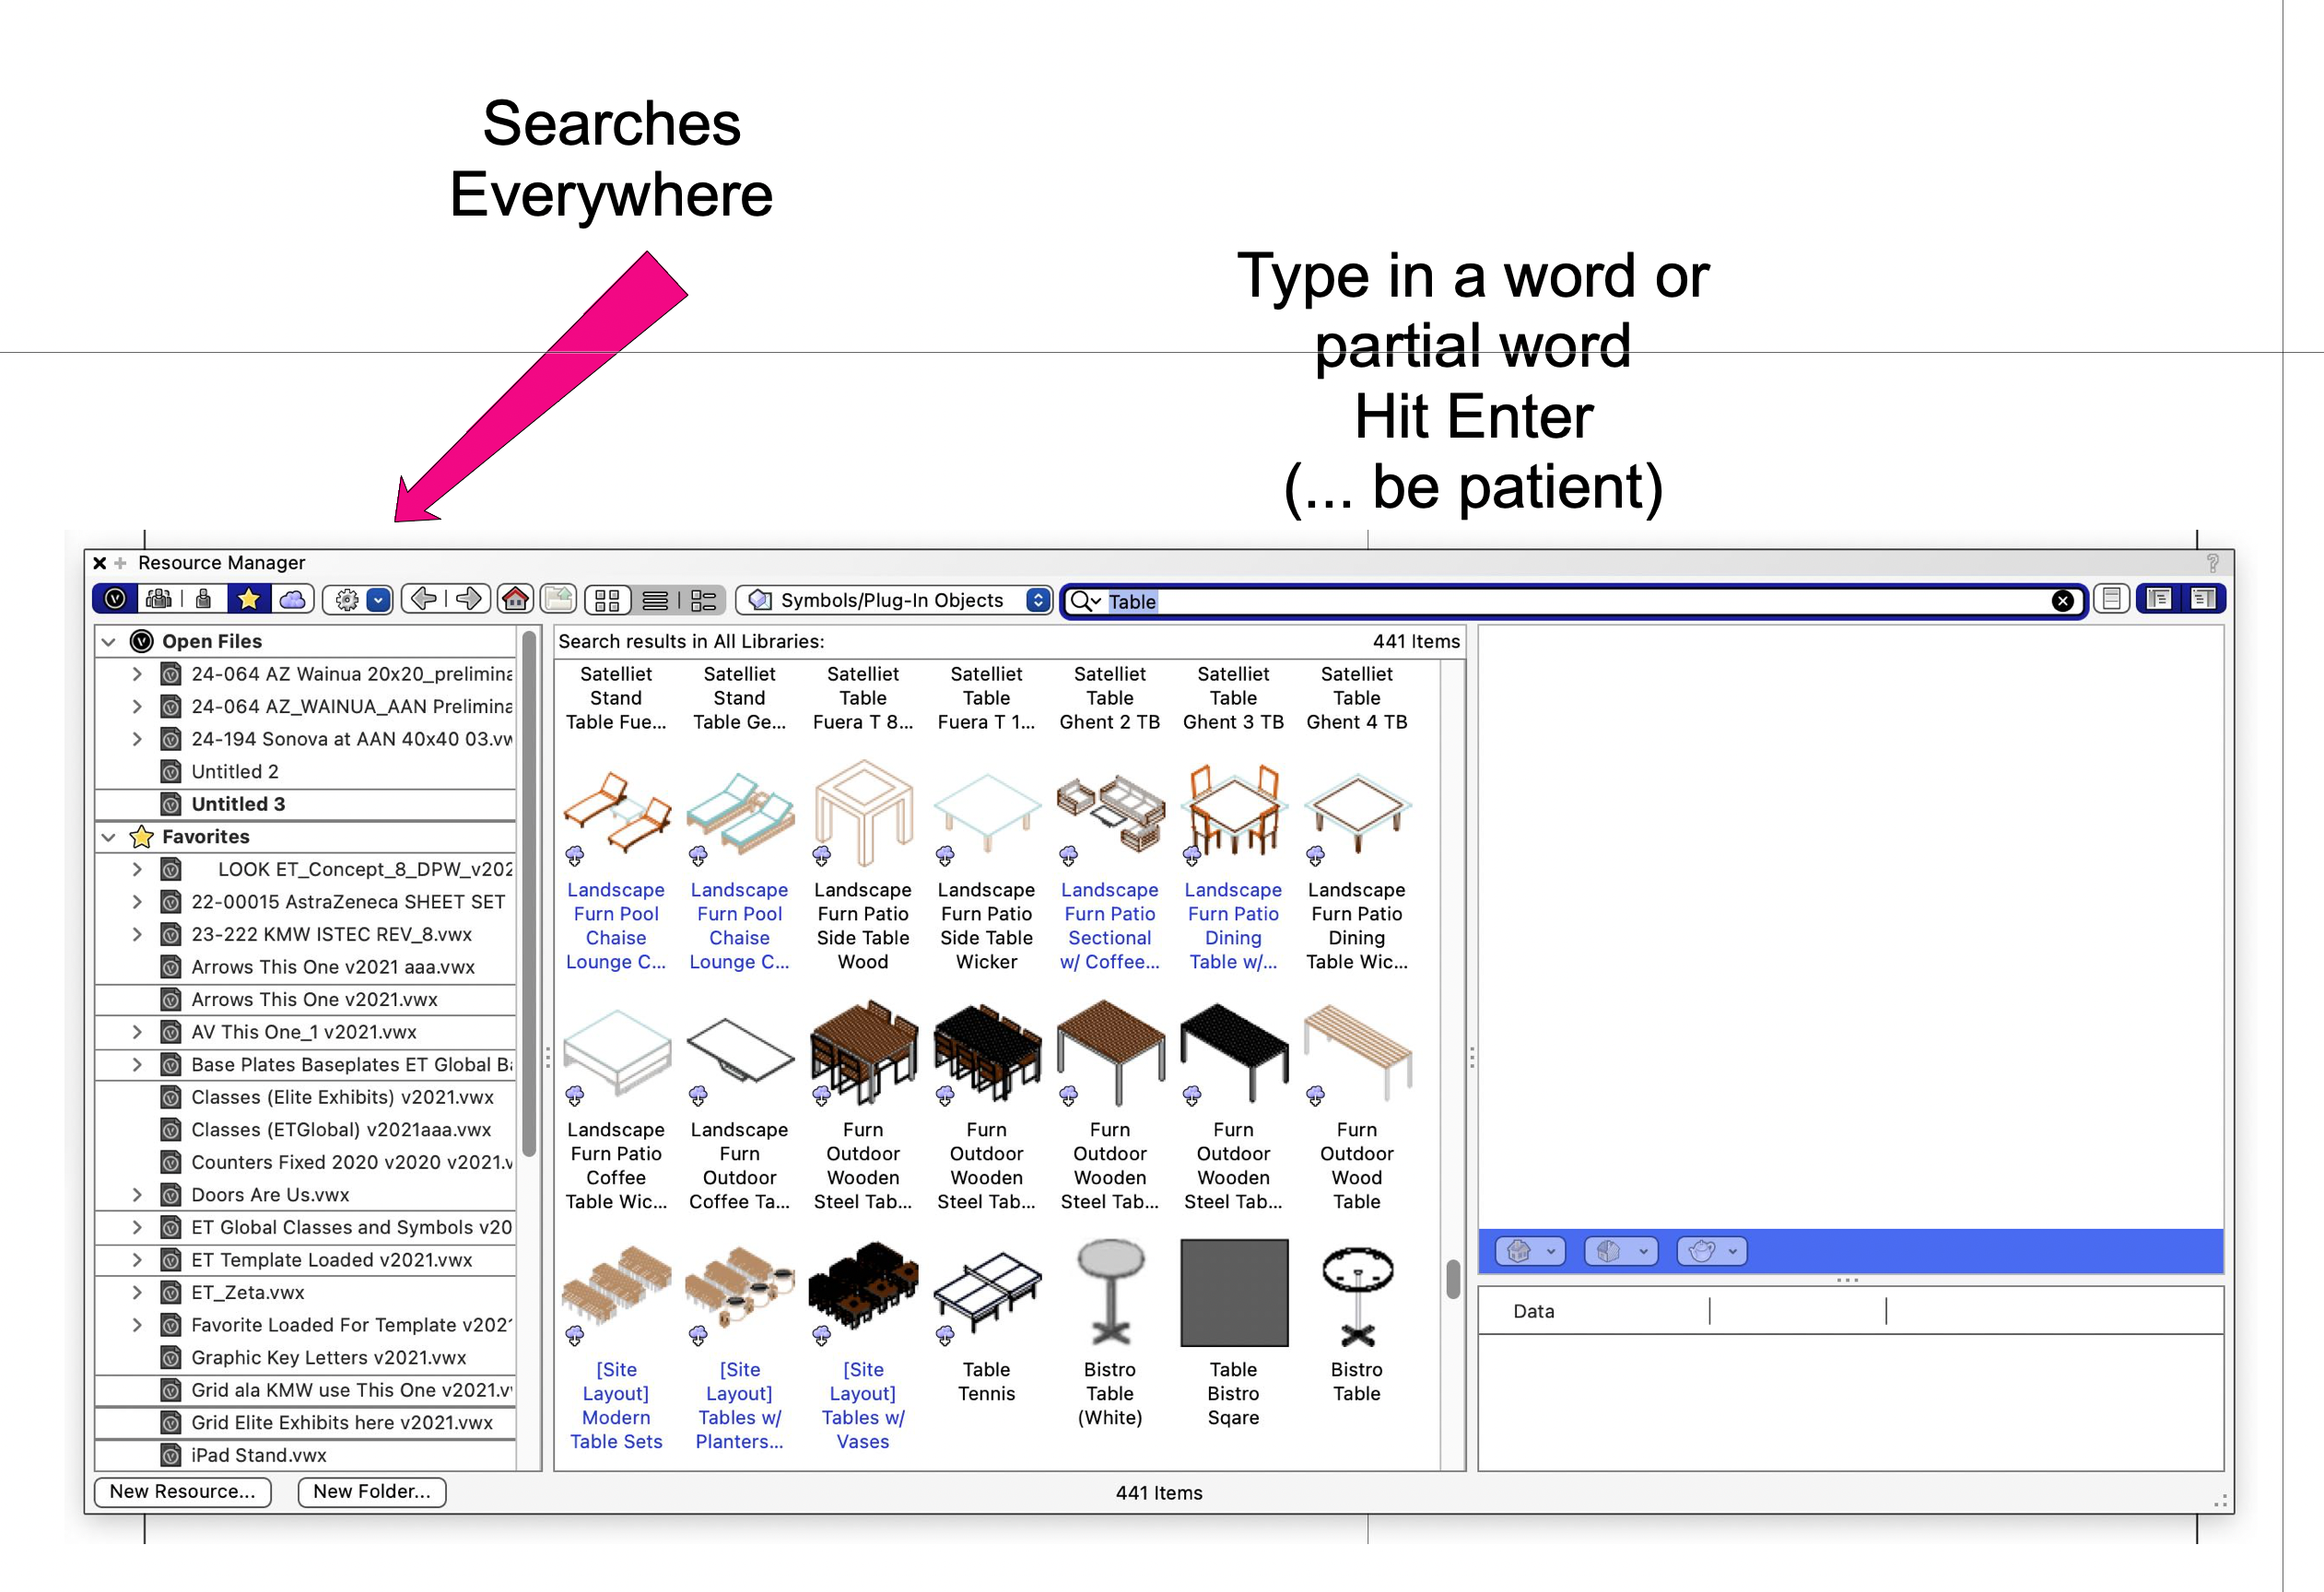
And, as Pat Mentioned, you may ask the RM to search. Where you search is also critical in what the RM finds for you- set that first, then type a word - start simple / generic as Pat indicates

Searching everywhere is the option if you do not have a specific file in mind. (Or don't know where it is...) Search everywhere is not really everywhere - it is everywhere on the left if the RM is connected to it (assume for now, if you see it, you are searching there.

The caveat with searching everywhere might be the RM finding multiple identical items and you not knowing where you have searched
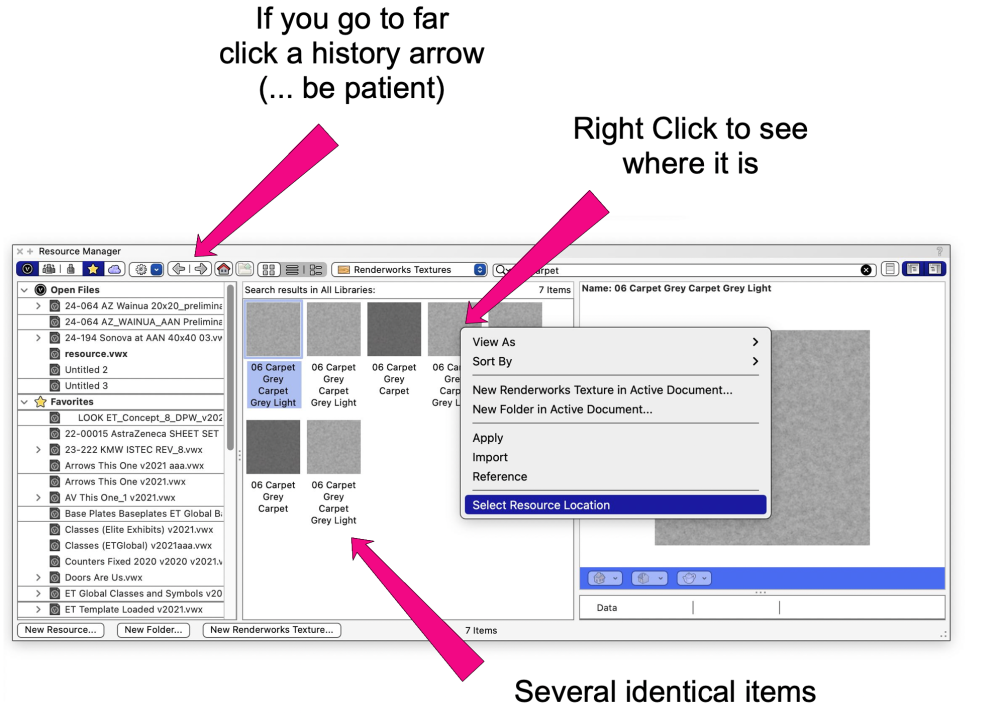
Right click on an item after the search everywhere and select the Location option
The RM will take you there. Not what you want ? History back arrow.
¿ Lost ? - The history arrows might help
Peter
-
4
-
-
To clarify, using a trackpad on a Mac book Pro you can set it so simple zoom and pan, in VectorWorks, works without having to change tools / hold a key / roll a wheel. The Track Pad can also be set so that right click / contextual menus takes no additional keyboard keys or alternate mouse clicks. You accomplish this direct from the trackpad. Control / function beyond the 3 switches and a roller wheel on a mouse vs fingers already on one Track Pad.
If you are NOT utilizing the Track Pad on your MacBook, an easy start is to turn OFF all gestures in the Preferences, then turn on one feature at a time and see what the function is in VectorWorks. Look also under Accessibility as there are additional features (gestures) there. If you play guitar or piano you know one may hold down a single finger while another finger does something else. Try a similar approach here. Example: Right hand starts to draw a rectangle, lift a finger, left had zooms and pans, right hand finishes the rectangle.
Test the Track Pad gestures along with the modifier keys as they add a few hidden features in VectorWorks.
Based on how you set up your Preferences - if the crop perspective is off - you get the ability with the flyover tool & Track Pad to maneuver in the 3-D world - if the crop perspective on - you get actual zoom… as in the drawing gets bigger rather than the 3-D world getting closer.
The Track Pad accomplishes the same mid tool functions a multi button mouse does. Except there is no external mouse to carry, account for, plug in and locate on some adjacent real estate while utilizing a laptop on the road (...or in coach class New York to LA).
Please see the attached - Track Pad only manipulation (¿ unable to download ?)
Peter
-
2
-
-
@Monique Freese aggravating anomalies have become prolific in VectorWorks, and they are impossible to look up in the VW HELP file - The FORUM is the place to ask
Peter
-
1
-
-
On 3/9/2024 at 5:14 PM, Jonathan Pickup said:
I always take a mouse with me, I just can’t draw or use Vectorworks effectively with the trackpad.
It is remarkable what can be done with only the track pad - try the addition of the left hand and existing Zoom / modifier keys.
Peter
-
@HMichael - Try the eyedropper tool -
Double click the eyedropper tool to get the preferences and set them accordingly - see attached
as Andy suggests above - include Class and see what happens when you use the Bucket (...option for the eyedropper tool) to apply these Attributes to the new object.
Peter
-
50 minutes ago, Jake Wilson said:
I have never defined the working plane as far as I know.
VW has a major faux pas in this Rotated Plane Mode - Defining an object rotated as it was originally created - especially with Imported Information.
Just Yesterday - I attempted to modify a Hybrid Symbol from a "Left / Right" version to a "Top/Bottom" version -
ie: rotate it 90 degrees -
No Layer Plane objects were harmed in this process - Hybrid was 3D and Screen Plane ONLY.
In the Resource Manager
Duplicate Hybrid Symbol
Rename
Edit 2D - Rotate 90
Exit
Edit 3D = Rotate 90
Exit
Viola ... Not so fast !
Some Text is upside down / Some text is backwards / Some is upside down and backwards
Mirror and rotate do work on this text (assume that it is now in a parallel universe)
Quick check of the Rotated Plane setting - (ARGH !) - VW has automatically set it to 270 degrees (?) and you could not select a standard views even Top/Plan was Rotated Top /Plan
Solution: Copy Hybrid Symbol into a blank drawing
take apart twin copies
1 @ 2D and 1 @ 3D
rotate as needed
reassemble as a Hybrid Symbol (with same name)
Import and over write the Symbol back in the original design
(ARGH !)
If there is a better way ...
Peter
-
@lkr241 Think of Associated Dimensions ONLY working in 2D - ONLY on a Design Layer - ONLY with Screen Plane (Top / Plan Component in up dated lingo ...) and you will have a happier VW experience - We turn them OFF and use them only for specific projects. (Yes SOME Wall Dimensions are able to be Associated Dimensions. Since ALL Wall Dimensions do NOT Associate, one may need to fix dimensions, ANYWAY, as you have noted - See Attached
VW HELP = "...links dimensions to 2D objects, as well as walls and wall components. "
Dimensions in the Design Layer are able to show up in a Viewport. This is determined by your Class set up - Viewport Crop etcetera. Dimensions as annotations in a viewport appear to be an easy solution, especially if dimensions are distinct Viewport to Viewport.
Associated Dimensions and Layer Plane 2D geometry may be a solution for this automatic mode you desire. It may end up being a bit of a work-around... ie: multiple sets of geometry if you are working (assumed ...) in the real 3D World)
Typically, VectorWorks idea of automatic mode is a double edge sword (ARGH!)
Keep in mind that Sheet Layers are Screen Plane ONLY - Viewports (annotations) are Screen Plane ONLY
https://www.youtube.com/watch?v=W2SJ-ftuNvY
Peter
-
@MikaelSteff - @Tom W. Just suggesting ...
We gave up on getting this Default 3D... to work as expected - As mentioned above - On again / off again aggravating frustration.
Not saying it is the solution to the problem, just a warning that you may be doing things right and VW is not
Peter
Post a file to let others take a look ...
-
3 hours ago, Tom W. said:
Also check your 'Default 3D View Render Mode' setting in the '3D' tab, VW Preferences.
@Tom W. This is good to mention, except we have had on to many again / off again issues with these Default 3D View Render Mode settings and have "given up" on understanding their behavior. Possibly, this is what is doing the "suddenly turn see through " for @MikaelSteff
We have shifted to Keyboard Commands For Wireframe / Open GL (Shaded)
Peter
-
@Martin Crawford Connect with @MullinRJ - I purchased a set of items that keep my Metric Metric and Inches inches in Worksheets - Works Great ! (Saves me every job...)
Peter
-
1
-
-
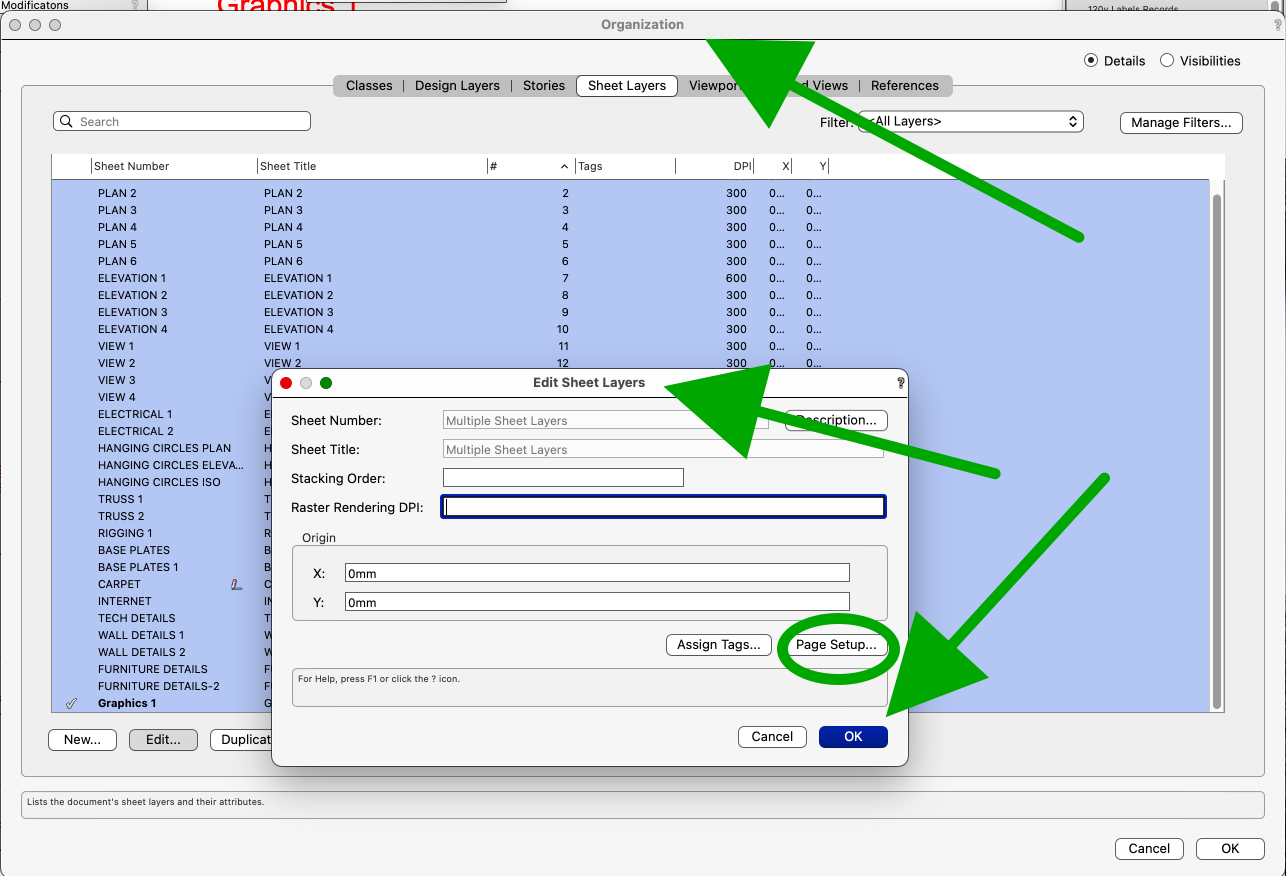
@schristensem This is where we find print problems
Often, these number shift in the page set up process and are overlooked
Peter
¿ Question ? are you printing from a Design Layer / a single sheet layer / many sheet layers ?
-
On a similar note to @VIRTUALENVIRONS I have had random issues similar to his attached screen shots above
Typically a blue grey color - with Open GL / Shaded & Image Props - see attached
Assumed that the RevderWorks Background Was the culprit
Peter
-
@soledad4 In your screen shots above. there are items not in the file you posted - see attached
Green Arrow points to a floor (?) - PDF layer is gone ...
as @Pat Stanford noted I do not see the Pink when I open the file
If you still have the issue - create a SAVED VIEW or three when the PINK sets in
Then repost the file ...
Peter
-
-
@mhersland In the Workspace Editor (as you show above) - Click on a single line - just below is the location to enter a keyboard equivalent - Shortcut for Selected Command
Peter
-
1
-
-
@zoomer have you ever had useable results with Photo to File in the VW Cloud ?
Recently ran three tests and was very disappointed
Want to have the process simple / low tech.
Photographed an object
Used a regular iPhone
Photos taken indoors
1st run failed (insufficient overlap)
2nd (More overlapping photos this time) resulted in a file that was incomplete
3rd (Better / New photos / More photos / even more overlap) (background stripped away on the iPhone) this also resulted in a file that was incomplete -
see attached with Results: File imported is on the Left and One example photo is on the right
The traditional manual mode ,to create 3D geometry from photos, is combination of photographs, details and manipulation. First with the iPhone (PHOTOs App) - some work in GraphicConverter (or PHOTOSHOP) as needed & then VW - Simple / Easy / Predictable (a 2D PDF is also a good asset)
¿ Anyone succeed at this ? - Would love to see some real world examples of objects (ie: Not landscape or buildings) that used the VW Cloud Photos to 3D File
Peter
-
@thinkingpencil Make sure that the Favorite file and the desired texture are visible / selectable in the Resource Manager
selection of a texture in the Class Edit Dialog / Organization Pallet sound be a similar process - see attached
Peter
-
...and when searching VW HELP - do it from a browser also.
Type what you think you want to find here site:app-help.vectorworks.net/2023/
or for VW 2021 - site:app-help.vectorworks.net/2021/
or for that mater change the last number to match your VW year
Follow @zoomer advice on different keywords above - Even if you type in exacty what the Menu item or Tool is.
HELP is loaded with great information - It is just not easily accessed some times.
Example Attached:
Page 1 - Search inside VW HELP - Drop Down appears to have a match to what was typed
Page 2 - First hit out of 1259 (?) - Not what was requested
Page 3 - Search with Google outside of VW HELP - Second hit looks good
Page 4 - Google search found it - and the requested phrase was in VW HELP it just did not find it as such.
¿ What is the "box indicator" ?
Peter
-
2
-
-
@Peter Telleman take a look in these two thread
When there are so many anomalies and aggravations, VW amazes me when it is able to "take you to right where it is" when you right click a Symbol from a Database Worksheet list !
(Please don't change that feature ...)
Peter
-
1
-
-
@Micaela Edwards There are also areas on your posted image that may be caused by duplicate items.
See attached
What this looks like may depend on the shape and the Rendering mode
Peter
-
1
-
-
@Micaela Edwards Assume that the image you posted is Rendered ?
See attached
At first glance the curves rendered as segments / facets appears to be a setting in the Options for the selected Render mode.
Extrude a Circle and it typically looks good rendered
Put a hole in the same circle then extrude - Facets may appear in the rendered view
Peter
-
1
-


Sweep command no longer works
in Troubleshooting
Posted
FYI
We have seen existing, fully functional Sweeps, from past versions / past designs that give a warning dialog when one attempts to edit them in a newer version of VW - Force Quit is the only way out of this situation
Peter