Gadzooks
-
Posts
509 -
Joined
-
Last visited
Content Type
Profiles
Forums
Events
Articles
Marionette
Store
Everything posted by Gadzooks
-
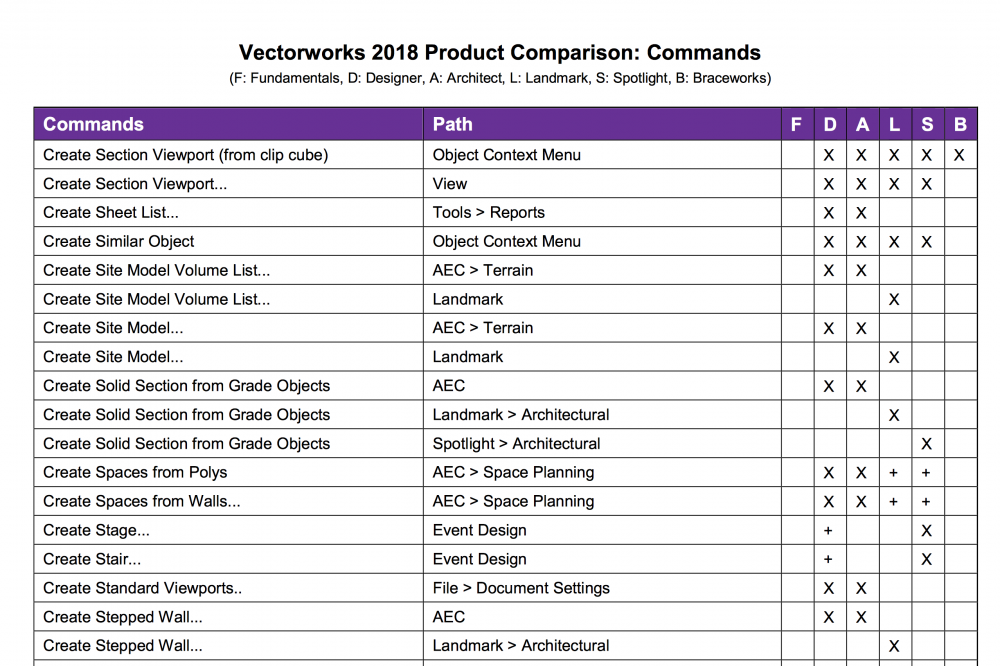
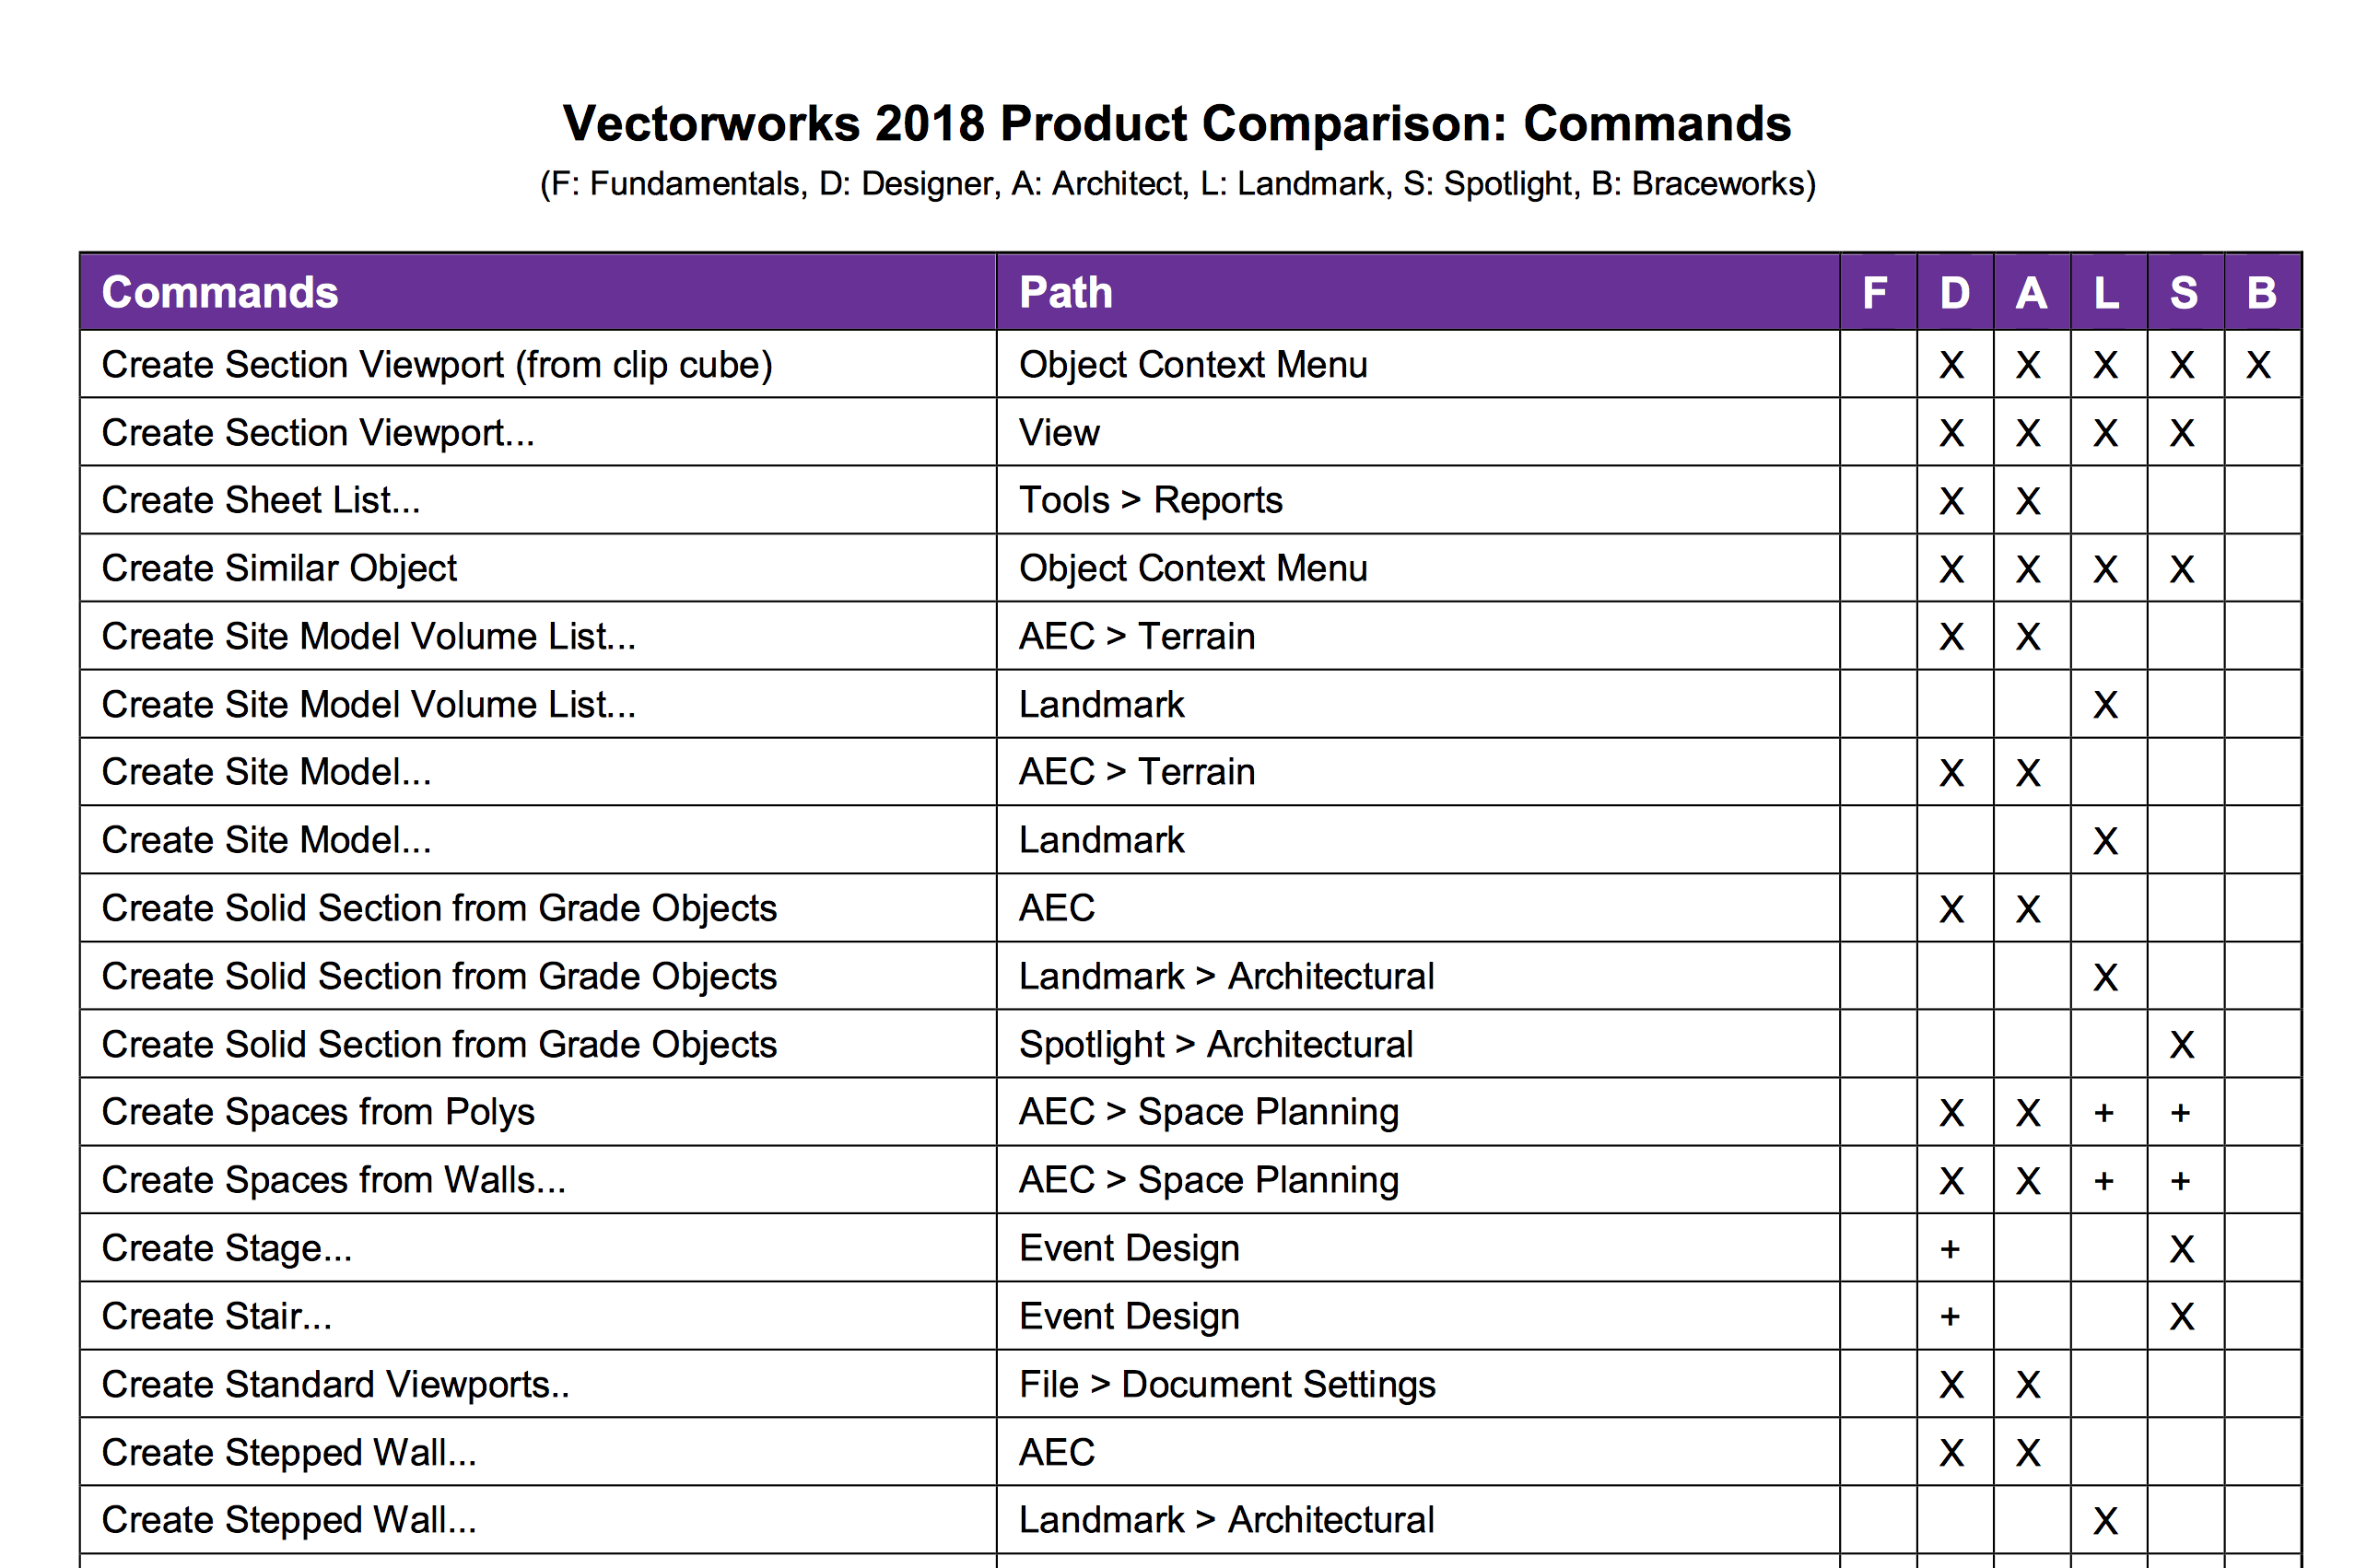
Hi @Bengt Nilsson Sorry - I misread/misunderstood your OP. I thought you were having trouble with the Help files. @Pat Stanford was on to it. We would have known earlier if your signature had shown Fundamentals. This is your problem. Vectorworks has been criticised before over what is excluded when using Fundamentals. Sections being pretty fundamental!! But I guess they have to create sectors to suit individual users and that is where the knife has cut on this occasion. To be fair, its clear from the published comparison charts that its clearly not included. So potential purchasers are advised of this shortcoming. (Although I can see thats not really going to please you at this moment.) The full link is here.. http://app-help.vectorworks.net/2018/eng/Commands_Tools2018.pdf
-
It is there. This should help you start with the info you need. http://app-help.vectorworks.net/2018/eng/index.htm#t=VW2018_Guide%2FViewports1%2FCreating_Section_Viewports.htm&rhsearch=Section viewport&rhhlterm=Section viewport&rhsyns=
-
From VW Help 2018.... Updating Vectorworks Products Vectorworks application updates are called Service Packs, and are considered maintenance releases. There are several ways to obtain updates: ● Select Help > About Vectorworks, and then click Check for Updates from the About Vectorworks dialog box. Alternatively, select Help > Check for Updates (Windows) or Vectorworks > Check for Updates (Mac). A dialog box opens to indicate whether the software is up to date, or if an update is available. If an update is available, click More Info to open a web browser to display and download available updates. If it is inconvenient to update the software at this time, click Cancel. ● Select to Automatically check for updates on a weekly or monthly basis from the Session tab of Vectorworks preferences (see Vectorworks Preferences: Session Tab). ● Updates are available for download at vectorworks.net/downloads. You'll find SP2 much more stable.
-
Interesting project. How does this work though? Would be interested to know more - but don't explain too much - my head, like Homer's, can only take so much before I lose something. I would have assumed (I know nothing!!) that if this work is for railways there would be some specific legislation or code that you have to design to (to to avoid derail?). And (further assuming!!) this would be tied to the rolling stock spec. So in the above scenario there might be a 'template' you could (or should) setup to give you some specific control points when using the polyline tool (which is I think the best option for you - as others have said) Sometimes its worth setting up this type of geometry even if the first instance takes a bit of your time, so you can use it over and over thereafter. But you seem to be saying that you will create 'by eye'. Kudos (or is this for a model railway)
-
Yes - much better thank you! Pity though - I was hoping you were going to detail something a little like the photos I'd attached. Yes agree - best way workflow-wise. Break-out details on sections or referencing 'standard' details that are then issued separately. After all VW only has a wall style and 'sees' a component called 'bricks' - doesn't have any idea it might include mortar, so can't expect to have enough detail in section - however much detail appears to be shown in elevation by the clever use of textures. Can I add (not a criticism, but offered as help ) Your wall has a 'brick' thickness of 90mm. I realise that's because you wanted to show the section as you've drawn by superimposing the correct size bricks (thus the 90mm is just the extent of the mortar). However, surely this approach will prove dangerous if you start relying on this wall style for setting-out any critical measurements. Personally, I'd stick with the 'correct' thickness (and make any changes required when overdrawing the section) (Just an observation) 20mm recessed joints - a bit risky?

-
Sorry - but can I wind you back to your above OP. I think it would be really helpful for you to explain what you are trying to achieve here, as you're getting some good advice but, reading the thread, I'm not sure we are quite 'there' yet I believe this would be to create a pattern on the face of a brick wall (let me know if I'm wrong), but theres a lot of difference between.... Where its probably best to model the pattern bricks in the chosen geometry, apply texture to match the main body and recess into the body of the wall (so they will show correctly in section/details) to achieve the 20mm you require... ^ I agree. And this can look really good if time spent well. On the other hand - if this is for a 'feature coursing/banding' detail, there may be alternative methods to achieve the result you want. Furthermore, it would be good to know at what detail this will be seen . There's no point in me suggesting spending a morning detailing a complete wall when its barely seen in a visual and the relevance to client invoicing is high on this type of detailing. Hope this helps.

.thumb.jpg.3969f37177d307563791bf552fbc7278.jpg)
-

Looking for applying textures to door parts tutorial
Gadzooks replied to Dubman's topic in Architecture
If you're going to construct your own door leaf(s) - this might be worth a look. Once again, a very useful VW 'how-to'.. Let us know how it goes. -
Double Wide Double HungWindow Sill Offset?
Gadzooks replied to Bruce Kieffer's topic in Architecture
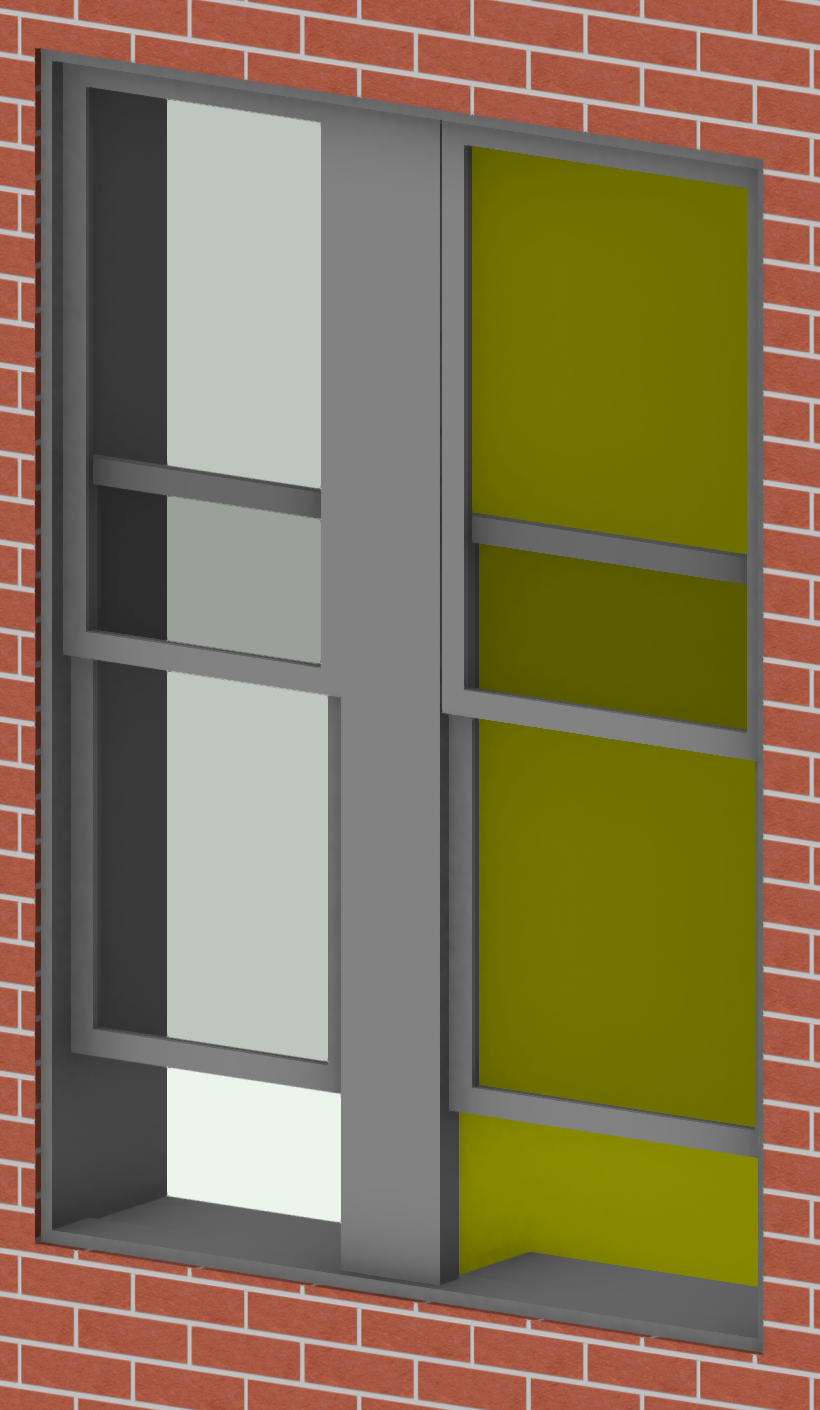
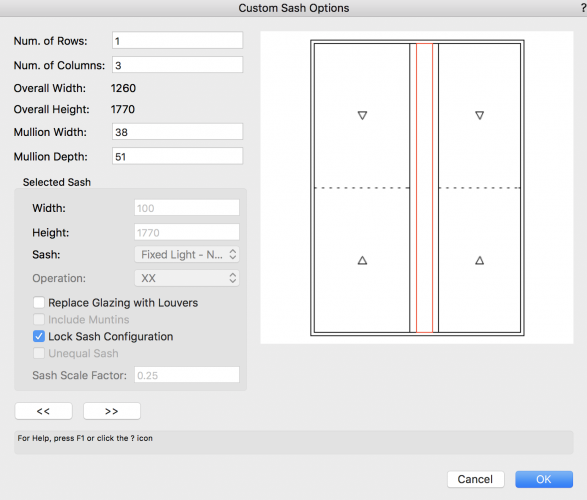
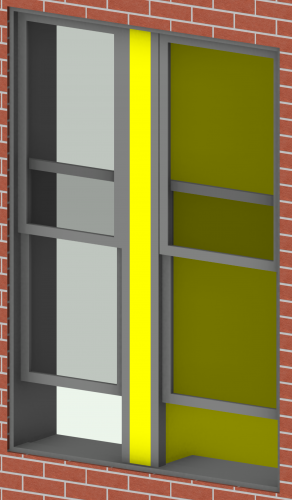
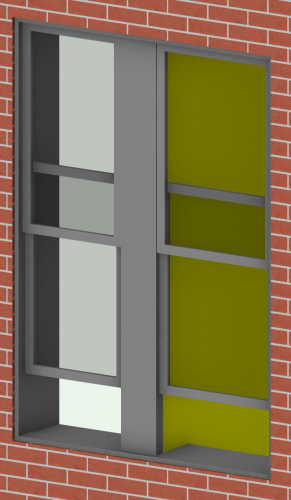
You've chosen to have a twin window (sashes) set-up. Short answer is there's not much control over this element (unless others will correct me) Thats (ok, VectorWorks' interpretation of...) the central running channel/divider between the pair. Just as you would need constructionally. Remember, we're not looking to create joinery workshop accuracy here Bruce! All-in, I think VW offers some useful options with this tool - certainly given the plethora of design options required to suit everyone. It beats constructing specials - although that is your (time consuming) alternative. ******************************** So - what is it you need? If its a more 'chunky' centre member, add another (small as you like) central section to the Custom Sash Options (choosing 3 column in the set-up options)....VW must have at least a +ve dimension inputted and you will bring the two outside sashes together with a (now) double width central member(s). Here you can see (highlighted red) I've created a central sash with 1mm width - and locked it. It will accept a decimal here - but I doubt you'd want/need the accuracy. The 1mm, being barely discernible, will provide a more 'robust' central member to your window design. As soon as you increase much more you will highlight the (now) visible gap between the twin sash set-up. However, this is useful for arrangements where rooms share the sashes and a dividing wall as a 'parting' construction is used. (Local regs allowing!!) Now 100mm centrally, I can provide a parting wall internally. Ive used yellow to to be more visible. All it would need is an additional cover piece between the sashes to suit the external design. I hope this may have provided something useful.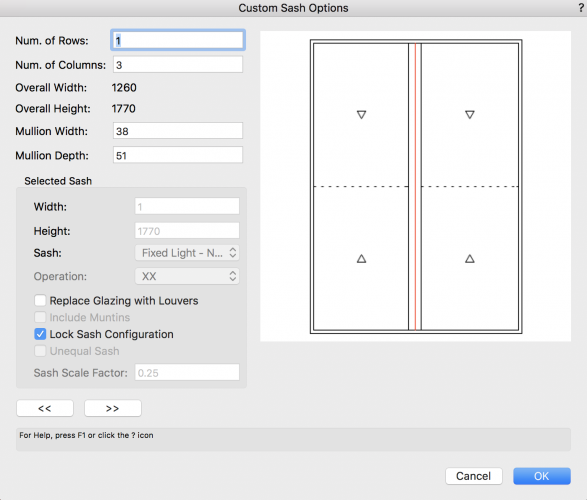

-
Double Wide Double HungWindow Sill Offset?
Gadzooks replied to Bruce Kieffer's topic in Architecture
Hi Bruce - Looks like you are wanting to use the jamb as a 'liner' to finish the interior recess? And I assume you want to move the window (well at least the sashes) toward the exterior of the wall to provide an improved interior recess. If thats all correct - (looking at your posted settings) use a smaller jamb depth (say 10?) that will provide you with 4" you can use to enter in the Plan Wall Offset field to move the window outwards (as @Resuelvectorworkshad suggested). Obviously you can tinker with the dims till you're happy. Your observation (presumably) is that you now have a piece of wall showing to the interior. Additionally choose, Use Jamb Extension. This will extend the jamb back to the full depth of the wall - which is what I assume you're needing. I hope this solves it for you. Let me know if I've misunderstood. -
OIP/Wall/Render/By Component or By Object?
Gadzooks replied to Bruce Kieffer's topic in General Discussion
Well observed Bruce. Not the first time this has been proposed. Sometimes it feels like it'll take a big broom for that clean. (Funny though) othertimes it feels like using VW is like an old pullover - it's got holes and doesn't even fit quite as well as it did (ahem, must start that diet) but it's comfy!! -
Hi @agill4- have you seen this post? I wonder if it might help your struggle with non vertical walls.
- 3 replies
-
- 1
-

-
- angled wall
- slanted wall
- (and 1 more)
-
OK - I'd love to see some of your Tech Tips Now! Nuff said...


-
Select all (this will pick up anything 'stray') Then View -> Zoom -> Fit To Objects Or are you saying this is what you've done and theres nothing there? Have you selected all and then accidently erased? Don't panic - Edit -> Undo (probably only needs a couple of steps back)
-
VW 2017 Snap with Line to 3D Object does not work.
Gadzooks replied to Hans28's question in Troubleshooting
Not attached Hans. Can you post please? -
Hi @ensta (just checking) I assume you realise that your imported dxf will have been given a design layer of its own (ok - doubt it's that, but had to ask) and, unless you've checked import options to suit your expectations, you might have imported a model that has 'disappeared' by being too small or now way off centre with the 'world' you are working with. Also, check the usual - visibilities of classes and layers etc. Its always more complicated though....... Worst case - send the dxf and someone will import it for you and provide the VW file. Your system details and version would be good to help this.
-
how can you show shadows in hidden line rendering as shown below?
Gadzooks replied to mike11968's topic in Architecture
This link doesn't work for me. Is it blocked now? edit... Thought I should explain. The link opens the webpage, but the video doesn't start. edit.. OK - works if I use the Mac rather than the iPad -
I thought it might be helpful to conclude this thread by confirming this (excellent!) tutorial is now published.
-
Hard to understand this approach Jab. Texture creation is a reasonably swift excercise and, although I'm no programmer, I can't see a programming approach would deal very well with the myriad of options VW offers to 'finish' the texture correctly for individual use. Just taking the scenario of a carpet. You have a png of the carpet you want to use, you 'automate' the creation of the texture and you're happy. Next, you want a png of a particularly attractive piece of ceramic tile - your program can't deal with the need for subtle reflection etc.. or at least not without giving you pop-up choices along the way. You've just reinvented the (VW) wheel, as all the options for convincing textures is within the software you have. If, on the other hand, if you'd like help in creating a particular set of textures for a project, then I'm sure there are forum members happy to help - me included.
-
Awesome if this could be a parametric solution Alan. (I should live that long!!) I'm reasonably happy with the framer and just re-do framing areas when theres been a change. I even use the framer to provide my external battens for the required ventilation spacers behind render/boarding etc. and because it sets out from the same origin the battens look good in construction details accurately spaced for fixing through to the 'parent' stud work. The framing details we produce are only ever 'design intent' and most always will be followed by a more rigorously designed set of specific drawings from the chosen subcontractor. Realistically, to have options on the type of 'stud' the framer uses (SFS etc) would be a more likely 'gift' from VW. Hopefully this will be just around the corner.
-
Maybe different on your setup. For me - beach ball...............................force quit. ⛑
-
I think I would agree. I obviously don't know the detail of your work and hence the workflow you've adopted, but it seems to me that you've chosen to move away from one of the fastest ways to drop doors and windows into a layout. Try using the door tool which will allow the 'flip' as a second action - This linked action is so much faster than the drag of clicking in the OIP (which was obviously the reason for your OP) Skipping between door types certainly lengthens the process - this may have been the reason you felt the tool was a slow option and you developed the 'duplicate and paste' method. I suggest that you choose doors one at a time and then move around the layout to populate all instances. (There will always be some missed, but to get the bulk onto the layout really helps). All the best.
-
Does this help?
-
On opening, this file is reported as corrupt by VW and I had to force quit. - Thanks for that. BIN IT
-
Doh - Just re-read your IP and you said that from the off. Sorry. Hope they sort you soon then.
-
HTH @Orme- but I can see its a PITA that Epson are so slow on this issue. I'm not fully clued up on any work around for this (by now you're probably well read on the subject so you'll know more than me!), but would printing to a 'generic' printer as a pdf give you the ability to then print to the Epson? Or, at least, be able to print from another PC/Mac without the issue


.jpg.46f7064f18a7ff2c1aae4a6d0f84f560.jpg)