


Tamsin Slatter
-
Posts
1,890 -
Joined
-
Last visited
Content Type
Profiles
Forums
Events
Articles
Marionette
Store
Everything posted by Tamsin Slatter
-
I'm a little puzzled why you have existing and proposed terrain on separate layers. A single site model can display existing and proposed. You apply site modifiers to the existing site, to create the proposed site. But Vectorworks keeps track of both, so you can calculate cut and fill. The Site Model Section command can then be used to create an annotation of the surface of both sites, together, with levels annotated if you wish. There's a learning curve, but plenty of information to help in Vectorworks University: https://university.vectorworks.net/course/index.php?mycourses=0&search=Vectorworks-Landmark&tagfilter[category]=0&tagfilter[type]=0&tagfilter[difficulty]=0&categorysort=default&mycourses=0&search=terrain And here's an overview of the process: https://app-help.vectorworks.net/2021/eng/index.htm#t=VW2021_Guide%2FSiteModel1%2FDesigning_landscapes.htm%23TOC_Concept_Sitework_overviewbc-2&rhsearch=terrain&rhsyns= &rhtocid=_9_0_0
- 10 replies
-
- 2
-

-
- vectorworks 2020
- sitemodel
- (and 1 more)
-

Creating my own user library of plant records
Tamsin Slatter replied to justinekwood's question in Troubleshooting
Hi Justine It's great that you already have the file set up with all your fave plants. It will be very easy to put them in a place where the Plant tool can always see them. And, if you follow this instruction, it will be migrated automatically when you next upgrade, saving the headache of piecing it all back together. I see you are using Vectorworks on a Mac, so: Open Vectorworks and go to the Vectorworks > Vectorworks Preferences and click the User Folders tab. Click Reveal in Finder. This will take you to the usually hidden location, where all the customisations are stored for Vectorworks. There is a folder for each version of Vectorworks that's installed on the computer. Open the relevant folder and then navigate to: Libraries/Object Styles/Plant Drag the file that contains your plants into this folder. Now, in Vectorworks, on the Resource Manager, click the cog icon and choose Refresh Libraries. Now, your plants will show up within the Plant or Landscape Area tool, regardless of which file you have open. In the future, when you upgrade, the Migration Manager will update this file and move the new User Folder for the new version. When you create new plants in any future project, simply right-click on them and choose Export Plant. Choose to put the plant in the same file and then your library will continue to grow organically, and be available all the time. -
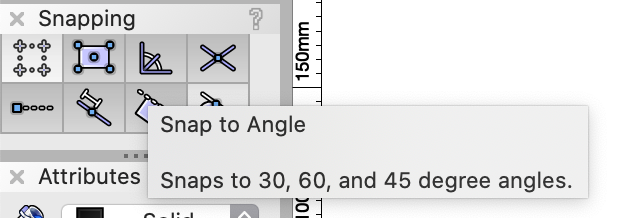
I think you may have turned off Snap to Angle on the Snapping palette. It's a toggle, so if you click it again, it will turn on.
-
Hi Louisa Tools > Reports > Create Report Then choose Preformatted Reports and you'll find all the standard reports there. If you had others that you had created, you'll need to find the files they were in, update them to 2021, and add them as Favourites.
-
You beat me to it @kevin allen. Exactly that!
-
The tag settings are determined by what is active in the Tool Preferences at the time you insert the plants or landscape area. Tool Preferences can be saved within the file template, so that they are always how you want them. Start a new file with your fave template, set the Tool Preferences how you want them, with class and pointer to Text Style. Then, File > Save as Template. Then, each you file you create from that template will behave as you desire!
-
Using Plant Report to Create Basic Planting Key
Tamsin Slatter replied to justinekwood's question in Troubleshooting
Here's a tiny example which I hope will help. Excuse the confusing file name. It was used to illustrate something in another thread earlier today, so I just adapted it. Plant Tag Text Example.vwx -
I've just tested this and had no problem getting it to work. First step is to create the text style (Text > Format Text menu). Then, edit the class you wish to use for the tags (I used Plants-Component-Tags), and assign the text style to the class. Then, in either Landscape Area Tool Preference, or Plant Tool Preferences, choose the Tag style you want, and ensure that the tags will be placed in the class you edited above. The text style is used for both sets of tags. I've attached a small example, so you can examine the settings of both my plant and my landscape area. Plant Tag Text Example.vwx
-
Using Plant Report to Create Basic Planting Key
Tamsin Slatter replied to justinekwood's question in Troubleshooting
As Tom described about - summarise items on the Latin Name column will give you a summary of all plants with a specific name. -
Put a "Scale bar tool" inside a "title block border tool"
Tamsin Slatter replied to Edgar RAMEL's topic in General Discussion
The North Point in the TBB can be linked to the Heliodon, which can be linked to the GIS settings in the file. OR, it can just be a graphic that you can rotate as you wish. Agreed - the scale should not be on the Title Block as it is relevant to different viewports which could be at different scales. In my view, it offers too much scope for misunderstanding and errors to be made when transitioning the design to the real world. -
Using Plant Report to Create Basic Planting Key
Tamsin Slatter replied to justinekwood's question in Troubleshooting
I would use the standard Plant List Simple with Images, that comes as a pre-formatted report in Landmark. Then edit to remove the columns you don't want (just right-click on the column headings you don't want and choose to delete the column). -
Do you mean the retaining wall site modifier? It's not my decision of course, but I can certainly ask.
-
Also, another fab feature of the Landscape Area's slope awareness is that it calculates the number of plants based on the actual surface area of the slope. Not the plan area.
-
Is there more than one wall? The objects are clearly inserted in a wall, but I'm wondering if there are two walls in the same place. So the wall WITHOUT the windows and door will run straight through the windows and doors and look like this in OpenGL.
- 1 reply
-
- 2
-
-
@Katarina Ollikainen Also might have some comments as I know the development of the Plant tool is close to her heart...
-
Plant style with various container sizes management
Tamsin Slatter replied to bob cleaver's topic in Site Design
Hi Bob One style should be sufficient. You can set a default container size in the Scheduled Size field. Then, when you come to use the Plant, in the Plant Tool Preferences, click the Advanced Settings button and click Schedule under the placement options. Here, you can choose if you want to use the Default option that you saved in the Plant Style, or override it with a Custom Scheduled Size: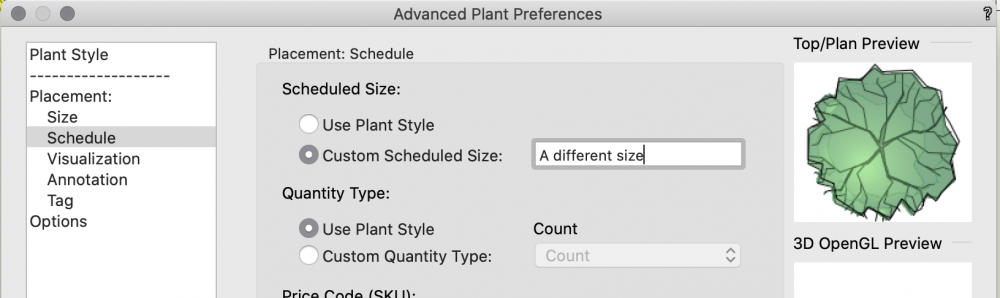
-
Also - check the distance of the geometry from the internal origin. If you have geometry a long way from the internal origin, that can cause problems.
-
Yes, you've probably got Mass Plants on by default in the Plant Tool Preferences. This means it has to calculate a random edge to the groups of plants, as you draw them. Far better to turn this off in the Tool Preferences. You can always turn it on later on the Object Info palette when you are happy with where the plants are positioned, to get the grouped look. (I have to admit that when I first typed that, it said "groped look". Not really what you're looking for here. 😊)
-
landscape area not aligning on site model surface
Tamsin Slatter replied to tristanwel21's question in Troubleshooting
Try Tools > Utilities > Reset All Plug-ins. -
Show Hide Grid Lines especially landmark
Tamsin Slatter replied to Landartma's question in Troubleshooting
It's a useful visual aid for scale though - especially on a screen. -
Show Hide Grid Lines especially landmark
Tamsin Slatter replied to Landartma's question in Troubleshooting
Agreed - I think a 1" grid is rather small for landscape design. There are two grids at play here. One is a visual grid to use as a design aid. I'm in the UK, and might set this to 1m typically, for areas around buildings. But larger if working on larger spaces. The other grid (the snap grid) is invisible, but forces anything you draw to snap to that grid. I usually work with that turned off anyway, as I prefer to draw to real world known measurements for accuracy. The Snap Grid, if it's set too large, can give you restrictions. So, if it's set to 1 foot for example, it means anything you draw will have to snap to the nearest grid point. This could be restrictive. So, no right or wrong answer here. Just flexible tools to adjust according to the needs of the site and your design process. -
The short answer is no - the Stipple has to be drawn. The reason is that it's a parametric object, with parameters that control the randomness, the size, percentage mix and whether it should fade from the edge. So, it has to be applied to a defined shape. You can select a Stipple as a 2D attribute on a Hardscape. Stipples can slow things down a little. You might want to consider making/using Tile fills instead to get the Stipple effect.
-
Thanks for clarifying @Christiaan
-
@ChristiaanGood question. I'm not sure...
-
@Michal Zarzecki Have you checked that your graphics card settings have to set themselves back to AutoSelect? I know we looked at this before when we visited your office (in that distant time when we were allowed out of the house!) And that the card is configured to recognise Vectorworks? The UK support team can help you with this if you need it. I created a support case and they will be in touch tomorrow.

