Gadzooks
-
Posts
509 -
Joined
-
Last visited
Content Type
Profiles
Forums
Events
Articles
Marionette
Store
Everything posted by Gadzooks
-
So - to reply more helpfully, use @Diego-Resuelvectorworks advice and create a roof (all sides pitched) rather than roof faces. Set your overhanging component as before (overhangs all walls) and then change the roof to double gable. The overhanging components will remain as set and the roof will stay unchanged at ridge level, which is what you required.
- 8 replies
-
- 1
-

-
- roof
- components
- (and 2 more)
-
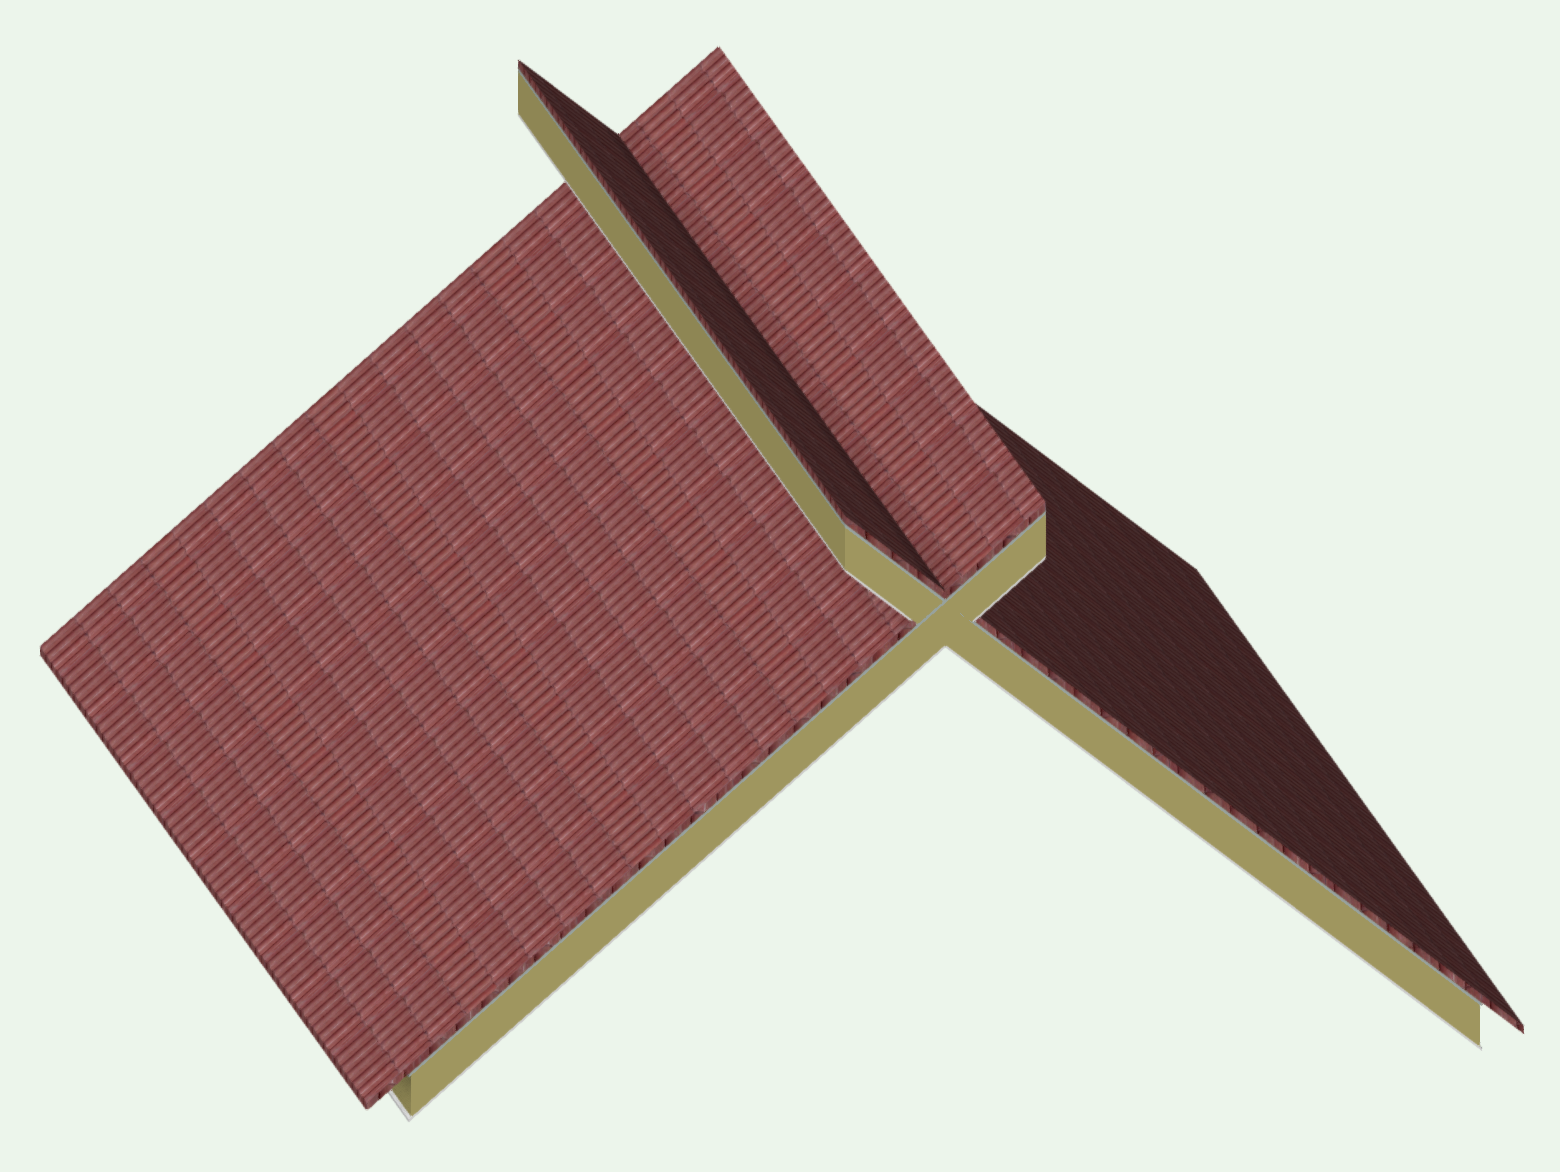
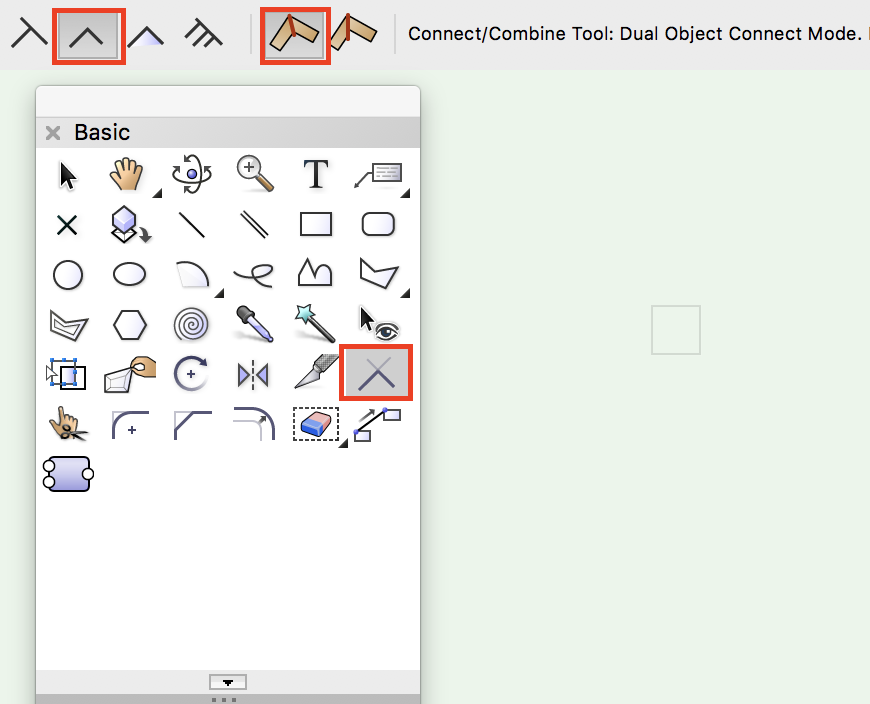
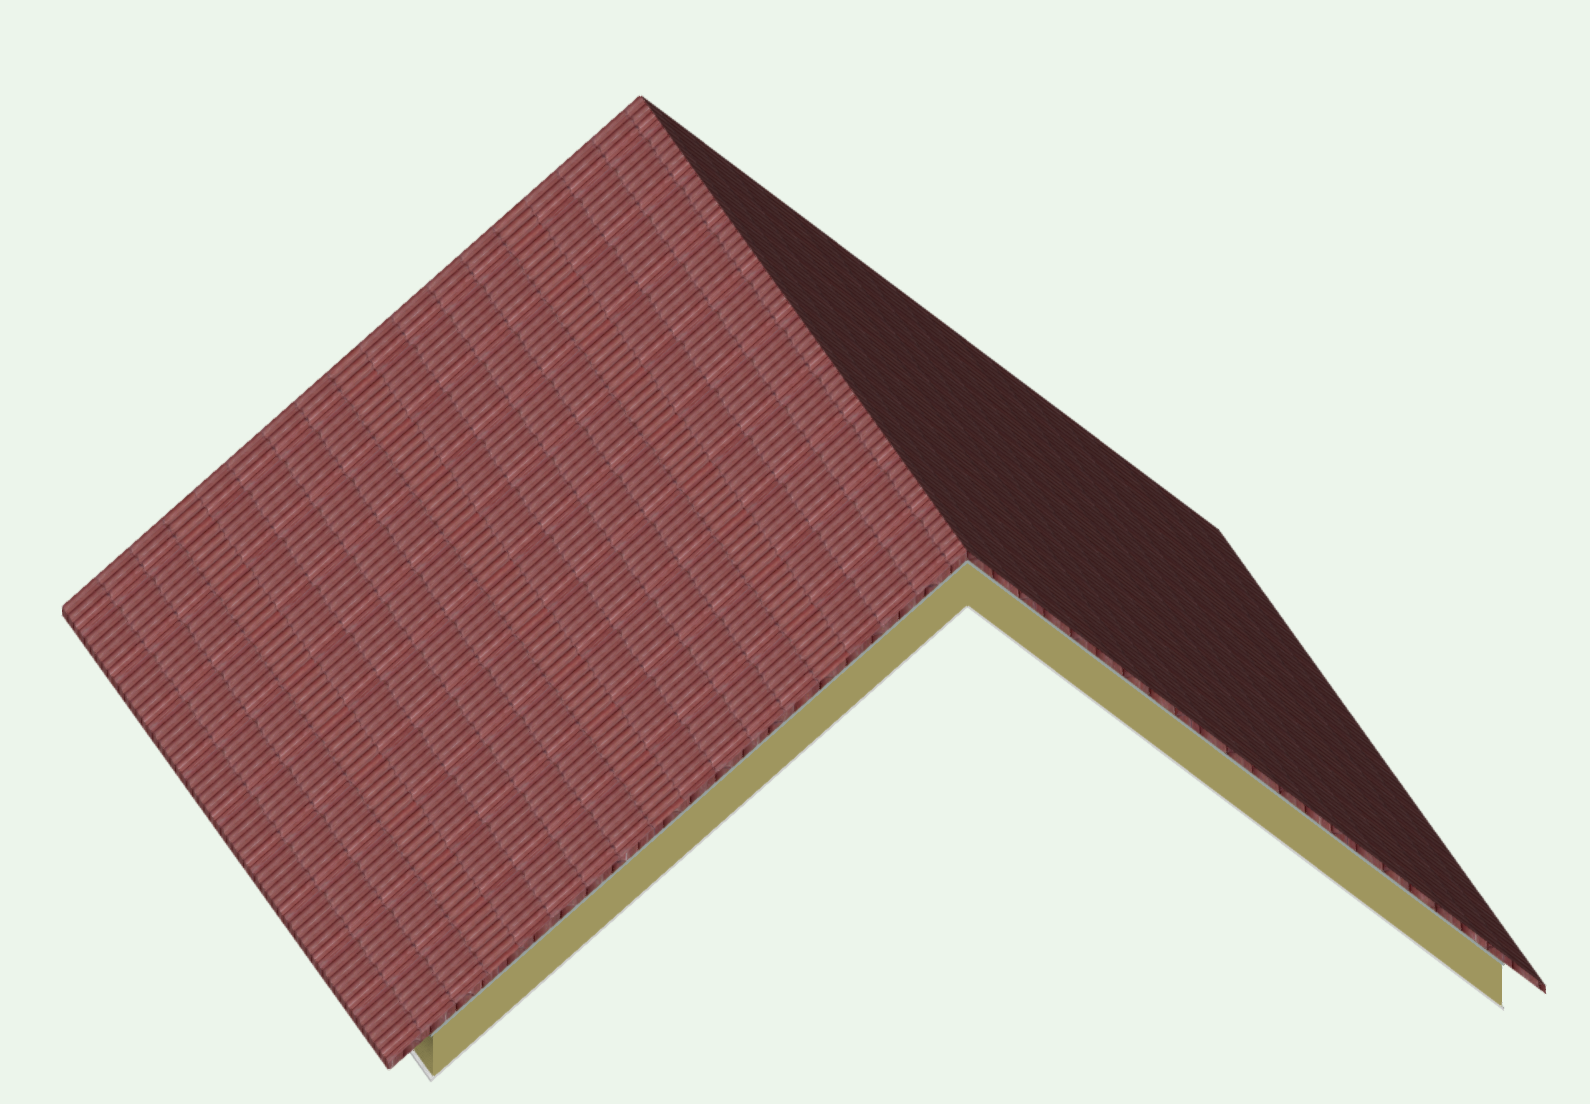
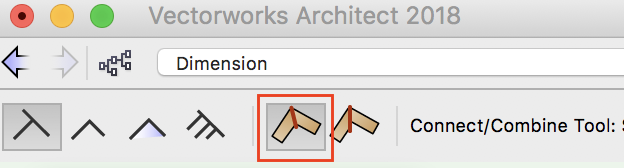
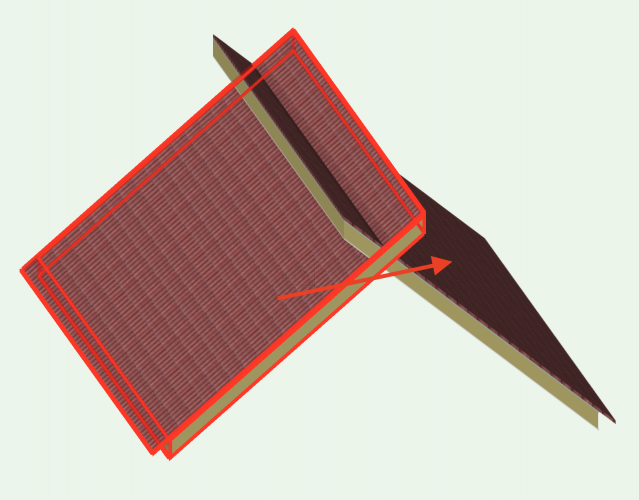
@mike11968 - there are a few issues with your roof construction here, but I'm sticking to just the top junction issue, you need the Connect/Combine tool Starting with a 'faulty' junction.. Use the tool and the appropriate options for the tool (have a play around with the options to get acquainted)... Then, highlight one section of roof and drag to highlight the opposing section to join the two.. to provide the fix you need... You can carry out this operation from any viewing position that you can see both pieces conveniently. I assume this is what you need. -------EDIT Sorry, (reading your OP more carefully!!) I have misunderstood your problem - you are talking about just top component. I'm guessing something said 'don't go there again' after an earlier similar question..... You'll see some of the issues.


-
Errr.....just double clicked it. 🤗 Sorry, no complicated or special technique, so I can't think you were doing anything wrong. HTH.
-
Good call. Worth a try for future reference.
-
Opens for me in 2017 but reports created with an older version Also opens in 2018 Saved as v2018 - try opening CR9966 MERCE 2017 Mº CRISTINA 270617 v2018.vwx
-
Excellent plug Nicolas. 😍
-
HTH (maybe update your signature)
-
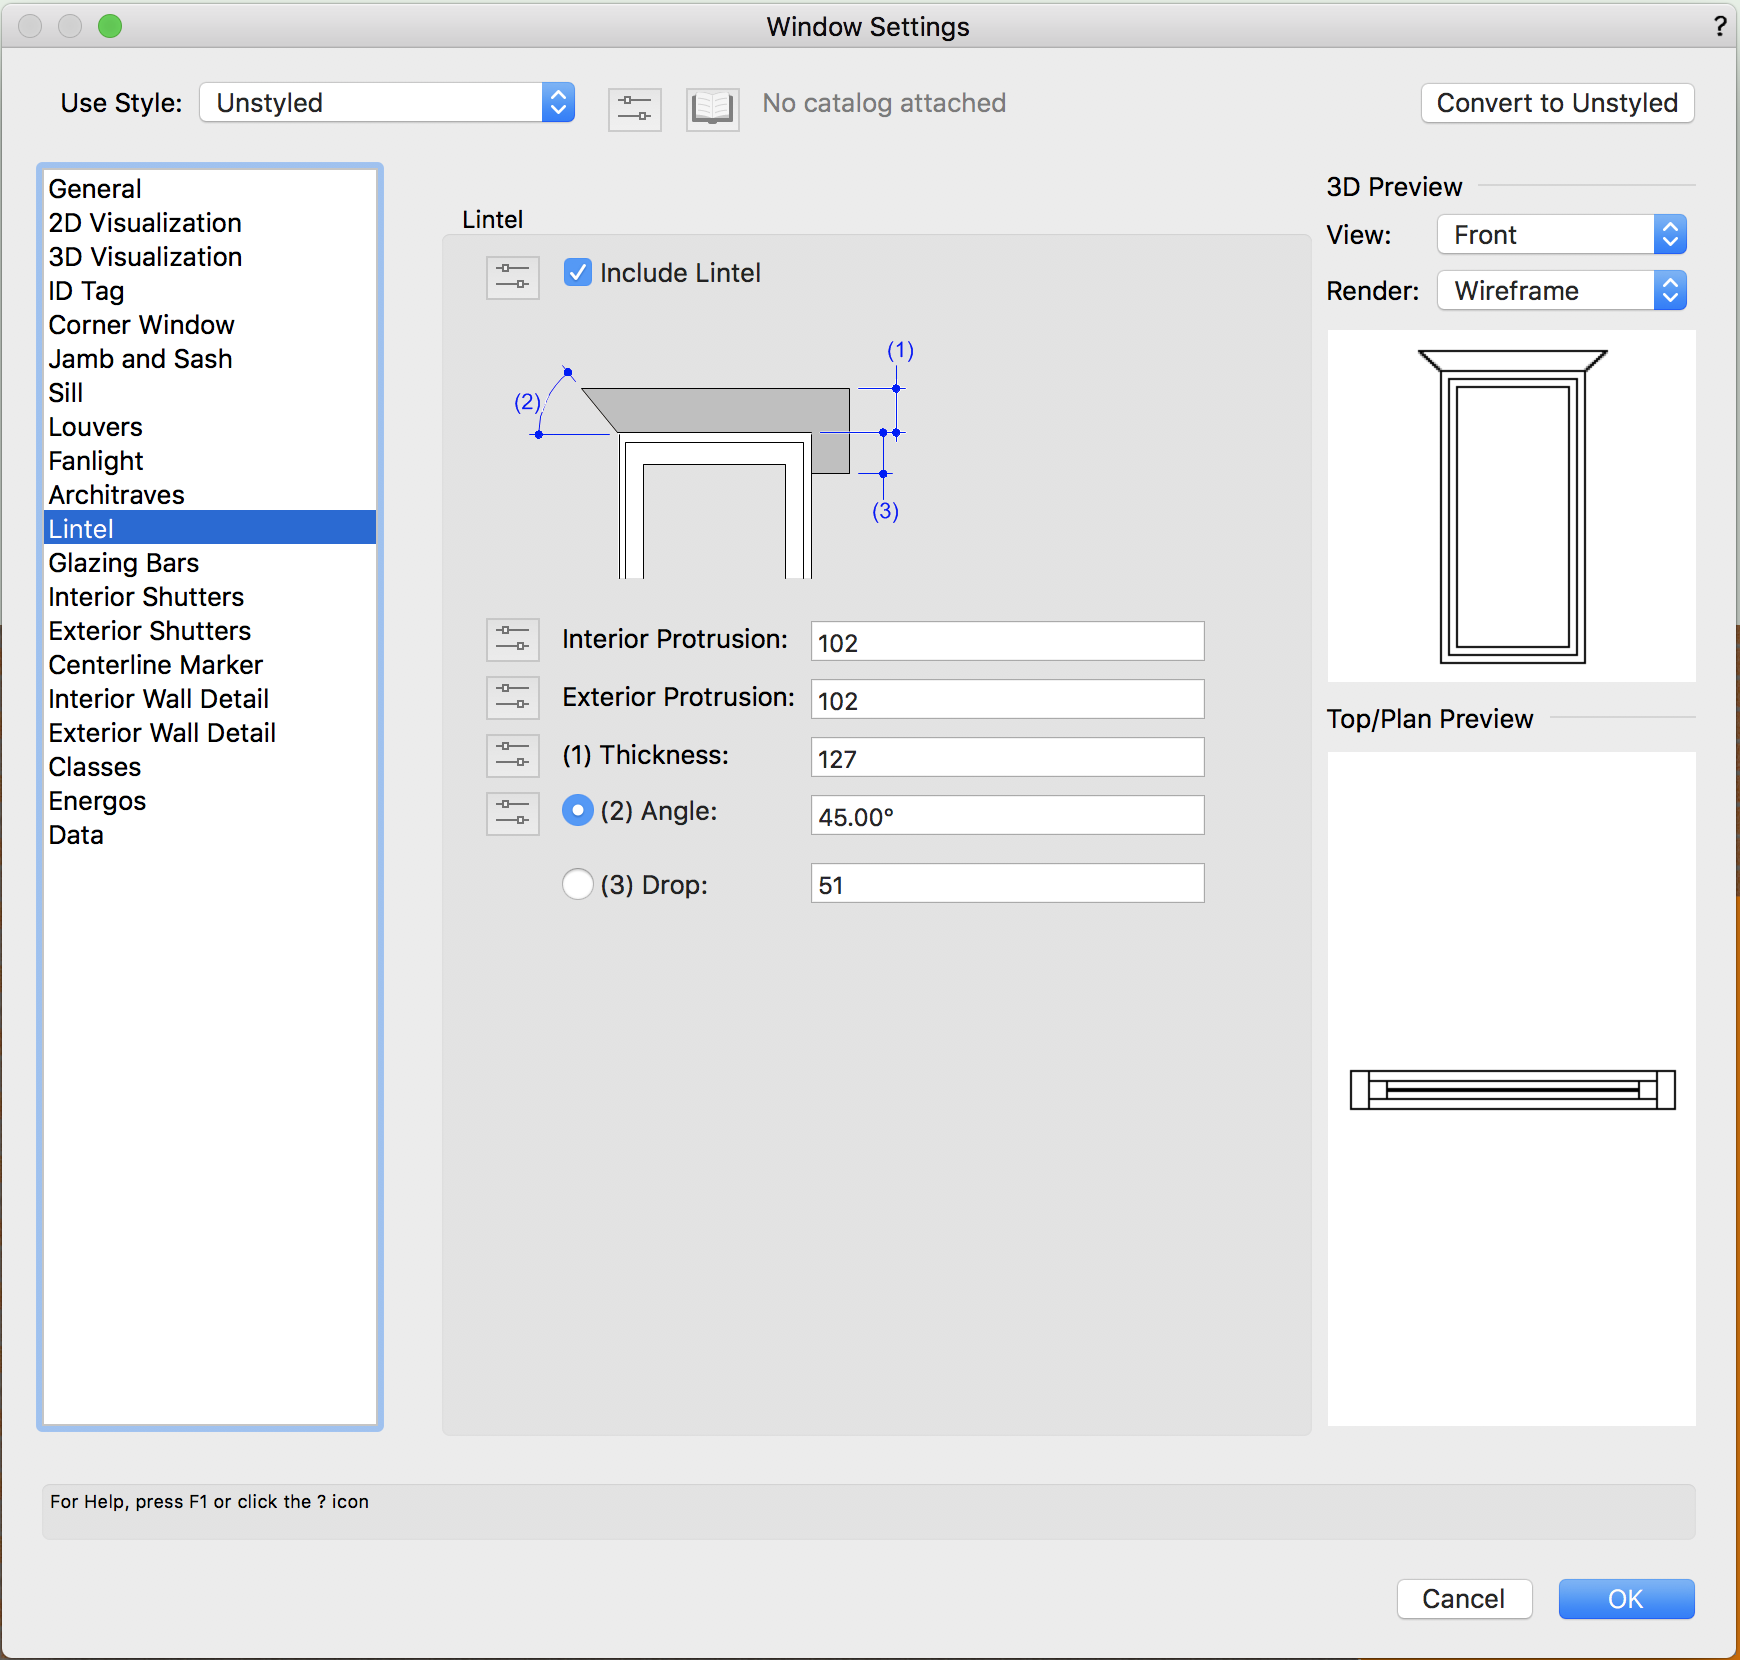
Hi @ccw - are you wanting more than the lintel settings offer? ---------------------------EDIT Oh - just seen you appear to be on 2015 - not available?

-

Worksheet: Show zero values as empty
Gadzooks replied to Thomas Wagensommerer's question in Troubleshooting
Oh - sorry Tim - forgot it was an older file version you'd posted. Didn't really take that into account. Glad it moved you on a bit. VW worksheets should come with 'user caution'. Half the time you know what you want and what result you're expecting in cells, but you have to slog away at different options to reach the goal. I've got my sheets set up for specific tasks and I don't usually create or modify so much, so it's just as hard for me! Whereas there are super talented people on the forum that could calculate moon landings 🤓 -
Worksheet: Show zero values as empty
Gadzooks replied to Thomas Wagensommerer's question in Troubleshooting
Try this..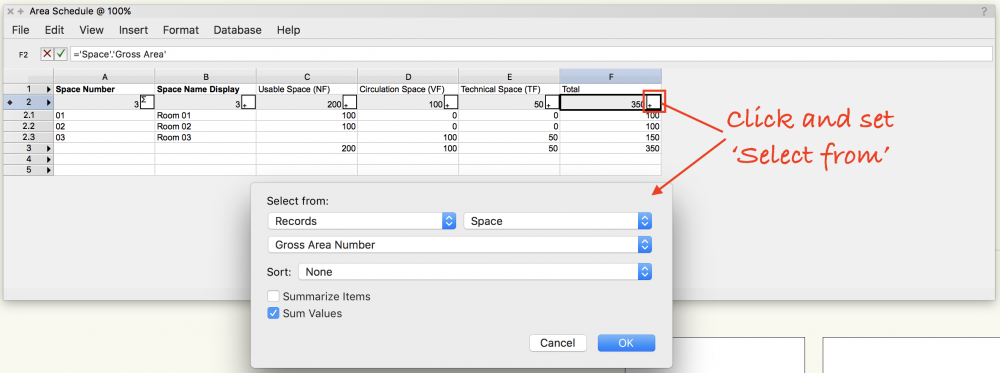
-
Worksheet: Show zero values as empty
Gadzooks replied to Thomas Wagensommerer's question in Troubleshooting
Mmmmm......(scratching head) Your worksheet has a choice NF, VF or TF to display areas with certain criteria. So it's a straight choice and the 'total' (by way of only one column will ever carry a figure) is already displayed. And therefore to SUM them would just replicate the figure. Although I do get your explaination that this is a question about "what if I wanted to...." (with a different sheet) I think not. In my example, the sum of 'component 1' is delivered at the bottom of the sheet. A straight column SUM, as explained above, and already in use on your worksheet to deliver the total NF, VF or TF of the Spaces it can currently 'see'. I think perhaps you accidentally swapped what you meant to say? (Just as an exercise) I can provide a TOTAL to the last column as this... (Reduced the sheet to just three components) I've highlighted the required cell boxed red. Works as an excercise, but doesn't offer anything useful to the Construction process. Let me know if I'm on the right path. If you want to further this, I think it would help to provide a more specific example sheet where totals both to rows and columns appear necessary, as at the moment, I can't see the reason with the sheets we are both using.
-
Worksheet: Show zero values as empty
Gadzooks replied to Thomas Wagensommerer's question in Troubleshooting
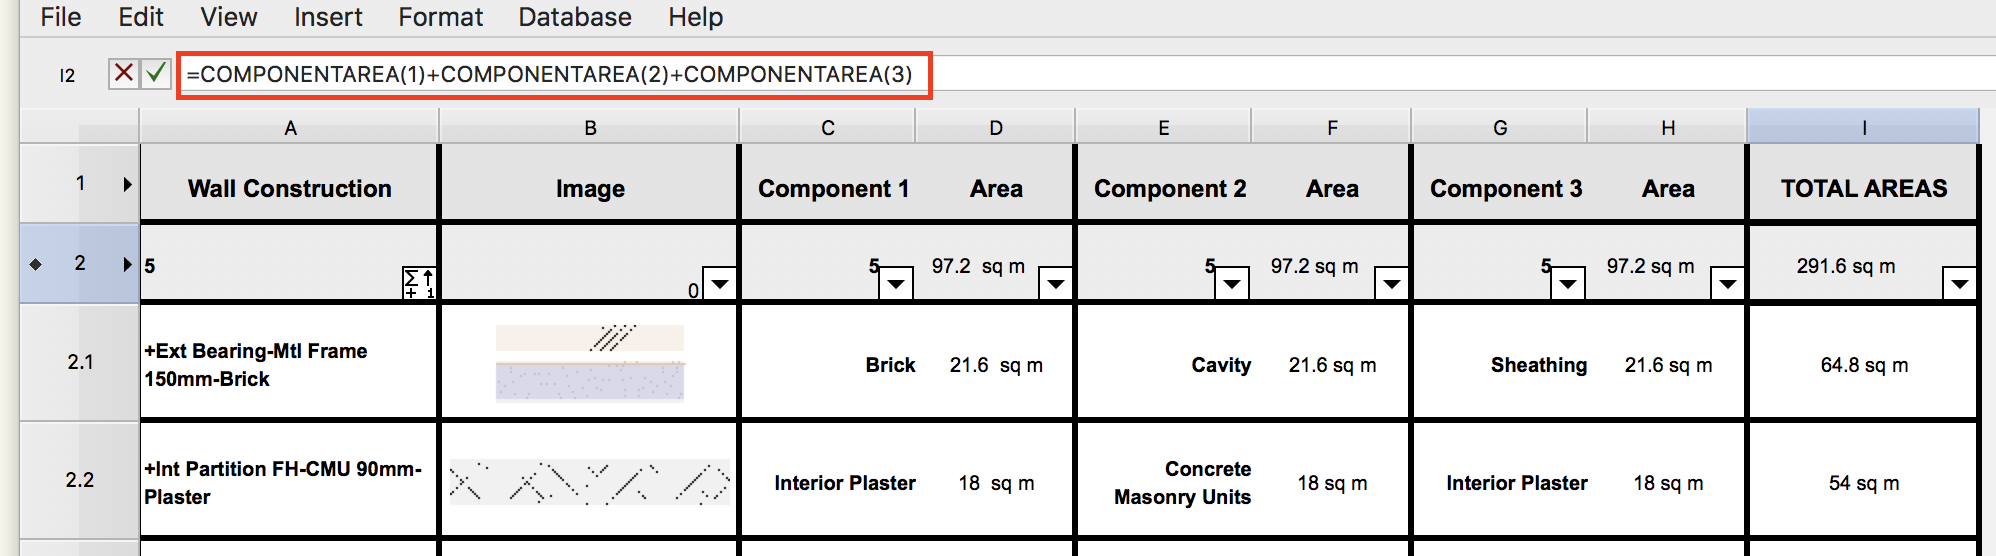
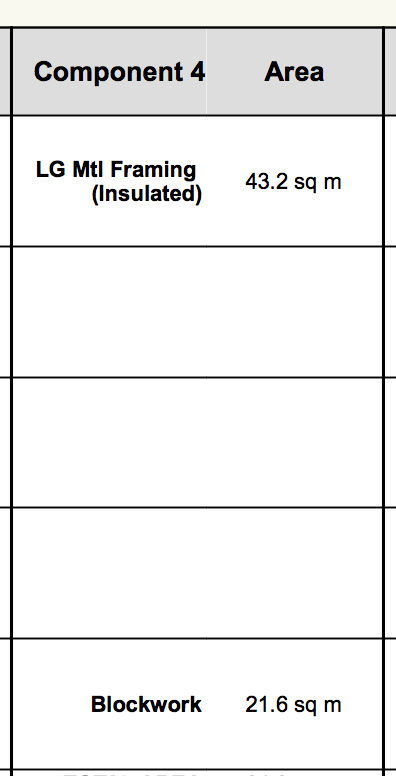
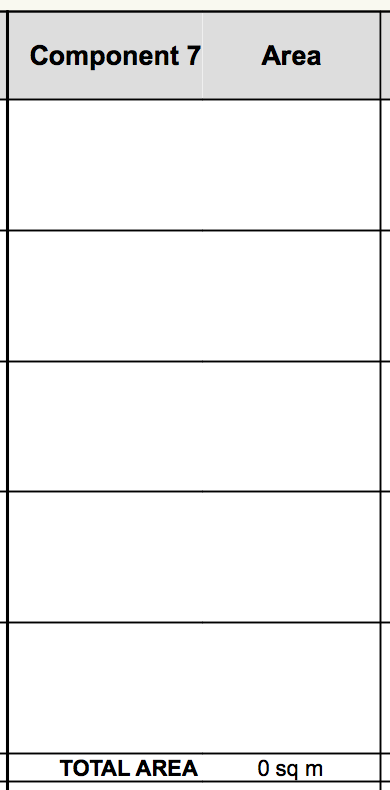
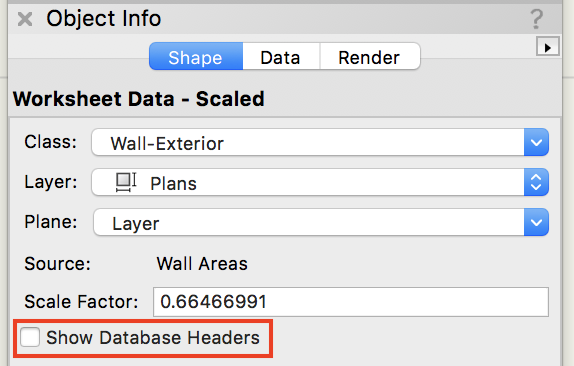
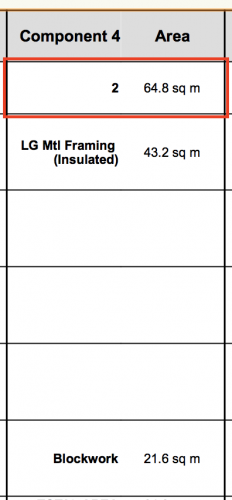
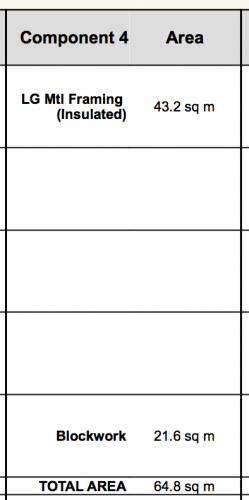
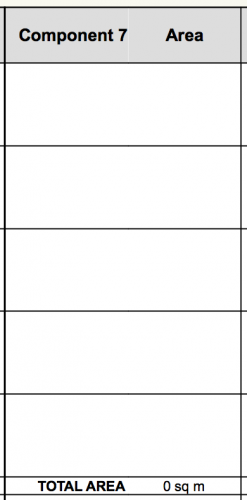
Hi @Tim Harland, if I understand your question correctly, you want to SUM the column (parts of which would be 0 (zeros) but having used the formula to be 'tidy' are now showing as blanks) You can still 'use' the hidden zeros. Using the sheet I have for wall styles (used in the above thread) and listing the components... You see the sheet finds 5 walls in the drawing and shows only two have a 'component 4' (the blanks are provided by the formula discussed in the above thread) Your question (I believe) asks for the SUM of this column (containing blanks) If you choose to see Database Headers... It will reveal the totals for you at the source cell. (also seen when you are creating the database headers) So... It shows a total of 2 components and reveals the total area. This may have answered your question, but if you want to 'pretty' the column up, stop showing database headers and place a spreadsheet formula below the database in each column. So... (Ive placed TOTAL AREA in the adjacent cell - this is just plain text) The cell contains SUM with the appropriate reference cell... or just '= J2' if you have no requirement to sum other cells Yes - summing different component areas is not a 'normal' calc, but this worksheet was to hand and thread specific having used it above. I believe you may want to provide a solution more like Thomas' example? Hope this helps. ----------------------------------- EDIT Just thought I should add. Once you have this working correctly (math wise), you will want to create a formula to 'tidy' this cell as well. For example..My cells below (still for the same 5 wall styles) for Component 7 are blank, but using the straight formula takes you back to an untidy sheet display... You will need to use a more 'intelligent' formula to provide clean blank cells - I'll leave that to you as you have all the information you need 😎

-
Creating a Symbol with a Roof Face Creates Phantom 2D Lines in Top Plan
Gadzooks replied to cberg's question in Troubleshooting
HTH (helped a lot that you posted a file) -
Creating a Symbol with a Roof Face Creates Phantom 2D Lines in Top Plan
Gadzooks replied to cberg's question in Troubleshooting
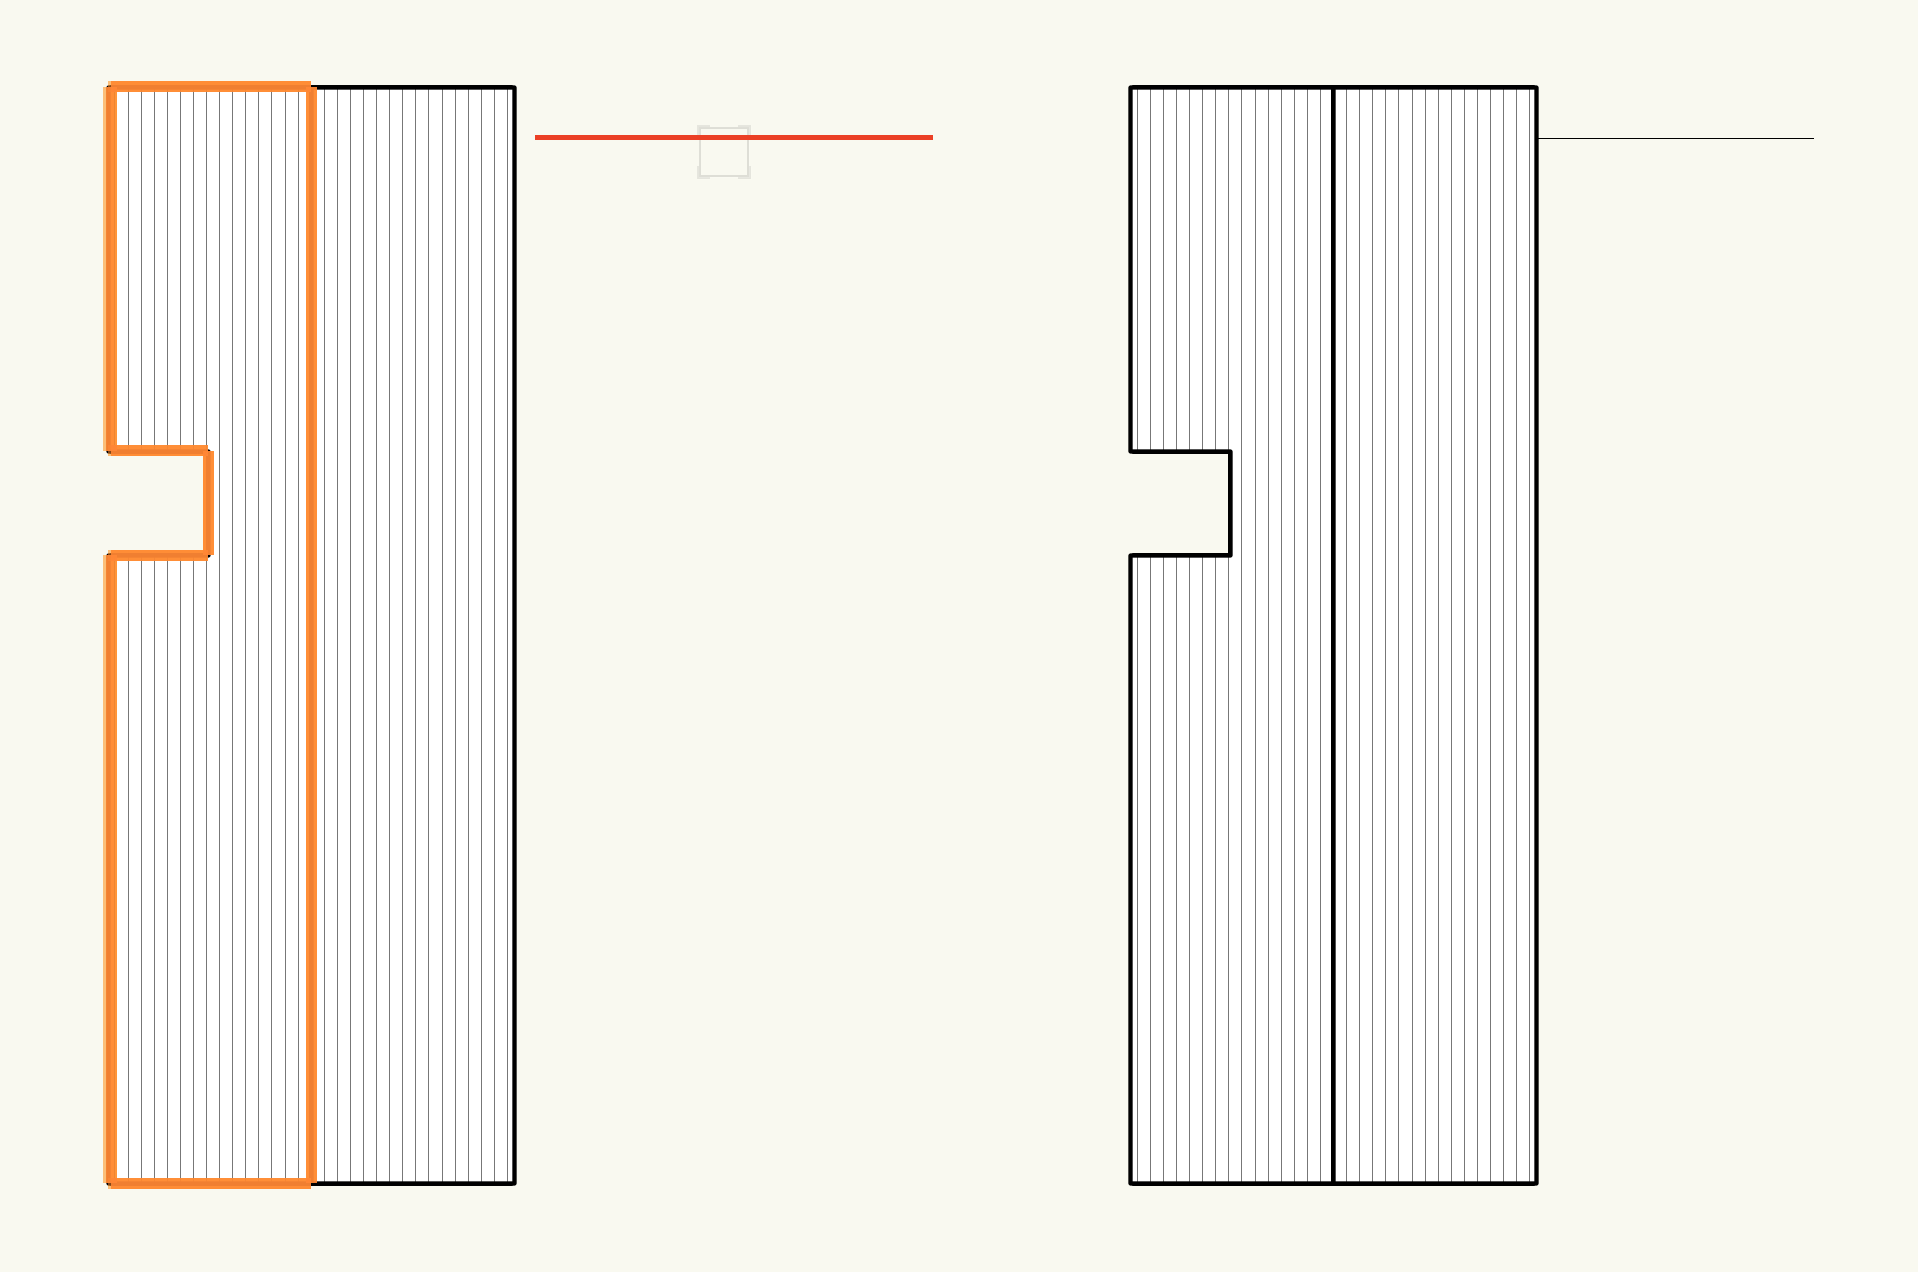
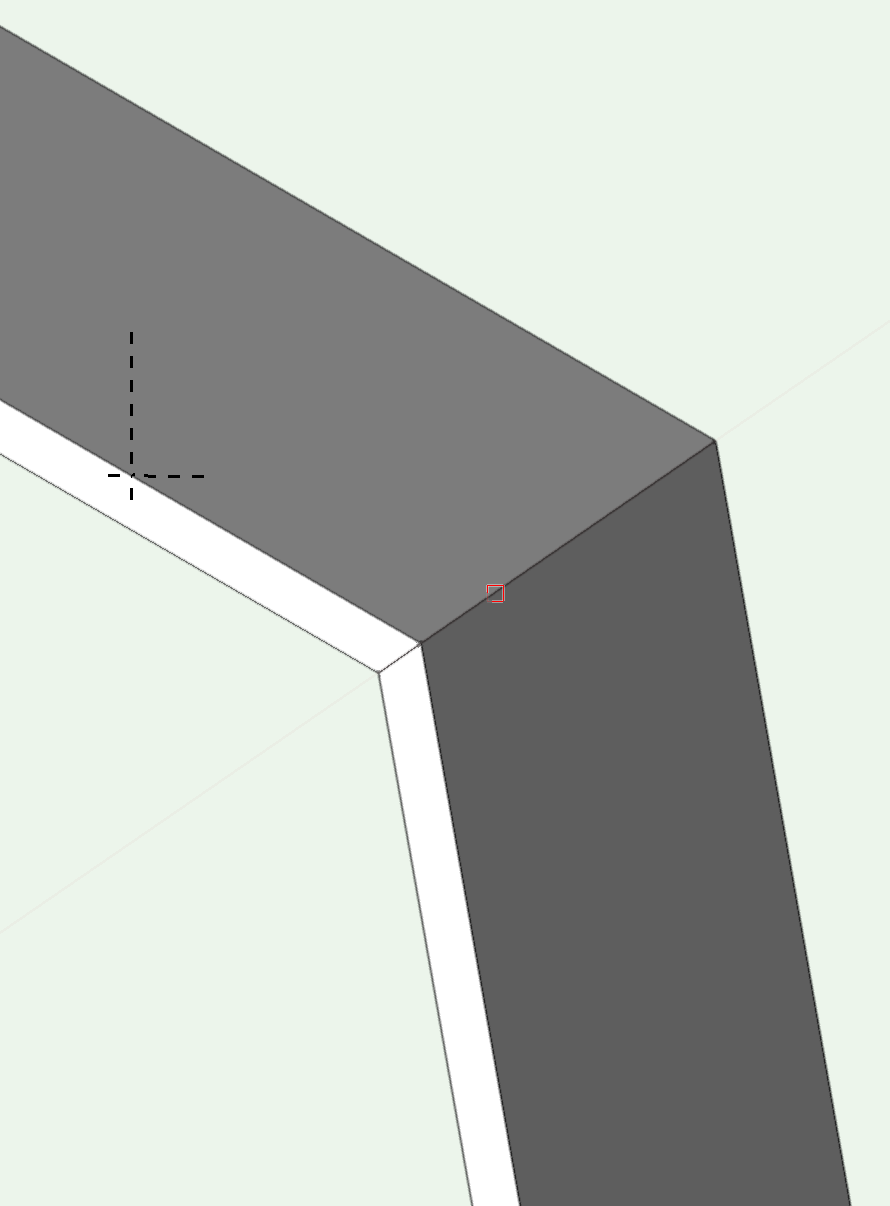
In the example you've posted there are two lines one showing and (the same one) hidden. Moving your cursor over the hidden line (in red) shows the line is part of the left hand roof face. Double clicking the roof face (to edit face) will show the line. Omit the line and exit roof face. To carry out the same operation on your symbol (the right hand roof) double click the (now whole) roof. Choose edit 2d component (as this is a symbol), then work on the left hand roof face in exactly the same way. Only you will know why there's a stray line - earlier construction alignment setting to wall got left in by mistake? Hope this helps.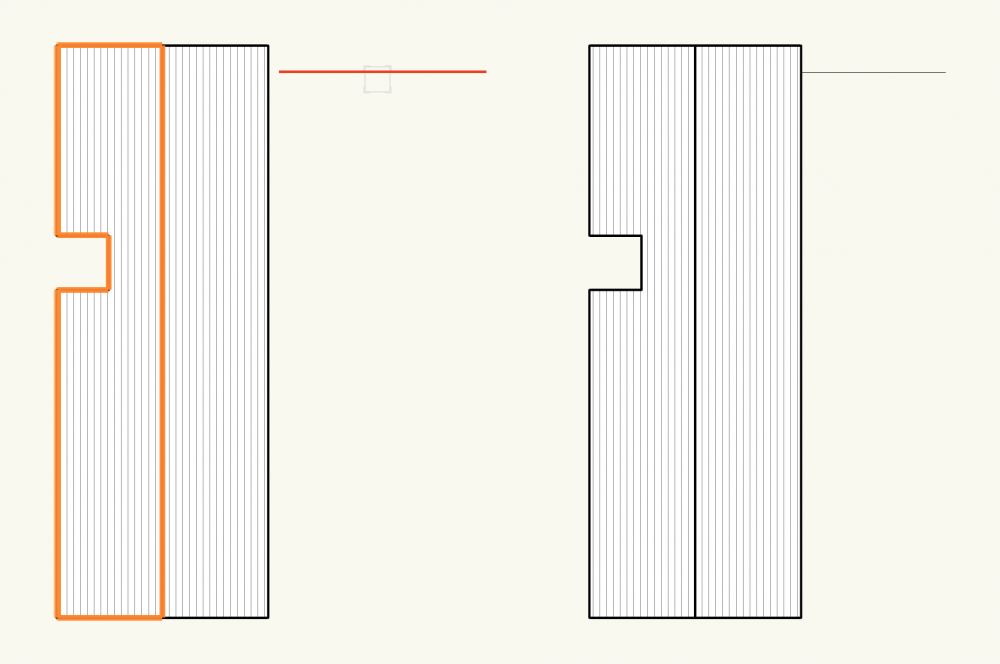

-
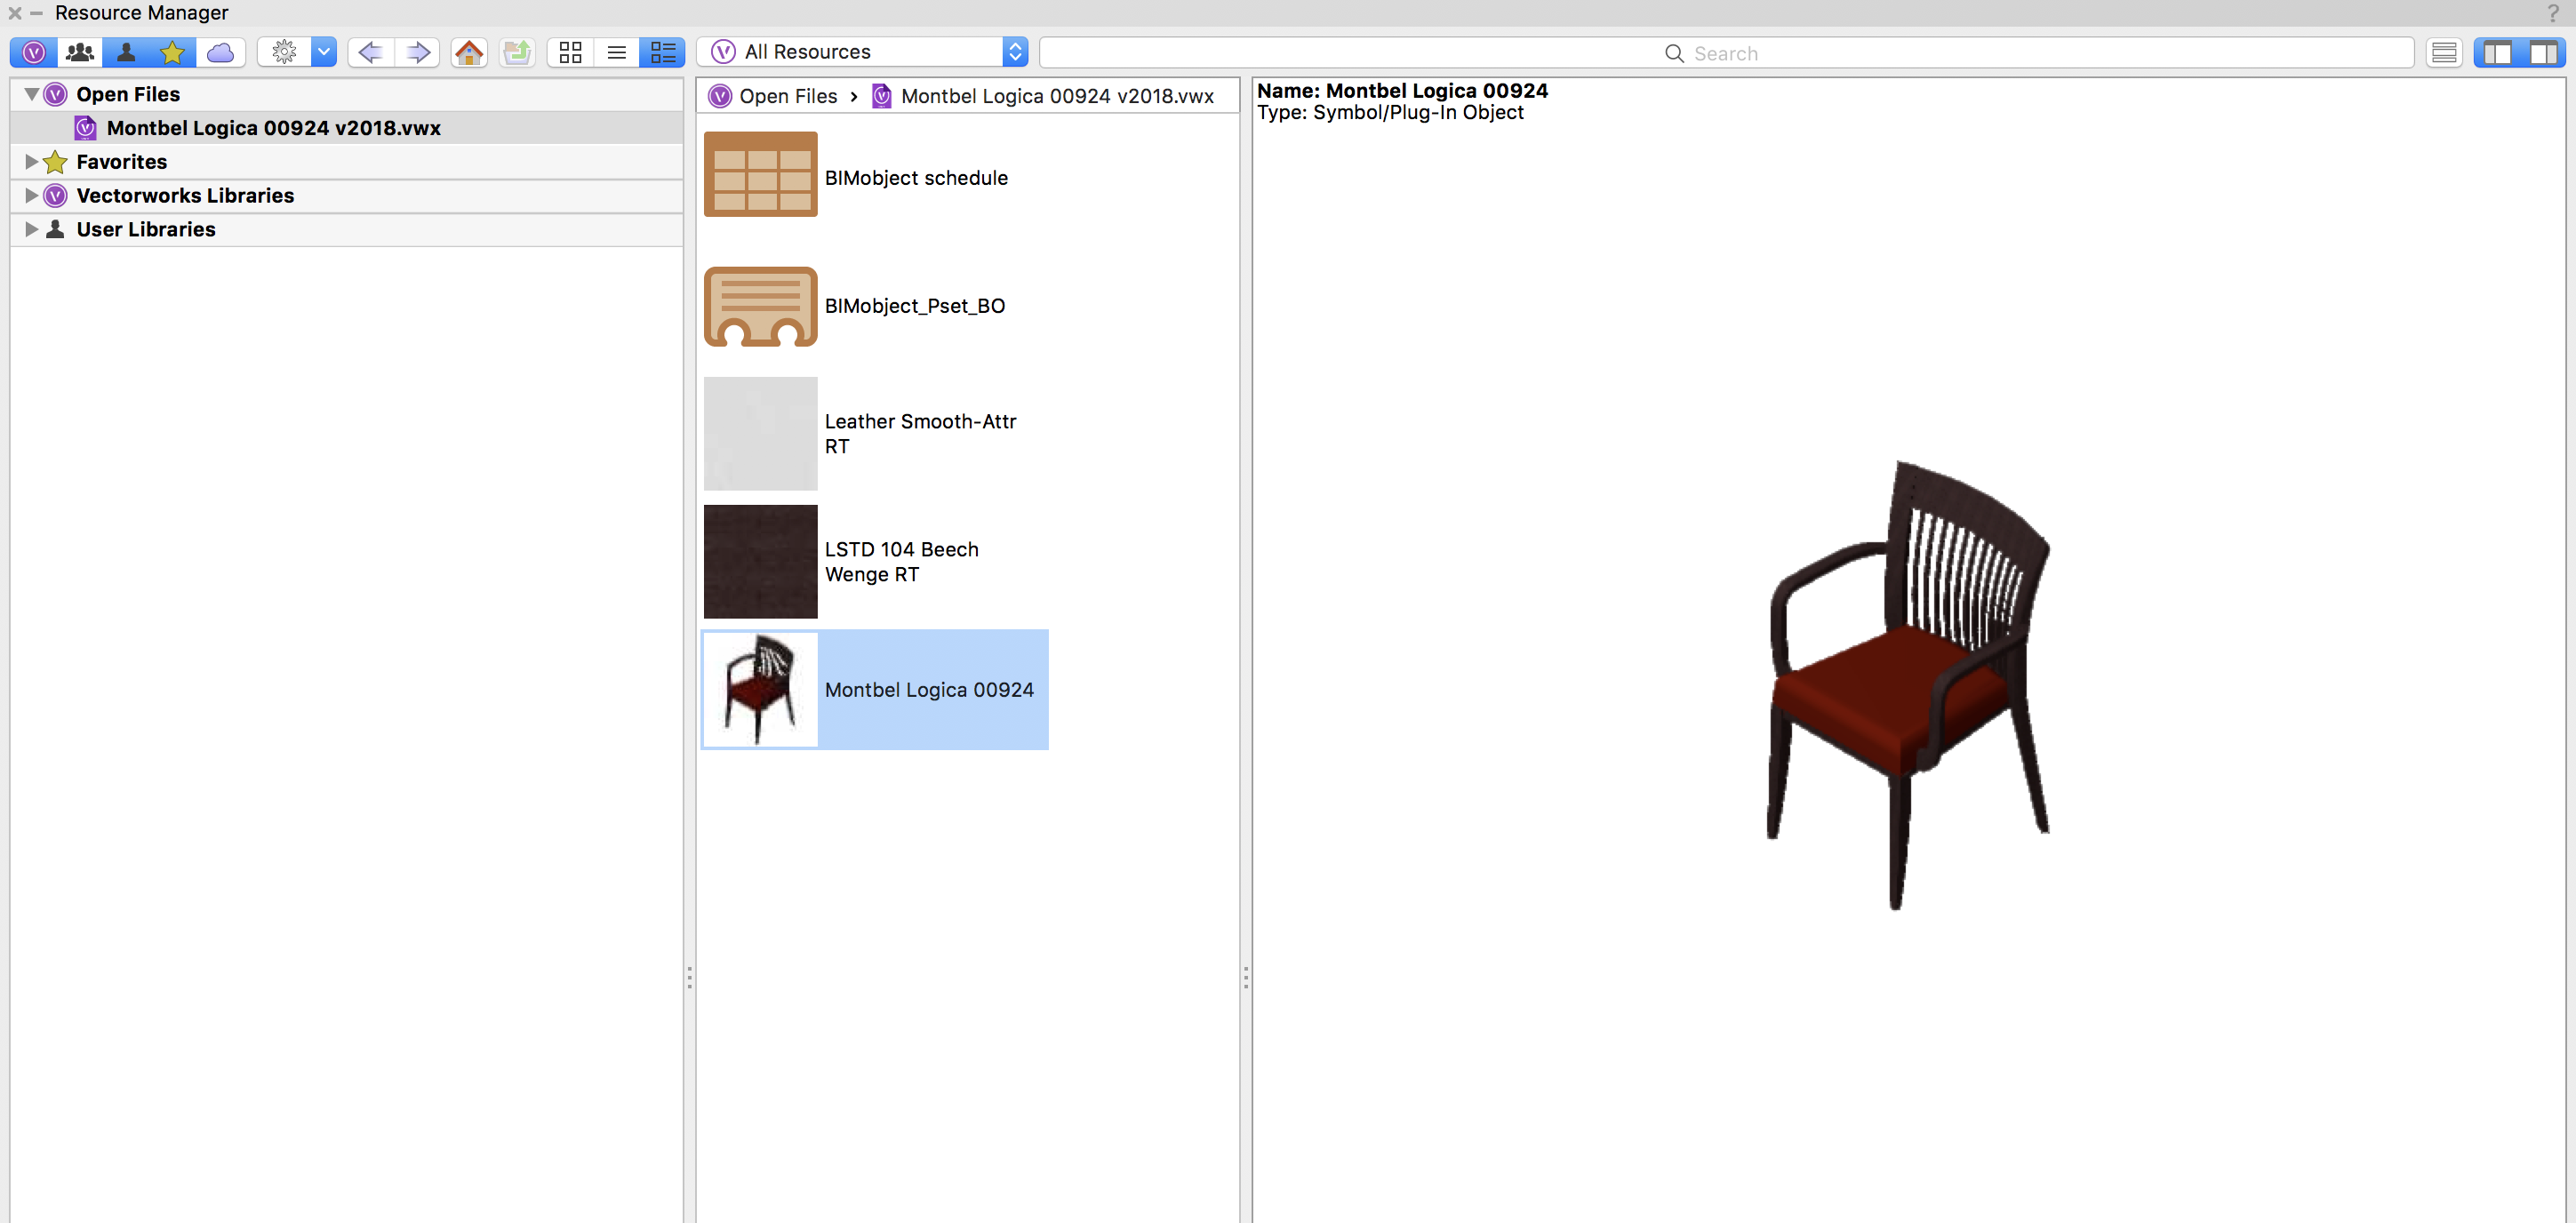
@Nathan_UK Ive just tried this and it does open without problems. Following the download from BIMObject site you will have this VW file (having chosen the VW file provided on their site) You'll now need to open it. Its an older file, so just agree when it says it'll open in (your) VW version. Although it appears you're now presented with a blank file - the asset is in the Resource Manager Place it where you want it. ------------------------- (Update) Just having a look back over your posts, I see the chair has a class 'Furniture-Main', so make sure thats not turned off. I think though @zoomer's advice should be followed to the letter, as I believe the advice is the 'usual suspects' When you say you 'import an additional model and it is instantly the only thing I can see' I'd say that points to it being (automatically) placed on a new layer and you do not have other layers set to show. When you say 'my model disappears and I am usually left with a 2D version at best.' sounds like you are most likely in Top/Plan and should choose to view in (any) 3D option Hope this (further) helps


-
Word of caution @David S, @Jim Smith will only turn left when he mounts one of those new fangled aero machines.
-
Create independent object with symbol insertion
Gadzooks replied to livespace josha's topic in General Discussion
Thanks @livespace josha Gotcha - Understand a lot more! You'll see from the jist of my last post that I was looking at your request for an 'architectural' solution, but looks like you're in events/theatre. (Great to see the varied uses VW is put to) Your first image I'd call schematic. The second I'd probably describe as diagrammatic (overlaid onto plans/layouts). I usually have a DL with my design intent power/lights etc (to be refined by specialist subby), but looks like you provide more info on your designs. Now thats a ✅. Couldn't agree more. Still scratching the surface on this atm, but... Yes - Have you looked into data visualisation to create your required output? Here's a start, which might suggest how you could work at modifying your workflow and use VW Data Vis to produce the layouts/diagrams you're looking for. https://youtu.be/xwZ2E2NZ_XM Someone may kick in with marionette solutions for this so I'd be interested to see how it ends up. All the best. -
Create independent object with symbol insertion
Gadzooks replied to livespace josha's topic in General Discussion
Josh, (Not a solution, but just to get an understanding of the question). Do you mean '(actual) circuit' or 'diagrammatic layout'? Sparky won't love you for anything other than a diagram. If that's what you need, are you proposing the lighting (including multi -way switching etc.) also be automatically created? (Doubt it, but interested to understand the level of detail you require) The above to include TV, CAT5/6, Intruder/Fire alarm, Door Interlocks, CCTV etc? (you get the general idea) And the system you create will apply the correct cable length/amperage to calculate cable sizes? (Once again, doubt it) Not something I'd want to put my PI on risk to, but I'd be interested to see the outcome of this. Leave it to them - you're already being super helpful to them by identifying and counting the boxes via linked worksheets. 🙂 Or do I completely misunderstand? -
Sheet layer navigation drop down alphabetical
Gadzooks replied to MartinFahrer's question in Troubleshooting
Or see if one of the Forum's scripting wizards can tackle this? Can this action be scripted? -
You've travelled to the Dark Side. Why are roofs/roof faces so buggy and disconserting to use? Are you using the join tool in the correct mode? (stupid question) But just in case.. Once you've attempted to join (and they refuse to hold hands with their partners) I find changing the (individual) eaves condition will sometimes throw the two together. Don't know why - I assume theres a geometric reason, but I haven't got that many years left on the planet to be bothered to find out. Its all rather hit and miss, but theres nothing special about this technique (all roof actions seem to have an element of "Oh - it worked, better move on quickly") Once you realise that the boffins coded a link to your web-cam that determines the way you are holding your face as you try to join the surfaces you'll be a master. I find one eyebrow up (Roger Moore style) and tongue pushed tightly against right cheek is they way to go. No - the inside of your cheek!!! Sorted? Seriously - come back if I'm totally useless. Part of the day I'm clueless - its just no-one knows which part its going to be (might be the port we talked about)


-
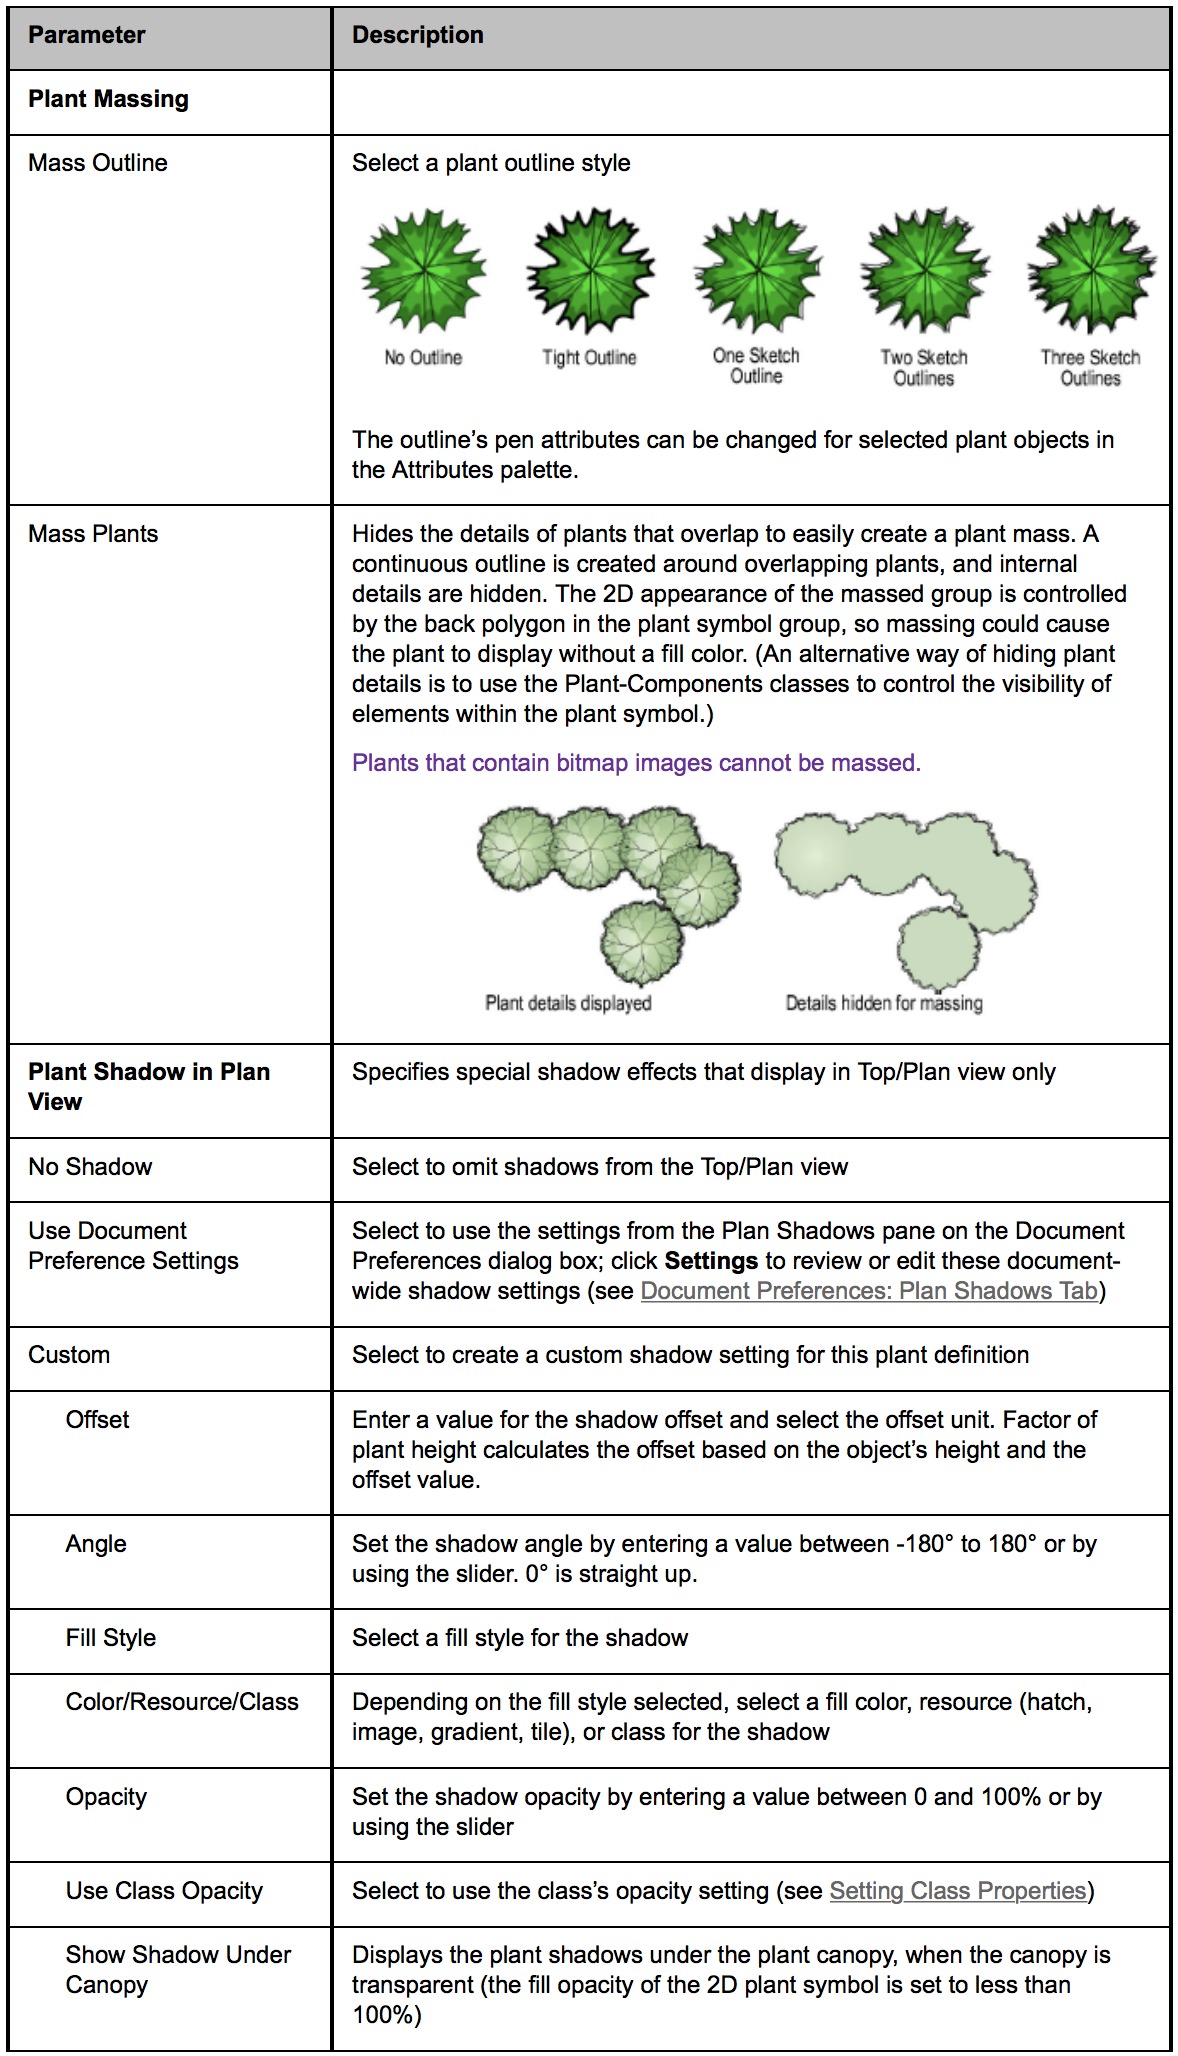
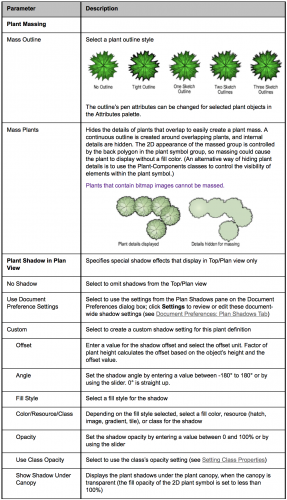
VW Help may help you? http://app-help.vectorworks.net/2018/eng/index.htm#t=VW2018_Guide%2FPlants%2FSpecifying_Plant_Definition_Parameters.htm&rhsearch=massing plants&rhhlterm=massing plants&rhsyns= This what you need? (extract from Help Pages)
-
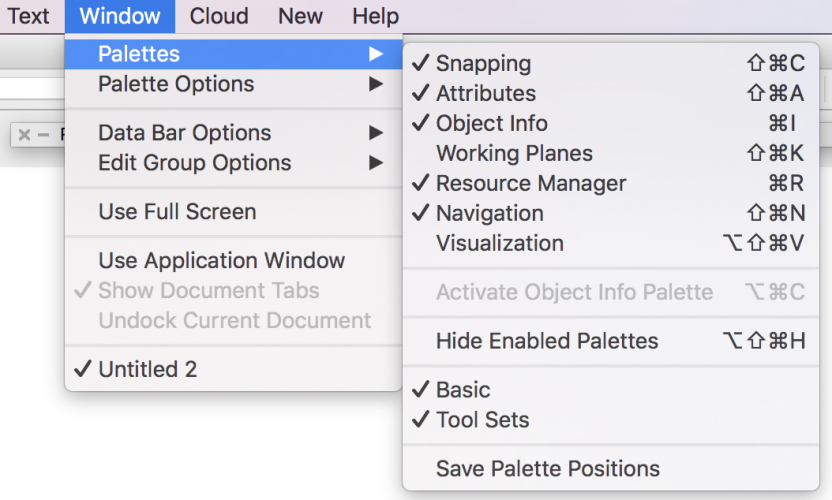
Are the tools you require unchecked - so won't show - as below? (haven't got Spotlight - but you can get the idea)
-
Yes, that's hit the money @Kevin McAllister Ill go and cut wood for the fire.
-
Nicely executed. Good share. Thankyou
-
Unless your post was offensive (or other contravention) the forum admin will leave in place. Waft it away, but it will always be there!! The upside is that others can still learn from your post - so thank you. 😉