


scottmoore
-
Posts
673 -
Joined
-
Last visited
Content Type
Profiles
Forums
Events
Articles
Marionette
Store
Everything posted by scottmoore
-
I have been doing some drawing recently where I have only been using my personal symbols. No Spotlight instruments, (no focus points YAY!!!) no Bracworks truss, no anything requiring a plug-in object with the exception of perhaps the screen tool. VW seems to move along just fine even with pretty complex drawings. As soon as I start replacing my fixtures with Spotlight instruments things start to slow down significantly. It’s also where I start getting frustrated with buggy behavior. Many VW users have transitioned from those that draw to now using VW as a plug and play solution. There is nothing wrong with that and the functionality is great, but that, along with an arguably dated architecture (CPU, GPU usage) are where the issues lie I suspect.
-
Good points all.
-
That is what I do. I am not aware of any other options.
-
I am absolutely interested Evan! That said, I am so far behind on projects currently that it will be a bit before I can focus on changing workflows.
-
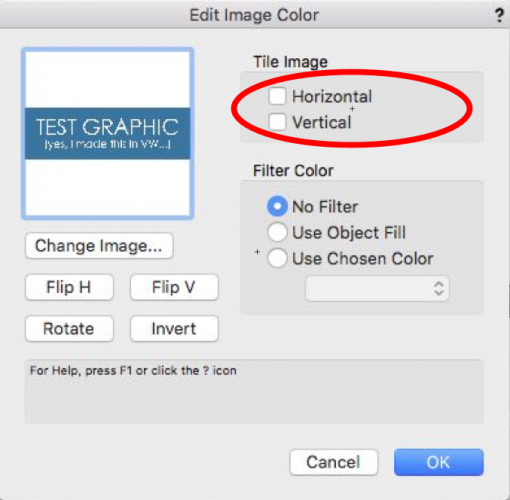
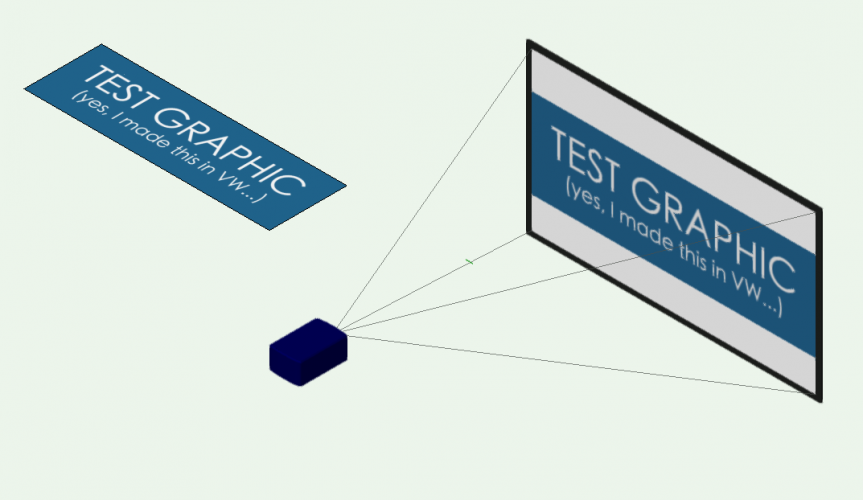
Go back to your intital texture for the logo graphic you created and edit it. When it is open, the first option is "COLOR" and in that drop-down menu "IMAGE" should be selected. Click the "EDIT" button next to that. A little window will pop up allowing you to change the image, flip, rotate or invert the image and select filtering options. In the top right there are two buttons for tiling. Deselect them both. That way there will only ever be one instance of your graphic. I created a quick graphic that is clearly not in a 16:9 ratio, turned it into a texture and applied it to a 16:9 projection screen. All you then have to do is adjust the placement which is in the same window where you added the texture. That should fix things right up. And, as an example of what I had mentioned earlier, the graphic was created in VW as were the screen grab and the oval highlighting the two check boxes. I find for anything this simple, it is much quicker to just do this in VW than jumping back and forth between applications. Plus only one set of tools and shortcuts to consider. hope this helps.
-
You do brilliant work Evan! I am about to give up on VW for rendering....I think.
-
Quick tip if you don’t have an image editor: Draw a rectangle the size of your desired screen or at least with the correct ratio. Make it white or what ever color you want your background to be. Import the image in question using the import function and drag it where you want it over the rectangle. Adjust the image size to get your desired result. Screen shot using the rectangle as your exterior extents and you will have a graphic that is the correct ratio from which you can create the proper screen texture. Not as good as a graphics program but if you don’t have one, this will work and you can do it immediately. For renders, you will never know the difference.
-
Thanks for the tilde tip. Very helpful.
-

Renderworks Challenge - acrylic poly window texture
scottmoore replied to Peter Neufeld's topic in Rendering
Agreed on the dissertation. Very informative. Faroe Islands?! Believe it or not I actually did a concert there at Torshavn back in the ‘90s. Beautiful place and wonderful people. -
Renderworks Challenge - acrylic poly window texture
scottmoore replied to Peter Neufeld's topic in Rendering
Wow! That is a lot to think about. Thanks guys. -
Oh. That is easy enough to fix. If there is no light in a scene, VW automatically adds an ambient light from over the views left shoulder, ostensibly so you can see what you are doing. VW does no recognize a glow texture as a legitimate light source so you have to add a real light to the scene. I usually set a light object way out of the way and set it to 1%. I think you actually set it to 0% but can’t say if I have tried that. Regardless, this will fix your issue.
-
Nice Wesley! Not an easy venue in which to work by ANY stretch of the imagination, but I am glad you were able to work our Edgelight product into the design! Your renders look great. At some point I need to spend some time with you guys to figure out what I would need to get up to speed in C4D if I decide to take the leap.
-
@EAlexander I always appreciate your insight. My current workaround for this conundrum is to render beams against a “black model” in the same way you mentioned. I use custom built lights that allow for solving the pinpoint issue. It’s a little time consuming but not that bad and the learning curve is pretty much 0. I start comping images together while the next set of beams is rendering so that’s how I manage the time issue. It’s far from ideal but not terrible.
-
Personally, I will say that volumetrics in VW have become very disappointing since VW2011 was realeased. It is even more frustrating that the rendering engine introduced in 2011 is the C4D rendering engine. The issue is that VW really does not allow any reasonable control of volumetric beam properties. Also, there is no sense of origination scale of the beam using Spotlight instruments. The latter can be worked around by building custom lighting instruments which is my solution. By doing that, you can have a beam of light that originated at the diameter of the lens. The former, however, is exceptionally problematic. The beams follow no law of squares and instead become brighter based solely on the diameter of the beam. That means, the beam starts off almost non existent and then gets brighter the further it goes. Ive been harping on this for years now to no avail. Most visualization packages produce really great looking beams, but the geometry of the scenic is often lacking which is how they accommodate real time functionality. Most will not include reflections. C4D will do all of that, but I find that I just don’t have time in my workflow to utilize two programs. Typically, I’ll need to produce shop drawings as quickly as the client signs off on a rendering.
-
These kinds of tips are extremely useful. I have to admit that I am not much of a computer geek and often just assume “things should work the way I think they should work” which often leads to disappointing results. I frankly did not know Chrome was such a resource hog. Jbenghiat, your insight is always helpful.
-
I agree with Mark and Mike. The glow texture is the way to go and should not cause the issues you are describing.
-
I felt like I could probably manufacture one from that symbol! It often gets overlooked, but than you to you and your team for all the hard work you’ve poured into this software. It is much appreciated.
-
I took a shot at using the SL100 symbol the other day as I had not drawn one previously. I eventually gave up on all of the detail in the 3D model and replaced with simple geometry that made the difference between waiting for 10 secs or so on an OpenGL render to instantaneous. I certainly appreciate the detail but it is a lot and would take a very, very long time to render with a lot of other geometry. I am assuming those are the manufacturer’s files.
-
I would go with the extrude. Probably does not even need to be a circle to improve render times. Hexagons and octogons generally work fine for this. Actually a square would work fine as well. Quick tip, assuming you are rendering from a viewport: Render the primary drawing WITHOUT the laser beam(s). Make a duplicate viewport that ONLY renders the laser beam against a black background. Once exported, use a graphics program to comp the two images together. You will want to make the black of the laser image an alpha channel of course and then add some additional glow to it. Should work pretty well. I do this all the time using Pixelmater. Really cost effective solution.
-
I just did one almost exactly like that the other day. My workflow is to simply ignore the LED tool as great is it may be. I create the module symbol I want and lay them out just like you would build the real thing which appears to be what you have done. I save those items to a specific class. I then create a “skin” for it that I save to another class that has the rendering texture on it. The downside is there is no plug-in object to do this for you. The upside is that the tile symbols look exactly like I want them to look in hidden line renderings and Renderworks results are just fine. Sometimes there is is no substitute for direct modeling.
-
Wesley, i am still on 2018 so haven’t seen any of what you are seeing. Love me some TMS.
-
Agreed with all the above. - We incorporate thumbnail “contact sheet layer” of our most commonly used camera angles so that renders are preset as well. - include commonly used backgrounds - I include design layers specifically for DLVP and have associated classes with the viewport already created. Huge time saver. - I keep a design layer specifically for creating CNC files for fabrication purposes. - a TON of saved views. We used saved views to completely navigate the project including all sheet layers, rendering sheet layers, working views etc. Saved Views is a massively underused resource IMO.
-
I find it doesn’t really matter. Here is what I try to do: If it is a position that is going to be represented in place in a 2D drawing, I’ll try to draw it in place to avoid additional viewports on a sheet layer. This would be something like a pod or a raked truss. If it is a vertical truss or torm/boom kind of thing, then the 2D representation is going to be somewhere else on the drawing anyway so I may just draw that on centerline and viewport it into a sheet layer for printing after the fact.
-
Actually, I would suggest creating the viewport in your template file. That way your drawing auto-populates and you don’t have to recreate those viewports with each new design. You would only need to change it if the design itself becomes larger or perhaps smaller than your typical event.
-
I don’t recall exactly what VW calls their control classes but there should be a set of classes labeled “truss-________” or “rigging-_________”. Something like that. This gives you the ability to “control” what is viewable. If you need a simplified truss view, turn that on and turn off the detail part of the model. Need the detailed version, turn that on and the simple class off. Want text? Turn that class on. In a blank document, insert a piece of truss and play around with it for a moment. You will quickly figure the process out.


