Pat Stanford
-
Posts
12,705 -
Joined
-
Last visited
Content Type
Profiles
Forums
Events
Articles
Marionette
Store
Everything posted by Pat Stanford
-
I would use an idea of using a worksheet as Gadzooks has suggested, but I would use it a little differently. I would create a design layer to house examples of all your line types. Create a custom record with fields for whatever you need to put into your explanations, plus an extra boolean field for "OnList" or similar. Put an example of each line type on to the "legend data" design layer, attach the record to each example and fill in the data. Create a worksheet with a database row. LegendRecord.OnList it true. This should give you a subrow for each object that has the OnList field set to true. Put in formulas of =LegendRecord.Explaination and =Image into different column headers. This should give you a working version that still will require a bunch of formatting. I have posted a couple of novels about worksheet recently. Do a search and you will get a good start on how to use worksheets. I am pretty certain that there will be Worksheet Sessions a the Design Summit in November. If you can wait that long. Example file attached. Select any line, uncheck OnLegend in the data pane of the OIP. Right click on the worksheet image and choose Recalculate from the bottom of the list. The Legend will update. The worksheet image can be put on any Layer you choose. It does not have to be the sheet with the sample lines. Worksheet of Line Explainations.vwx
-
I was just about to post this into another thread where we were fighting with Python. 🙂
-
Converting Scientific Notation to Real
Pat Stanford replied to Julian Carr's topic in Python Scripting
RunScript works fine with Vectorscript. If you want to use the extra possibilities of Python, that is great, but the dozen or so short RunScripts I have written are all VS. But I am sure you already know that. -
You can install on two machines at a time:
-
Select a random assortment of objects?
Pat Stanford replied to Andy Broomell's topic in General Discussion
Try this one. I changed the way to edit the number of groups at the last minute and missed two places where I needed to change a variable name. Random Group.vsm -
Unfortunately, VW thinks that the copy is an operation and therefore it has no way of knowing that the VP is not really out of date. Time for a wish list item.
-
Converting Scientific Notation to Real
Pat Stanford replied to Julian Carr's topic in Python Scripting
Lots of special cases here. The GetRField returns a value. In the case of units of mm, you get something back that Python interprets as a number (but in scientific notation). If you return feet and inches, it includes the unit marks and returns something that Python considers to be a string. I have not tested it, but I would bet that if you had the unit mark turned on for mm, it would probably return something that python would consider to be a string also. So, you either need to do special case for everything, or possibly turn on show units, run the script and then turn off show units. That way you should always end up with a value returned that is a string, so at least you don't have to fight with some returns as numbers and some as strings. But if you can live with just mm, try this: perimValue = (vs.GetRField( vs.FSActLayer(), 'Space', 'Perim' )) perimValueStr = format(float(perimValue),'.4f') crit_ = "('Space', 'Perim' = "+ perimValueStr + ")" vs.Message(crit_) -
Area calculations of objects within Symbols
Pat Stanford replied to Steve Riddle's topic in General Discussion
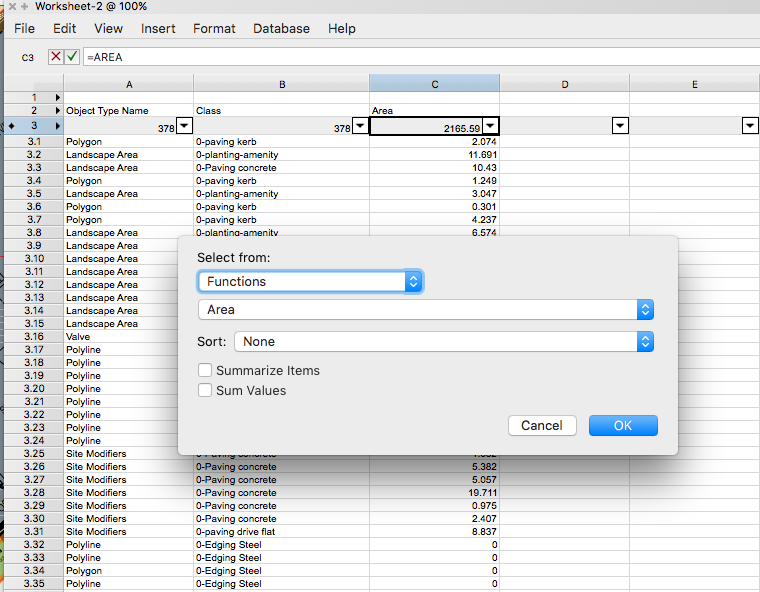
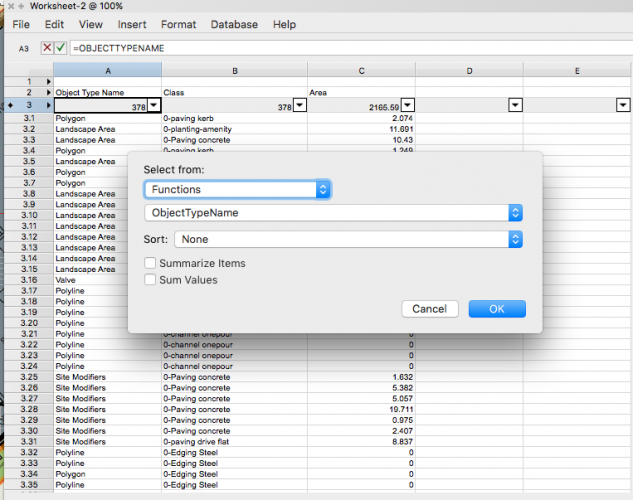
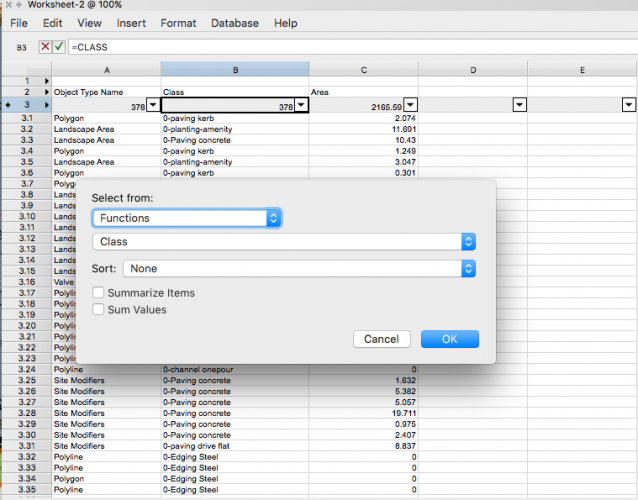
I think you can get what you want by putting an instance of the symbol on a separate layer and then doing a database criteria something like: Add more criteria to limit it. It looks like you have made good use of classes, but I don't know your drawing well enough to figure out what classes should be In or out of the criteria. You can use the More Choices button to add extra "rows" to the Criteria Builder. I would then use a columns like Object Type Name Class and Area See some of my other recent posts on worksheets for information on Summarizing all of the similar type objects into a single subrow and then also SUM the areas together in that subrow to get a total. If this is going to be done one at a time and not have a lot of overlap between projects, you could probably get away with one detail layer to extract the data from the symbol and just change the symbol on that layer so you don't end up with 27 layers and 27 different worksheets. Ask again if you need more help.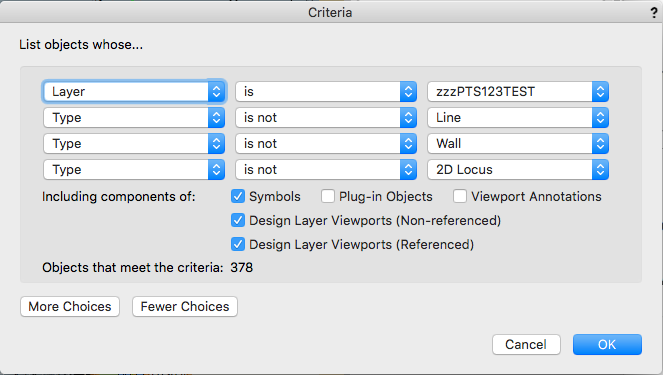

-
Select a random assortment of objects?
Pat Stanford replied to Andy Broomell's topic in General Discussion
OK, I am ready for some beta testing. Download the attached file. Save it into your User Folder/Plug-Ins folder. On my Mac the path is: Pat/Libraries/Application Support/Vectorworks/2018/Plug-Ins. I can never remember if you have to restart VW after adding a plug-in. Edit your workspace and add the Random Group command to whatever menu you desire. It should show up in the Miscellaneous column on the left pane. Select multiple objects on the active layer (the script only handles objects on the active layer) and run the script and you should get a number of groups. Each group should have close to 1/(Number of groups) objects randomly assigned to each group. If you hold down the OPTION (ALT) key while choosing Random Groups from the menu, you should get a dialog box that will let you set the number of groups to divide the objects into. This will also be set as the new default so you don't have to do this every time. The object and script are unlocked and licenses under the Lesser General Public License for free use. You can see the script by going to Tools:Plug-ins:Plug-In Manager and looking under the Custom Plug-ins or Third Party Plug-ins categories, selecting Random Group and clicking the Edit Script button. This is very lightly tested, with no warranty expressed or implied. See the source code for all the disclaimers. There is not a lot of error checking. If you get error messages, please screen shot them for me so I can see what I can do to eliminate the errors. Let me know what you think. Random Group.vsm -
Still hoping for a better solution, but for now the following seems to work: Option by itself does not seem to trigger properly, but combined with AUTOKEY it does. If NOT AUTOKEY(L1) AND OPTION then Begin N3:=IntDialog('Enter Number of Groups (Max. 10)',Num2Str(0,NumGroups)); NumGroups:=Min(N3,10); End;
-
I am working on a script for a menu item. I would like to be able to open a dialog box to change a parameter if I am holding down a key (preferably OPTION) when selecting the menu item. I can't get this to work reliably. Occasionally it will work and when it works it will normally keep working on repeated runs. But then sometimes it won't work and it won't work repeatedly. I can't figure out the pattern of when it works and when it doesn't. Any ideas? Any better solutions than what I have below? At the top of my script I currently have: If OPTION then Begin N3:=IntDialog('Enter Number of Groups (Max. 10)',Num2Str(0,NumGroups)); NumGroups:=Min(N3,10); End;
-
Converting Scientific Notation to Real
Pat Stanford replied to Julian Carr's topic in Python Scripting
PS. I really much prefer the mandatory typing of variables in Vectorscript. It makes sure you know what kind of a result you are getting. And I really hate using white space as block delimiters. Being/End are so much easier to read. Overtime i have to work in Python I feel like I am back in Fortran in 1983 and counting columns on a punch card. -
Converting Scientific Notation to Real
Pat Stanford replied to Julian Carr's topic in Python Scripting
The quotes around the 9e02 are forcing it to a sting instead of a number. Also, the format command needs to be used in conjunction with an assignment (I think). widthValue = 9e02 widthValue = format(widthValue, '.0f') vs.Message(widthValue) the .0 forces it to zero decimal places. Leave that off and the default is 6 decimal places. OK if you are doing a greater than/less than. Not so good if you are doing an equals. -
Converting Scientific Notation to Real
Pat Stanford replied to Julian Carr's topic in Python Scripting
Maybe: format(PerimValue, 'f') https://stackoverflow.com/questions/25099626/convert-scientific-notation-to-float https://stackoverflow.com/questions/44767119/python-convert-a-number-in-scientific-format-to-string -
Converting Scientific Notation to Real
Pat Stanford replied to Julian Carr's topic in Python Scripting
Julian, That error message makes me think it is already a Number (type Float) and that the problem is that Python can't convert the float into a string which is the required input of the Str2Num. Perhaps use something like If Type ( vs.GetRField(.......)) = str then PerimValue=Num2Str(GetRField(.......)) else PerimValue = GetrRField(.......) -
Find whatever was the top-of-the-line Macbook Pro 15" when it was released and you should be OK. I am still running a 2014 MacBook Pro, 2.8 Ghz Core i7, with 16 GB of RAM and an Nvidia graphics card and it runs VW2018 fine. I would love to have more speed some times, but it is OK for what I do. It should have cost about$3000-$3500 new.
-
Graphic enhancements to Worksheet Databases
Pat Stanford replied to Jim Smith's question in Wishlist - Feature and Content Requests
No, I don't think you are being clear enough. I understand how difficult it is to explain complex issues in something other than your mother language. Please try again and see if you can get screen shots to upload. There is a problem with uploading photos right now, so perhaps wait a day or so. Or upload the screen shots somehtere else and just put links to them here. I would like to help, but I don't understand what you are asking for. -
You should be able to do this with Associations: VS:AddAssociation VS:RemoveAssociation VS:GetNumAssociations VS:GetAssociation Basically Associations create a link between two plug ins. An association of kind 4 deletes the associated object when the master is deleted. Kind 5 resets the associated object when the master is deleted. Your "dimension" PIO would be the associated object. You probably want to create at least a Kind 5 association and probably both (2 different associations). Then when the screen is reset, your dimension will be reset also. In your reset code us GetAssociation to get a handle to the screen object and then do what you need to copy the data from there into the dimension object. It will probably need some playing to get it to work, but the online version of the function reference has a pretty good example of AddAssociation. http://developer.vectorworks.net/index.php/VS:AddAssociation. Ask again if you need more help.
-
You can do this with a simple worksheet script in a database row that returns objects that can be inserted in walls. It will return the name of the wall style each object is inserted in. If you include a =Count column and Summarize on the Wall Style, you should get a count of how many objects are in walls of each Wall Style. Either create a vectorscript in the document with the following script OR save it as a text document into the Application/Workgroup/User folder Libraries:Defaults:Reports~Schedules folder. I used the name GetParentWallStyle, but you can use whatever name you want. It just has to match how you call the function. If the script is in the document use =RunScript('GetParentWallStyle'). If you put it in the library use =RunScript(120,'GetParentWallStyle.txt') Procedure GetParentWallStyle; {April 24, 2018} {© 2018,2016, Pat Stanford pat@coviana.com} {Licensed under the GNU Lesser General Public License} {No Warranty Expressed or Implied. Use at your own risk} {Returns Walls Style Name of the wall each object} {in the database that is inserted in a wall is in.} Var H1:Handle; Begin H1:=WSScript_GetObject; WSScript_SetResStr(GetWallStyle(GetParent(H1))); End; Run(GetParentWallStyle);
-
More info for a better answer please. Is your plug-in just a calculation or is it an object that is placed in the drawing? How is the pitch and scale attached/entered for the other object? What makes entering the data there better than entering the data into your calculation PIO? You should be able to make a link to another object, but it will depend somewhat on how much control you have other the objects. Assuming you don't have control over the object that has the pixel information, I would consider adding a custom Record to that object and then storing a UUID into a field in that record. Store the same UUID into your calculation PIO to create the link and then figure out how to get the pixel information to transfer. Probably need two modes to the calculation PIO, one to create the link and a second to update the calculation using the preset UUID information.
-
Would a way to display the wall style a door is in in a worksheet be enough? I am pretty sure I can write a worksheet script to return the Wall Style that a door in wall is inserted into. I am not certain I can get a database to be limited to doors that are in certain styles of walls. Alternatively, a script could store the Wall Style into one of the User Fields (or a custom record format) and you could use that to limit the database. But if a Wall Style changed you would have to remember to run the script again or you will get incorrect information.
-
Creating Symbol with 2 Different Color by Class
Pat Stanford replied to nippaz's topic in General Discussion
Chain Hoist is both a tool and an object. The tool part let's you insert the object into the drawing. The object is what remains in the drawing with all of the settings. Let's get @Sam Jones into this conversation and see if he has a pre-made solution. If not, we can do a quick and dirty scripting course. Actually, I kind of think that Marionette might be a better way to script the creation of objects. Vectorscript is easier to use to modify things, but since Marionette handles all of the interaction with the Object Info Palette, it may be easier. Can you post a sample of one of your symbols? Are they very complicated? -
Creating Symbol with 2 Different Color by Class
Pat Stanford replied to nippaz's topic in General Discussion
I don't think symbols are going to work for what you want. In a symbol, you can certainly class different parts and use different fill colors, but EVERY instance of the symbol is going to use the same classes for those parts. If you need to have different instances show different colors you are either going to have to make duplicate symbols or you are going to have to use something other than symbols. One option would be to use symbols, but use the Convert to Group option. This will convert the symbol into a group when it is placed. You could then edit the group to assign the classes/colors you need. But you lose the ability to have them function as symbols. If you have to edit the symbol definition later, the ones converted to groups will not change. The best solution probably depends on how many instances you have in a drawing and how many different color combination you need. -
Sorry I can't resist: "Sit quietly and stare into the flame. Slow your breathing. Now focus your energy on your interior tutorial."
-
Your RGB values are not right. Each of R G B should be in the range of 0 to 65535. 121 is really small, so the very small trace of red is not noticeable. Try using 65535, 0, 0 in the SetPenFore and you should get a real red. The following script will give you the RGB values for the first selected objects PenFore. Select an object with the color you want and run the script the three values will show up in the dialog box as the X, Y, and Z fields. Using the existing 3Pt dialog box was a quick and dirty hack to get an easy display. Procedure Test; Var R1,G1,B1:Real; Begin GetPenFore(FSActLayer,R1,G1,B1); PtDialog3D('RGB Is', Concat(R1), Concat(G1),Concat(B1),R1,G1,B1); End; Run(Test);