Gadzooks
-
Posts
509 -
Joined
-
Last visited
Content Type
Profiles
Forums
Events
Articles
Marionette
Store
Everything posted by Gadzooks
-
Wouldn't sheet layers be a preferable workflow and provide better control over print areas for you?
-

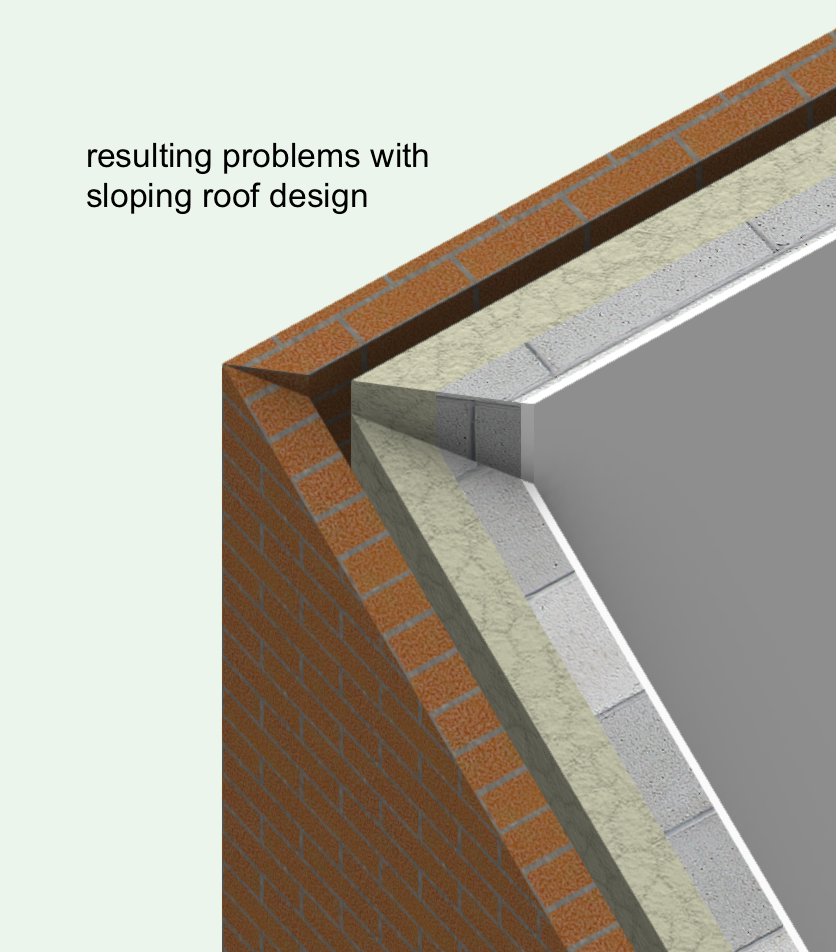
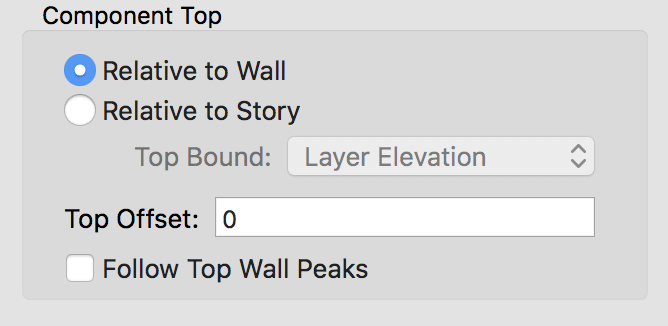
Odd Wall Component joins when fitting walls to roof
Gadzooks replied to Phileas's topic in Architecture
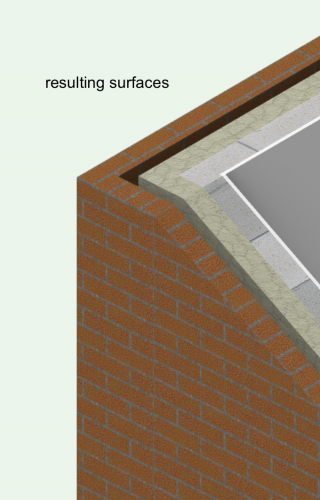
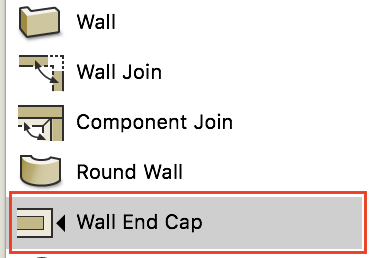
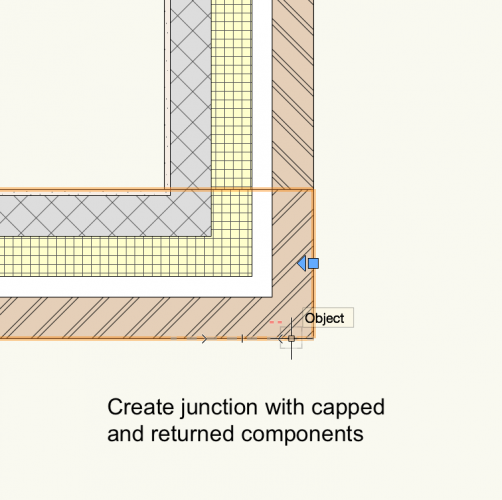
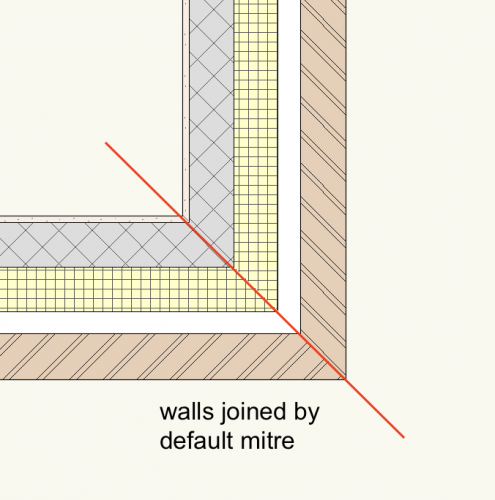
Haha - Thats not what we want to hear!! There is a way to make this work towards a more accurate model. As already discussed, the best way to create 3D is to build your model as you would build the real thing. If VW will allow. A criticism I usually have is that the boffins don't follow through with the tools to let you do the job. On this issue, I believe they've done a really good job. You've raised an issue with joining walls and your image shows (I believe) walls with the default mitre join. (As already discussed) The walls and their components struggle to resolve the two planes coinciding at their junction. One wall wants to remain level and the other needs to achieve a slope. So - using the Wall end cap tool... Modify the 'level' wall as shown... (also try the sloping wall to see the alternative options and results - there's never 'only one way' to do these things) If you'd rather not rely on the roof shrouding the inconsistencies, remaining height differences can be tweaked by setting components at differing top offsets so that timber wall plates etc. can be placed accurately. Additionally, small infills (say just the brick skin) can be provided to sit on top of the main walls to raise to the level required to fit the joisting/framing material for the roof. Which, once again, is just as it would be built. Hope this helps.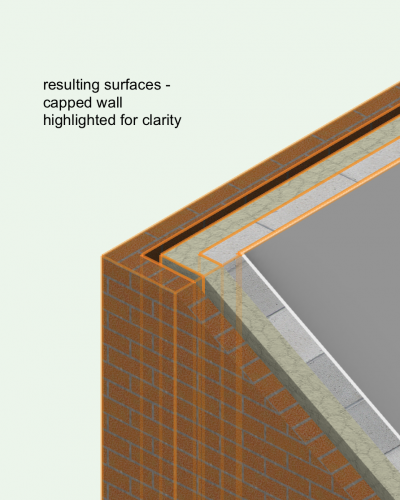


-
Best Wishes from Gadzooks!

-
I think the answer hangs on Pat's question and to what end the result you need. If you want to use roll-over as described, then.. However, if you want to create simple interactive annotation within VW, or pdf's for clients to use themselves you could use VW built-in Hyperlink Tool from the Dims/Notes toolset. This will allow you to add links for simple operations (within the document) like navigation ('next', 'previous', 'details here'...etc), together with external links to manufacturers product information webpages. I'll warn you though - don't set your expectations too high. The hyperlink tool could be a lot better. For a more robust presentation and depending on your objective, I think I would steer you towards preparing design pdfs exported to (say) Powerpoint and add the required 'hot spots' to allow your additional information (internal/external) links. I've created more intensive presentations using FileMaker Pro. These allow me to add the 'hot spots' to link to external webpages/pricing info/'pop up' items/ etc. and then distribute 'kiosk mode' to clients as part of our pitch assets. Hope this might help.
-
@Scott61 Try this for very useful explanation.... https://www.youtube.com/watch?v=d_VJkYTVf00 Come back if thats not helped.
-
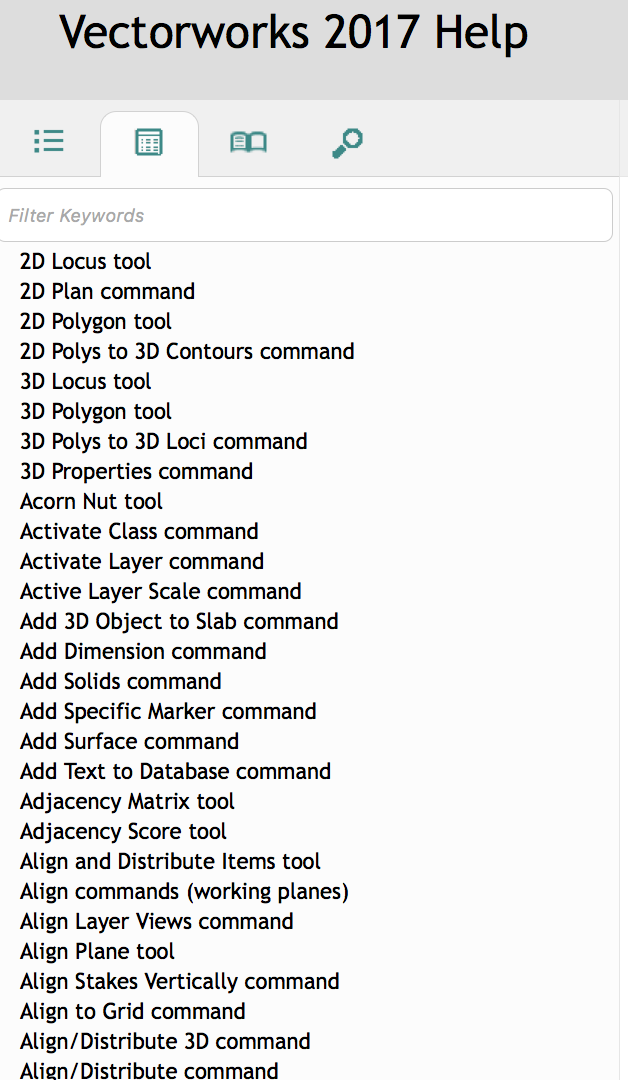
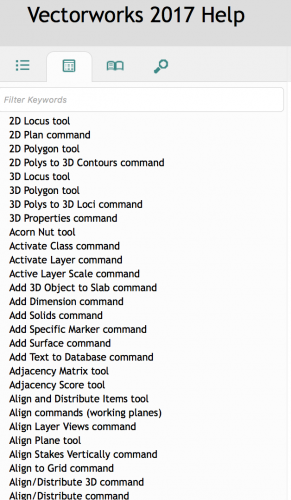
Does this help Mathias? Maybe better to have a reference to hand with more detail of each feature? Taken from 2017 Help , as your signature states 2017.
-
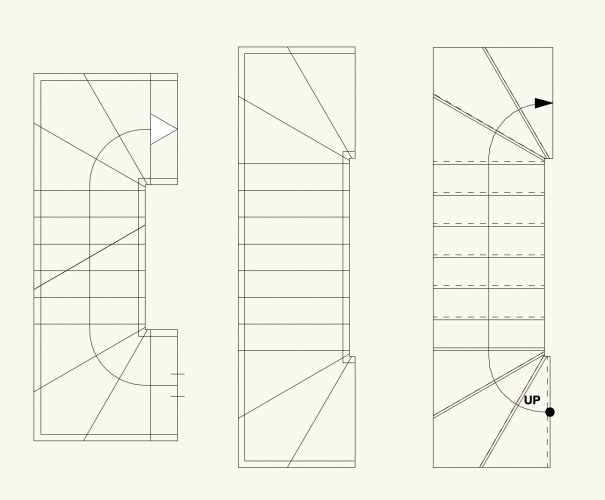
NNA fanfares that VW is a solid modelling environment with the obvious benefits this brings to manipulation/change such as highlighted here. Yet simple stair (and custom stair) is now 'legacy' and is tucked away in preference to (all singing, all dancing????) Stair Tool, which as Kevin illustrates, clearly does not provide the promised/expected geometry. Nor (as discussed widely) does it offer anything close to a simple, user friendly, robust design tool for professional use - as it ought.
-
This isn't the first time this has been asked. Custom stair tool may be your answer See file - Haven't set specific riser/going or handrail, but standard 13UP is possible House Type Stair Test GADZOOKS.vwx
-
Not an answer to your specific 'creep' question, but have you purged the file? On the face of it, if you're not adding anything, it won't help, but at least you'll have rid the file of 'excess baggage'. Edit: Just a thought. File size increase maybe a symptom of the file becoming fragmented over multiple saves especially on a nearly full drive? Tech support might be able to confirm Mac or Win OS will behave like this and that the increases are TBE ('to be expected' in tech speak). You can check this by copying to a different drive and checking file size in its new location.
-
Yes I see it has the same 'cell ceiling' problem. I'm not on 2019. It might be a new fault with 2019. A test for this would be to open in 2018 and see for yourselves. Are you able to do that or could you 'export as 2018' and post here please.
-
I can't replicate this atm. Maybe your version? Or type face chosen (unlikely). Could you let us know what version you are using.
-
I think both mac Mac and Windows OS fonts are already chosen for being 'easy on the eyes', and are bound in to their systems pretty tightly in all sorts of ways, so to consider changing will bring moderate benefits at best. And could set you back quite massively. If you google 'change OS font', or other variations, there's a variety of suggestions - mostly 'don't do it!'. I think you'd run the risk of untoward problems. Just searching for 'mono spaced' fonts, or similar key words, produces some quite good variations on your theme and it's plain that others are keen to adopt this. Try these as an example (this was just the first in the list of suggestions). https://wesbos.com/programming-fonts/
-
I think the doors on the one you'd downloaded look for placement purposes only - the door would need to be replaced with a correct choice. (so possibly unfair of me to describe as rubbish) You'll do better to draw you own styles then you'll have everything as you want.
-
You misunderstand The file you've downloaded is rubbish. It doesn't look like IKEA product and is composed of 3D objects without thickness. Yeh - bin in it and find better quality stuff if you want to start with existing assets. The door Ive shown you above is a single door from a file I downloaded ages ago. It has better detail and correct spec parts. They are out there if you look.
-
18mm
-
That doesn't even look like IKEA Have a better look - there's better ones out there. With much better detail...
-
Thats the only part of your post I saw! Its your call, so use what you can of others suggestions - bin as appropriate! Yes - but whatever suits your planned workflow. Probably better (in my view) to keep things together and class them down to the last bracket - if you are confident you and your colleagues can manage the visibilities. Symbols can be used within symbols if you wish
-
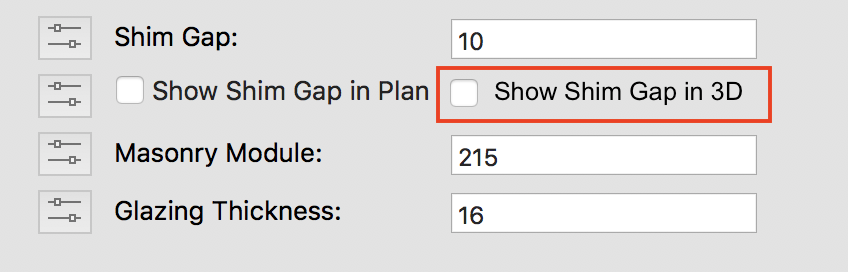
Filling shim gaps so they don't render as open cavities?
Gadzooks replied to Christiaan's question in Troubleshooting
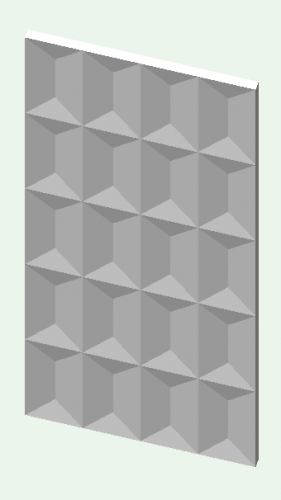
Bit nasty? NEVER A design management decision at the highest level!! "Its the silicone line Mr Client" (I like the bricks Christiaan) Edit: Maybe a Wishlist item? Default to unselected.
-
(Just a suggestion - You'll start to arrange things to suit your workflow later I'm sure) Create a drawing 'KitchenUnits'. Create and set out the individual units (as symbols) as and when you need them. Some organisation of these items in the file will help as a reference when you need to open the file directly (basically, don't just create the units and leave them in a heap on the design layer - spread them out (columns/rows?) and give them each a label). This file can then be directly 'seen' by Resource Manager without opening. You will need to place these sorts of drawings as a 'Workgroup Resource' so everyone can use them - Prob best to look that up and take advice about organising for the workgroup. (With the above accomplished) The individual resources (carcasses/plinths etc..) can now be selected and placed into your new design layouts. As an option (e.g.. with the IKEA types above) you could have the door colours change by 'classing' the colour options and choosing visibilities for presentation. Harder - and why would you want to? Picking from a limited number of standard options isn't too dificult. Of course. VW worksheets can be designed to pick up your data and list as a schedule with all types of information (costs, areas, materials etc..) Just be sure to create that info as you go, so plan the information you'll need to report and make sure its attached to each of the individual parts as you draw them. Going back over things is a real chore!!
-
Regretfully, VW has a cabinet tool that gets you part way there (like a lot of the VW tools its the last part that proves annoying). Thats why there's been an opportunity for InteriorCad to step in. I can't speak for their software, but others are pleased with it. You seem to be doing a reasonable job of adjusting things to suit your requirements. Of course - that is one of the most powerful attributes - creating your own libraries. Start work with a set of the most used cabinets drawn by yourself (lets face it, cabinets use many standard parts, its easy to very swiftly create a 'Standard Set' covering most often used layouts and then when there a need for a 'special' you can create and add to the Resource Manager for future use. Tip - Have a look on the web for kitchen parts heres one for IKEA https://3dwarehouse.sketchup.com/search/?q=ikea kitchen metod and the collections.. https://3dwarehouse.sketchup.com/search/?q=ikea kitchen metod&searchTab=collection
-
Would you believe it!! I should've gone the super simple obvious route first @joerg Although your file opens with 'updated' viewports, I just found that choosing to update is the simplest way to return the cursor cues etc.. Sometimes VW can be so irritating😂
-
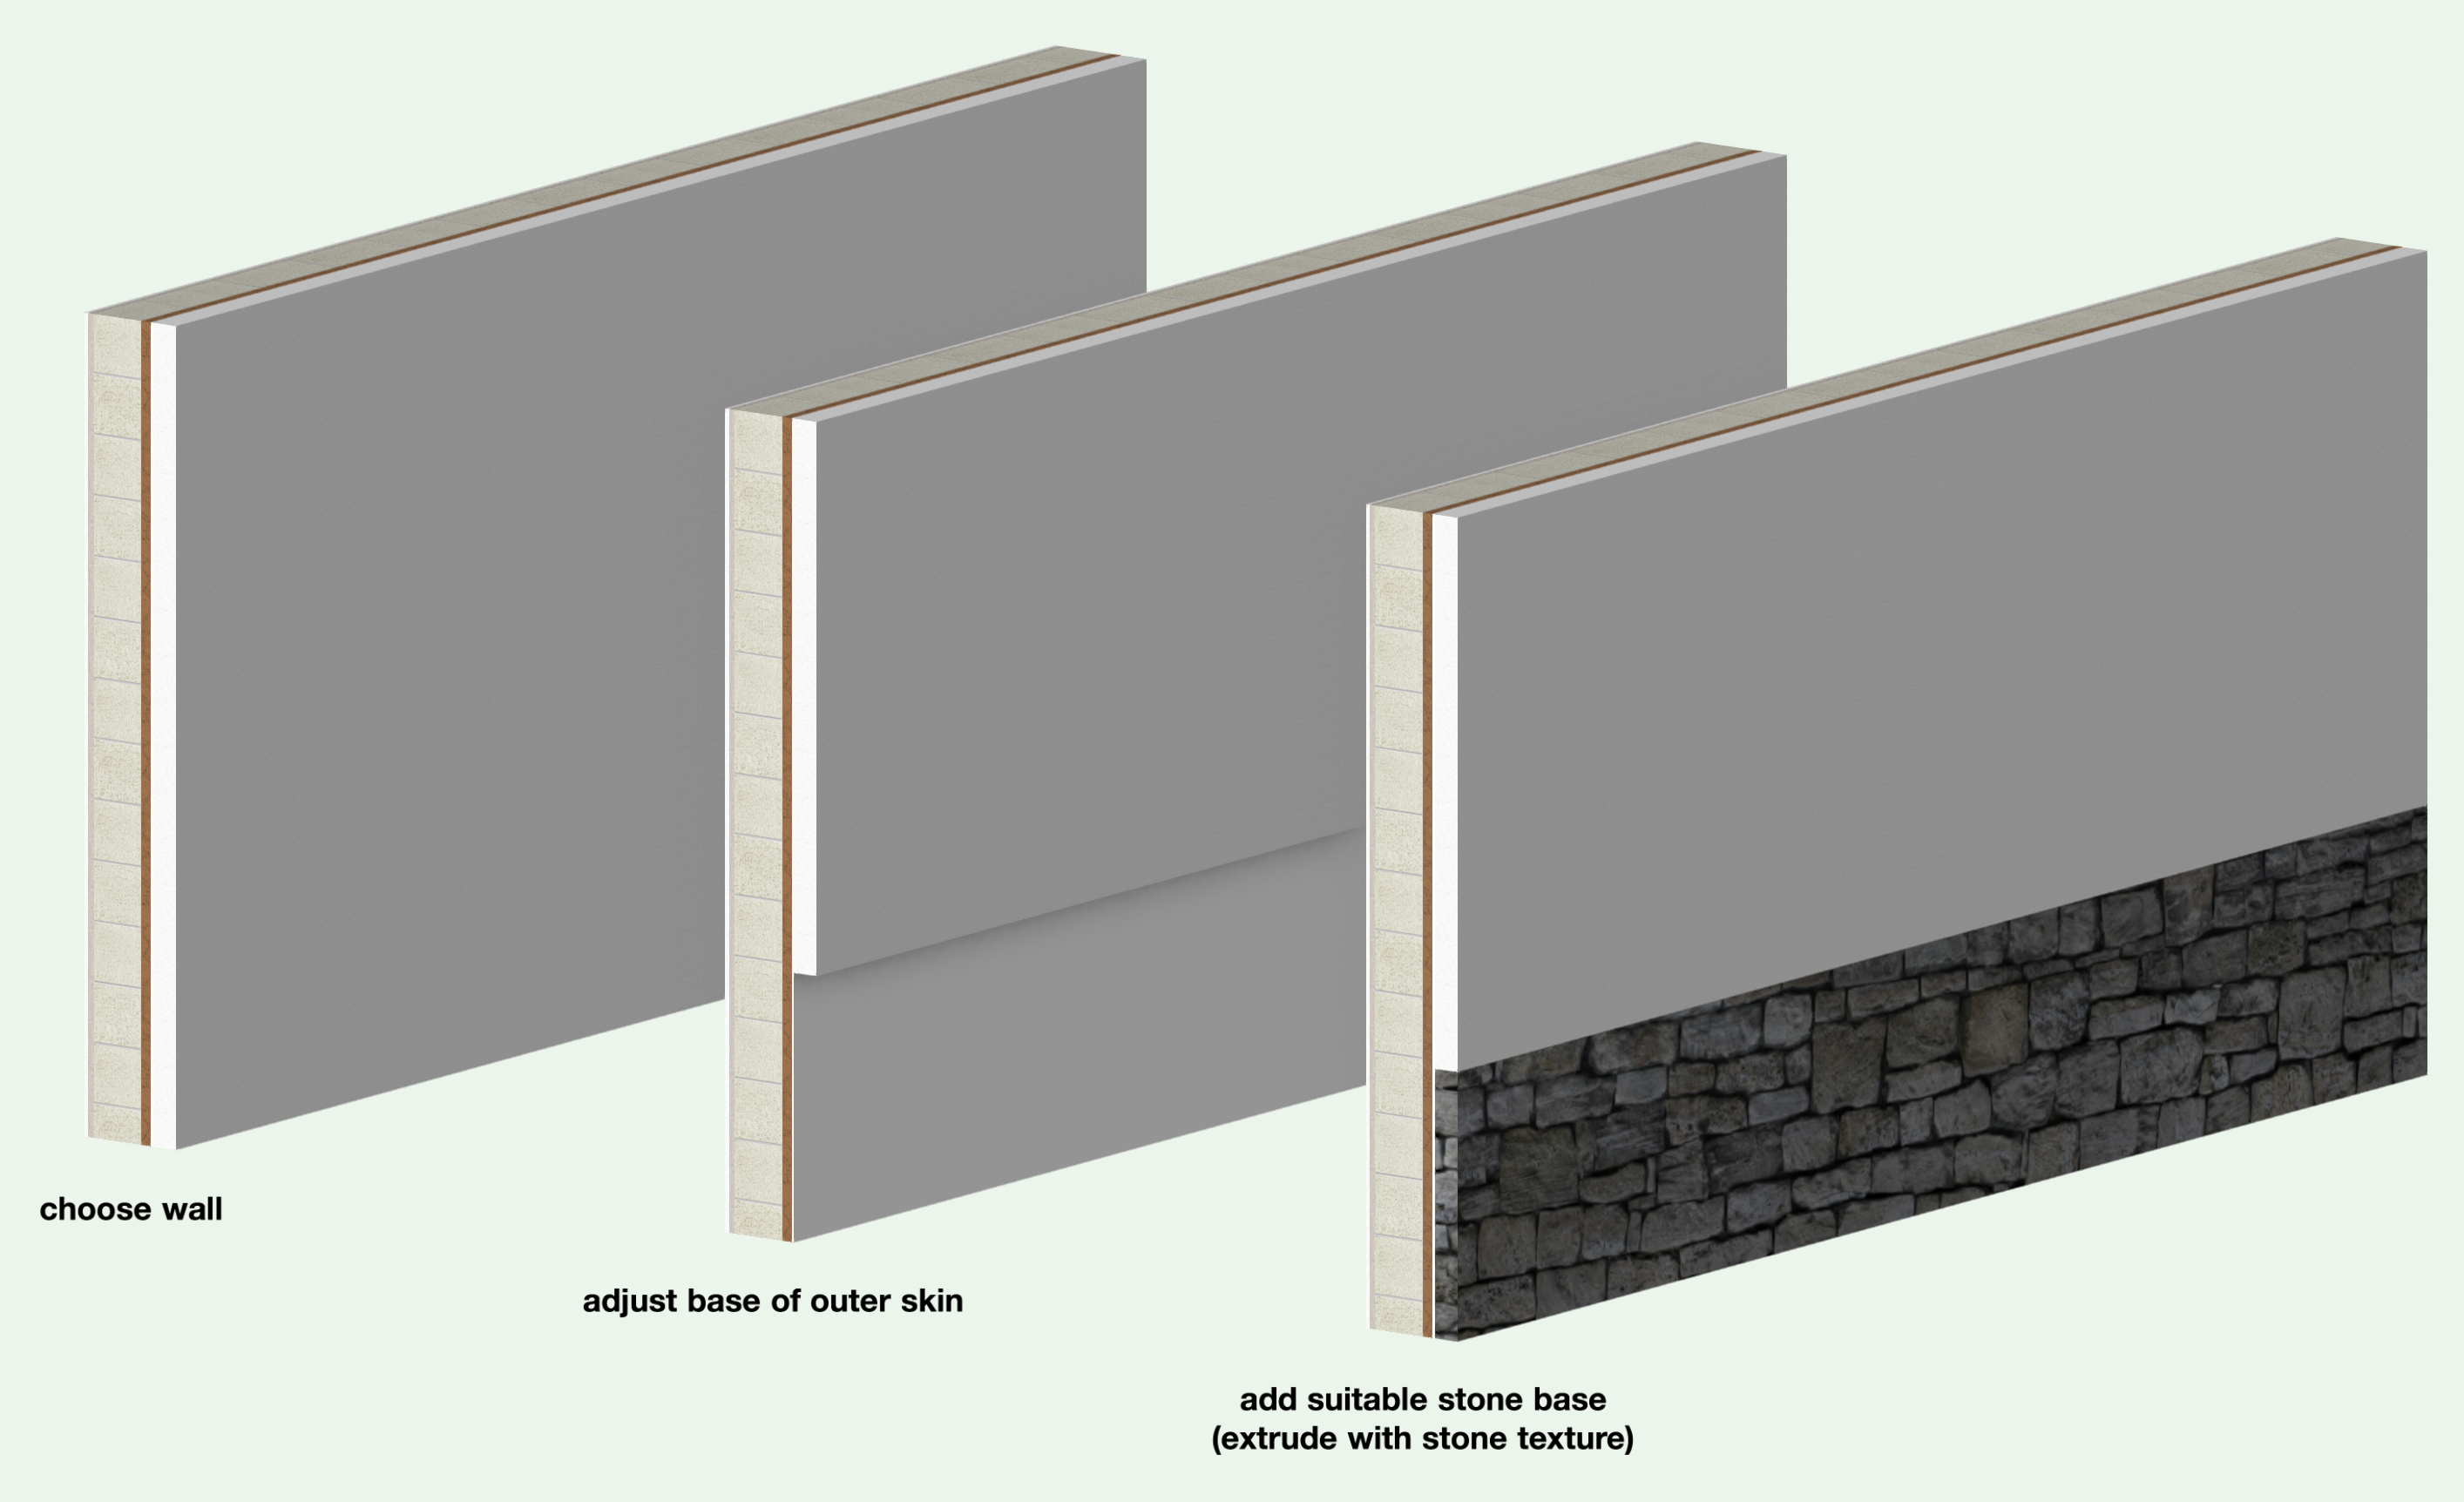
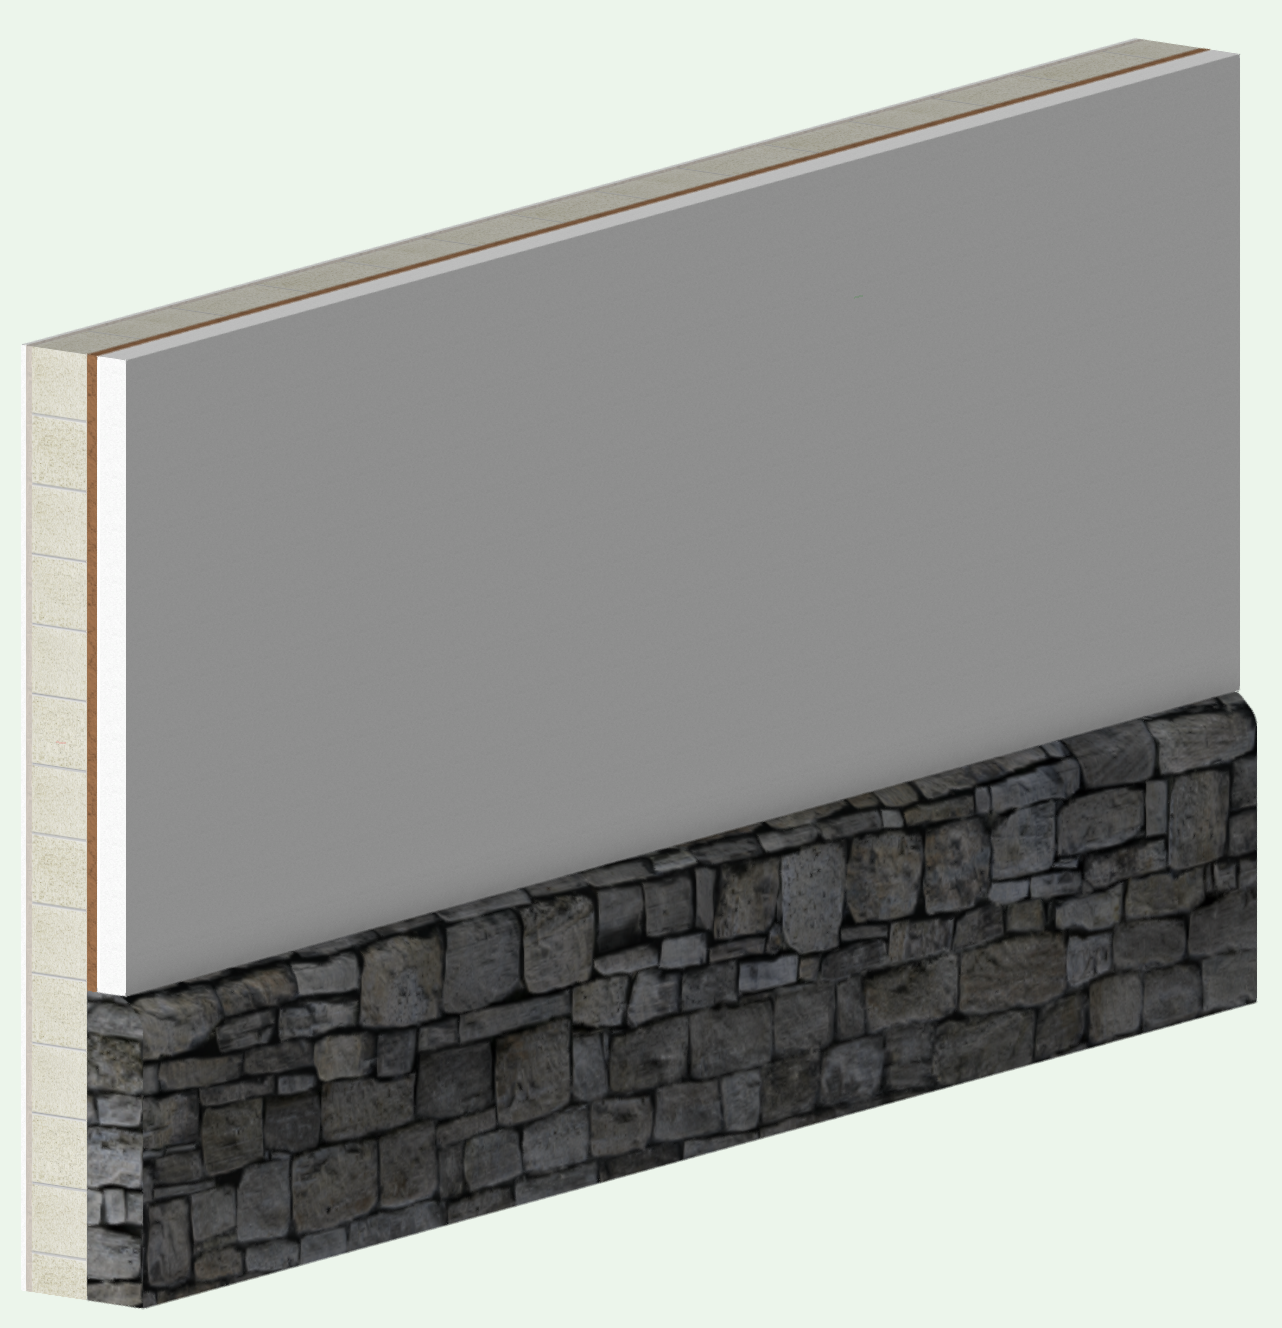
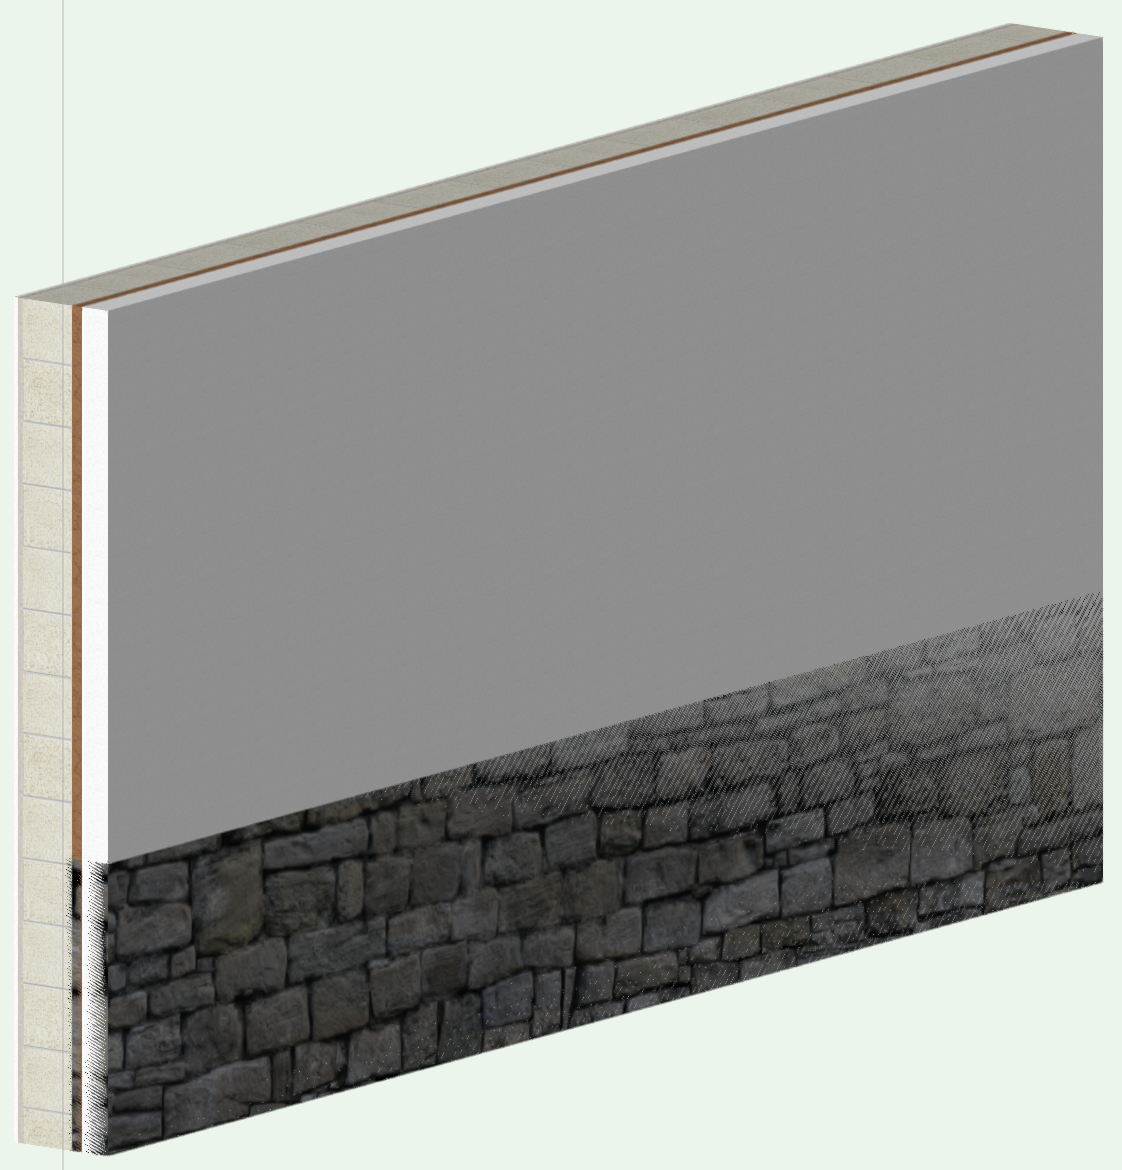
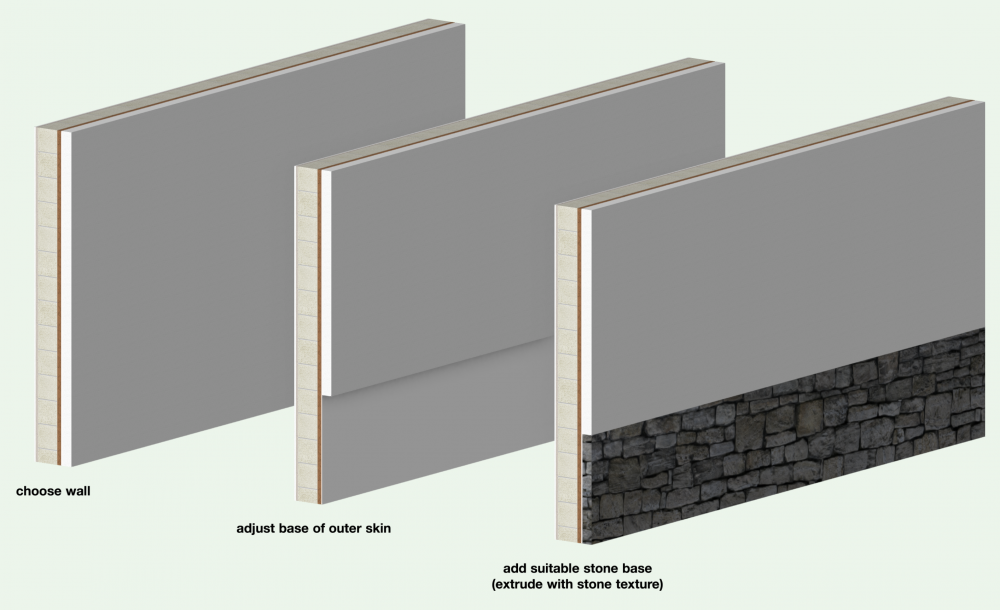
I reckon this can be 'fudged' depending on your requirements. @CipesDesign 's suggestion of a classing approach I think will work well - you just need to organise how the 'magic' will work in practice. For me, the way you want to use the end result determines the (VW) construction method. You could just replace the lower external area of the wall with 'in place' geometry (an extrusion with your chosen texture)... Often these feature wall bases are thicker rather than flush and this gives you the flexibility to provide this... This could work well for you if you need to section through these walls - unless you have huge lengths of wall like this? It will just take a bit of time applying the areas of additional geometry (don't even think of going the 'create wall projection' route!!). Alternatively, you could maybe take the 'cosmetic' approach. Using a wall with an extra external component, being the stone, set just to show proud of the wall above. If you're after this 'flush' finish you'll have to set the component thickness as slight as VW will allow. I experimented with less than 1mm (as you correctly say this influences the wall thickness overall.) VW will not accept zero as I thought it might (interesting, because you can 'extrude' a floor base with zero thickness in VW). However you can input (say) 0.1 - this is taken as 1mm and this is added to your wall thickness - which I believe you wanted to avoid. So try thinner - theres a 'sweet spot' where VW thinks it's so small it can't add it to your (declared) wall thickness, but renders OK. For me, this was 0.01. This was with 0.0001 Hope this helps.


- 3 replies
-
- 1
-

-
- walls
- wall components
- (and 2 more)
-
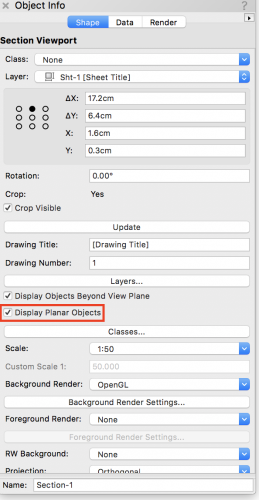
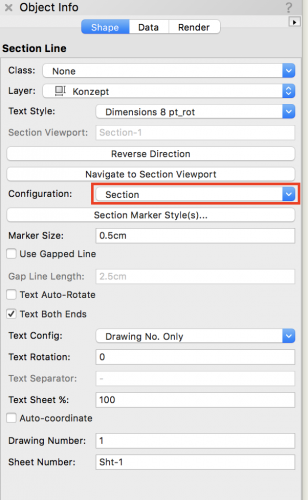
Strange, no-one has replied. This is the same for me still on SP4. Ive decided I can't trust updates from NNA atm. (and Ive taken to wearing a tin-foil helmet when using VW) The settings for your section viewport need changes...but I can't reason why.... See if you can reason... Set as above then update (stay with me!) Now deselect Display Planer Objects Update - and it seems fixed BUG? The other thing I found is your choice of section line appears to have the same effect. Open the file again (revert to saved) and look at the section line... If you change it to either of the other two options in the OIP your Viewport comes to life - and says alive to curser cues even when returned to your first option. BUG? Perhaps someone else can confirm (or point out I need to lay off the tin-foil helmet) Hope this helps (its been a long day)
-
Not what you want to hear @lgoodkind, but Ive tested this again and I can't get it to not work. Surely its just that symbol? Or maybe a group of symbols that you use a lot. (Although I know you said it was a stock VW Library issue) Edit - What version(s) are you guys running?
-
Oh - sorry thats not worked. I felt sure it was just the 'quirky at best' image function not displaying correctly and that by experimenting with the settings in cell format you would crack it. Seems its more problematic. You say its all symbols? Maybe others can offer advice if they've experienced similar problems. Happy to take a look at a sample worksheet if you think that may help.