


Boh
-
Posts
1,704 -
Joined
-
Last visited
Content Type
Profiles
Forums
Events
Articles
Marionette
Store
Everything posted by Boh
-
I never knew this. Thanks for the pro tip! I played around with it little and it looks like if the class(es) you want to edit in the referenced file are not in your working file, then changing a ref vp class to use the document's class definition imports the class into the working file. You can then edit the class in the working file including using sheet layer vp class overides. Very cool. The only caveat is that the class is then referenced, so if you edit a class in the referenced file then those changes are brought into the same class in the working file when the reference is updated.
-
Hi @LewisFegen. Sorry, no we no longer require staff for vectorworks. Thanks for your interest.
-
VW2023 and VW2024 architect licenses for sale
Boh replied to Boh's topic in Buying and Selling Vectorworks Licenses
License sold. -
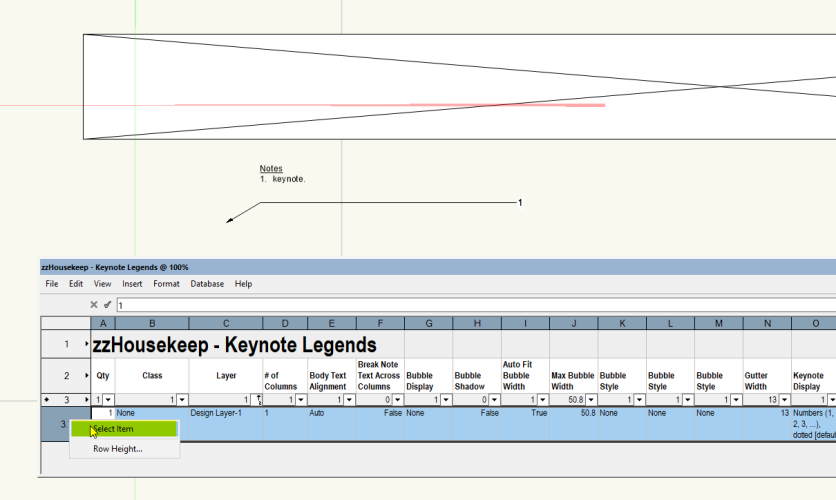
You might find this keynote legend worksheet useful for finding / formatting legends. I put it in this shared folder as for somereason I can't attached it to this message. https://cloud.vectorworks.net/links/4PhxMqfAa27Q4PHW/
-
There is a custom script that does this which I got from this forum years ago. I tried export it from my vw but the plug-in manager doesn't seem to be working atm otherwise i'd share it. Perhaps search the forum?
-
There are various ways to set up wall styles that might suit different projects. My baseline is to make a new style for each wall type of build up but I make sure to set all component and wall style attributes to use class attributes. This means I need a set of wall component classes which wall define the texture of walls with components using that class. My other baseline is to set the class of the wall core to use the wall class. This means for example the walls placed in a black “proposed wall” class will have a black wall core and the same style placed in a white “existing wall” class will have a white core. Using class attributes means that if I decide to change the texture of a certain finish, I just edit the class all wall styles using that component class will update. Another advantage of using class attributes is that you can use viewport class overides. So I’m one view you can have a pink wall and in another view of the same wall you can have the wall appear blue. In essence using classes along with wall styles provides simple modelling with flexibility whilst providing global editing capability across multiple wall styles. A project can easily get more complicated but as mentioned this is just a baseline.
-
Option to disable classes in sheet layers
Boh replied to Steve Murray's question in Wishlist - Feature and Content Requests
I may do that, we might have 500 or more classes in a file but with hierarchical display they collapse down to just 14 sets of classes and each of those sets have subsets, so still a few clicks but easy enough. Other techniques are to select the objects you want to work with and group them, thereby isolating them. Or, once I have a particular view but I need to navigate to another one, I’ll do that with a second floating window so I don’t lose the custom view. There is of course the clip cube too. These are kind of workarounds and I probably should set up saved views more often but I’d argue that it ends up being extra file management time. -
Option to disable classes in sheet layers
Boh replied to Steve Murray's question in Wishlist - Feature and Content Requests
Interesting that you rely so heavily on saved views, whereas we hardly use them. The difference is undoubtedly to do with the type of work we do and how we collaborate with others as well of course our preferred way of working. We have probably dumbed it down so that others can easily jump on a file, and I guess we could make better use of saved views, but in general we find saved views another bit of file organisation that sucks up time. They do come into their own occasionally especially when you need to quickly jump from one custom 3d view to another view. -
Notes Manager / General Notes / Callouts Suggestions
Boh replied to _James's question in Wishlist - Feature and Content Requests
Agreed. Lately I’ve only been making project/file specific notes databases for keynotes and using the project notes database to keep the keynotes uniform. For standard call-outs I might initially draw the note from a master notes database but thereafter would tend to use a worksheet for global editing of standard call-outs. -
Notes Manager / General Notes / Callouts Suggestions
Boh replied to _James's question in Wishlist - Feature and Content Requests
I've found that if I change a note in a notes database, I'll only be asked if I want to update the notes in the current open file to the linked revised database note. Other files with notes linked to the changed note will not change but just become unlinked. -
Notes Manager / General Notes / Callouts Suggestions
Boh replied to _James's question in Wishlist - Feature and Content Requests
The notes manager was improved a few versions ago so it is actually possible to effectively update notes across a file using a notes database. That said, I agree with @line-weightthat it is a tricky tool to use. Not very intuitive. If feels like it needs to be upscaled and rethought so that can be effectivley and efficiently used across multiple diverse projects. The actual notes database files are very small. It seems to me it would be better if each drawing file had it's own integrated notes resource, and accessed just like any other resource in the resource manager. -
Option to disable classes in sheet layers
Boh replied to Steve Murray's question in Wishlist - Feature and Content Requests
I always put legends in vp annotations for this very reason. It doesn’t matter what the current file class settings are the legend will always publish. Added bonus is that any vp class over rides used will also act on the legend. -
PM if you are interested. Thanks.
-
Option to disable classes in sheet layers
Boh replied to Steve Murray's question in Wishlist - Feature and Content Requests
I think there is a bit of confusion about this request. As I understand it, it is not about class visibilities in viewports, rather the class visibility settings when you are on a sheet layer. If you draw a line on a sheet layer (but not in a vp annotation), you turn it's class off, it will become invisible. So if you have objects on different classes on sheet layers and they are not all visible when you go to print then those objects will not appear in your print. This is a potentially dangerous situation, for example, if you issue construction drawings with important information not appearing on your drawings without you realizing it. My workaround to avoid this is to keep all objects on sheet layers on the none class. Any objects with a different class, if not in a design layer, go in VP annotations. So I fully support this request. -
What are the differences between and 'issue' & a 'revision'?
Boh replied to Liam-HEM's topic in Architecture
Yes, with the project revision history worksheet, once you have done your revision changes you then need to add an issue for the revision numbers to show in the worksheet. The title block manager can be tricky to work with though I understand it has had undergone some improvements in vw2024. My process for what it’s worth: Open title block manager Go to select sheets and choose the sheets revise Add revisions Go to select sheets and choose the sheets to issue (if different from the set you’ve just revised) Add an issue Go to select sheets and choose all sheets you want to appear in the project revision history worksheet. Make sure “update project revision history worksheet” is checked. Close title block manager. Hopefully the worksheet updates correctly! -
Hey Tom. Yes, I’ve done that too, I just don’t like having to model both 2d and 3d in a hybrid symbol and I don’t like the auto hybrid tool. Also using an orthogonal top view means mech roof plant, terminal vents, spouting, chimneys, access ladders etc can just be simple 3d solids with no 2d portion. Much quicker for revisions.
-
I’ve done some very consulated parapet cappings using EAPs or combinations thereof. That said it would be great to have a plug-in tool of some nature included in the architect release of vw. One tip I discovered recently is for roof plans to use a top view rather than top / plan. The extrudes will then appear as solid rather than wireframe and wall components aren’t visible like they are in a top/plan view.
-
Custom Selection please show me where my symbols are?
Boh replied to Bruce Kieffer's topic in General Discussion
Possibly your symbols were nested in groups or symbols or possibly on sheet layers or in viewport annotations. I can’t think of another reason why that shouldn’t work. -
Custom Selection please show me where my symbols are?
Boh replied to Bruce Kieffer's topic in General Discussion
You could just turn on all classes and layers, show/snap/modify others on your layer options, and then when you use the custom selection tool you can then zoom to selection (ctrl 6 on windows). This gets tricky on a busy cluttered file. -
Custom Selection please show me where my symbols are?
Boh replied to Bruce Kieffer's topic in General Discussion
Hi Bruce. I don't know how to use the custom selection tool to find the item but you can instead use a worksheet to find them. You use a similar process to set the criteria for the custom selection tool as you do for the worksheet. Once you have the worksheet you can select a line item and select it in your drawing file. Attached is one I use all the time along with another one that simply lists all objects in a class which can be used in a similar way. There are some instructions in the worksheet itself if you are not familiar with how worksheets work. It's important that the columns aren't summarized otherwise you can't select a line item in your file. HTH Symbol locator.vwx -
When you want to link a section line to section vp for example you need to scroll through a list of viewport names to select the one you want. Auto generated names like viewport 1 and viewport 234 aren't very helpful. I don't know why you can't but it would be nice if you could link by viewport drawing title instead. I use a script to rename viewports rather than do this manually which would be very laborious.
-
This is why on my sections sheet I often place a reference plan off the sheet page which displays instances of the section lines for sections on that sheet. So I can quickly jump back and forth between section and section line.
-
Title Block Border Revision History Reports
Boh replied to Boh's question in Wishlist - Feature and Content Requests
Thanks @Nikolay Zhelyazkov! I’ve still to checkout vw2024 but this is promising. Regards. -
I have a section line style that has no markers and a few different data tag styles that substitute as section line markers. The section lines can define or link to the section view with different markers for each section line as required.
-
Adding to the mix that if you want different size style markers for the same section in different views you can use a data tag as a section line label instead of the actual section line marker. This also allows the marker to move anywhere you want which can be useful on busy drawings.

