

Elite Exhibits
-
Posts
583 -
Joined
-
Last visited
Content Type
Profiles
Forums
Events
Articles
Marionette
Store
Everything posted by Elite Exhibits
-
"Favoriting" items in the Resource Manager
Elite Exhibits replied to cjanuszewski's topic in Architecture
Question: There are two locations on the Mac for Favorite files - One is Application Support and the other is the Application Drag & Drop (Great Tip!) as @Tom W. suggests above, appears to works with the Favorite files in the Application Support folder, NOT with the Favorite files in the Application Folder Question is: ¿ Why two locations for Favorite Files ? Peter -
"Favoriting" items in the Resource Manager
Elite Exhibits replied to cjanuszewski's topic in Architecture
On the subject of searching RM Favorite... 1. Is there a contextual way to change the RM Filter ? (Right clicking in the middle area...) 2. If there are RM items listed as RenderWorks Textures (..for example) are there also other textures ? The sub folders simply state "Textures"... Peter -
"Favoriting" items in the Resource Manager
Elite Exhibits replied to cjanuszewski's topic in Architecture
@Tom W. Truly a hidden feature ! Many Thanks Peter -
"Favoriting" items in the Resource Manager
Elite Exhibits replied to cjanuszewski's topic in Architecture
@Tom W. This is a great way to collect oft used items - We have many files with pre defined Hybrid Symbols. Some of these VWX files contain thousands of items... We have a set of drawings locked & backed up, with specific/desired duplicates only in the VW favorites. File names are assigned so there is a logical order on the right side of the RM. Subdividing, as Tom suggests above also minimizes the time needed to locate something. In the RM, if the "All Resources" filter is set at the top, and you select a Favorite on the left, that only has Textures, then you do not need to guess at what you will find there, nor do you need to change that RM filter setting as often. The opposite is also true. Set the RM Filter to, "Text Styles" (for example), then arrow down the Favorites list on the Left. When you hit a favorite with Text Styles it "jumps" into the middle window for easy selection. Sub Folders in specific Favorites are also accessed (...on the left) with the arrow keys (expand/open/close/minimize) on the left side of the RM Peter -
How do I dimension this VP correctly?
Elite Exhibits replied to Bruce Kieffer's topic in General Discussion
@Bruce Kieffer Dimensions in an iso / Perspective Viewport are in the Design Layer https://www.youtube.com/watch?v=W2SJ-ftuNvY Peter -
Perimeter mapping seems to be gone from VW2023.
Elite Exhibits replied to MGuilfoile's question in Troubleshooting
@Matt Panzer My first take on Per Face Texture Mapping was to delete the tool from the work space. It appear to do things automatically (?) where none were desired. (A common faux pas: VW adds a feature, vs introduces a feature) Tech Support was limited on how to NOT have the Per Face kick in. Initially it only served to create more work. Fast forward and a few NON VW videos have clued me in to what the possibilities are with Per Face Texture Mapping. The point is ... VW may not need to bring back Perimeter Mapping - what would help is a take on This was the way to do it (Perimeter) / Here is how VW made it better (Per Face). (...and don't sugar coat it ) Peter -
Snapping in 3D - Frustrating
Elite Exhibits replied to Michael Siggers's topic in General Discussion
@Michael Siggers Try setting the object down then pick it up again. Draw, for example a rectangle, click the first point... Then set the second point down (anywhere) Pick that second point up again (Selection Tool) Now try to snap to the desired point See Attached Peter Second time Is the charm.mov -
Resource Manager - Delete files
Elite Exhibits replied to Daniel OKane's question in Troubleshooting
@Daniel OKane Since about the start of the year 2021 - I tend to use GOOGLE to search the VW HELP system - Yes there is a plethora of information in VectorWorks HELP - Yes one is able to search internal to Vectorworks - finding the applicable information is often the caveat... (see attached) Somewhere on this FORUM a suggestion was posted for searching In a search engine : what you want to find site:app-help.vectorworks.net/202X/ (Change the end four digit year to match desired version of VW) Example: Paste in Place site:app-help.vectorworks.net/2021/ should search for "Paste in Place" in the 2021 HELP files and may I add that the - what you want to find - verbiage is another stumbling block (Quotes should get the exact phrase) Peter Search VW Help for Paste In Place_1.mov -
Perimeter mapping seems to be gone from VW2023.
Elite Exhibits replied to MGuilfoile's question in Troubleshooting
Hmmmmmmm... ¿ have I seen this comment before ? Peter -
Lighting tutorial NOT related to Spotlight
Elite Exhibits replied to MGuilfoile's topic in General Discussion
FYI - On a Design Layer - Zoom with the keyboard (Mac = Command 1 or 2) With a Cropped Perspective and without Very distinct difference. Our workflow always has Cropped Perspective on for 3D Design Layers. While there are many reasons to use Viewports on Sheet Layers, the opposite is also true with the simplicity of Saved Views / Class Settings and a single Design Layer. For many projects - faster - easier ... and yes it utilizes the Cropped View. Peter -
FYI I often find that when I draw a new object on existing 3D geometry (Top/Plan typically) the first snap / start point works. When the second point is selected and there is "no snap" I put the finish point down near by, then select it again, and that final point I wanted ... the one that I could NOT snap to... It snaps just fine ?!?. Its just a Workaround NOT a fix Peter
-
after update, solid objects not obscuring lines anymore
Elite Exhibits replied to iswope's question in Troubleshooting
@iswope Long standing issue with Screen Plane / Layer Plane - check to see if some items are Layer plane - This will create the illusion (ARGH!) that one item covers the next when you are thinking it is the opposite. Recent project here, had just the Callouts being set to Layer plane, so they were visually cut off by other components. Even though the Plane Mode setting was for Screen Plane. One workflow / work around is to duplicate a known item vs reselecting the tool and making new. There are also Scripts on the FORUM that will assist if this is your issue Objects to "Screen Plane" & Objects to "Layer Plane" (Screen Plane - also known as Top / Plan Component) Peter -
as @Pat Stanford mentions above - exact duplicates render with strange artifacts see attached two of three bars have exact duplicates to start - when deleted (...or Purged / Coincident ...) the artifacts are gone Peter Exact Duplicate Noise.mov
-
Anyone know where extract image from texture went in 2024?
Elite Exhibits replied to jjanavs's question in Troubleshooting
@jjanavs FYI - for several versions now, we have experienced an issue with the Resource Manager - where you right click on a texture and select an option, only to find that there was a different item already selected and that is what you end up with (edit or other wise) vs what one right clicks on Peter -
@Don_ when you select the ViewPort and Open the OIP or get the Properties What does it say - Red Arrow - Background Render? (Attached) What does it say VP.pdf Peter
-
More on the use of the 'Glow' reflection option
Elite Exhibits replied to Kevin K's topic in Rendering
@Kevin K FYI - Another ... "what does the GLOW shader do" example No lights save one to control the ambient look ie: a single light in this design - in the file / turned on / set to zero (... based on how VW treats a scene with no lights) Other than that - No Lights were harmed in the making of this rendering Peter
-
Section Viewports
Elite Exhibits replied to shorter's question in Wishlist - Feature and Content Requests
@shorter Does LOCK not work for you in this situation ? Might be in a different location in your Workspace ... Peter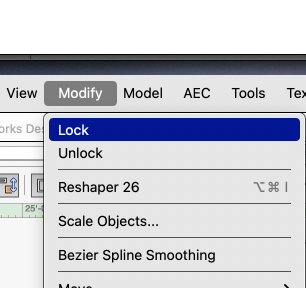
-
Auto update texture when an image is changed
Elite Exhibits replied to htranbos's question in Troubleshooting
@htranbos @Jesse Cogswell FYI - Look at this thread very easy to do Great for Museum design - exhibits - store design Peter -
Vectorworks keeps selecting the wrong texture. PLEASE HELP!
Elite Exhibits replied to htranbos's topic in General Discussion
FYI @htranbos Other threads - https://forum.vectorworks.net/index.php?/topic/105229-right-click-selects-wrong-item-in-resource-manager-vw-2020/ Peter -
Vectorworks keeps selecting the wrong texture. PLEASE HELP!
Elite Exhibits replied to htranbos's topic in General Discussion
@htranbos I have found that the Resource Browser has a continuing problem in that - if there is an item selected and you right click to apply or edit something from the RM it does NOT always take what you right click on - instead it takes what is selected (Blue) - The aggravation comes when this selected item, in the RM, is not directly visible - (ie: you would need to scroll up or down to see it) - So the workflow is now: be nice / click twice to make sure what you select is really selected. I tend to use the RM vs the OIP as the Textures (for example...) in the OIP are oddly illogical in the selection process. With a complex list of textures (for example...) one typically needs to scroll and pick a different one, even if the desired texture was just created, or last used. Would love to know the logic in this part of the application... Peter -
Vectorworks keeps selecting the wrong texture. PLEASE HELP!
Elite Exhibits replied to htranbos's topic in General Discussion
@htranbos Where do you select the texture to apply ? Obj Info ? - Resource Manager ? Peter -
@katebjohnson Import the file with the Drag n Drop as @E|FA mentions above If it is not a Layer Plane Object to begin with, change this in the OIP Do so in the Front View (import the graphic only as a Screen Plane. First set the desired size, view, location, etcetera, then change it to a Layer Plane Object - less work) If the graphic is a rectangle you are able to resize it as you would a rectangle Move this Layer Plane graphic in 3D space, until it is just in front of where you want it to be. (Attached - GRAPHIC ON A WALL.mov - shows such an example.) Note that the Graphic is visible with the design in a wireframe state. If this graphic is not the final shape you desire, Double Click the graphic and add a Crop. The crop is any single shape you are able to draw. This Graphic / Sign is two dimensional. ie: Layer Plane is akin to extruding geometry and setting the Z to Zero. It is adjustable in 3D space. (¿ 2D or 3D ?... Confusing) If it is the face to a sign cabinet, create the cabinet with extrudes, and apply the graphic where the sign face is If you wish, for example a set of flat plate letters, on a brick wall, use a PNG with the back ground invisible / alpha channel / green screen. (Attached - BLACK LETTERS ON CABINET.mov - shows such an example.) Black Letters (logo) is a graphic (PNG) set, just in front on the cabinet face. This could be a separate piece of geometry placed as a "Decal" or if you have a few hours to kill, a Texture in a Texture as VW calls the Decal option in the OIP. BLACK LETTERS ON CABINET.mov BLACK LETTERS ON CABINET.mov BLACK LETTERS ON CABINET.mov Peter GRAPHIC ON A WALL.mov BLACK LETTERS ON CABINET.mov
-
Go away – Component Edit palette!
Elite Exhibits replied to Kaare Baekgaard's question in Wishlist - Feature and Content Requests
What is a long term issue is: VW not understanding the workflow ramifications of the additions / changes / features. As far as the Component Edit palette goes, the title of this thread is apropos - We have been forced to find alternates to the workflow because of it. Peter -
Go away – Component Edit palette!
Elite Exhibits replied to Kaare Baekgaard's question in Wishlist - Feature and Content Requests
@line-weight maybe you know this - we have found the above to be another aggravation of Unified View Peter -
@Bruce Kieffer Ironic ... wish it WOULD auto center and often, it does not Workflow has added Command-6 to the regular mix Peter


