


mjm
-
Posts
1,282 -
Joined
-
Last visited
Content Type
Profiles
Forums
Events
Articles
Marionette
Store
Posts posted by mjm
-
-
downloading as I type...
-
41 minutes ago, jeff prince said:
Have each student draw a couple of symbols and share with the class. You’ll have a library of your specification in no time.
@jeff prince I actually love this idea.
-
 1
1
-
-
2 hours ago, klinzey said:
The Spotlight numbering tool numbers the cells in the same order they appear in the OIP. This is determined by the stacking order of the cells inside of the symbol.
If your cells are not numbering in the correct order edit the symbol, overlap the cells slightly so you can see the stacking order and then use send forward or send backward to get them in the correct order then align them again.
If you are using one of the symbols shipped with Vectorworks please let us know which symbol so we can correct it for everyone.@klinzeyYes, I'd already forgotten that. The prompt is much appreciated. Rendering a different project atm, but can't wait to dive in.
-
56 minutes ago, Pat Stanford said:
It SHOULD work for Publish also. I have published numerous sets using different page sizes each based on the Sheet Layer setting.
If you are trying to Publish multiple sheets all from design layers then you will get the problem you describe as all Design Layers share a single Page Setup so one page size, one orientation, one resolution. Each Sheet Layer has its own Page Setup to avoid that problem.
@Pat StanfordThank you as ever for your input Pat.
I don't however understand what you are driving at with "If you are trying to Publish multiple sheets all from design layers…"
Each design layer uses the same page layout and size.There are three same-dimension SLs; two Portrait, one Landscape. The Portrait sheets get published to pdf as a landscape sheet, ie; the portrait-based layout appears vertically in a Landscape sheet. This does not happen in a new file where the SL layout appears to be respected. Wonder why that is…
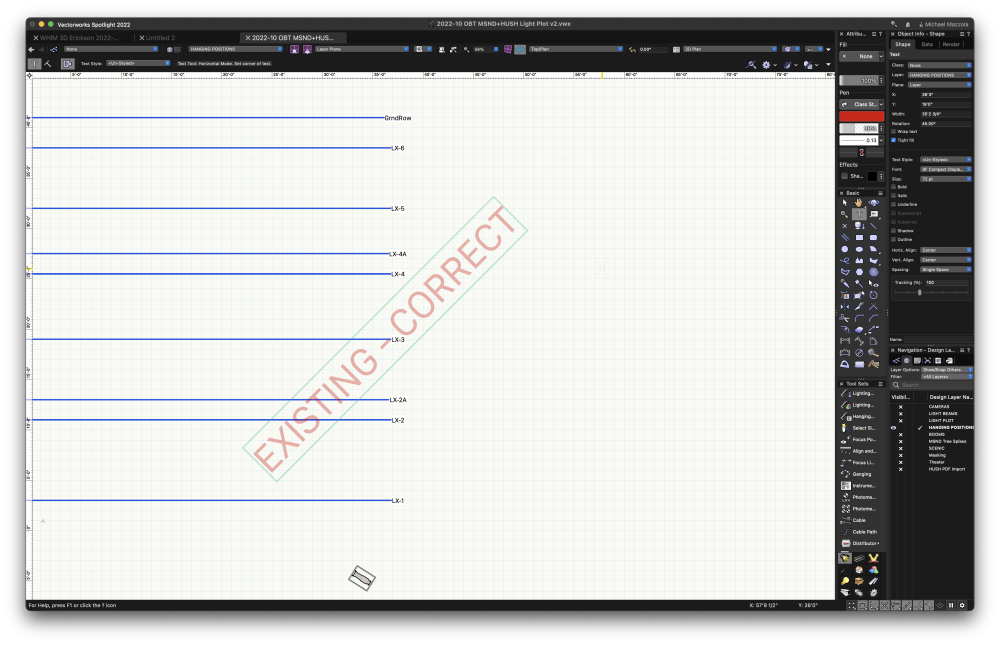
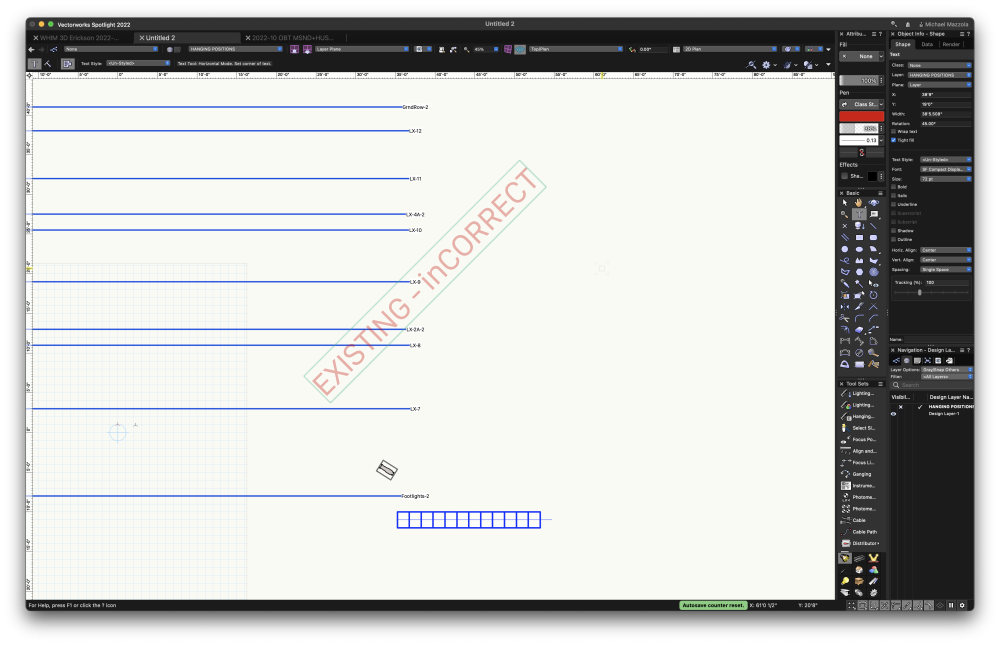
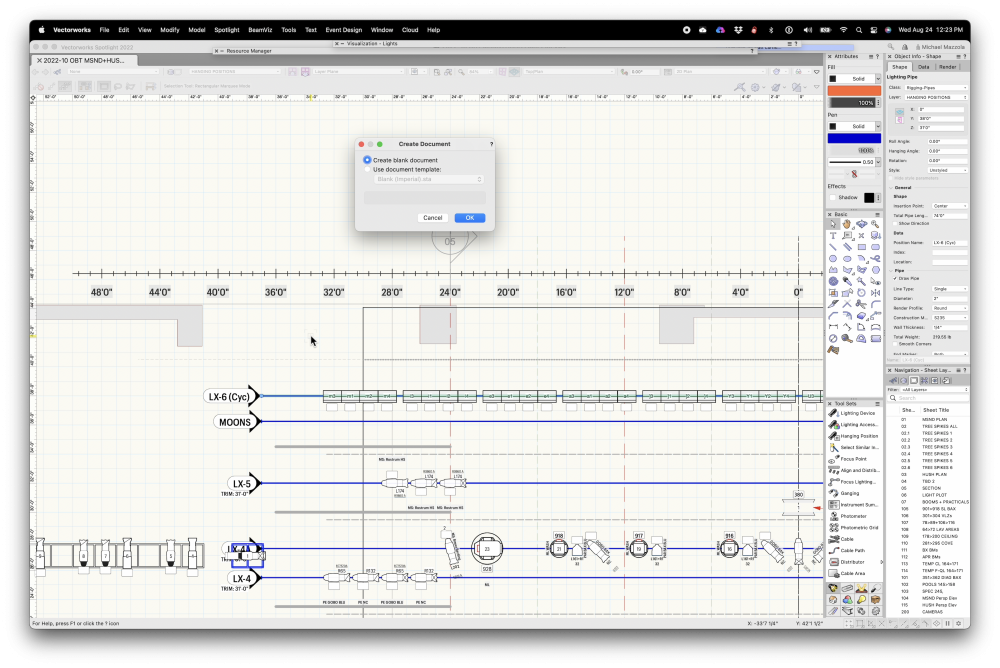
And, when I choose to create a new blank document (say in order to rebuild the file in a clean document) import my layers with layer objects, why do the Position Names change to what appears to be some default numbering system 1, 2, 3, 4 etc?I find this is reproducible across the first two existing files I try this import with, see screenshots attached.
Created a new file, did the DL & SL + objects import, went through and renamed all positions & in happy (?) news, the new file does appear to publish sheets correctly, so I'm loosely guessing the originating file is corrupt in some way.
-
1
-
-
50 minutes ago, MrTemplate said:
Hi mjm;
I only see the movie of Josh's Savvy Sequencer?
Hi @MrTemplate—I guess the Autonumbering part, which is first, goes by too quickly. My apologies. The very first action which occurs is the cursor sliding frame R to the Spotlight Auto Numbering tool, the cursor clicks & if you watch closely, you will see the deeply incorrect numbering executed by that tool. That is followed by the menu choice of Savvy sequencer, etc.
-
Why does SL Auto Numbering seem so uh iffy? AutoNumbering seems to fail regularly with multicell fixture numbering.
I have attached a video demonstrating both the SL AutoNumber fail as well as the current workaround— Savvy Sequencer, developed by @JBenghiat.
-
12 hours ago, mhersland said:
Hello all
I am trying to do some renderings with Entertainment fixtures, moving lights.
However I am struggling a bit on getting the right workflow.
Is there a way to get different positions, zoom / fokus / color / gobos?
I am looking into scenes, but they don't seem to change the positions of the fixtures.
How do you work with moving lights, and renderings?
All is very appreciated
Best from Mathias
@mhersland Pretty much think Nemetschek wants you to do this type of work in Vision…
-
On 4/5/2022 at 6:02 PM, Pat Stanford said:
First, in Page Setup check the box for Choose size unavailable in printer setup. Either choose from the list or just type in the Width and Height you want. If you don't want to see the page break lines, uncheck the Show page breaks check box.
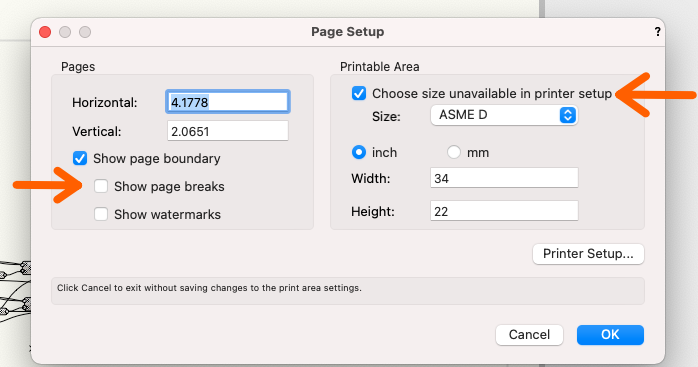
Then in Publish, select the item(s) and choose Options. From the Export PDF Options dialog box make sure the Export Whole Document as One Page is selected.
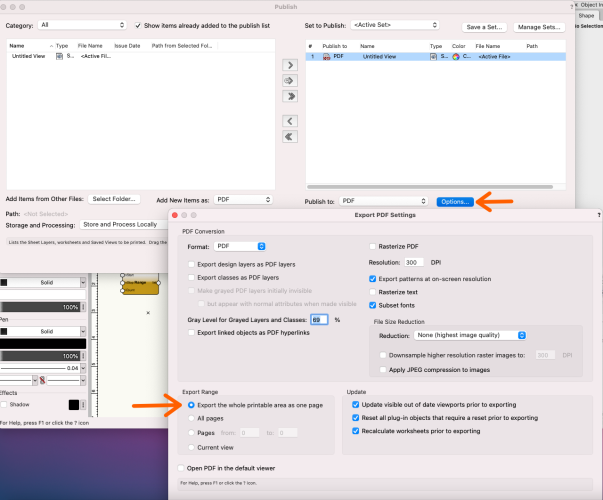
@Pat Stanford @JuanP Pat- thanks for the info above, which works perfectly for exporting a sheet. Unfortunately, publishing the same sheet/s results in Pages not respecting the P/L layout, ie; all pages published seem to be oriented only Landscape, no matter what the Sheet sized and layout is.
I note there's no switch in the Publish pane to set the exact parameter you show, by the individual sheet, some may be Landscape, others may be Portrait. Having to go through and export each one individually is a carbuncle.
To my recollection, this began after I got the MBP M1 and found no way to install or even locate DesignJet PPDs to set up a fake printer.
I'd be thrilled if the issue here is that I am simply missing a tiny toggle somewhere.
**couple more notes:
- A new file does not exhibit this behavior, it produces correctly both in publish mode and export mode, no matter how the design layer is set up.
- In that new file, the Export Range holds it's toggle on "Export the whole printable area as one page", and even when I change that toggle to"All Pages" in the Export PDF Settings pane, when I publish to PDF, all pages export correctly according to their SL layout dims.
- whereas in my working file, that value is not held. Super irritating.
-
21 hours ago, Jesse Cogswell said:
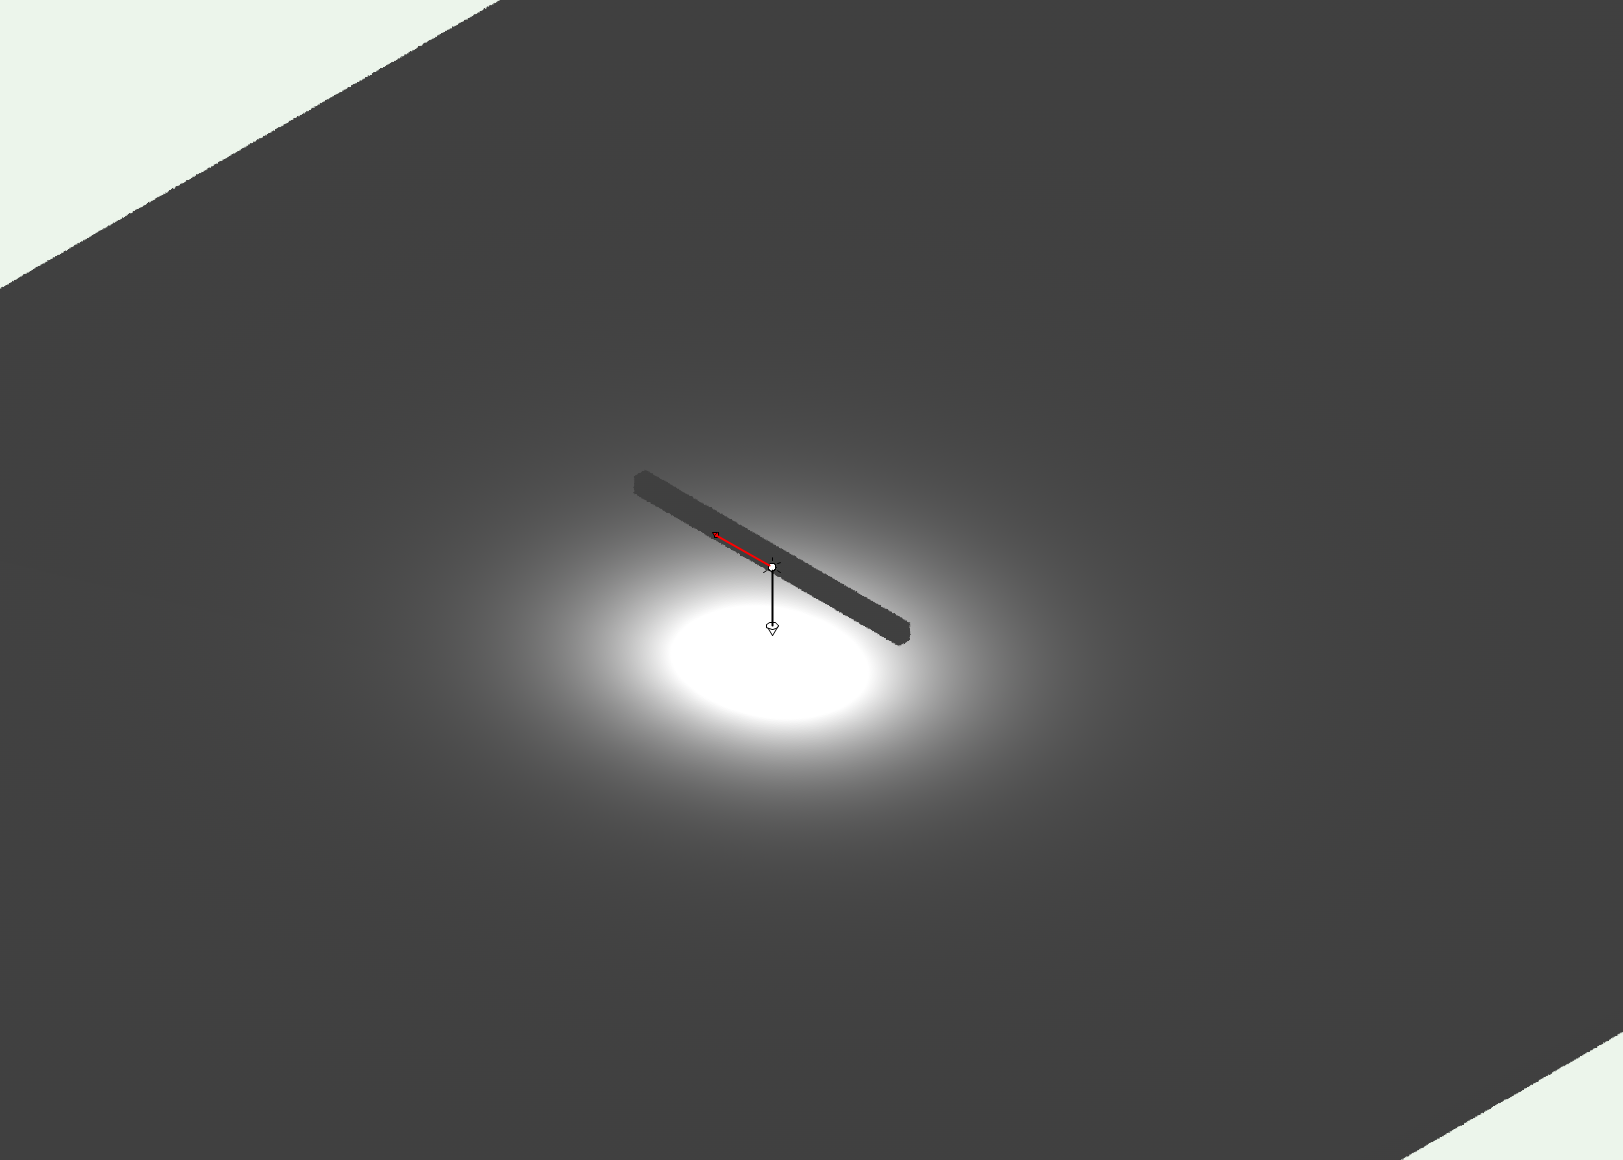
Good morning. I am trying to do some realistic rendering using some LED linear lighting fixtures and have a question regarding IES distribution files in Vectorworks.
A standard IES file contains data for the luminous area dimensions (in my case, 3"x6'0"), but does Vectorworks actually use that data? Or do I need to distribute Custom Light Objects along the body of the fixture to get accurate output? If so, with what spacing?
As an example, here is a screenshot from VW with the a symbol containing a custom Light at 2'-0" with a loaded IES file:
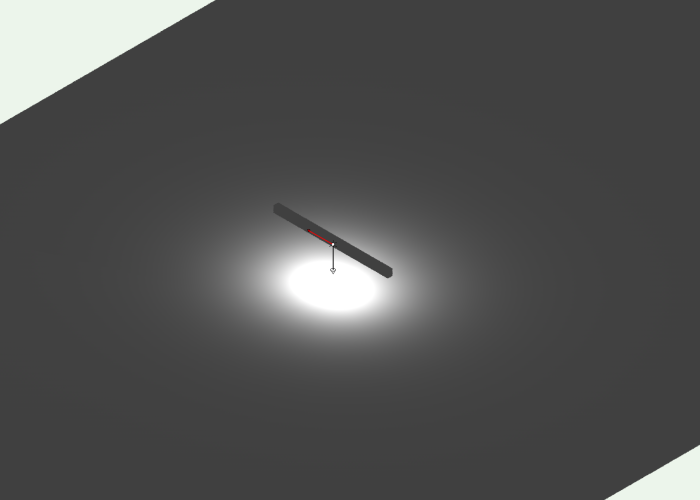
You'll notice that the beamspread looks pretty circular, even though it wouldn't be in real life.
Here is a screenshot from AGi32 (lighting calculation software) with the same fixture/IES file at the same height:

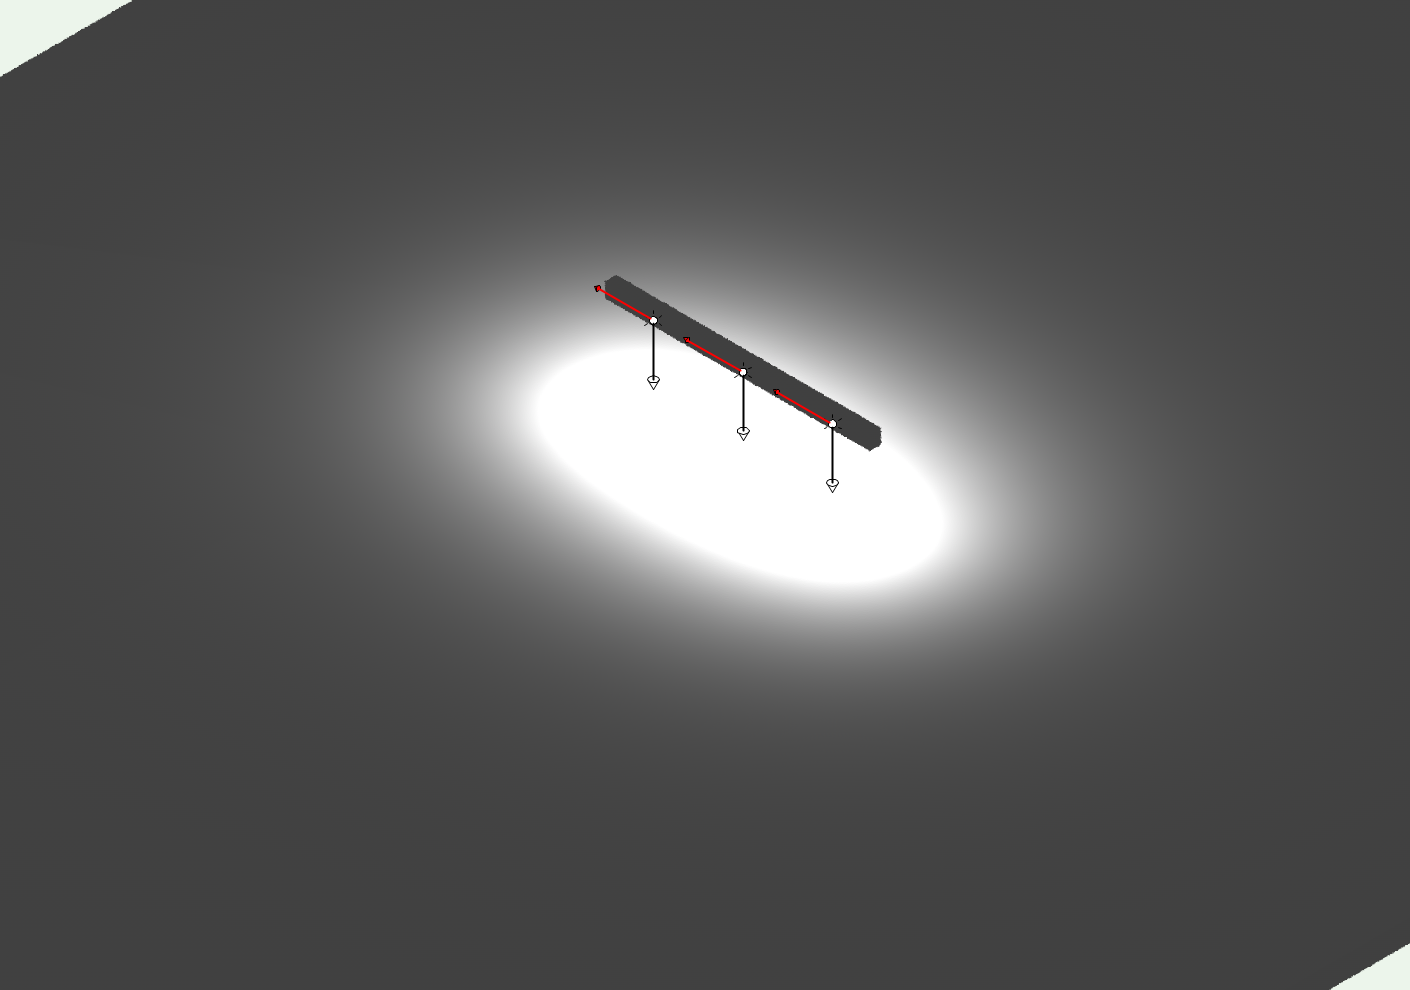
This distribution looks much more like what I would suspect. I can mimic this somewhat by copying the custom light and spacing them out, but I would love to know the proper spacing to do this with so I don't mislead the client.
Here's the custom light distributed every 2'0":
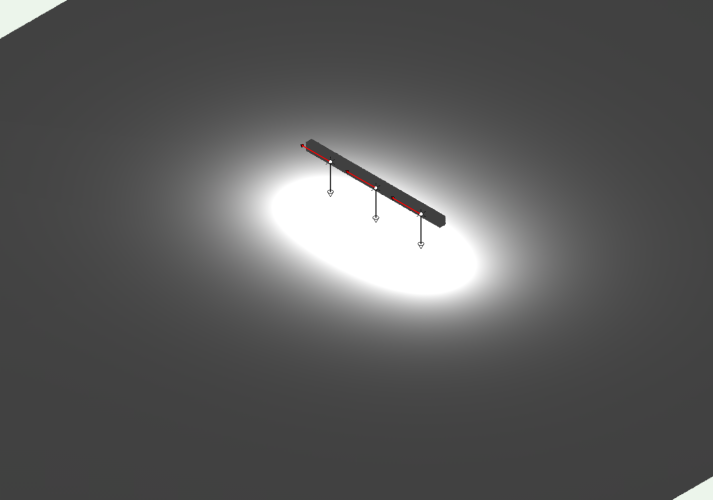
Big thank you to anyone who knows the answer to this question.
Same Question here. Been hand building strips for a while now with IES files but having to duplicate multiple sources to make something resembling RL output.
-
Just now, mjm said:
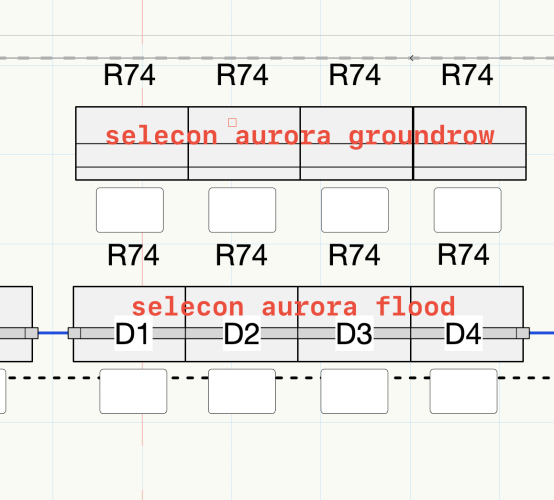
@JBenghiatStellar. Thanks man. It appears there may be other stranger things going on too. the attached screenshot shows two symbols direct from the VWX base resource mgr files from the Select line. One handles
everythingalmost everything correctly (except for the backwards cell numbering), one doesn't show the unit number at all (Which of course is the exact fixture I need. Haven't found a solution to that yet.But your suggestion about stacking works a treat.
-
56 minutes ago, JBenghiat said:
Yes — and if you've numbers with Savvy, you should immediately see the numbers in the correct order.
I'm also going be memory here — I believe cells order is front to back, but there's always a chance I have that backwards.
@JBenghiatStellar. Thanks man.
-
24 minutes ago, JBenghiat said:
Yes — just edit the symbol and use Send Forward/Send back until the cells are in the right order. Usually, I select cells in order (starting with 1) and Send to Back.
@JBenghiatSuper. Thanks ever so. Assuming I can do that to the symbol in current use
-
14 hours ago, mjm said:
@JBenghiatfunny you mention that… I have attached a vwx demonstrating a couple of the numbering issues
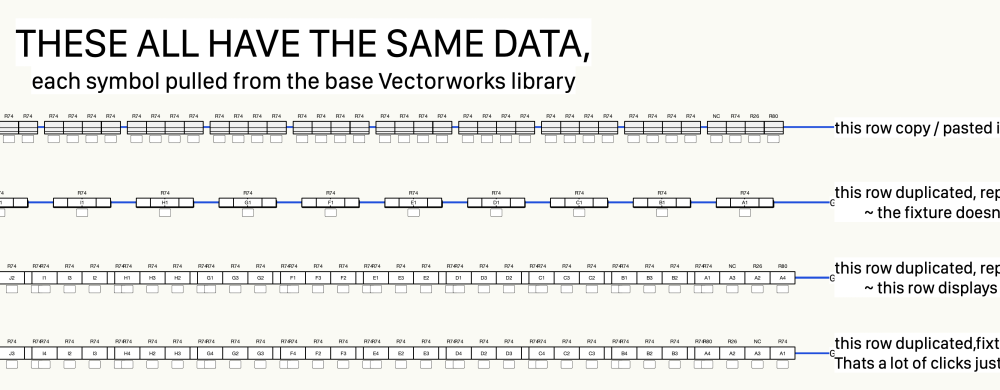
@JBenghiat, @klinzey I added the MR-16 Altman Z-Strips to my plot today. Numbering issues there as well. Is it possible for me to somehow re-build the multicell fixtures myself so they number correctly?
-
3 hours ago, klinzey said:
@mjm I need some more details for the bug report. How did you import into the blank file? Copy/Paste, workgroup referencing?
Thanks for asking @klinzey. I went through the Organization window of the new blank document. Import relevant Layers and their objects.
For all prior tests to drill down to the Lighting Pipe issue it was Copy Paste In-Place to new document.
HtH
-
29 minutes ago, JBenghiat said:
@mjm FYI, Savvy Sequencer and Select Similar use the cell numbers for multi-circuit numbering. The cell order is determined by the stacking order in the MC symbol. You should see A1 align with the channel and color for cell one, for example.
If these directly from the content library, then there is a bug that the cells are not in the correct stacking order.
@JBenghiatfunny you mention that… I have attached a vwx demonstrating a couple of the numbering issues
-
2 hours ago, mjm said:
I'll have to check with client.
Currently installing SP v5, with fingers x'ed
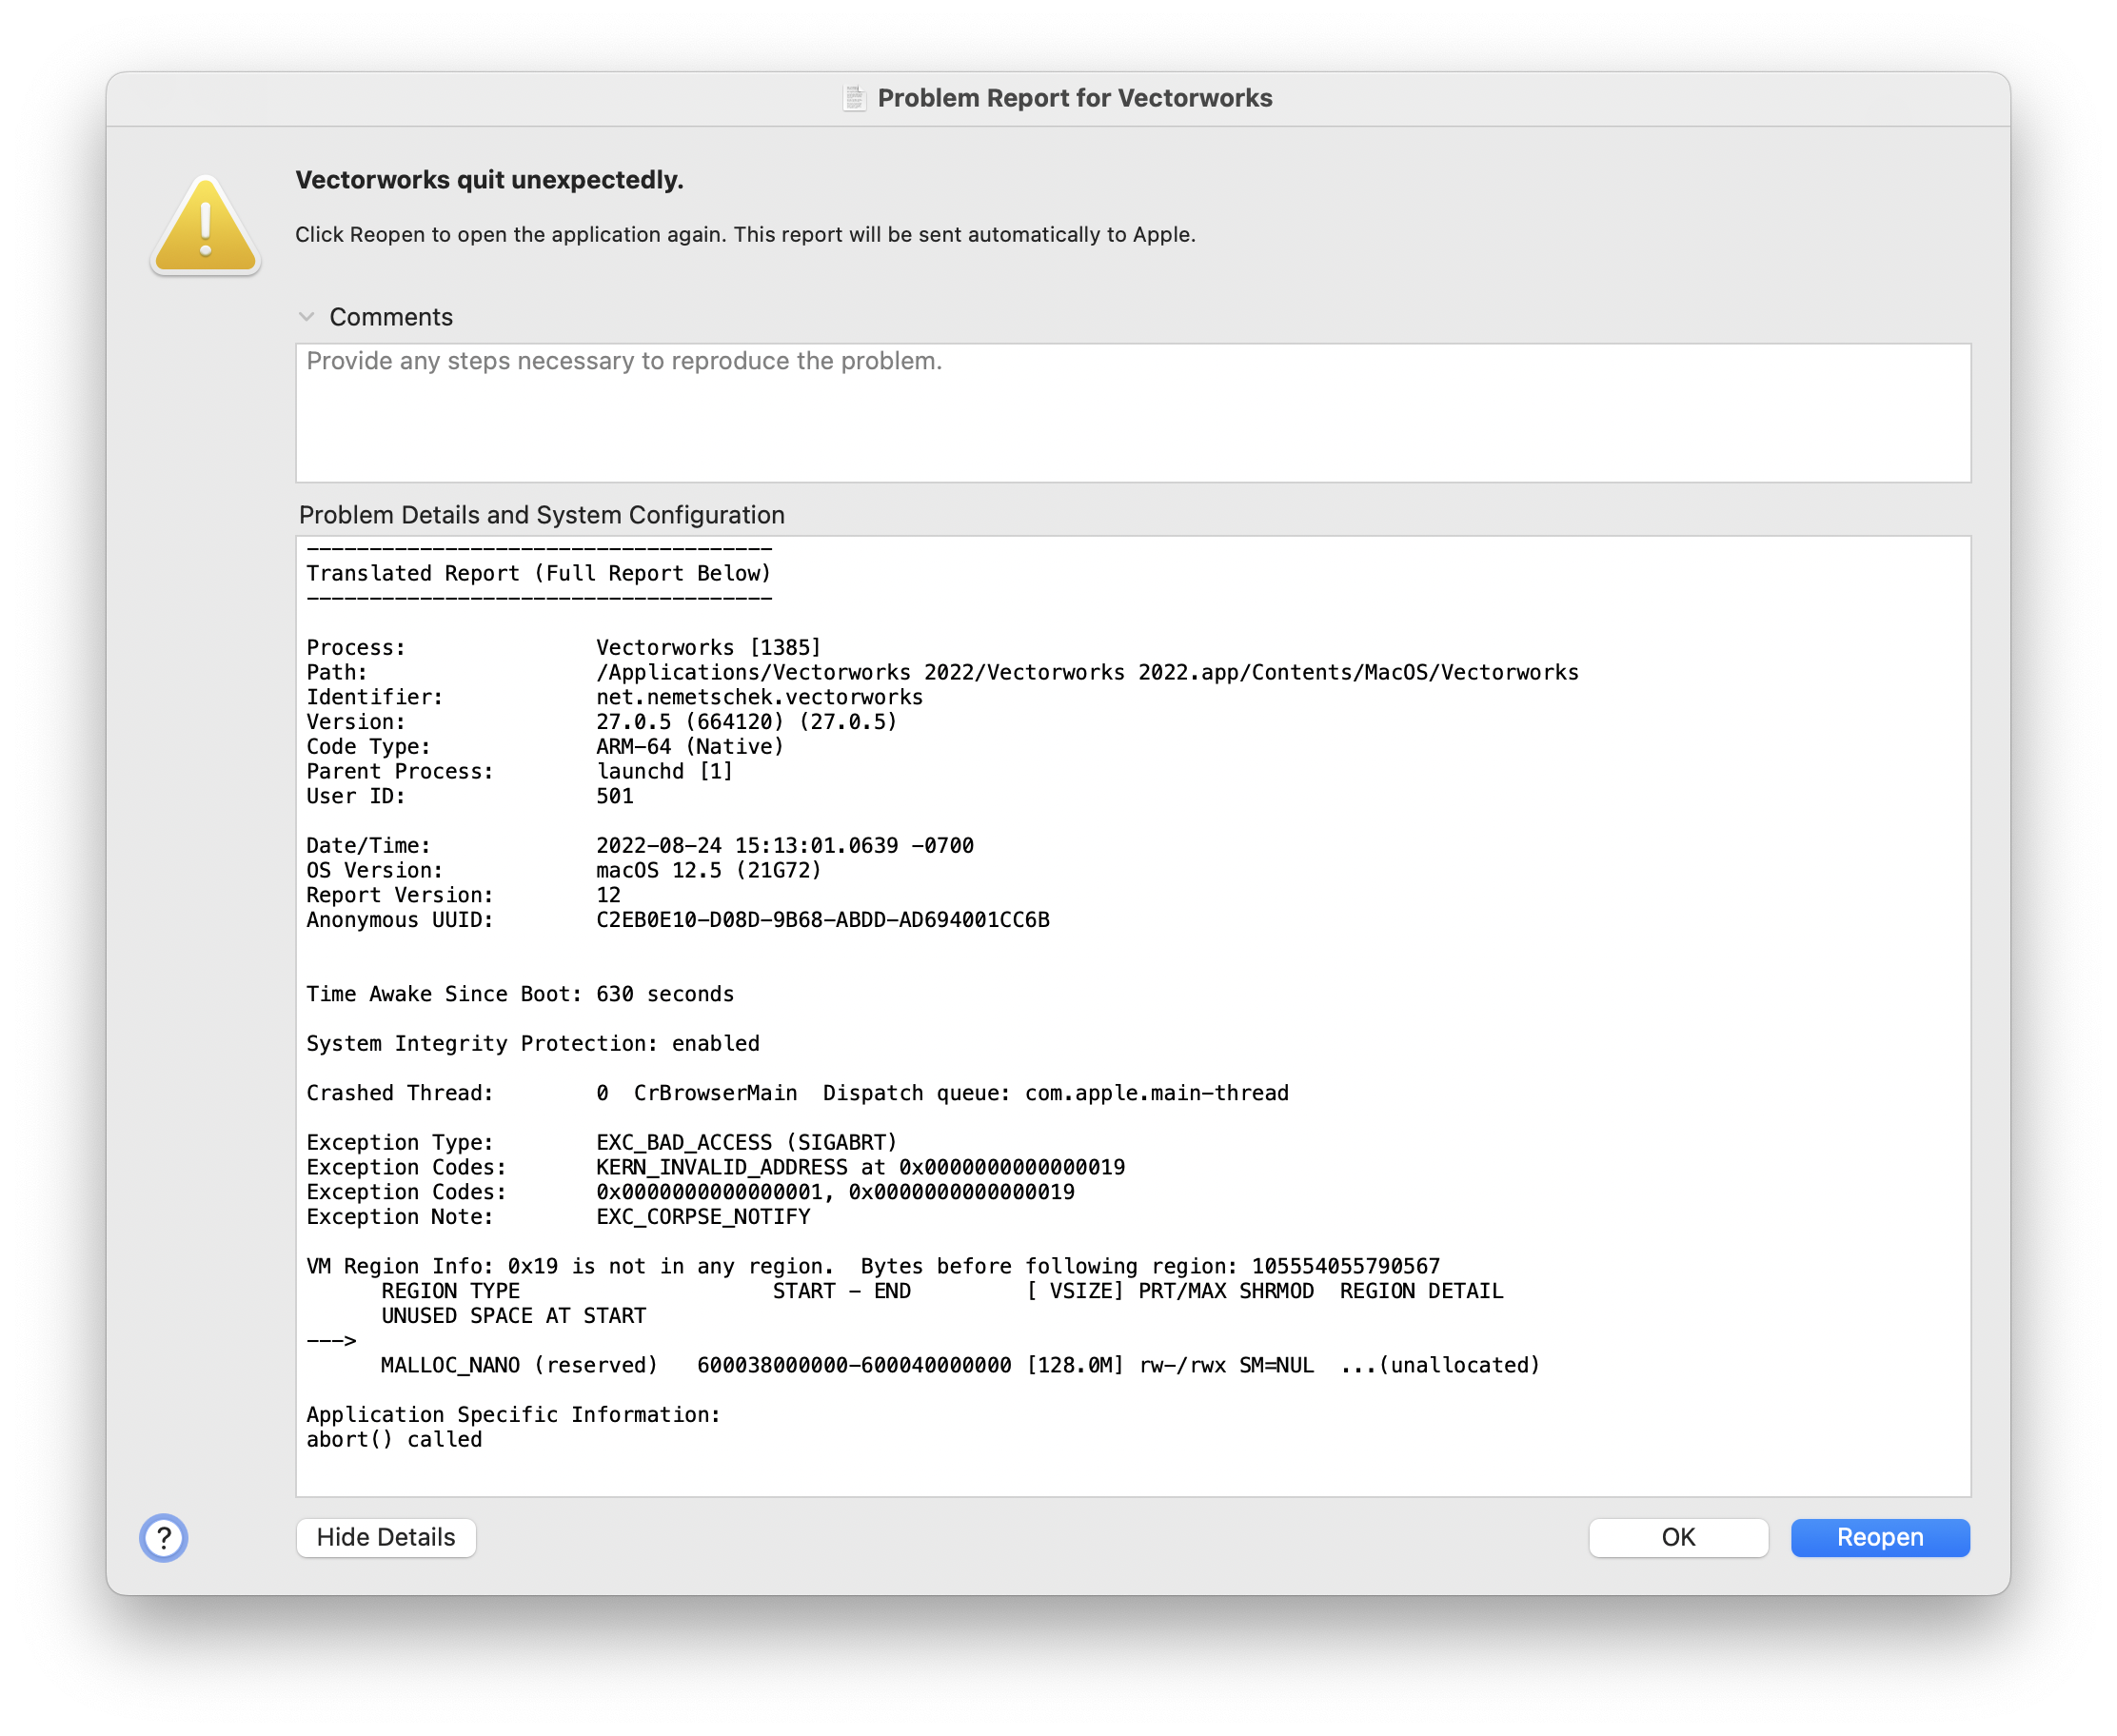
@klinzey: I made a copy of the file, renamed it CrashMonster.vwx, dewleted all but the Hang Position layer, saved.
Open new blank file. import layer + objects from CrashMonster. BOOM!
For your enjoyment. Very curious as to what's happening…
So my guess is I need to replace all suspect HPs.
-
So here's where I'm at at this juncture:
- I think the file has become corrupt & so…
- restart, etc, open blank VWX file
- from suspect file, import 2 layers + their objects: the fixture layer and the hang position layer
- Watch as it imports everything
- click on drawing and BOOM! Crash monster

-
And then this is happening…you'll notice the fixture numbers appear to have disappeared. Same LL as the LX-6 fixtures.
Checked the LL anyway & looks fine to me.
so I hit command+/ to refresh the SL fixtures. The video shows the results.
The Fixtures are numbered, however, for reasons indecipherable, they've become invisible.
(edit: so, trying my new trick, I copied and pasted the hanging position and fixtures to a scratch file <nothing but those HPs from earlier in the thread>.
BOOM! bye bye VWX SP5.
Restart time.
-
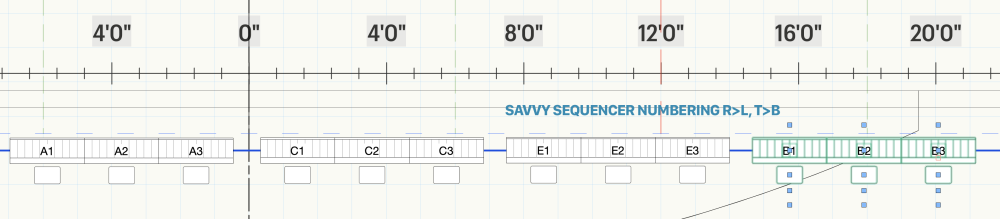
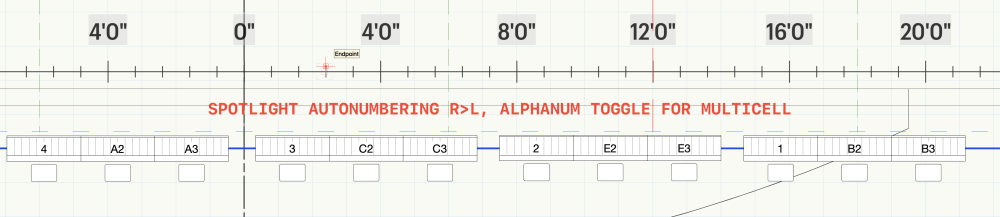
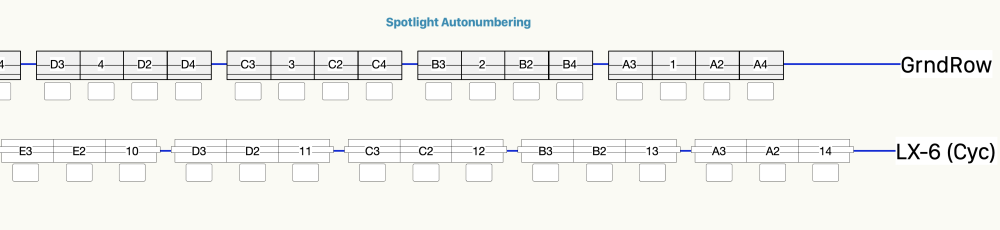
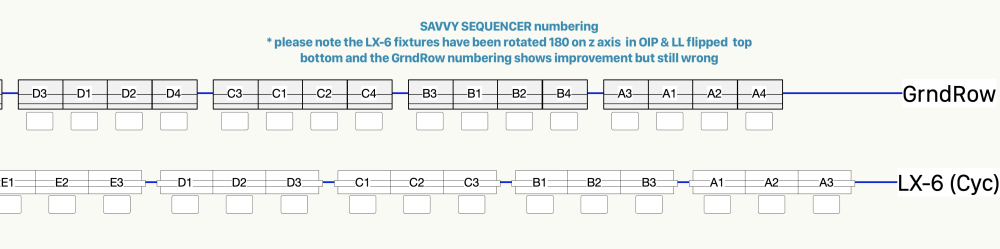
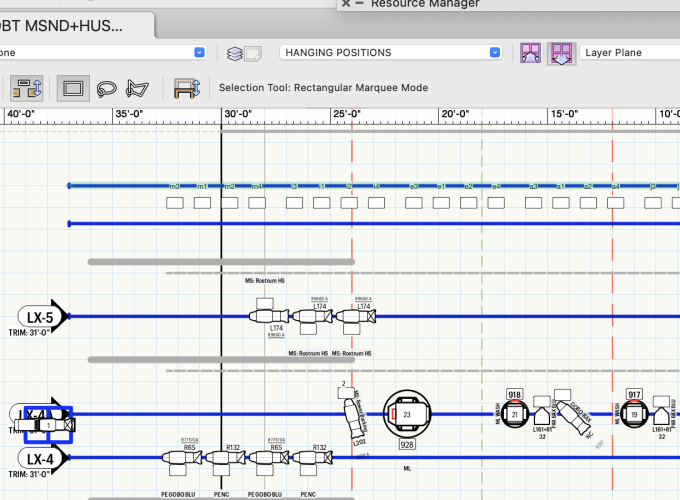
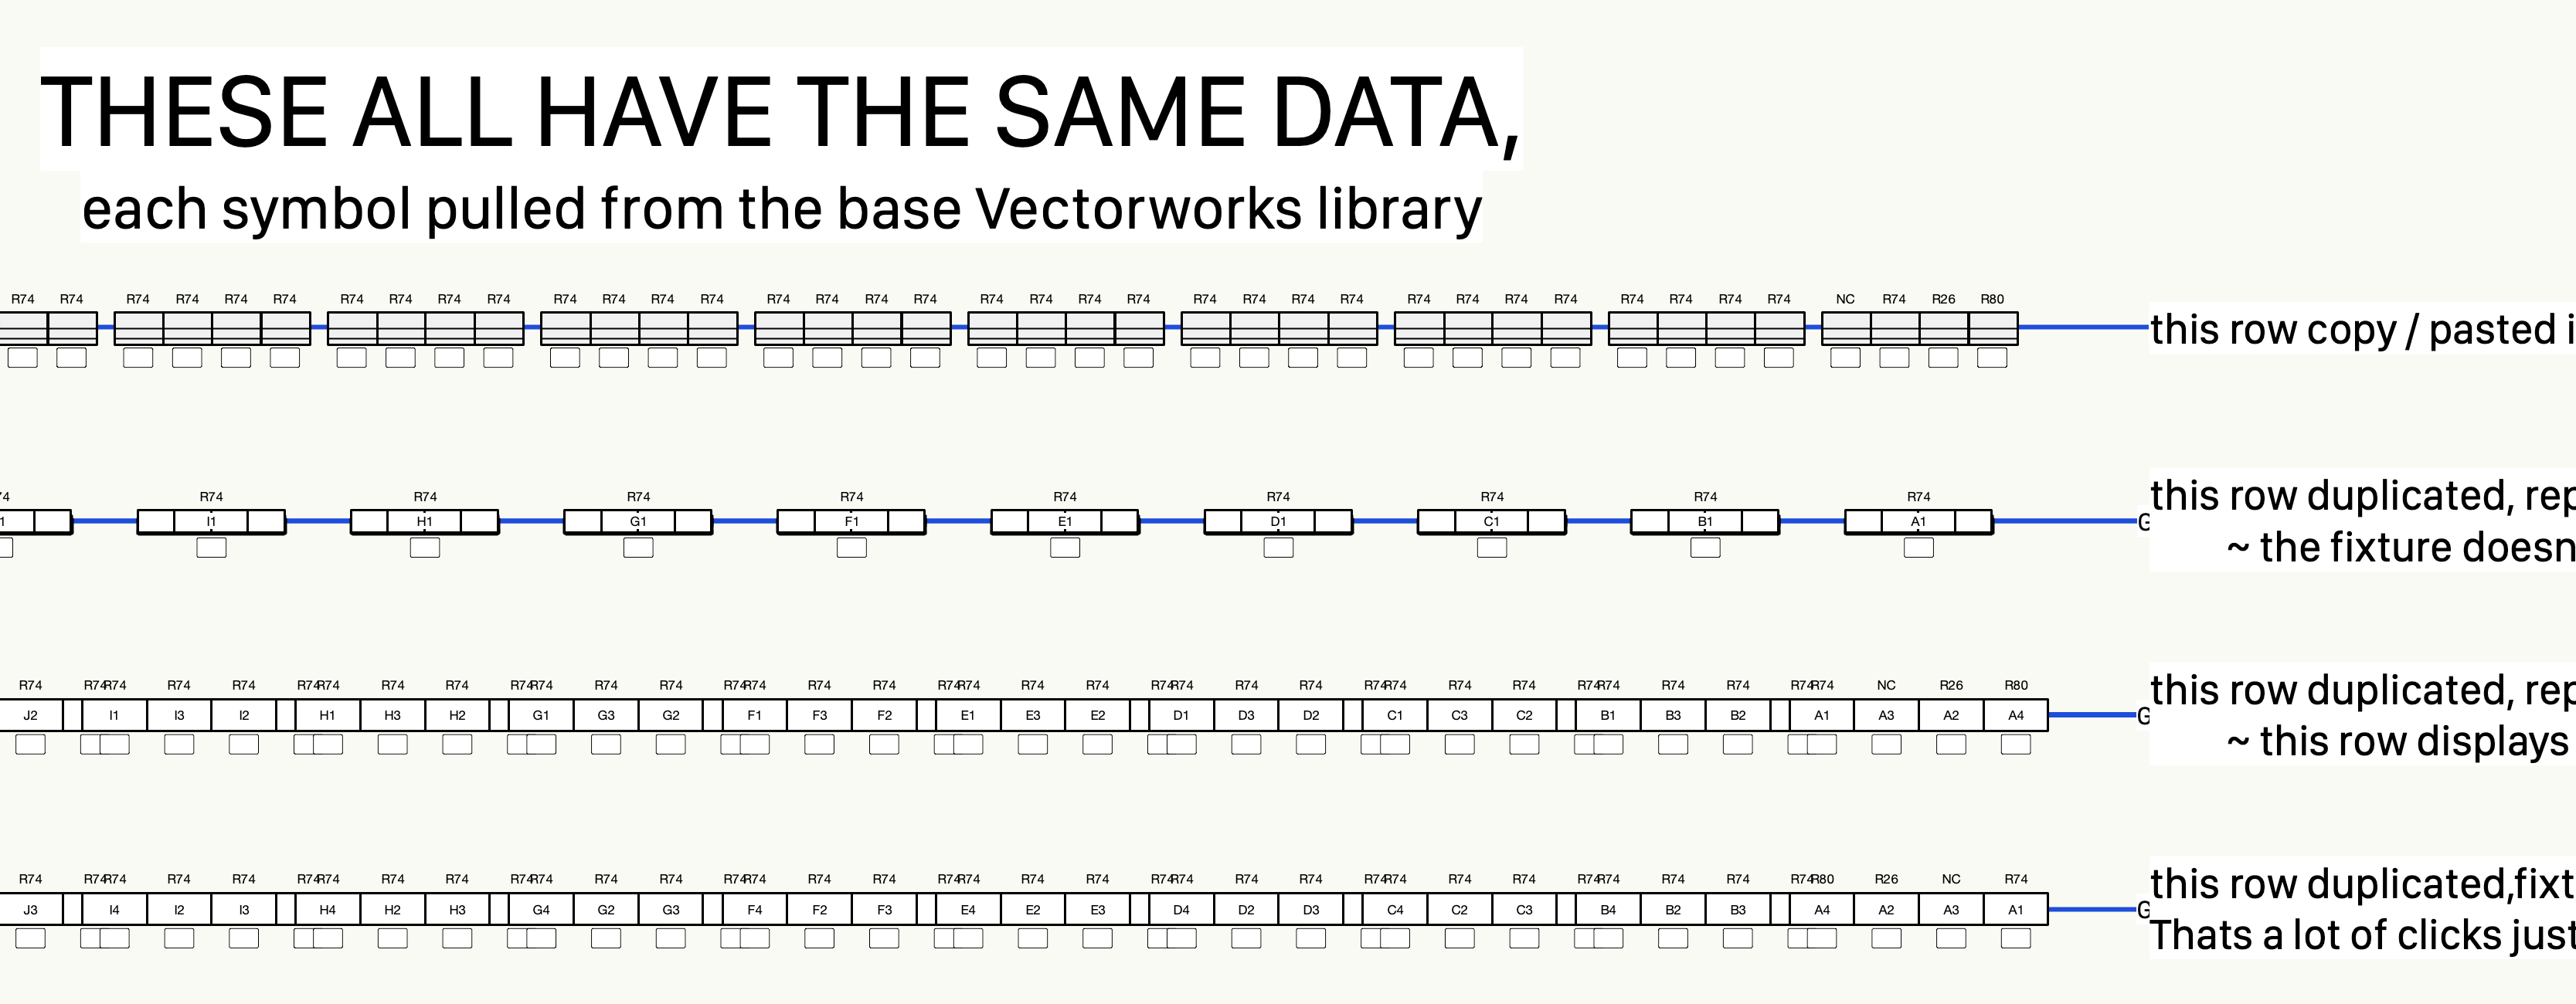
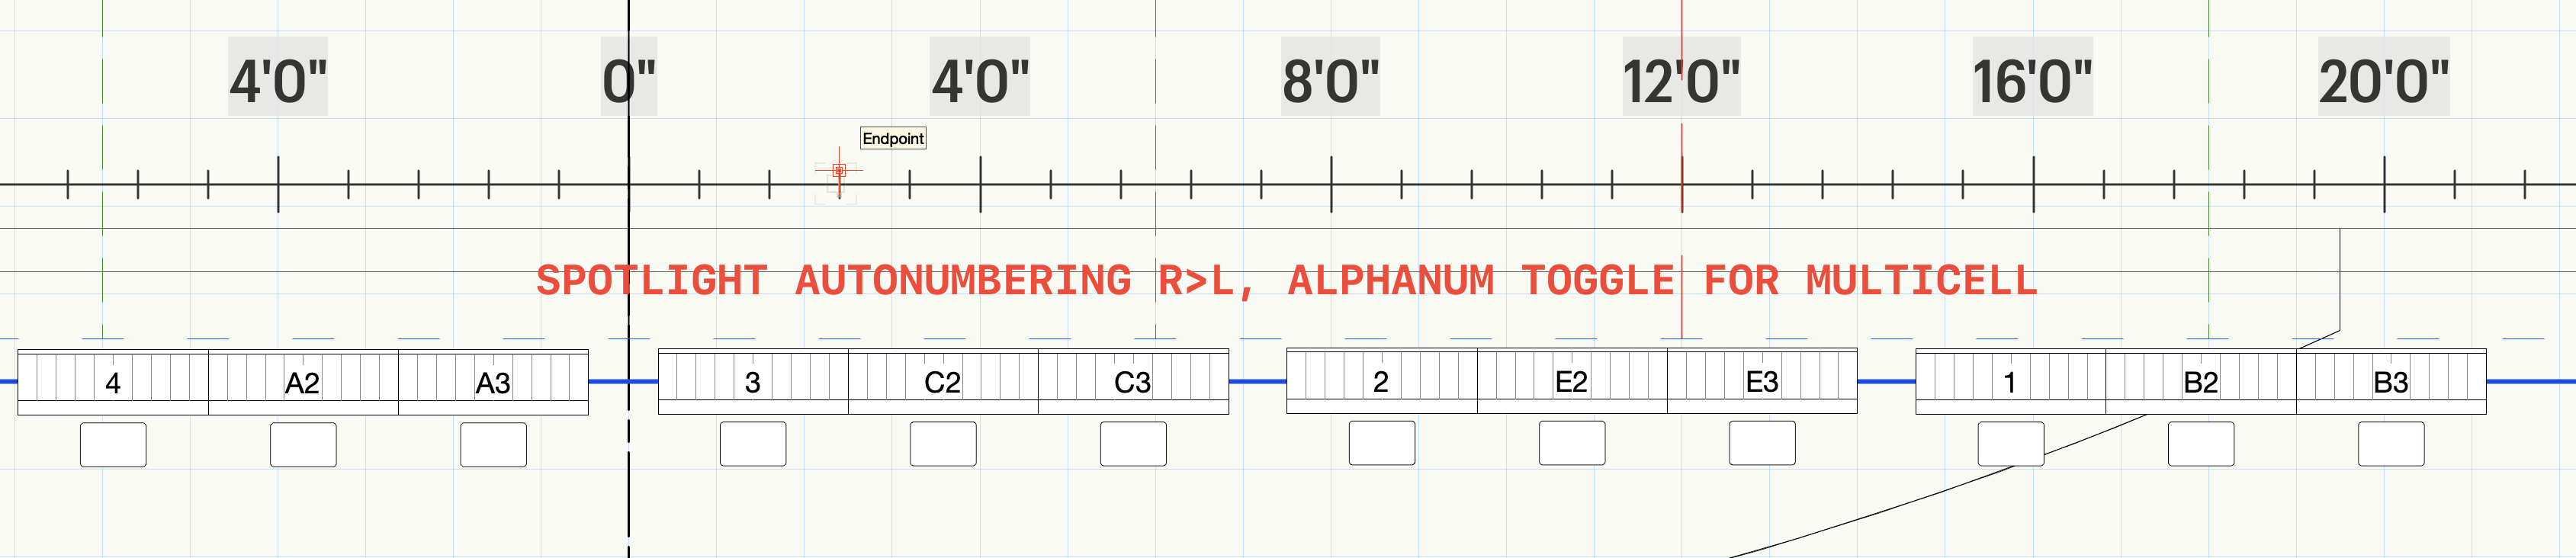
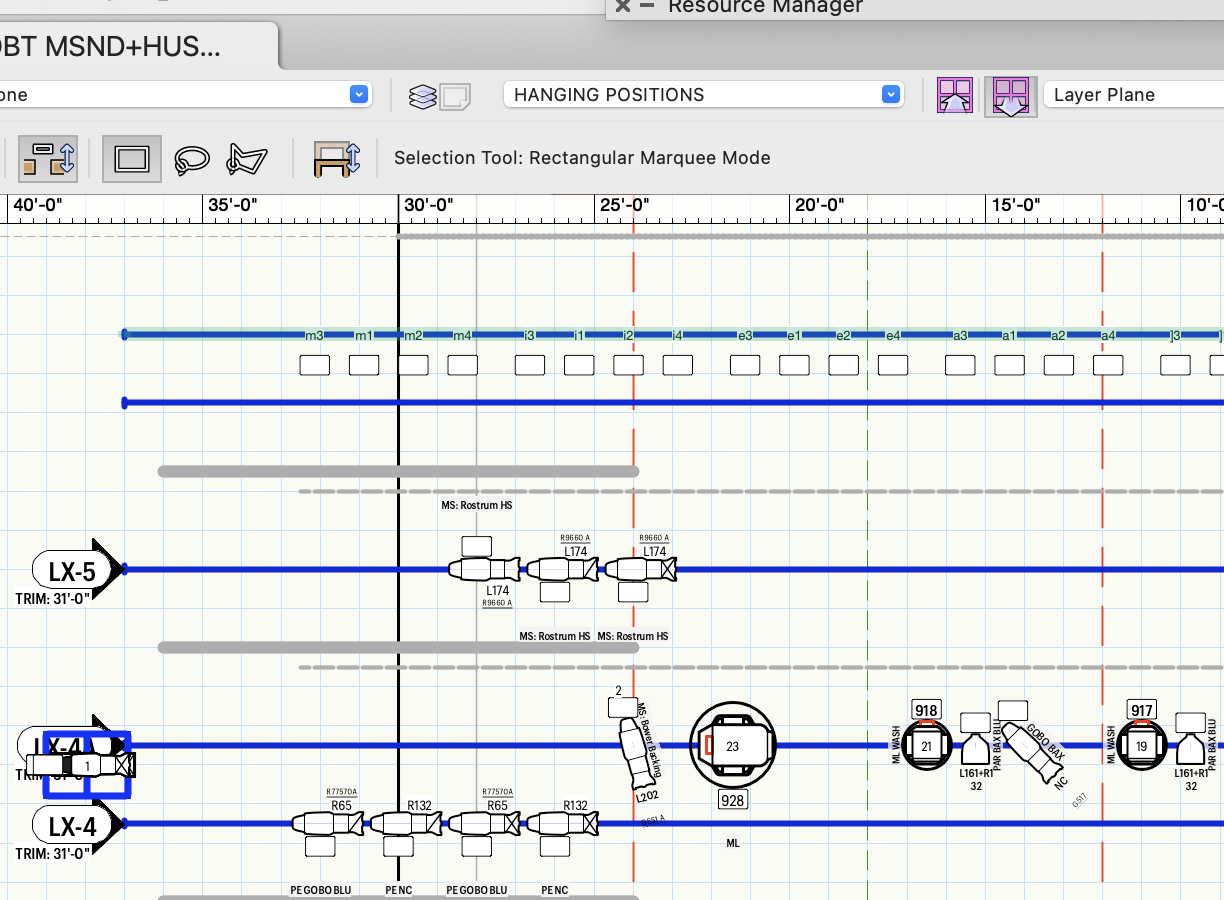
Also gonna throw a shoutout to the poor results from the Spotlight auto-numbering tool. I have attached two Screenshots, one shows the SL autonumbering of two multicell positions, the other show numbering through @JBenghiat's Savvy Sequencer. Couple things of note:
- Let's note how much actual paid work is getting done here
- the SL fixtures are all fresh from the VW RM. No editing by me.
- the Hanging Positions show in OIP as HPs.
-
30 minutes ago, klinzey said:
Can you post the fie or submit the file to tech support so that we can investigate.
Client says no.
After updating to V5, same issue.
restarted, etc, opened blank file, from original file copied pasted lighting pipes in-place, converted to hanging position en masse no prob, copied those, pasted in-place in original file, sent backwards, selected the lighting pipes, deleted those, and then renamed each of the hanging positions individually, because they all automagically incremented from the lowest available HP number. Fun😃.
But at least I am back in business.
-
 1
1
-
-
17 minutes ago, mjm said:
I'll have to check with client.
Currently installing SP v5, with fingers x'ed…
ok have just installed SP 5, re-started the MBP, opened the file:
An anomaly right away:
The file opens to the same place it has been after every crash.
this time it opens with the fixtures on the affected lighting position hidden, their label legends still visible tho.
Screenshots: first is V4, second is V5
(edit: it is happening in V5 as well.)
-
2 minutes ago, klinzey said:
Can you post the fie or submit the file to tech support so that we can investigate.
I'll have to check with client.
Currently installing SP v5, with fingers x'ed
-
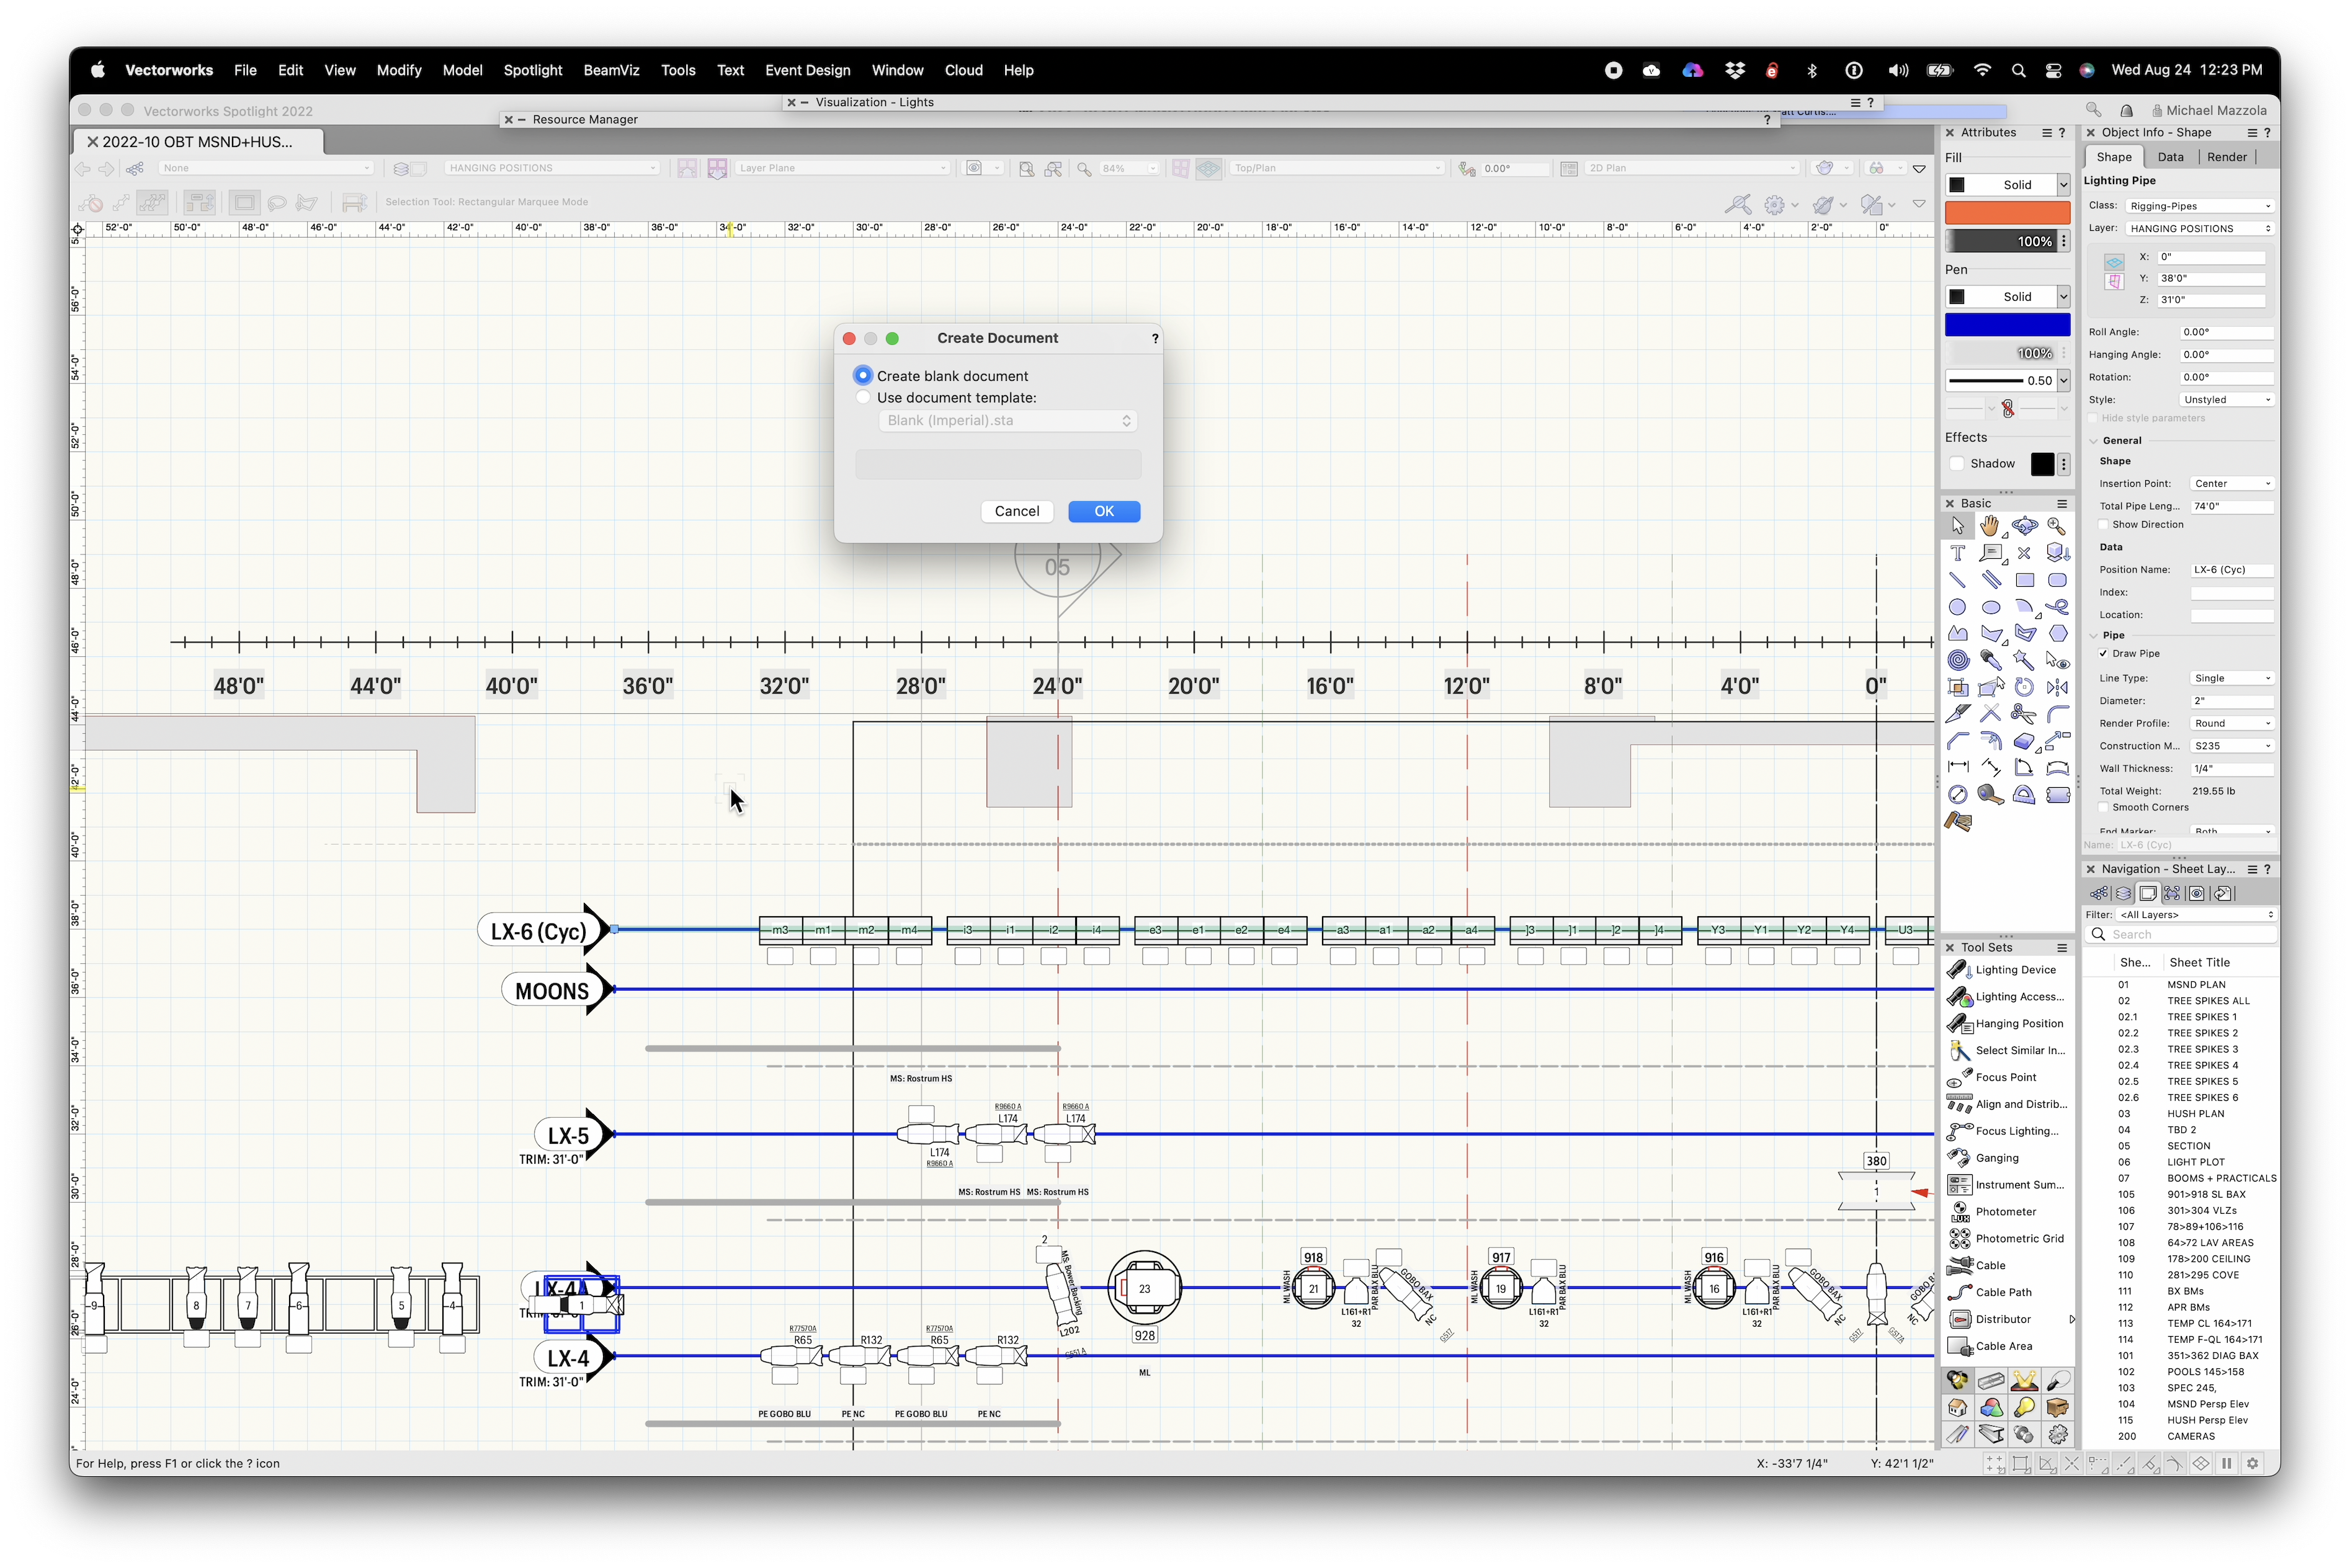
Ok. how I started my day:
- open a current VWX file of a show I am working on, on the 16" M1 MBP Max 32gB machine.
- click a PIO object denoted Lighting Pipe
- Choose Object Conversion…Hanging position
- Instant crash to the desktop
- restart the machine
- execute the steps above
- Instant crash to desktop again
- rinse
- repeat
Work done: zero
(edit: copied offending Lighting Pipe PIO into new Spotlight document, ran the commands above et voila—it became a hanging position)
(edit2: took so much joy in that, that I tried the next pipe in the Light Plot document and it too became a hanging position, YAY.
then, silly me, I grabbed all the other Lighting pipes overstage and ran the command. It went through each pipe, turning them into geometry-only hanging positions, properly confirming names of each. At the click of the last button, sure enough, crash monster.
Work done: two lighting pipes changed to hanging positions)
-
14 hours ago, Mickey said:
Google is your friend (except when they are selling all or your information)
https://benghiatlighting.com/software/product/beamviz-6/
Yep, that's the stuff.


2023 is out for Service Select Members
in General Discussion
Posted · Edited by mjm
More deets
@designedAFI'm guessing you've restarted your machine at least once? Seems to be the universal panacea…
On my first render pass on a recent 2022 file, the same modified Redshift Style was employed as in 2022. Render took slightly longer, used about the same overall amt of memory as before, tho this time instead of the task being split between Cineware and Vectorworks, it appears, as mentioned by @Dave Donley (I seem to recall) that it all takes place under the Vectorworks 2023 app. fifty Clay PAky Mini-Bs, eight VL 2600s and four Solaspot 2000 out of sight behind the prosc.
I will say the redshift render in it's preview modality is faster & with better results than the Spotlight Styles in 2022 or 2023.
I =basiclly haven't needed to turn on denoising in redshift in either 20922 or yet in 2023.