


Jeff Prince
-
Posts
2,965 -
Joined
Content Type
Profiles
Forums
Events
Articles
Marionette
Store
Everything posted by Jeff Prince
-
You must have selected a Sheet Layer to export. If you export Design Layers, the option is available. That's the way it has been working.
-
Yes to this. I have folders on my desktop for storing backups for a variety of programs and a place to deposit screen shots. Fridays, I take a quick look at those folders and delete the unneeded before the big weekend backup.
-
Just tested it in 2024, and it still works. Attached file for reference. works in 2024 too.vwx
-
Have you tried QGIS? It should be able to take the output from Vectorworks and create the correct file. But it sure would be nice if Vectorworks just added this the to available exports...
-
If you follow the directions I provided, it certainly works.
-
Mine works fine. Maybe it’s something on your end. Post a file of what you are trying to loft.
-
Oh man, I spoke too soon. The basic tools look okay, but those tool set icons actually look worse and are harder to read. It's like someone over there is intentionally sabotaging things. Why do they make these changes in a vacuum and force them upon us? This UI would be better served by a command line like AutoCAD.
-
On the ranch, you never name your steer or chickens. On the Vectorworks, you always name everything.
-
No, no, no, a thousand times no! Old Icons 2020-2023 RIP Your life was cut short for the betterment of humanity Hmmm. This looks promising. Maybe kudos are in order for the development team. Perhaps I will download 2024 just to look at the interface. Minor opinionated criticism from the icons in this post... Symbol insertion still looks too busy. I find it odd the Texture Tool looks to have broken the monochromatic look with what looks like a paint roller skidding over some dog poo. The Split tool would look much better as Illustrator's Slice icon which is a simple exacto blade looking outline. Easier to recognized that current. My only question.... did the hardscape icon get fixed? I sure hope so. My commentary from the last redesign... "Oh, poor hardscape tool, what have they done to you? You used to be this pretty little field of pavers surrounded by a border presented in plan view, now you look like an isometric version of a shoe from an old Atari game."
-
@Bertadesign have you tried Collada (.dae)? That's a pretty good way to move back and forth and preserve some texturing. Plus, it works with Sketchup too. Unfortunately, some channels of a material don't come along for the ride like displacement mapping. If you use such materials, you just have to make a blender version. It's probably better to texture in Blender to avoid issues with your animation/render solution. I would avoid .dxf at all costs for this workflow.
-
Yes
-
 Yes, it does in fact. Pretty sure you either have your grid off or it is set too small to see. You could post the file here and end the mystery.
 -
Isn’t that what I said LOL 😉
-
look at the units set for your drawing and that will tell you.
-
I think it's your grid size being small and your object being large. Your grid size is set to 13... 13 what, mm?
-
Sliding Door With Glass Leaf Showing As Solid Leaf in Plan View
Jeff Prince replied to Kevins330's question in Troubleshooting
if you configure the sliding door so it uses classes for the graphic display of the components.... You can set the "leaf" and "jamb" to match a class for your windows or set them to a class that matches the windows graphics, I would go with the latter personally. The middle door is using this method while the others are using default door characteristics.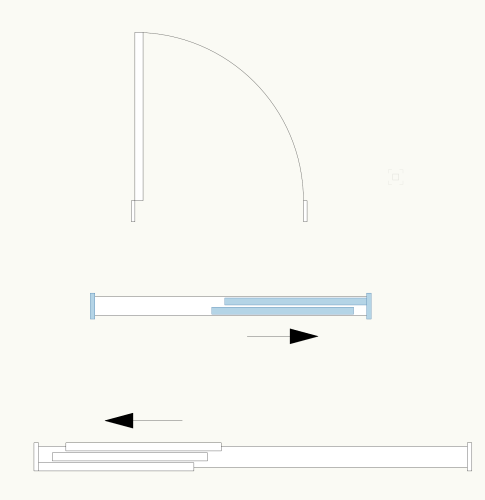
-
How were you doing this type of drawing in AutoCAD? it’s likely the same methods can be used in Vectorworks.
-
You can do that pretty easily with Metashape or contracting someone to do the combination for you if you don’t use such software frequently. Alternatively, you could generate point clouds from your photos and then manually line them up in Vectorworks if you have some easy to identify common points. either way, it’s going to take a bit of effort since the data you were given may not be the quality needed and could be challenging to find common alignment points.
-
To change the sheet orientation, you need to set the print/page setup as Landscape instead of portrait. The help menu has a good explanation of turning the grid on and off and button and/or menu used to do it. I’m away from a computer, otherwise ide screenshot it for you.
-
I'm not sure if you can do that with a 2D hatch if it is a single roof object. If it is broken into roof faces, you could use the Attribute Mapping Tool to rotate the hatch for each Roof Face. Hatches don't respect the 3D map orientation like textures do. Hopefully someone else with more knowledge will weigh in.
-
Why does my arch not look like an arch when I subtract a solid?
Jeff Prince replied to davidronn's question in Troubleshooting
Your arch is circular, it's just rendering in low detail of Shaded mode. Simply change your Shaded Options detail level to something higher like High or Very High and things will look smooth for you.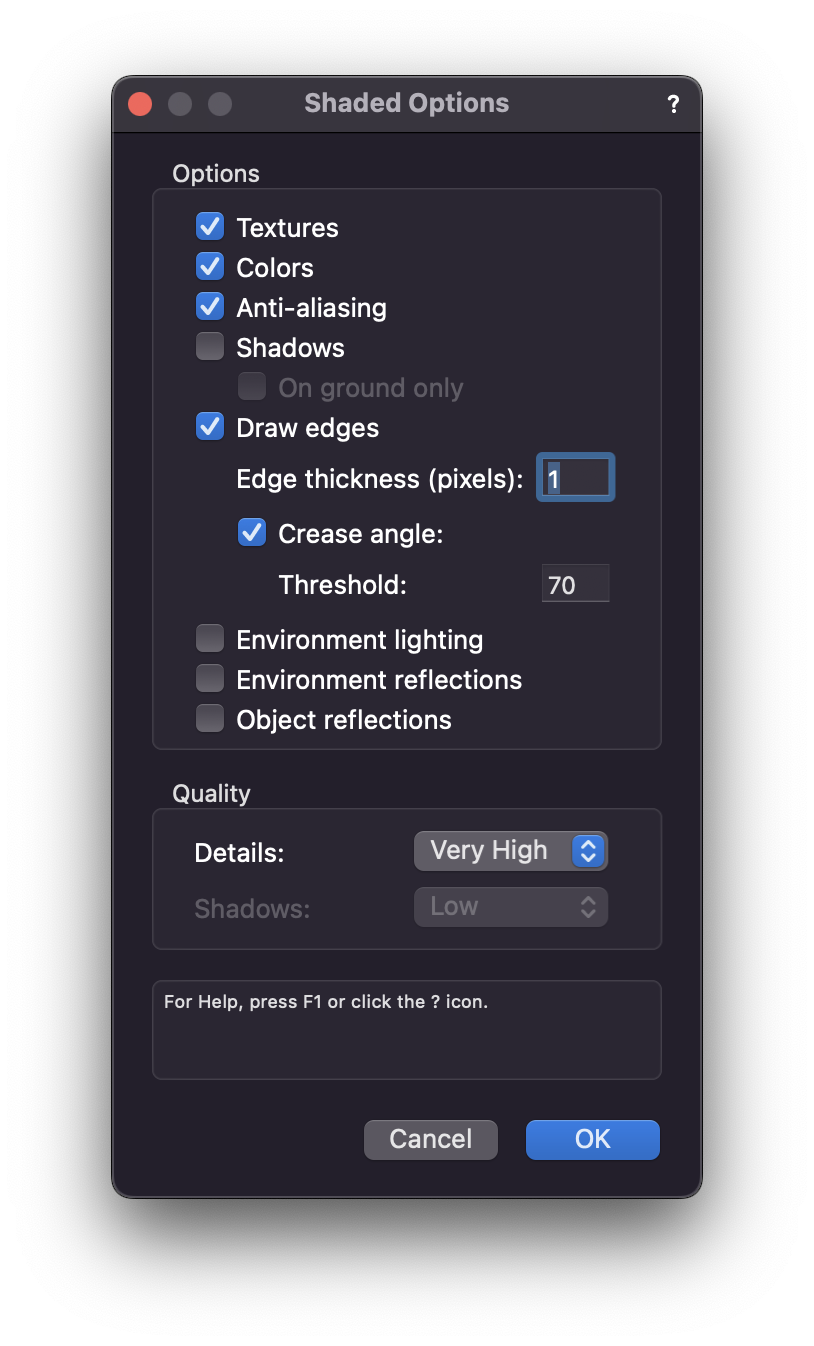
-
You're welcome. Stick with it, it gets easier. Take @E|FA's suggestion and get on VWX Uni for some training. Start at the beginning and pay attention to the nuances of how tool modes work, the attribute panel, and such. Some things to remembers.... Vectorworks "classes" = AutoCAD "layers" Vectorworks "layers" = AutoCAD's Modelspace or Paperspace Vectorworks has Design Layers (like multiple model spaces), Sheet Layers (just like paper space) To display something from your Design Layer on a sheet, the fast way is to create a shape around the object in the Design Layer and then select "create viewport" from the View menu. It will then take you to the sheet you send the viewport to. This is just like an AutoCAD viewport looking into model space. Now, the trick is adding notes and dimensions. Just like AutoCAD, you can place them on a Design Layer if you want, but a better way for most people is to place them in the Annotation Space of a viewport, which is a special feature a bit different than AutoCAD. The attribute panel controls the graphic properties of anything you draw or model. I like to set mine with all properties set to byclass so the objects I make take on their graphics from the class. You can do it however you wish, but it's something that trips people up frequently when their stuff doesn't look the way they expect 🙂 That should keep you busy for a while 🙂
-
just to add to what Amanda and Pat said.... I'm a former AutoCAD user. To do this task in AutoCAD you would typically use the "hatch" command and either pick a point inside an existing boundary, pick a boundary, or draw one. If that boundary was not closed, chaos would rein on your hatch. Vectorworks is similar in that it needs a closed boundary or you get the results show in your image. Vectorworks is different than AutoCAD because entities can have a fill, essentially a built in parametric hatch of sorts. So, when you are rendering 2D drawings, you might find it helpful to follow these conventions: create classes for objects with the same desired graphics draw items "by class" so they inherit their graphics from the class setup. use separate classes for hatches/fills. Things you might want to separate into different classes... Shadows, object fills by material or color, plants, color vs B&W fills get familiar with draw order, send to back, and opacity to get the best 2D graphics effects. You could do everything with the attributes panel, which would be like drawing 'by object' in AutoCAD. However, it's usually faster in the long run to adopt a "by class" workflow as a project gets bigger and/or you develop a library of objects to use in future illustrations.
-
That Roof Plan doesn’t seem to match the model. Based on the sketch over the model, I would cut the left roof back to the ridge of the right roof. Then I would extend the right roof to fill the space indicated by your sketch. Finally, the left roof would need to be trimmed to conform to the right roof. You might then want to trim the right roof where the left one intersects, if the attics are to be joined.
-
How to combine terrain and hardscape created from DWG files
Jeff Prince replied to zhoukaiyi's topic in Site Design
Get started on the right foot by completing some training on Vectorworks University. You can create either feature first or in parallel with each other if you have multiple people working the project. How they are combined is a function of how they are created and the desired outcome. So in other words, you need to be more specific in describing what you hope to accomplish and the purpose of the work to get good advice. Otherwise, people will be guessing and lead you down the wrong path potentially.


