Boh
-
Posts
1,705 -
Joined
-
Last visited
Content Type
Profiles
Forums
Events
Articles
Marionette
Store
Everything posted by Boh
-
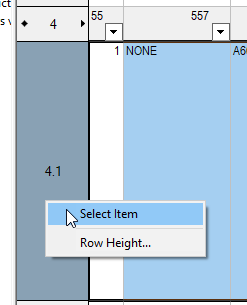
You can use data base worksheets to locate items if you right click in the row header and click "select item". (It has to be a single item - i.e. not summed or summarised). Yes keynotes can only be on one keynote legend. You can choose which legend the callout keynote appears but it can only appear on one legend. Here's another thread discussing getting keynotes the same across multiple sheets and keynote legends. Cheers


-
Just a suggestion. Here’s a thread on global editing of callouts if you’re interested in exploring the idea further.
-
This is one of the reasons I use callouts instead of plain text. Via a worksheet you can spell check and edit text callouts notes throughout a file or a selected part of a file.
-
Slightly off topic but putting your legends in vp annotations means the visibility’s and class overrides for legend will always be the same. if you want the legend on more than one sheet make it a symbol. this way works really well for me and less viewports to manage
-
I always keep the none class as the active class so that I don’t inadvertently create objects on random classes they shouldn’t be on. The none class is always set to visible so I always create the objects on the none class then class them as required (hence why I wanted this “assign class” script). With this way of working groups will always be on the none class with the objects inside classed. That way the grouped objects vp visibilities is only dependant on the class they are on and not also the class the group is on. For most “standard” symbols I do it the other way around where the symbol instance is on a class and the objects inside the symbol are on the none class. I do it this way so: 1. I can set up the symbol to insert straight into a specified class (in edit symbol options). 2. The symbol can be used in different files without bringing in additional classes. 3. The symbol’s visibility still only relies on a single class.
-
No, that script changes the selected object to a particular class - In that case a class called 'my class name'. I don't know of a script that will change objects to the current active class though I imagine that it wouldn't be hard to write one - unfortunately I don't know how to script. I always have 'none' as the active class. If you do that too then you could change 'my class name' in the script to 'none' and the selected objects will then be placed in the none class. It doesn't work within groups or annotations.
-
Controlling visibility using data visualisation
Boh replied to line-weight's topic in General Discussion
Just throwing in another idea... Is there a workable option to draw all the buildings with no fill or line I.e effectively invisible, but then use dv to add fill and lines to make them visible? (This is the inverse of using DV to make things invisible). Edit: You couldn’t model the Bldgs in that file but possibly drawn in another file and as symbols referenced into master file where the classes are changed. Thus probably isn’t a realistic solution but still interesting. -
Is it possible to link text to drawing numbers?
Boh replied to Christiaan's topic in General Discussion
Yes I meant a Section Line Marker which can link to any type of viewport.- 15 replies
-
- 1
-

-
- automatic drawing
- coordination
- (and 1 more)
-
This little script is great@Julian Carr. Unfortunately it doesn't seem to work in viewport annotation space. Is it easy to fix this?
-
Controlling visibility using data visualisation
Boh replied to line-weight's topic in General Discussion
The custom selection method suggested earlier would only have as many layers as there are views. Im interested though in how Pat would use custom visibilties to control the visibility of objects that are on both the same layer and class. -
Is it possible to link text to drawing numbers?
Boh replied to Christiaan's topic in General Discussion
Its good practice to run the “recalculate all worksheets” command prior to publishing. (Btw I see there is a seperate Wishlist item asking that worksheets show if they are out of date). Is there a user field in the sheet data record unique to that sheet you could use for the worksheet to look for? If not you could creat a custom one. The field name could be “drawing continued from” or something like that. -
Is it possible to link text to drawing numbers?
Boh replied to Christiaan's topic in General Discussion
This is an extg feature. The “continued on:” is just text. The rest is a section marker in elevation mode. There are a few differerent default marker styles you can choose from so I chose one that I thought might look best, perhaps one that isn’t used much so you might not have recognised it. After posting that I thought that maybe the VP link would be broken if the sheet no changed but I’m pretty sure it will auto update.- 15 replies
-
- 1
-
-
- automatic drawing
- coordination
- (and 1 more)
-
Worksheet - Summarize items that match two fields?
Boh replied to Zenlux's topic in General Discussion
You can have two database rows in the same worksheet. Have one for area x and one for area y. -
Is it possible to link text to drawing numbers?
Boh replied to Christiaan's topic in General Discussion
Or simply a reference marker line linked to the viewport of the continued drawing?
- 15 replies
-
- 2
-
-
- automatic drawing
- coordination
- (and 1 more)
-
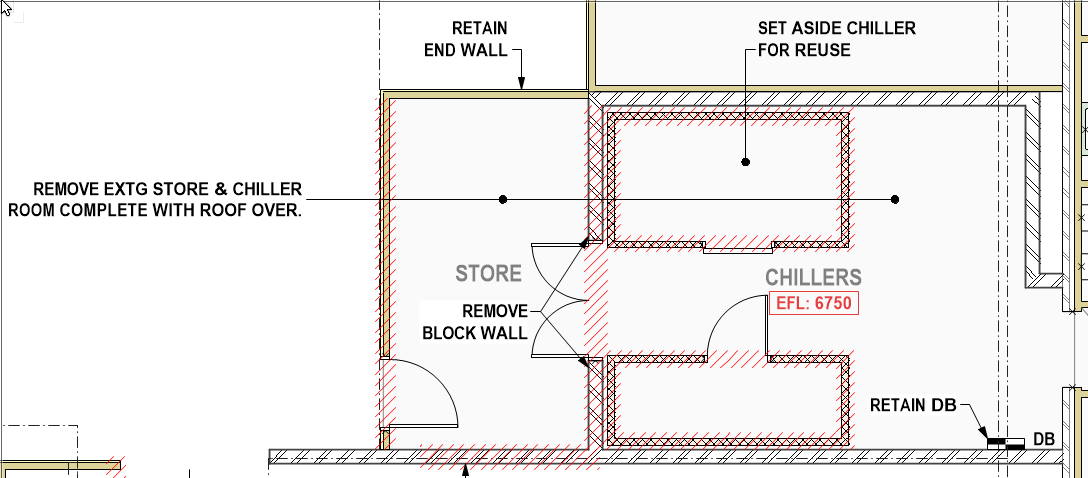
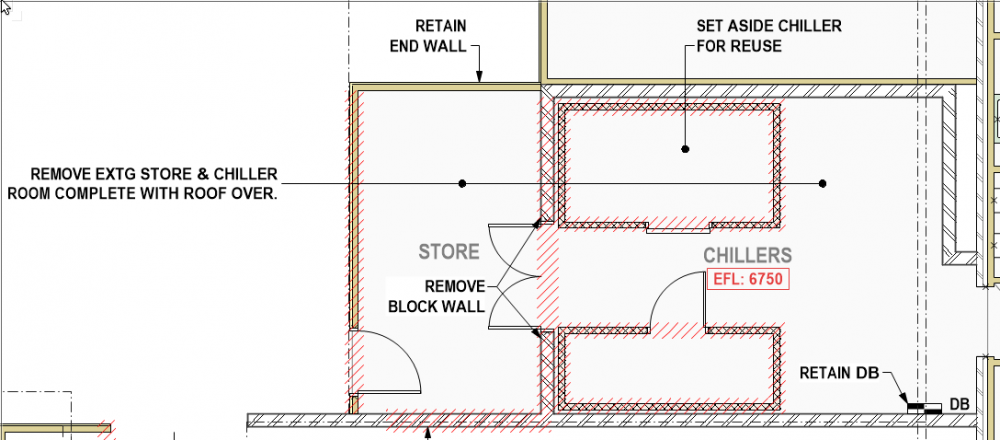
Funny we seem to be moving in tandem - nice to know there are others out there grappling with the same stuff. Exactly what this forum is for! We used to have separate classes for demo items but have moved away from that somewhat as it was getting a bit unwieldy. For our drawing set up we always maintain a complete "As Existing" model. A duplicate of this is created and is then changed into the "Proposed" Model". So we have two completely separate models. We do a really good initial site measure to try and get the existing model as accurate as possible prior to duplicating it. Our demo drawing is typically just a 2d floor plan. For this we just have a viewport of the existing model floor plan and in the VP annotation space place "Demo-Hatch" polygons over the items to be removed along with accompanying notes (see screen shot). Occasionally we do demo elevations and do the same thing for the 2d plans - Elevation views of the existing model and demo - hatch over items to be removed. In details, if we need to show demo items then these will be drawn using a "Demo-Lines" class which has a dashed line. Often it's just a matter of simply exploding a symbol and putting the lines on the Demo-Lines class. It is really basic but also really quick and very clear to the contractor. We don't need multiple demo classes or symbols. Having two seperate models for existing and proposed means for items like plumbing we also don't need "Existing" and "New" plumbing classes" - we simply put all plumbing and drainage fixtures on a class called "MODEL-FITTINGS-Sanitary Fixtures". To distinguish between new and extg toilets we may use a generic looking symbol for existing toilets with a more refined symbol for the new toilets but mainly text callouts/annotations or record field data are used to distinguish new from existing rather than graphics. This system works well for the type and size of projects we do.
-
We are a small architecture office with 6 of us using vectorworks. We have been going through a process of standardising our workflows and office organisation. It's still a work in progress so it's interesting reading the above feedback. At the moment our office resources are organised into a single main resource library file and a bunch of template files set up in a workgroup. We are now finding the library file is getting too big (and slow) so we will have to break it down. So we are coming up against the same issue @Matt Hall has of how to split up resources that often work in tandem with each other. I will be looking into using referencing symbols, I've been a bit wary of them as in an office environment it is too easy for referenced symbols to be unintentionally changed across multiple files. One thing we do which has really helped is to have a really good class system AND use class attributes as much as possible. This not only gets consistency of file organisation but using class attributes also maintains graphic styles between projects and staff. Using class attributes has the added benefit that viewport overrides can be used. This system does mean we have a lot of classes to manage - so for this we have one admin file that just contains all of our standard classes. In addition, for classes that use hatches, tiles or require specific textures or line types we have also created custom hatches, tiles, textures and line types just for these classes. We put a "zzz'' prefix to the names of these resources to identify them as "class" resources. (The triple z prefix also means they drop to the bottom of name list). This set of classes, along with their custom "class" resources is the base of our Library file, templates and project files. If a project requires additional classes then they can usually be found in the class base file. If not then a totally new class can be created and perhaps added to the base file if it may be useful for other projects. Occasionally we need to update or edit a class or one of the "class resources" in the base file - these same edits are also done on our Library and templates so they are always the same. To easily manage this system the key has been to have one clean base file with all of the classes.
-
Move Viewport, not my crop
Boh replied to Anthony Neary's question in Wishlist - Feature and Content Requests
You can do it with 3d views with the translate view command. I can't find a tool that doesn't for 2d views. See this thread: -
Command to zoom out to "floaters"
Boh replied to Paul Vanderwal's question in Wishlist - Feature and Content Requests
Alternatively turn on everything select all then zoom extents. Do layer by layer for bigger files. As everything is selected you should see the floaters selected. Slightly trickier if the floater is in a group. You need to isolate the group with the floater in it somehow. -
Controlling visibility using data visualisation
Boh replied to line-weight's topic in General Discussion
Yes it would be good if DV could used to set visibilities. I’m sure though that it could prove very useful on a project like this. With the range of tools available there is surely a way of quickly updating the views. One way perhaps is if the custom selections were saved as scripts they could be quickly run again. -
Controlling visibility using data visualisation
Boh replied to line-weight's topic in General Discussion
What about making the buildings symbols and having a layer for each view. If a building existed in a certain view an instance of the building symbol gets placed on the appropriate layer for that view. To do a new view duplicate a similar one and add / delete building symbols as required. This would work for a limited number of views. Edit: Or to quickly prepare other multiple other views: Create a custom "building Life" record for each building symbol with "Year Constructed" and "Year Demolished" fields. In a layer consisting of an instance of each building a custom selection could be run with the criteria being Field value "Year Constructed" < [input low year range] and Field value "Year Demolished" > [input high year range]. The set of building symbol instances selected would be the required set for the new view and they could be copied to a design layer representing that view. -
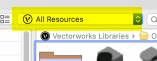
Yes if you convert the objects in your furniture files into symbols they should show up in the RM as symbols. If you have a lot of symbols you will want to get a good naming protocol so that they list in such a way that you can quickly find them. Also within the RM you can create your own custom folder structure to organise your resources. E.g. you can put all chairs into a "Chairs" folder etc. In this way you can build up an organised library of resources. Note that RM folders can only have one kind of resource in them - you can't have symbols and hatches in the same folder. Also you can choose what type of resources you want to see in the RM. At the moment you have "All Resources" selected. You can also choose which projection and render mode you want to view symbols in the resource browser. Right click on some symbols in the RM to see the options. Hope that is helpful!


-
“However when I click on one of my objects in this file, all I see are the textures and not the model itself.” Do you mean when you click on one of the files in this folder in the RM? You can’t bring in the “model” per se via the RM. You should be able to bring in any resources contained in that file however. The RM will only display resources I.e. hatches, textures wall styles , symbols. For the objects in the file to display they would have to be symbols. From what I see on your screenshot the only resources the baskets file has are textures. Which seems odd as typically there would at least be a linetype or two as well. Can you confirm the file does indeed have other resources? Try refreshing your libraries (from gear icon in RM).
-
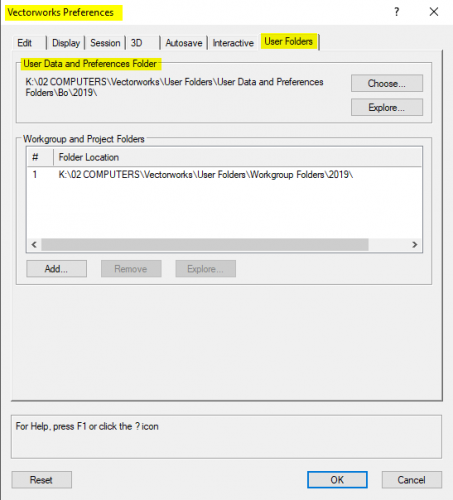
The default location for me (on windows) is: C:\Users\bo\AppData\Roaming\Nemetschek\Vectorworks\2019\ There is a default "Libraries" folder in that location that is the top folder of the User Libraries. Being on a mac yours will be slightly different but similar. You can also find/select it by going to tools>options>vectorworks preferences and going to the User Folders tab. You can create your own custom location (rather than the default which is slightly hard to find) and then specify it in the above dialogue. Note the top folder in the user folder needs to be called "Libraries". When you "Choose..." the User folder in the dialogue you navigate to the folder that the "Libraries" folder is in - not into the Libraries folder itself.

-
Each release has it's own user library so when you install vw2020 it will create a seperate user folder for that release - it won't touch previously release user libraries. It should however give you the option to migrate your previous release libraries and preferences to the new release. So if you go with this any new folder's you created in a previous release should be copied through to the new release location (as well as updating any vw files in them to the new release versions).
-
2019 just crashed without warning - no backup file...
Boh replied to Rob P's question in Troubleshooting
I've personally found vw2019 less stable than previoius releases (after sp5) with more crashes and weird graphic behaviour.