James Russell
-
Posts
394 -
Joined
-
Last visited
Content Type
Profiles
Forums
Events
Articles
Marionette
Store
Everything posted by James Russell
-
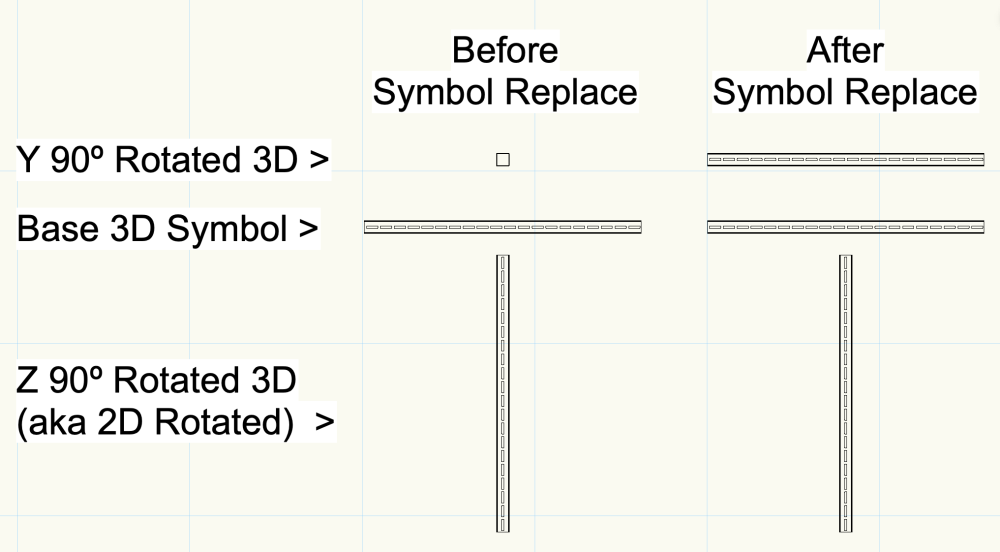
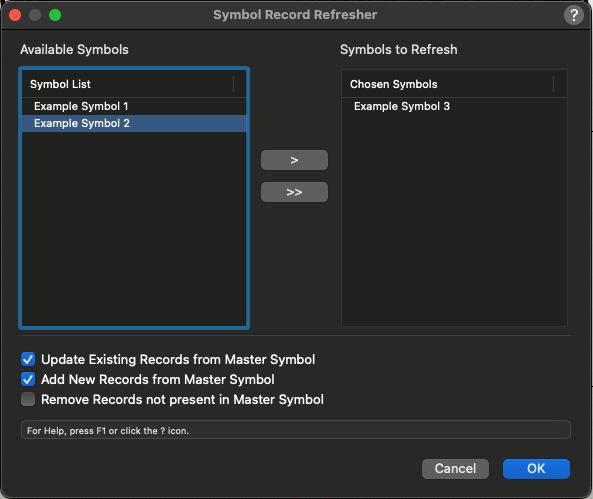
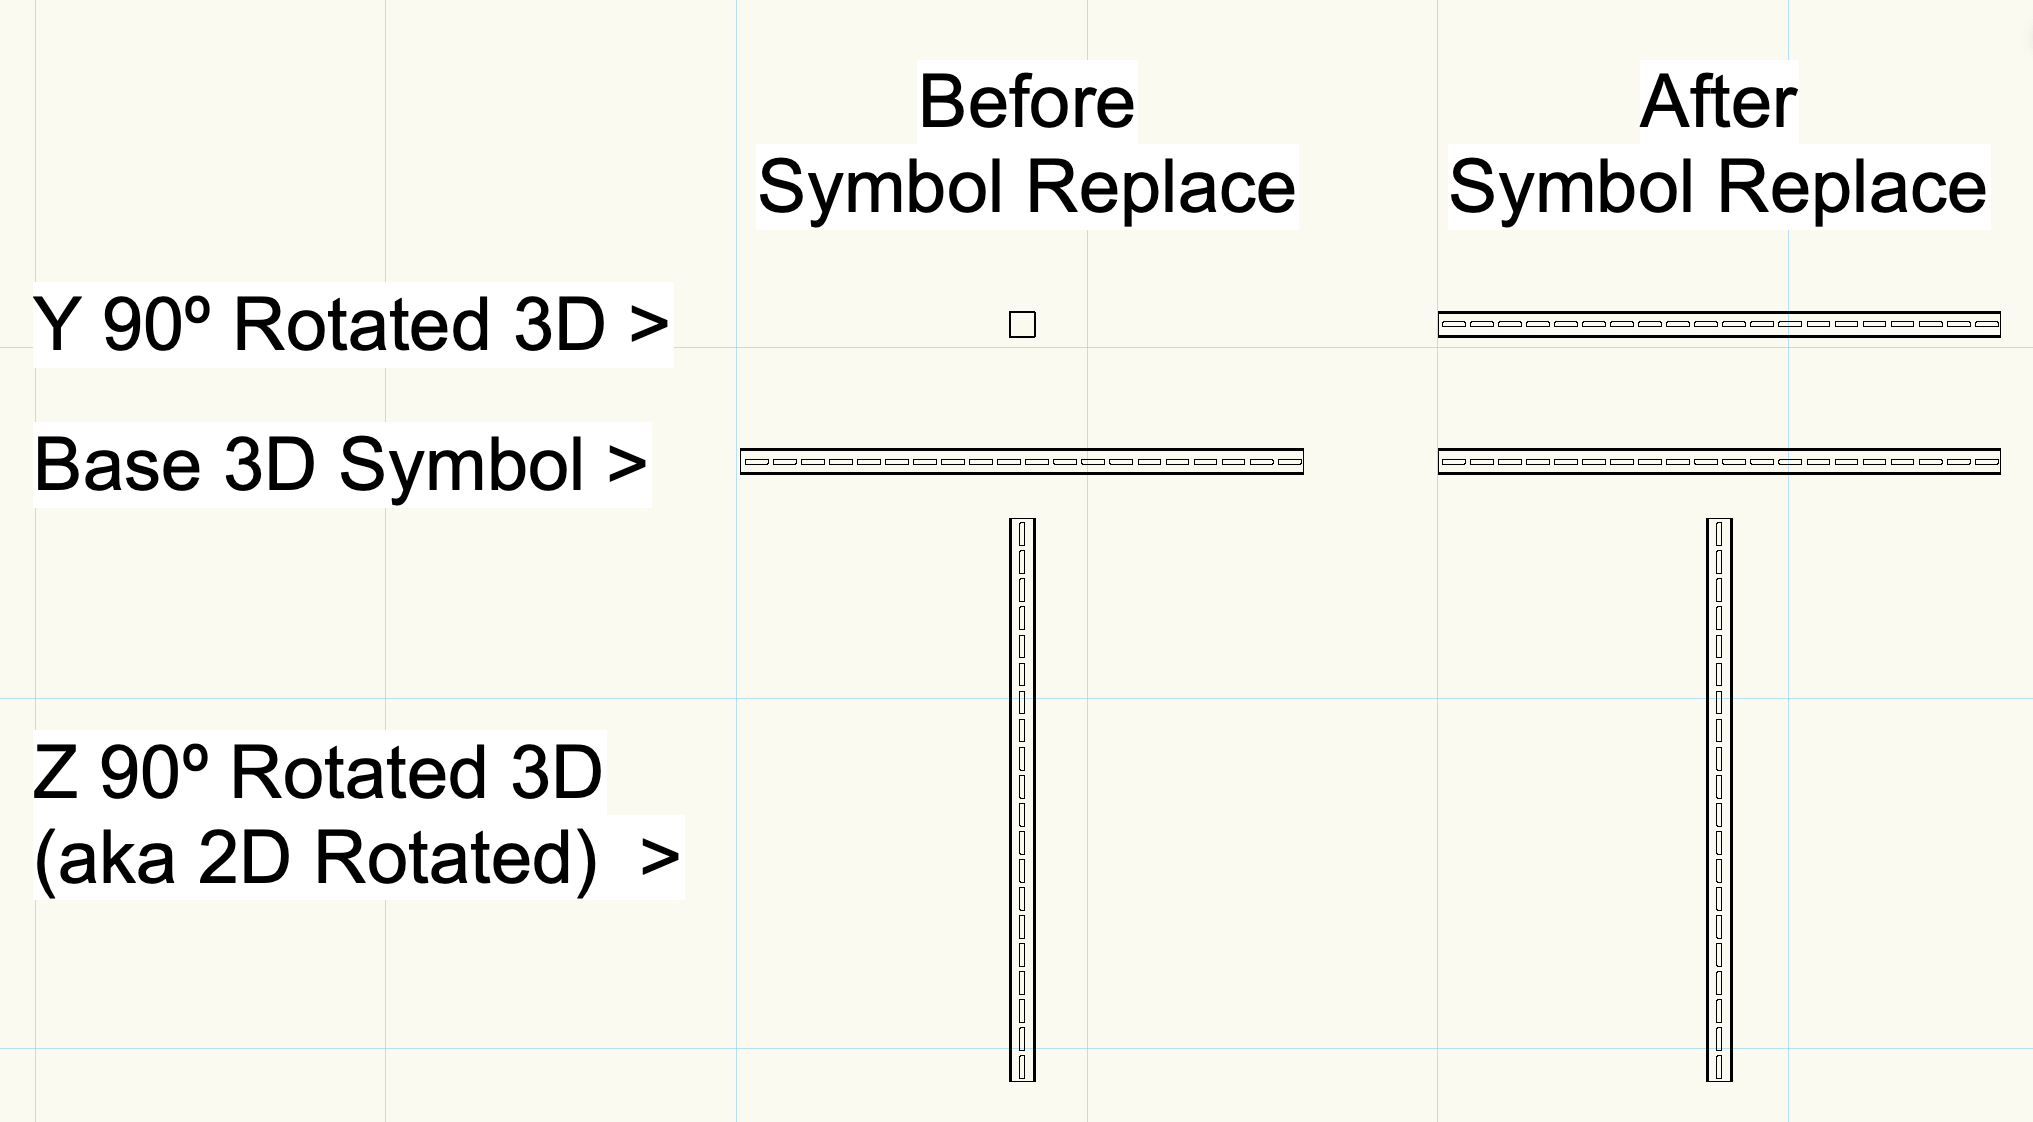
Ahoy all, Current Methodology I'm looking for other user's feedback on a methodology for Record 'Re-issuing' from the master symbol to symbols in the drawing. We know the following; Records can be attached within the symbol by selecting nothing within the edit mode of the symbol and then choosing 'Attach Record' from the POI, or via Resource Browser Right-Click Context menu (or one of about three other methods of choice). Symbols inserted after this point will automatically have the record placed upon the external container and available in the POI Data Tab. If the record field data is changed at a later stage in the Symbol Master it will not be forced to Children Symbols already present in the drawing (Agree with the methodology here 100%). The current best ways to retrospectively update Symbols already in the drawing would be; Create a worksheet summarising the desired symbols and change data manually, or; Use Modify > Convert > Replace with Symbol... and choose "Use records of substitute symbols" Although tedious these options are plausible, however not really effective on mass. The Issue The bigger issue for a client of mine currently is that the 'Replace with Symbol' method is only effective for 2D Symbols (including Hybrid) not 3D Only Symbols. When attempting Replace with Symbol in a 3D View the command is unavailable (fine). When replacing a 3D Symbol, with the same Symbol (with the intent of Record Replacement Only) the rotation is only maintained for the 3D Symbol's Z Rotation. Image showing that the Z Rotation is maintained (like a 2D Symbol) but not X/Y Rotation Although it could be argued that the Worksheet change methodology could perform this operation, this is true however taking a broader step to Record Addition, a Worksheet is unable to ADD records to a Symbol where as the 'Replace with Symbol' command can. Additionally, typically the 'Replace with Symbol' is performed in conjunction with a Group Selection (either manually, by Select Similar, or by Custom Selection) however this is sometimes not practical - especially if the desired Symbol is within another Symbol. Supporting Issues I've seen quite a few discussions on the record management from base symbol topic and think it requires an additional menu command to be considered; Proposed Solution Presuming that I'm not missing another working solution, noting that OBCD is possible but tedious (from experience) I would propose the following two options - however welcome feedback on options. Creation of a menu command which opens a modal dialog listing all Symbols in the document. An example / proposed dialog is below; A right click context menu from the Resource Browser allowing for easy single Symbol (and subsequent record) updates to instances throughout the document. However, I'm just one user's perspective from many. If you've got a different method that I've missed amongst the Data Manager or Record Commands I'd love to hear them. Then I guess I'll move this topic to the Wishlist... Cheers, J

-
@DCLD are you a Windows user per chance? I've just checked my Windows system and of course file structures are 'Movies/' on Mac and 'Movies\' on Windows - I should have known. I've just uploaded a new version which saves the output files directly wherever the current files is saved. 240421 - Multiple Rotate with Recording Module.vwx Or if you want to you could change the line; On Mac: T := Concat(T,'Movies/',Date(2,2),'.mov'); On Windows: T := Concat(T,'Movies\',Date(2,2),'.mov'); I'll have a dig tonight and find a check for the platform of choice as it would be nice to keep the folder structuring (and also be able to Make Folder depending on if the Movies Folder is present or not... but that's for later! Happy rendering, and let me know if that solves it on your system! Cheers, J
-
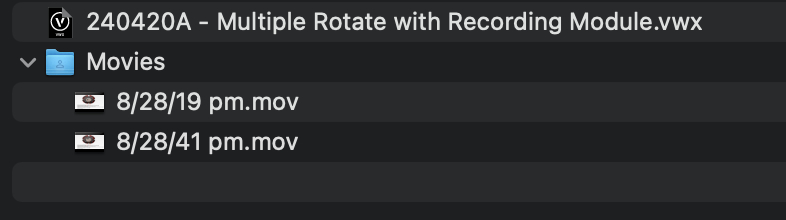
@DCLD you have summoned me - well played. A few months ago I had the time to sit and finally crack the QuickTime Recording using Vectorscript, as most probably used in Animation Works, Solar Animation and Animation Pathing. Although I'm now using it for several more advanced animation and pathing tools in Vectorworks which are not yet released, I thought this particular thread deserved an update. @michaelk I've added to your (not so at all) badly coded rehash, and over-skinned my current/draft QuickTime code. Please find the attached file - however keep the following in mind; Combined Concept of Michael Klaers and James Russell 240420A - Multiple Rotate with Recording Module.vwx 1. Ensure this file is saved somewhere. Wherever you save it also make a 'Movies' folder. 2. Find the Script Pallet under Window > Script Pallets > Adventures in Spinning is open. 3. Double Click "Multi Spin w/ Record" to start. 4. Videos will be output to the Movies folder in the same location as the file. 5. Movie setting are hard coded (25FPS #WelcometoPALAustralia), however can be unlocked by changing QTSetMovieOptions(movieRef, 25, 10, false, false); to QTSetMovieOptions(movieRef, 25, 10, true, false); 6. Enjoy this concept file. Example Renders Below; Core Example OpenGL Half Speed.mov Core Example Concept File Core Example.mov Core Example (IsoMetric Clear) Example Hidden Line Full Speed.mov Hidden Line User Example (Thanks @Peter Neufeld. for a cool file!) Example OpenGL Full Speed.mov OpenGL User Example (Full Speed) Example OpenGL 10th Speed.mov OpenGL User Example (10th Speed - Better Lighting) As much of this thread alludes to there's many better ways to do this in actuality, my most common one being TwinMotion and translators these days. But in terms of seeing something cool through to an endpoint this is it. Enjoy! J

-
AI BIM?
James Russell replied to John S. Hansen's question in Wishlist - Feature and Content Requests
Negative - I actually wrote it after visiting the Henry Ford museum in Nov '23, probably why it was still fresh in my mind as a great case example for workplace and sector innovation, with similar role replacement implications due to technology and mechanical advancement. It could be considered factually incorrect in it's wording as technically the Ford motor company invented the Moving Assembly Line which was my intentional reference here if that's what you're implying... Edit: Somewhat ironically this post additionally is a great point of a Reverse Turing Test where a human answer is believed to be AI - but again that's more of a philosophical discussion, perhaps better suited elsewhere! -
AI BIM?
James Russell replied to John S. Hansen's question in Wishlist - Feature and Content Requests
Sorry in advance for a deeper discussion than originally proposed but I think this is a really interesting and bold topic - and more over one that so many fields are encountering at the moment; ChatGTP and other language based models are redefining the roles several fields; Translators and Interpreters, Customer Support Representatives, Data Entry Clerks, Content Writers, Legal Assistants, Medical Transcriptionists, Journalists, Administrative Assistants, Researchers, Tutors and Educators Stable Diffusion, Dall-E, Midjourney, Adobe Firefly and other image based models are also redefining the roles of several fields too; Graphic Designers, Photographers, Fashion Designers, Architects, Interior Designers, Storyboard Artists, Product Photographers, Cartoonists and Animators, Medical Illustrators, Marketing and Advertising Designers ...and what's even worse is I just used ChatGTP4.0 to make those lists ranked by statistical data as the top 10 anticipated replacements by AI type... I think we're going through a very broad, unknowingly drawn-out Industrial Revolution - a Cognitive Computing Revolution if you will, however I think it's also a matter of perspective. Henry Ford's invention of the Assembly Line significantly affected manufacturing sector, or jump back to the 15th century and have a look at the Johannes Gutenberg printing press and the impact this had on literature, education and culture. There's no putting the 'Genie back in the bottle' for any of this - the question is now that AI has passed Turing Test; when the AI can actually design something indistinguishable, or better than a Human / Designer / Architect / Biologist / Mathematician - what are we actually meant to do? Now coming back to BIM instead of a deep Philosophy session... I personally believe that AI is unlikely to take over roles the BIM Drafting sector specifically in the next five years. I think that the nuance and attention to detail of specifically required for BIM Drafting, but also for the roles in which Vectorworks specifically is targeted, are something which both won't be a currently targeted sector, and/or the cost vs. benefit analysis for training AI specifically for that sector vs. the error corrections required in its infancy would be drastically outweighed. I do think AI will be used as a presentation tool. I do think AI will be used for inspiration. I do think AI will be used for filling gaps in our tedious work (creating textures, creating rough surrounding buildings, extrapolating topographical data, material data sheets, fact checking, material analysis). I, finally, believe that several governing bodies will establish a rebuttal before this affects job integrity in the BIM Drafting field (and extended higher design fields), setting a universal precedent - similar to the actions taken during the 2023 Writers Guild of America Strike. ... who knows in 6 Years though... 🤪 -
@Dave Donley certainly! When using SD (or other AI Image Generators; Midjourney, DALL-E, etc) for extended periods of time you'll realise that although the sliders are good, it's actually the prompts (both positive and negative) which are better at 'steering' the direction of an image. I think in my mind 'Prompt Assistance and Understanding' might have been a better way of writing my dot-point, and it comes in two parts; Parameter Weighting Understanding For those of you newer to the AI world, the Prompt essentially steers your image generation (combined with the Seed Number for variance) over several iterations through the magical web of possibility until you reach your destination image. Weighting is the concept of how much impact a particular word(s) has within the phrase. I would suggest reading this nice snippet / overview - however @Dave Donley you and the team would have to confirm that all of this syntax is accepted by VW AI Viz: https://getimg.ai/guides/guide-to-stable-diffusion-prompt-weights Within the provided VW Documentation (https://app-help.vectorworks.net/2024/eng/VW2024_Guide/Rendering2/Generating_AI_images.htm?rhmapfs=true), it would seem the GUI sees () and [] as increase and decrease in prompting respectively; for those of you used to SD (in particular Automatic1111) this is the common syntax. Guide Snippet (To be confirmed with VW): single words without parentheses: penguin holding a beer+ single or multiple words with parentheses: penguin holding a (beer)+ penguin holding a (beer)- penguin (holding a beer)+ penguin (holding a beer)- more symbols result in more effect: penguin (holding a beer)+++ penguin (holding a beer)+++ nesting: penguin (holding a beer+)++ --> beer effectively gets +++ all of the above with numbers: penguin holding (a beer)1.1 penguin (holding (a beer)1.3)1.1 Weighting with numbers + is equivalent to 1.1 ; ++ is equivalent to 1.1^2 ; +++ is equivalent to 1.1^3 etc. - is equivalent to 0.9 ; -- is equivalent to 0.9^2 ; --- is equivalent to 0.9^3 etc. As you can see, with the same Seed Value, the weighting of particular word(s) [in this case beer] can change things. In a practical example, which I'll need to test within VW AI Viz, this could be the difference between; rock band on stage, bright red shiny drum kit, male lead singer with long black hair and black vest, blue lighting, brick back wall AND (rock band) on stage, (bright red) (shiny)++ drum kit, (male lead singer) with ((long) black hair) and (black vest), blue lighting, [brick back wall] The best implementation I've seen of this was a plugin (I'll go digging later) which simply coloured more positive words / phrases in deeper shades of blue, and more negative in red, which visually helped people understand the weighting so much more! Prompt Assistance (including Styles) Over time users will find series of words which help 'steer' an AI Image Generator toward their result, which could develop into a style. Without wanting to re-train and/or checkpoint (really time consuming ways of making an AI do the particular thing you want), it's often better to find your descriptive style and then vary from there. When looking for inspiration try sites like; https://lexica.art https://prompthero.com/ These sites allow you to search for something basic, for example 'stage', and then visually find something which matches your requirements - allowing you to see the word associations with those images. So for example searching for 'stage', I might find an image that I like the look of, and from there a portion of or whole prompt of; image of a retro stage, full view of the stage, red curtains on the sides, with a slight shadow,stage lights, a soft image, a winding path of strings and notes, men dancing in the middle of the stage, women dancing in dress style,dancing on stage, orchestra backstage, ((best quality) ), ((masterpiece) ), ((realistic) ),(detailed) , creative, poster style, highly detailed realism, 4k Over time I might find myself constantly using "((best quality) , ((masterpiece)), ((realistic)), (detailed), creative, poster style, highly detailed realism, 4k" and if I'm using this phrase all the time I might like to consider this a 'Style', and save it as such: 'Custom Style - Realistic' - very much like our Renderworks Styles and Sketch Styles. So instead of writing these words every time I can just add my 'Custom Style - Realistic' and these words are added to my prompt. There's been some amazing GUIs over the last few years which have prompted users who start looking for additional words, for example if a user typed the word 'Realistic', the prompter will then suggest; masterpiece, best quality, detailed, high realism, 4k, etc I think implementing Styles or Prompt Suggestions could be something to look at for the future, in particular as this technology is introduced to newer users - essentially an automatic version of the overview provided in the "Tips for writing a good prompt" section of your existing documentation. Happy generating everyone! Cheers, James

-
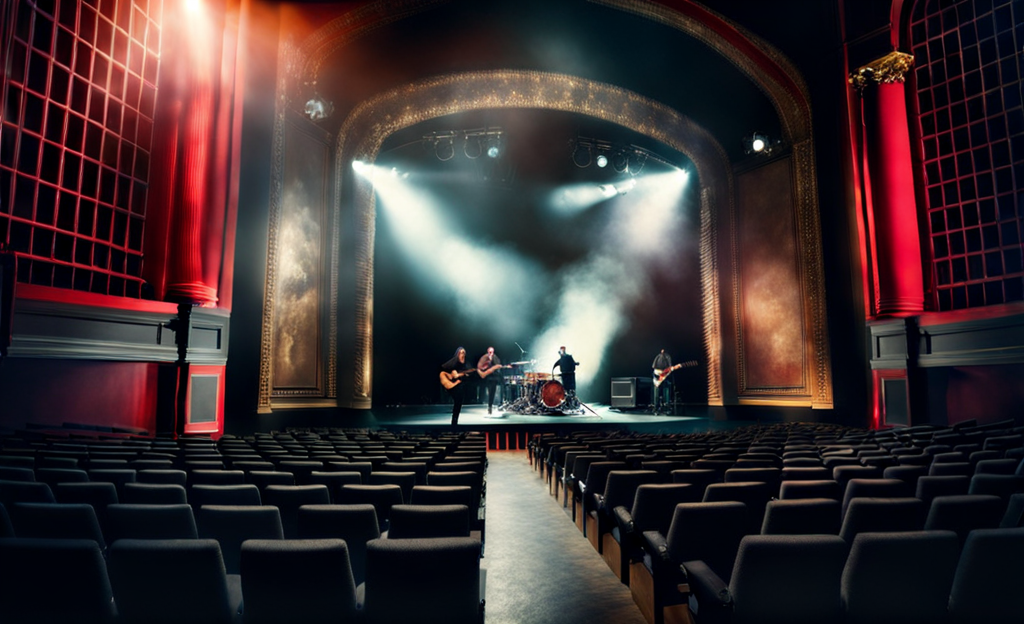
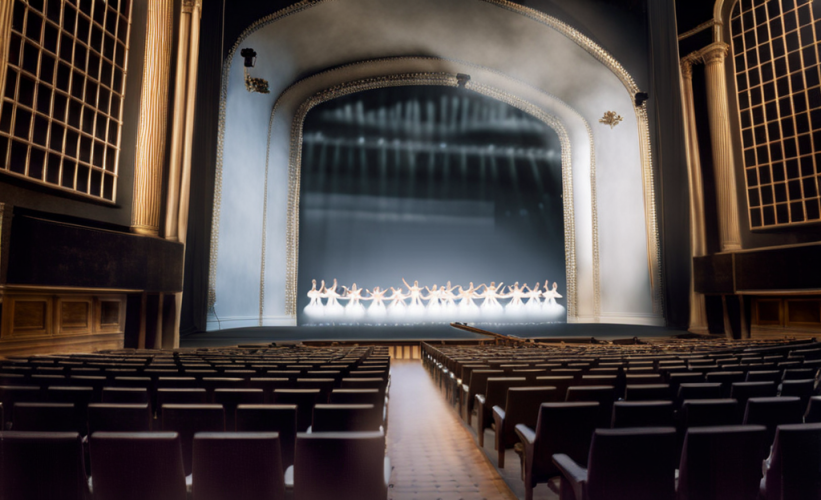
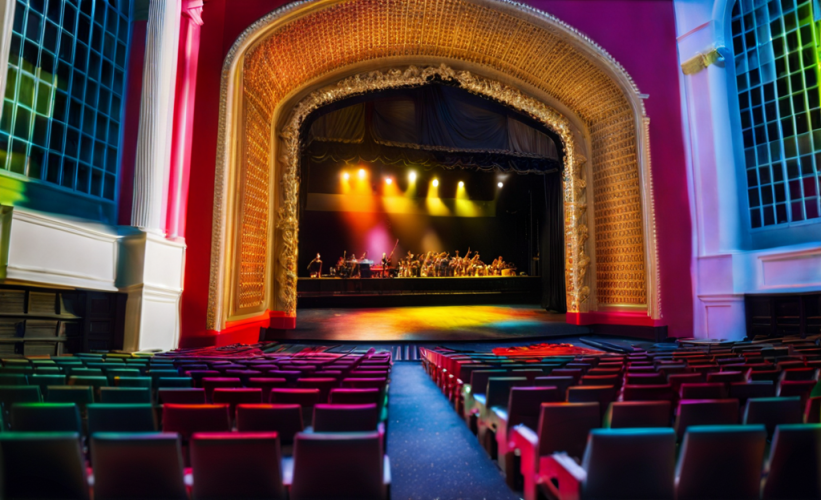
Hi All, Firstly, congratulations to the Vectorworks Development team - this is a bold step and a necessary implementation to remain competitive within the market - and to simplify what some of us were turning to other applications (SD Standalone, Photoshop, etc) for in the interim. Initial implementation, in my opinion, is great. Updated VW2024.4, Updated VSC, Pulled 'AI Visualizer' into the workspace and generating images in no time. Coming from a background of using Stable Diffusion 1.4 (2022) to XL1.0 I'd like to put the following items up for discussion and implementation - primarily to bring the usability of this feature inline with longterm SD user expectations; Saving and File Names Organisation of files is one of the baseline features of SD iterations. As such the following could be considered; Option to Automatically Save All Iterations to Folder. Option to Automatically Create a Session Folder. Option to Auto Name files with; Incremental Number Datestamp / Timestamp Shorthand Description (Initial 32 / 64 Characters of Description Field) Seed Number Option to Save Upscaled Versions to Separate Folder Option for Text file to be included with; Associated Incremental Number (ID) Within text file include full details of generation; Positive Descriptions, Negative Descriptions, Seed Number, Image Resolution, Number of Steps Super important when leaving a project for a time, then returning and trying to remember prompts for a certain image / result / seed. Multiple Iterations (Batch) Combined with MultiSave (above) multiple iterations is one of the biggest creative boosts I've personally found over the few years of SD use - to be able to generate 8 / 16 / 64 versions of something and choose the best one. Multiple Iterations - allows multiple images to be generated (1 - 64) and then once a desired seed is found tweeks to prompts can be made. Batch Time Saving - I'd be quite keen to finalise a viewport / image in VW and then set a batch of 16 iterations going to give me options. Grid Return - natively SD support a grid summary of results with individual outputs to follow - suggest implementing. Iteration Slider Controls Although the creativity slider is good, and is a simplification of the multitude of variance in SD it would be good to see some of the following in an 'Advanced' dropdown; Seed Number should be shown for resuming previous sessions (presumably this is what the Generate Similar actually refers to) For new users the Creativity Slider should indicate 'More Creativity' direction (hover text same as the CFG slider native to SD for reference). Number of steps - combined with iteration steps becomes and important element in 'steering' your desired results. I'll often produce 64 results at 25 Steps, followed by the best of those 24 x 40 Steps and then the best of those 12 x 60 Steps. In Fill / In Painting Very sure this must be in the pipeline however worth mentioning. Marquee Selection Infill - a logical step to be able to select a particular element and infill. Rectangle, circle and lasso marquee and mask painting overlay would be preferred. Inverse Selection Infill - useful for keeping a central element (for example an outdoor stage) and then changing the surrounding elements (sky / weather / season) Bleed / Blur / Feathering - the 'hardness' of the marquee selection and resultant Infill / Outfill. Miscellaneous Items Face Restoration - could very well be on by default. Would advise allowing for pre- and post- images to be saved independently for comparison. Tilling - would suggest looking at this checkbox / plugin, mainly for iterative texture creation (one of the biggest things I currently use SD for) Auto Prompting - at a GUI level it would eventually be good to see this, in a similar way to Styled Prompts in SD Standalone / Photoshop. PNG Transparency - often achieved with the Background Remover Plugin, this is the best way to create Image Props (currently how I do them with SD) I'm sure that some / most / all of these above is in the pipeline and completely consider the current release as a taste of what's to come - excellent for an introduction to many in the community. Raw image - Palais Theatre (Melbourne) Concept Generation - RAW AI VW Concept Generation - RAW AI VW Concept Generation - RAW AI VW Congratulation to the team again on this. Cheers, James
.thumb.jpg.022f40ad6431e127fc59d16c0e53ac3c.jpg)

-
Twisted Extrude Along Path - Challenging Columns
James Russell replied to James Russell's topic in General Discussion
@VIRTUALENVIRONS, I did encounter the same two issues you mentioned; Both the Dialog at creation and the Object Info Panel seemed to max out the number of turns / pitch (both around the same relative value). Ideally, as shown in the reference image, I would have liked a pitch of around 70º but could only achieve something closer to 50º with my variables. I ended up having to duplicate my path to create a second helix 180º out of phase - but would still like to know why I couldn't get the pitch/turns much much tighter. I found great issues trying to do the EAP with a Locked Profile Plane, which in your example would have the flat of the Profile Object maintained perpendicular to the Cylinder. I opted for an octagon for my extrusion (compromising for roundness vs polygon count) but would still like to know why the square I originally tried both failed multiple times and/or took incredibly long to generate. Very nice result though in your example image - well done! -
Twisted Extrude Along Path - Challenging Columns
James Russell replied to James Russell's topic in General Discussion
Hi @Tom W., What an excellent suggestion as I'd never considered the Helix Spiral beyond a straight vector before! I'll leave this post open for a little longer incase there's other crafty critters out there with alternatives... in the name of science that is! Cheers, J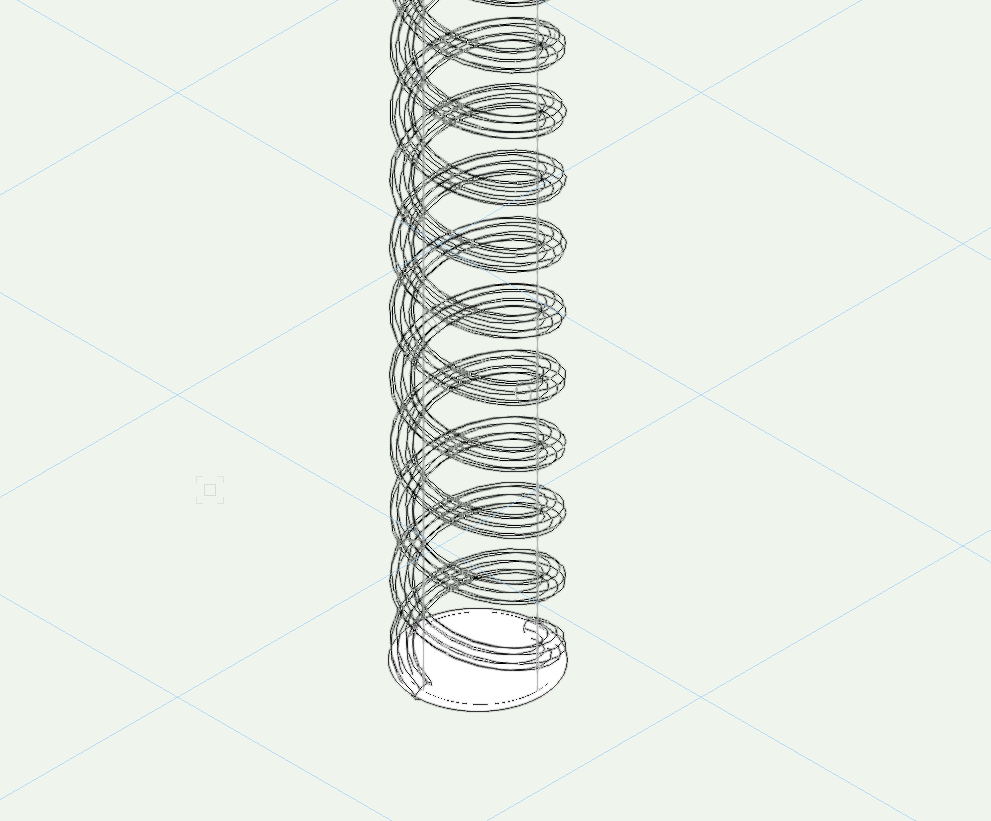
-
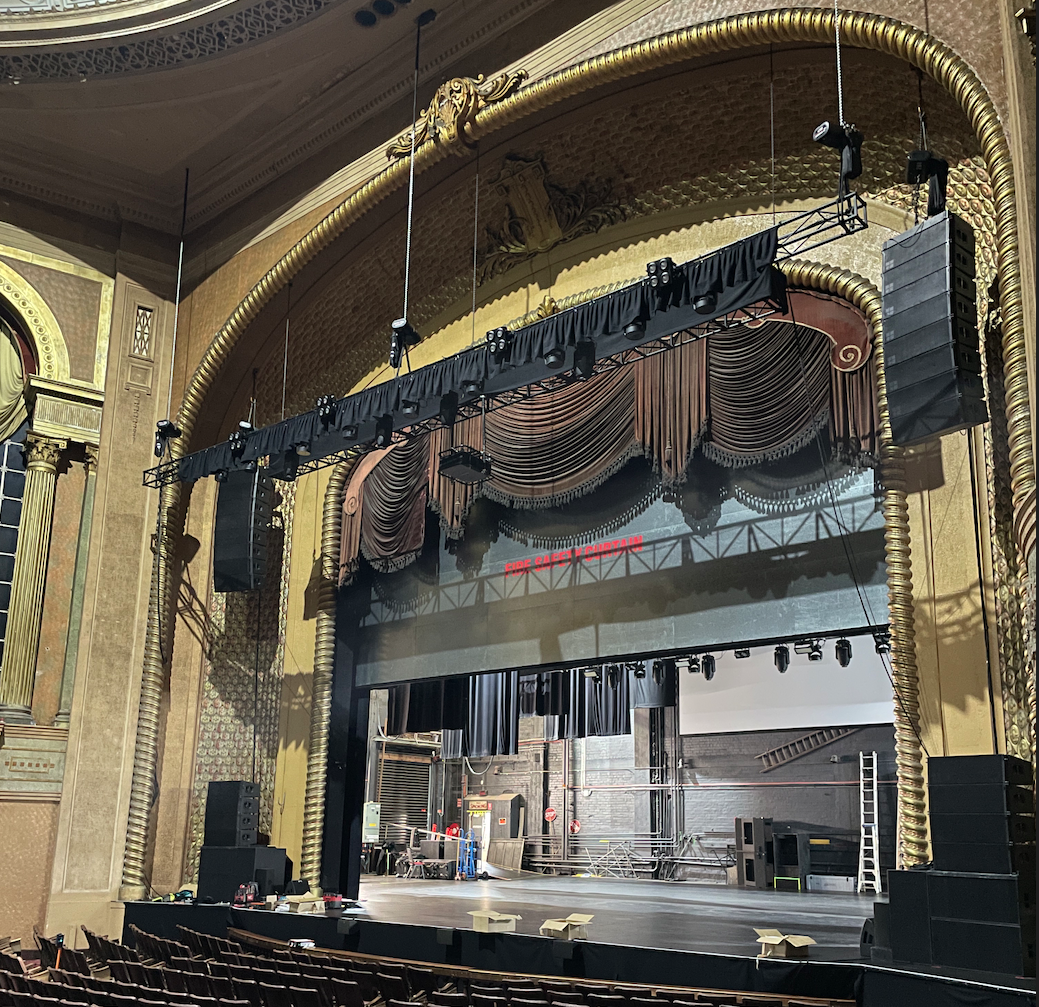
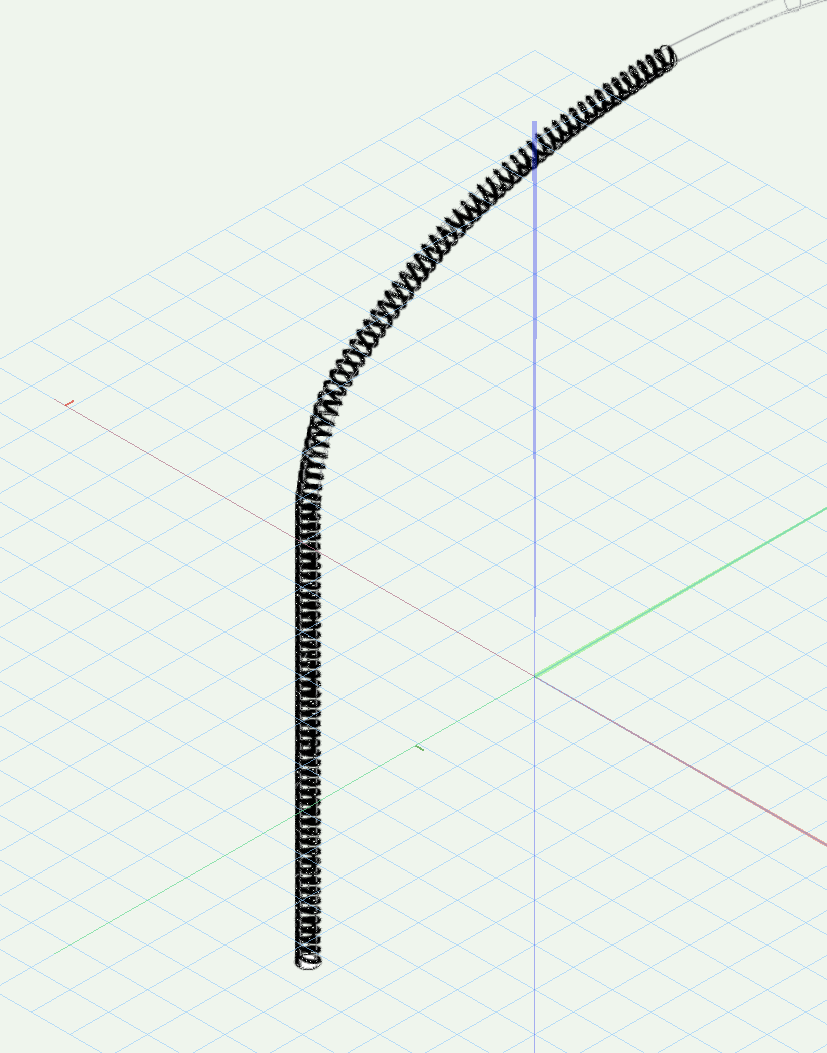
Hi All, I'm currently drawing a lovely old theatre in Melbourne called the Palais Theatre. A picture below shows the rather extravagant proscenium which in particular is framed by a set of rotated columns which arc into the ceiling. Drawing these as Extrude Along Path as basic circular geometry and a cute texture applied is fairly straight forward, and fine for this project's context, however it does beg the question; How would we do this as an actual solid? Find the attached example file for discussion. Save views are included to look at the individual components however as an overview; Extrude Along Path (shown in two examples) is the overall end goal however EAP doesn't have a 'Twist' component. Twisted Columns could be created, as shown in the two examples, by Deforming an existing shape or using a Pitched Sweep function. Notably there are probably further thoughts on a loft between two twisted rails, or a Duplicate Along Path with No Rails Loft Objects following. I'm interested if anyone has any super creative and/or obvious easy ways I've overlooked. Hope you're all well. J 231212 - Twist Along Path Challange.vwx

-
Hi All, I'm looking at a workflow for Point Cloud data in Vectorworks, in particular room scanning. We had some great success in testing the new AR Point Cloud capture in Nomad and an example .vwx file is attached to this post. However I'm interested in people's experience in a practical workflow for utilising this data. The excellent YouTube video below gets us started on several workflows, in particular Sectional Viewports to Sheet Layers; https://youtu.be/7H2GX2TgS2k However, I'm wondering if anyone has a workflow for creating a Sectional Design Layer Viewport. As shown in the example file attached we can achieve an excellent section using the Clip Cube on the provided point cloud (have a look at the Saved View progression for this) however it would be useful to have this functionality with a limited depth from cut plane Sectional Design Layer Viewport. The only current workflow that I have is; [Optional] Copy Point Cloud to retain original. From a side perspective of the Point Cloud, with the cloud selected, choose to Isolate Points from the OIP. With a rectangle marquee draw over the central portion required as the "section depth". Either leave Isolated and/or Remove Points beyond Isolation in OIP. I feel that if there is a Sectional Design Layer Viewport function or workflow there'd be more functionality in the ability to define the section line z-depth and the extent before and after cutting plane - giving more precise control over the Point Cloud Cut. The workflow above is functional, but I feel it's a little inefficient / clunky, I'd be interested in other user's feedback and other tricks / tips you have! Hope you're all well. J 231117 - Point Cloud Isolation Example.vwx
-
Temporary Snapping Un-suspend
James Russell replied to Kevin McAllister's question in Wishlist - Feature and Content Requests
Hi Kevin, I share your snapping vibe and the implementation of the 'state based snapping inversion' is probably a good and easy overall change. However I've also found people aren't aware/appreciative of the slightly hidden 'sticky suspended snapping' shortcut (done by a quick double-tap of the ` key), which I've probably committed to muscle memory in lieu of your suggested GUI/interface change. Cheers, James -
Additionally, let's not forget how crazy this little animation concept can become [See attached Pacman project from 2015] Controls: W : Up A : Left S : Down D : Right Space: Stop Esc: Quit I still strongly believe this deserved to be in the included sample files of VW by default, perhaps @Peter Neufeld. the AU/NZ VW2023 needs to be rebundled. 😅 @michaelk - Pacman definitely requires your tagline of "Badly scripted by James Russell" JRussell - PacMan 2015.vwx
-
@michaelk : It's not often I awaken from my forum slumber - however I'm impressed and you deserve to know it. However, I'm a marinonette man now, and as such the challenge has been reset. I'm off to explore this for a bit. One day we'll know the Animation works secrets... one day.
-
How can I reference my Marionette Object in a worksheet?
James Russell replied to Dmoozak's topic in Marionette
Hi all, It's been a while but I'm playing with Marionette for Large Expo components. It feel like two way Marionette functionality should be fairly easy programatically VW change right? We do it for the LED tools, Lighting Devices, etc. Why can't we have a ='Marionette Object'.'My_Field_Name' call, it's just a database entry. I think it's somewhat essential to the development of practical tools to be able to work in bi-directional worksheets - to be able to track multiple entity changes, edit object names/parameters, counts of fields, even booleans changes would make this much more powerful and sellable to client workflows. I hope maybe @Marissa Farrell or one of your crew could look at the plausibility of this request for the Roadmap of this Tool. Otherwise super enjoying it. Cheers, J -
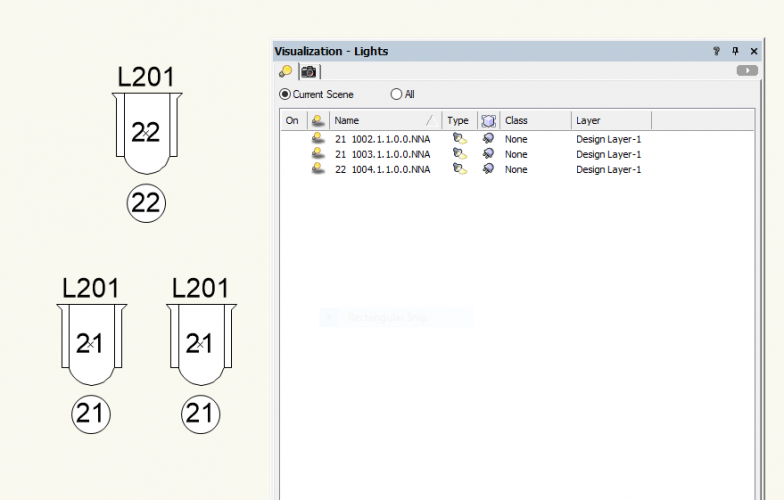
Hi Nick, The best way for run based numbering is using the 'Manual' setting within Spotlight Numbering. To do this I find it best to: Have no lamps selected, but be on the Layer with your lamps. Spotlight>Spotlight Numbering from the menu bar. Tick the box next to DMX Address. (See additional options for the DMX Footprint, either manually input a number or by the allocation within the fixture profile) In Numbering Direction choose Manual from the Primary Direction drop-down. Press Ok. Start clicking on your lamps one by one in the order you'd like them to be numbered. When finished double click in a blank space. Hopefully that answered your query, should I have misunderstood let us know! Cheers, J
-
100%. You'll actually notice in the Lighting Device world this is done through the name field being locked to an auto incrementing number generated as the lamp is placed its unique identifier is created (similar to a timestamp really) - no reason the same can't be applied here (or actually similar would be preferred as a lot of people would like the name field to be available for LOC based lookups...).
-
I can somewhat agree with this from an ease of use perspective, by default it would be good on copy (either flat copy, repetitive duplication, mirror copy or rotation copy) that things auto incremented however I can also see how the logic is derived from the predecessor of this, the Lighting Device. When you mirror a lighting rig, although it would be a nicety for the unit numbers to perhaps auto increment, for the most part we actually want that data to remain the same - for example in key fill pairs, or floods/wash pairs. Unit 73 (or Channel 73 pending your theatrical preference in numbering and conventions) may actually be present in two or more locations along a bar for pairing purposes. Although it does add additional steps to a workflow when dealing with hoisting the past, particularly on long truss runs with 10 hoists or more, I've just found myself using the Spotlight Numbering feature more, getting familiar with the shortcut key and punching out a line from Left to Right. It's not ideal but it certainly does the job. Perhaps another alternative is the option to resolve Hoist Number conflicts as a menu item - it wouldn't be a large script at all to write! I look forward to you pushing Braceworks further Nathaniel. J
-
Problem exporting 3DS file and "Normals"
James Russell replied to awlightingdesigns's topic in Entertainment
Just thought I'd jump in here with more than just a +1 to this line of inquiry. I, for the longest time, have wanted to use VW drawings in several packages, Unity and Blender primarily - however prevented by the seemingly random normal directions when using formats such as .3ds and .fbx. I hit the very same (if not very similar) series of roadblocks in 2016: At the time I, along with a few others ( @rDesign & @zoomer for example), were having grievances in the way VW renders normals overall. Being able to use objects created in VW in other packages fluidly would have great benefit moving forwards into AR/VR experiences, game intergration and rendering overall. I believe I gave up the day that I drew a 1m cube, exported it, viewed in Blender/Unity the top and the bottom were inverted normals. I then in VW rotated the cube 90 degrees in an axis, exported it, viewed it was completely inverted. That was the day I knew until a core fault was fixed we'd never move a model from VW to Blender/Unity. **Note: There is an answer here to "Double Normal" both side of an object, and yes - this would appear to be a correct solve on face value (no pun intended), however there are multiple downsides including additional excess rendering power, texture map rotation/flipping and overall general messy practice. I would love to see this resolved however looking at the progress and interest thus far I don't really expect it. I'll be following. J -
Hi Henry, I've just had a quick look over the Enscape Technical Specifications and it is only for VW2020 Service Pack 3. You won't be able to just update your VW2019 to VW2020, that's not quite how the Vectorworks updates work. You'll receive updates for your yearly version, (ie. VW2019SP1, VW2019SP2, etc), but not for yearly releases. Presuming you're a current student you should be able to log into your student portal and then download an installer for VW2020. (Note: There are some random clauses from memory, like if your course is ending in less than 3 months you'll not be provided with a link - and a few other random things like that.) Otherwise if you can get your hands on VW2020 you should be good to go. Good luck, James
-
Hi Henry, You are correct that there should be a menu item beneath Plug-ins which would lead you to Tools>Third-party>Enscape>Add Enscape to Workspace. Looking at your Workspace Editor on the left I notice you don't have an Enscape item listed and/or available for dropdown. You could expand the "All Menus" section and have a quick look in there for "Add Enscape to Workspace". This would firstly lead to thinking the plugin wasn't successfully installed originally. I've just done the installation for VW2020 (and noted you're running 2019 here) however it was quite straightforward and mine appeared instantly. Perhaps redo the installation of Enscape, ensuring VW is closed whilst installing, and that you have all the Runtime and Distributables it requires in the first installation menu. Let us know how you go. J
-
 Firstly @sbarrett cool as work - that's so much fun. I'll be having an in-depth look later tonight for sure, great work! @michaelk / @Nick Armory - 5 years is a long time. Unfortunately that's somewhat as far as we ever got there (I'll dig the old files out later). The crux of it being some hidden magic behind the older (2019) create animation and the way it would real-time cycle through object updates - however not so applicable for parametric objects. It's something one day I'd love to explore further - if only we had an extended period of isolation to do such things... However not wanting to leave you hanging for options please see the attached file. It's old but good - still runs in 2020 (double click the script in the scripts panel then W,A,S,D to control). Stay safe all, J JRussell - PacMan 2015.vwx
 -
@Kazemester do you happen to have a PDF which displays this behaviour between version (presuming by your post you mean between VW2019 to VW2020 or similar). I've only really ever seen behaviour as @danm01 describes where you have two formats of PDF compression; Vector-based PDFs: These will commonly ungroup into three components; A Bitmap Preview, A White Rectangle (representing the 'Page Space' of a PDF) and a group of the vector data (usually lines, rectangles and some polygons). Rasterized PDFs: These will only have the first two components; A Bitmap Preview and A White Rectangle (representing the 'Page Space' of a PDF). Some people use this as a way to protect data, also depending on the DPI they can be smaller than a complex Vector-based PDF. [also often older venue plans or scanned documents will be Rasterized] If you have an example of a PDF you've run into which behaves as you've described feel free to link it here and I'm sure the community (and myself) will be happy to test between version. Cheers, J
-
Notes Manager/Callout Tool
James Russell replied to LeeElston's question in Wishlist - Feature and Content Requests
@LeeElston I stumbled upon this whilst teaching a new class a few days ago. I agree it seems like a step backwards compared to the side-by-side previous layout! +1 for a change back to the previous layout. -
Changes to Create Animation 2019 vs 2020
James Russell replied to James Russell's topic in General Discussion
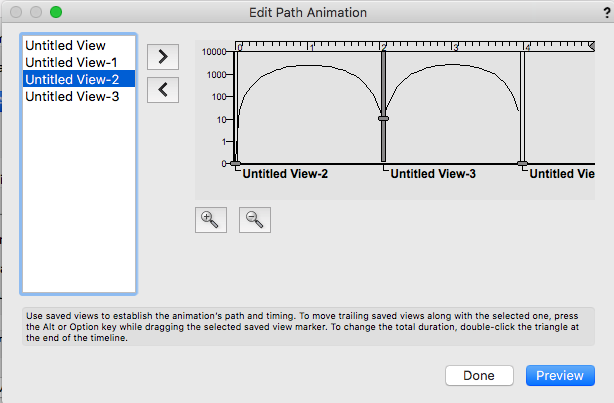
If you're using VW 2019 and have created this curved travel path from Save Views you should be able to grab the slider in the Edit Path Animation dialog and drag it all the way to the top, creating a smooth transition line; No problem. I'm currently using Spotlight 2020 for the examples in my previous videos - however Create Animation is available in all versions, including Fundamentals. Just be cautious if you have transitioned from VW2019 into VW2020 and used the Migration Options to keep your old workspace then you may not have the new 2020 Create Animation set in your current workspace. Head to Tools > Workspaces > Edit Current Workspace and look for the Create Animation subset in the left hand side. Firstly I appreciated the work you and your team have put in so far in VW2020. As with my second video I have tried to use this new speed slider to alter the path and transition speed between keyframes. A) The slider and context doesn't seem as intuitive nor flexible as the previous Edit Path Animation dialog (at least in my mind, this timeline interface has worked quite well for years). B) There doesn't seem to be the ability to hold on keyframes for a duration of time. C) Reducing the speed of one or more keyframes does not slow the path movement down, it seems to instead reduce the video duration and ignore speed altogether. Increasing the speed (as shown in my video above) also doesn't seem to have any effect - just incase your context of -99% to +100% refers to inverse movement speed for some reason. D) Field of view variables should be inherited from the Saved View they were created from to avoid tedious tweaking of FOV after creation. Should you have solutions and specific methods which can replicate, solve or guide the points above I'd love to see a video showing this in action. Otherwise alternatives might include reinstating the old toolset, at least in another menu or depreciation type effect as with other new experimental tool releases. Again I respect the efforts to improve this tool, and enjoyed creating my first 360º video output which is a new function - however without the ability to pause in place the user in this experience has no time to appreciate the efforts put in. Cheers, James


.jpg.0a2e570b3c377f56d62e668b6afa6230.jpg)