-
Posts
12,626 -
Joined
-
Last visited
Content Type
Profiles
Forums
Events
Articles
Marionette
Store
Everything posted by Pat Stanford
-
No does not sound right. I just created a group. Edit Group, Rotate Plan. Worked as expected. Created a Symbol. Edit Symbol, Rotate Plane. Worked as expected. Rotate Plane. Edit Symbol. Worked as expected. Plan stayed rotated and I was able to edit the symbol in that rotation. Further rotation of the Plan View worked also.
-
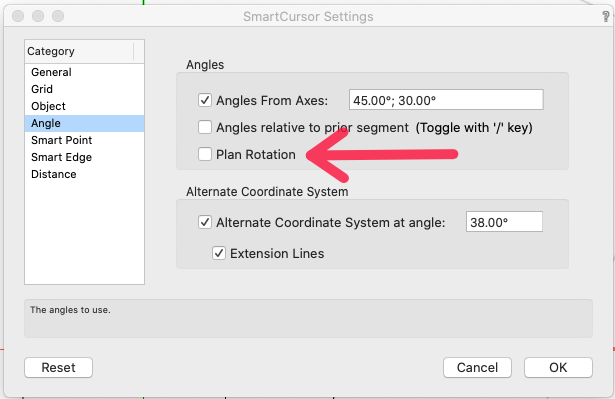
Do you mean this check box in the Snapping Settings? It set an angle snap that is parallel to the X and Y axis in an unrotated view while you are in a rotated view. Rotate a view, go to somewhere close to the axis indicators and see that you can draw parallel to the axis markers when you have the option checked.
-
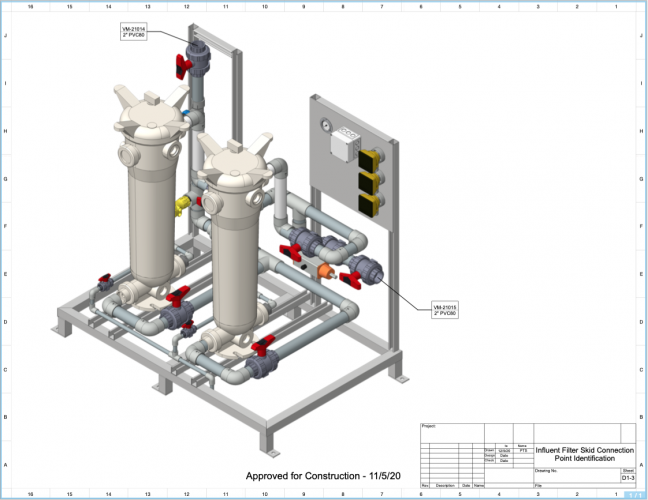
Not a taboo topic, I just don't think there are a lot of people working with medical devices. You can import objects in almost any format and they will be usable in VW. Sketchup, Revit, STEP, IGES, DWG, DXF. The best suggestion would be to import objects into new blank VW files so you don't end up with a bunch of layers/classes you don't want/need. Clean up the objects there and then put them into a library file once you are happy with them in VW. All of the objects in the attached drawing with the exception of the frame, plates, and pipe (all extrusions) were imported from other file formats. Sorry for the relatively low resolution screen shot.
-
Revision History Not Showing in Title Block
Pat Stanford replied to girwin's question in Troubleshooting
If you Edit the Title Block form the Resource Manager and then Edit the Title Block Layout, you will see that there are three blank text block above the No, Date, and Stamp titles. These block are linked to Issue data, not Revision data. I don't remember 2020, but in VW2021, I just had to select each text block and change the Dynamic Text link at the bottom of the OIP. HTH -
Delete Classes and RETAIN Original Graphic Attributes
Pat Stanford replied to jeffharris's topic in General Discussion
Have you considered the "Shuttle File" method? Import the Revit file into a blank VW file. Then reference that file into your working file using a Design Layer Viewport. All of the Classes will be isolated in the Shuttle File and you will still be able to see and snap to the drawing. If you need to update, just delete the information from the Shuttle File and import the new Revit into to. If you search Shuttle File in the forums there is a lot more information available. -
@Conrad Preen @Tamsin Slatter @Lien I did not even pay attention to what forum this was in. I am going to move this thread to the Site Design forum so that more people who work on this are likely to see it.
-
Export PDFs and have them mark them up is the best option unless they want to buy a full copy of VW. Fundamentals would be sufficient if all they want to do is markup and not to change the PIOs you use.
-
Check the permissions on your user folder to make sure VW is allowed to access the file. If you start VW, change a few preferences, quit VW, Restart VW, does it give the same error message? Remember that preferences are only saved when VW successfully quits. If it crashes instead of gracefully quitting the preferences will not be saves and may be corrupted.
-
You are correct it won't export the correct coordinates unless you have the file properly georeferenced. Do you think you have the file georeferenced and it is still giving wrong results?
-
Almost anything is scriptable. ;-) How much to you want to learn?
-
Look up Georeferencing in the help files. You can define the coordinate (I think of it as the offset) of the file 0,0 point to be the correct real world coordinate. HTH
-
It has been a while since I fought with this. ;-) The "outside" border of the Title Block Border is actually controlled by the Crop settings. The "inside" border is controlled by the Border settings. If you don't need the outside line you can Edit the Style and change the Crop setting to None on the Sheet Zones and Grids page of the Style Settings. If you want the outside line, but don't want it dashed it is a little trickier. The basic layout of the title block is defined by a symbol named plankopf-A3 in the Title Block Border Style folder. If you edit this symbol, you will see that there is a dashed horizontal line near the top right corner. You can make the outline go solid by changing this line to Solid. Alternatively, you can also make the outline go solid by simply selecting the dashed line and Send Back to put it as the back of the stacking order. My guess is that the crop outline is inheriting the line type of whatever object is at the top of the stacking order in the symbol. By making that object have a solid line type it fixes the problem. Let me know if you need more details. HTH
-
I don't think you can report record.field combinations in a spreadsheet cell. Hopefully someone will let me know I am wrong [ @michaelk ]. It can probably be done with a worksheet script, but transferring criteria can be problematic. I will try and take a look at that this weekend also.
-
The documentation for FormatField is wrong and the name is misleading. A better name would be FieldDefault. What it does is returned the default value for the field specified in the record specified. It is not a criteria function, so you can't pass it a criteria.
-
True, but since nothing is going to be changed about VW2017, you either are going to have to upgrade or find a work around. :-(
-
There should be a button under the C that is your temporary avatar that will let you upload an image.
-
How about posting a file with an example of the Title Block. I can't tell exactly what is happening from the screen shot.
-
Standard troubleshooting question. Do you have the last service pack of VW2017 runnning? I believe it was SP5. You can see the exact version and build in the About VW dialog box.
-
Can you post a screenshot showing the extra lines?
-
Same issue with Selection set. GREATLY increases the complexity of what we are doing.
-
In my world, that is called UNDO. ;-) It would certainly be possible, but it would mean that rather than just hiding things a list of everything hidden would have to be kept. Takes the script from a single line to probably 100+ lines to make sure to properly handle all the edge cases. Not something I have time for right now. But a good idea.
-
I have not used that before and won't have time to play until probably this weekend, but I don't think it does what you are hoping it does. My reading of the description is that the criteria portion only applied to data associated with the Record specified. I can't see where this is a useful function as you can already just use the Record.Field combination to get effectively the same thing.
-
Using Mono Tool - Any way to only show dimensions in a colour?
Pat Stanford replied to justinekwood's question in Troubleshooting
Another possibility would be to use Stacked Viewports. Create your first viewport and set it to Mono (Black and White Only). Duplicate the viewport. Put colored Annotations for the dimensions you need to be in color in the Annotations group of the top viewport. Set every layer of the top viewport to Invisible. This will change the size (unless you have a Crop object) to only surround the annotations, but should still display the annotations. Change the top viewport to not be Black and White Only. This should give you color annotation showing above a Black and White viewport. -
I don't think there is a way to display an image in a worksheet that is not already placed in the drawing as all of the Image functions effectively work based on Handles. There is a new Worksheet Script function that will put an Image (specified by a handle) into a worksheet cell. You could theoretically import an image, place it in the drawing and link it. The issue would be how to not import if you already had the image. But there may be a way around that also. What are you actually trying to do? Take a look at this thread for a little more information;
-
It is a very big dialog box, so if you are using a low screen resolution (1024 x 768 or similar) yes it will not show. The OK button is the default, so as long as you are not in a text field if you hit Return it should activate the OK button and save. Command-period (or possibly Escape) should activate the Cancel button.


