Michael H.
-
Posts
24 -
Joined
-
Last visited
Recent Profile Visitors
1,471 profile views


-
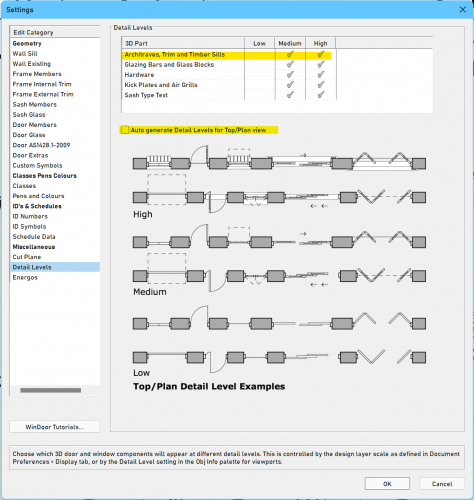
In WinDoor Settings, Detail Levels tab, uncheck 'Auto generate Detail Levels for Top/Plan view', then select which 3D part to show for Low, Medium or High levels.
-
Reference Marker - unable to change double spacing
Michael H. replied to MickyC's topic in General Discussion
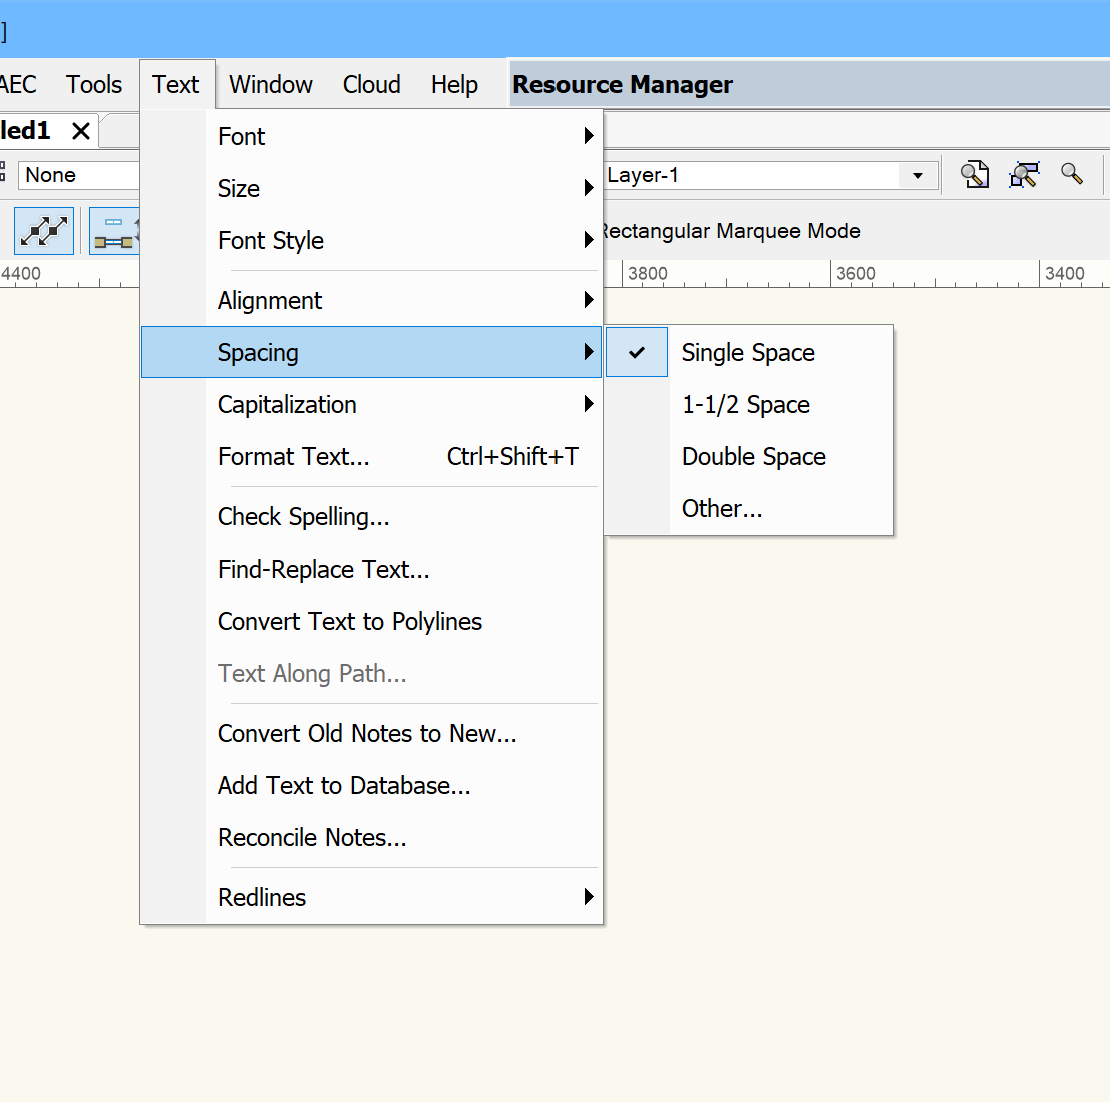
The only thing I can think of is to set the line spacing to single from the menu bar before you draw a reference marker. I was able to replicate the double spacing in the reference marker by setting the spacing to double space before I drew the marker. I could not change it to single by selecting the marker and then using the above menu to select single. Hope that helps.
-
You could create an auto hybrid object. That way you can control the appearance in 2D plan and model separately. Have a look at "Creating Objects\3D Modeling\Creating Auto Hybrid Objects" in the help documentation. If you try to alter the shape of a plug in object such as the Framing Member Tool to create the rounded ends (by subtracting or adding a solid), the plug in object then becomes generic solid and you lose the ability to change certain attributes through the OIP (Object Info Palette) as well as controlling the 2D plan look.
-
New versions of VW can be frustrating, I feel your pain. I now follow these self-guided rules which seems to work well for me. If I start a project in a specific VW version, finish it in that version. Don't migrate to a new version of VW until at least SP2 or SP3. Just because a new version has been released doesn't mean I have to jump on the bandwagon immediately. Spend some time to play around with any new version to learn features, see what works or doesn't before taking the leap. I tend to move to a new version about 6 months after the initial release. Every now and then I re-do my templates from scratch. I'm now on VW2019 and it's been plain sailing so far. Hope your issues get resolved.
-
I have the same problem too. Both my laptop and desktop have 4K screens set at 200% scaling. Anything smaller makes everything too hard to read. I've found the affected dialog boxes are: Door Window Title block They cannot be resized. If these could be fixed, that would be great. I manage to get by with hitting the enter key and sometimes that accepts the changes I've made, depending on which field/button has the focus.
.thumb.png.c1e1359f7d1a38df0724e09b610070bc.png)
.thumb.png.d1540140b8756283e5d336484cdaaf61.png)
.thumb.png.203ede3d116b8ff4979797921d59d4e6.png)
-
Vectorworks Cloud Services app upgraded to a new version and everything appears to be working now. Thanks! Michael.
-
I managed to roll back to Windows 10 version 1703 (OS Build 15063.674) and Vectorworks Cloud Services is working as normal. When I check Windows Update, version 1709 (which is causing the problem) is lurking there waiting to be installed.
-
Hi Iskra I deleted the Vectorworks Cloud Services folder, restarted Vectorworks, a message appeared stating that Vectorworks Cloud Services was setting up, then I got the same error message. I reinstalled Vectorworks and still the same problem. I'll see if I can uninstall the feature update to Windows 10. My only problem is that Windows will reinstall it since you cannot turn off updates in Windows 10 Regards Michael.
-
I cannot log into Vectorworks cloud services, I keep getting the following error: When I check the logfile it shows the following errors: This started today after my PC decided to update Windows 10 to the recently released Windows 10 Fall Creators Update (version 1709, OS build 16299.15). Do I need to reinstall Vectorworks or could there be a compatibility issue with Windows 10 version 1709 and the Vectorworks Cloud Services application? Thanks Michael
.thumb.png.1013f9b0e66c12fdd229476004e4f236.png)
.thumb.png.4a22ddea262eaa8badae94dcc3d10736.png)
-
Door PIO settings dialog box scales incorrectly on 4K monitor
Michael H. posted a question in Troubleshooting
When I open the door PIO settings dialog box, it scales incorrectly on my 4K monitor. The dialog box OK and Cancel button are missing making it unusable. Any ideas?.thumb.png.989074def0543667ca42f77f78614c1d.png)
-
Plans exported to PDF appear with curves as lines
Michael H. replied to Josh NZ's topic in General Discussion
Is the WC and other objects imported from a DWG? Sometimes I notice that imported DWG arcs or circles are made up of polylines with lots of vertices or just lots of lines. This makes them appear "jagged" as they are not true arcs. Often I will replace them with VW arcs or circles so they print properly. -
Go to the design or sheet layer where the viewport is located, select the viewport, the name of the viewport is at the bottom of the OIP (VW2017). You can rename it there. In previous versions of VW it was located on the Data tab of the OIP. It took me awhile to find it when I upgraded to VW2017. Michael.
.thumb.png.89ff655bfec581ede1bcf6fe955eb39a.png)
-
Roof bound offset disappears when inserting skylight
Michael H. posted a question in Troubleshooting
I have a problem when inserting a skylight into a roof object. If a roof is created using the "Roof Face" command, the component bound offset disappears after a skylight is inserted. When selecting the affected roof face, the OIP for that object constantly flickers and I'm not able to change any values for the roof. I can select the skylight and the "Edit Roof Element" dialog box displays and I'm able to edit the skylight. If I delete the skylight the roof object goes back to normal, the overhang reappears and I can edit values in the OIP. I would normally use the "Create Roof" command but I have a project with a complicated roof, and the "Roof Face" command is better suited to my needs. I inserted a skylight into a roof object that was created using the "Create Roof" command and everything is OK. Image below to show what I'm going on about. I created a basic roof in a new file and was able to recreate the error. I'm using VW2017 SP3. SP4 isn't available yet from our local distributor. Thoughts?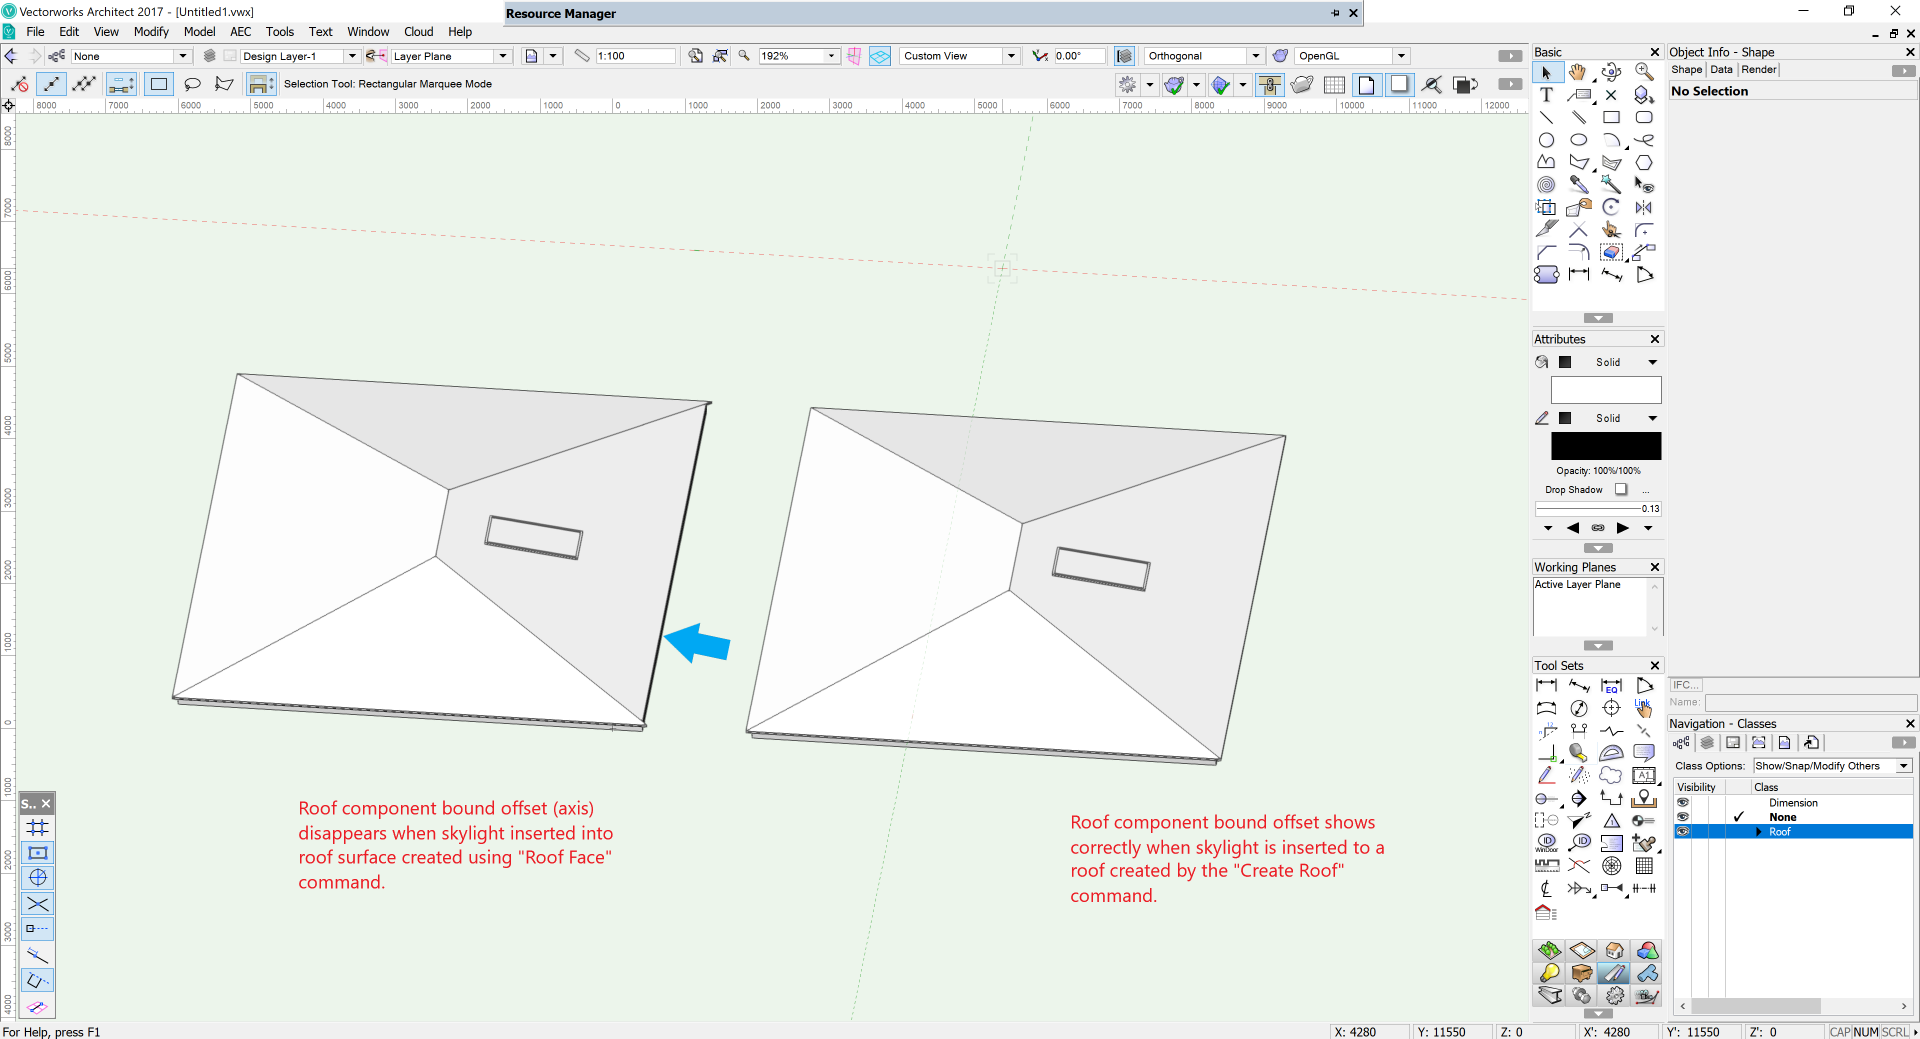
-
Windoor Awning Arrows Appear Upside Down When Part of Door
Michael H. replied to Josh NZ's topic in General Discussion
As Alan noted, make sure the selection has the word "Rev" in it. Rev = Reversed direction arrow. If you're still having problems, maybe upload a Vectorworks file with the problem WinDoor so we can have a play around with it. Hope that helps. -
Windoor Awning Arrows Appear Upside Down When Part of Door
Michael H. replied to Josh NZ's topic in General Discussion
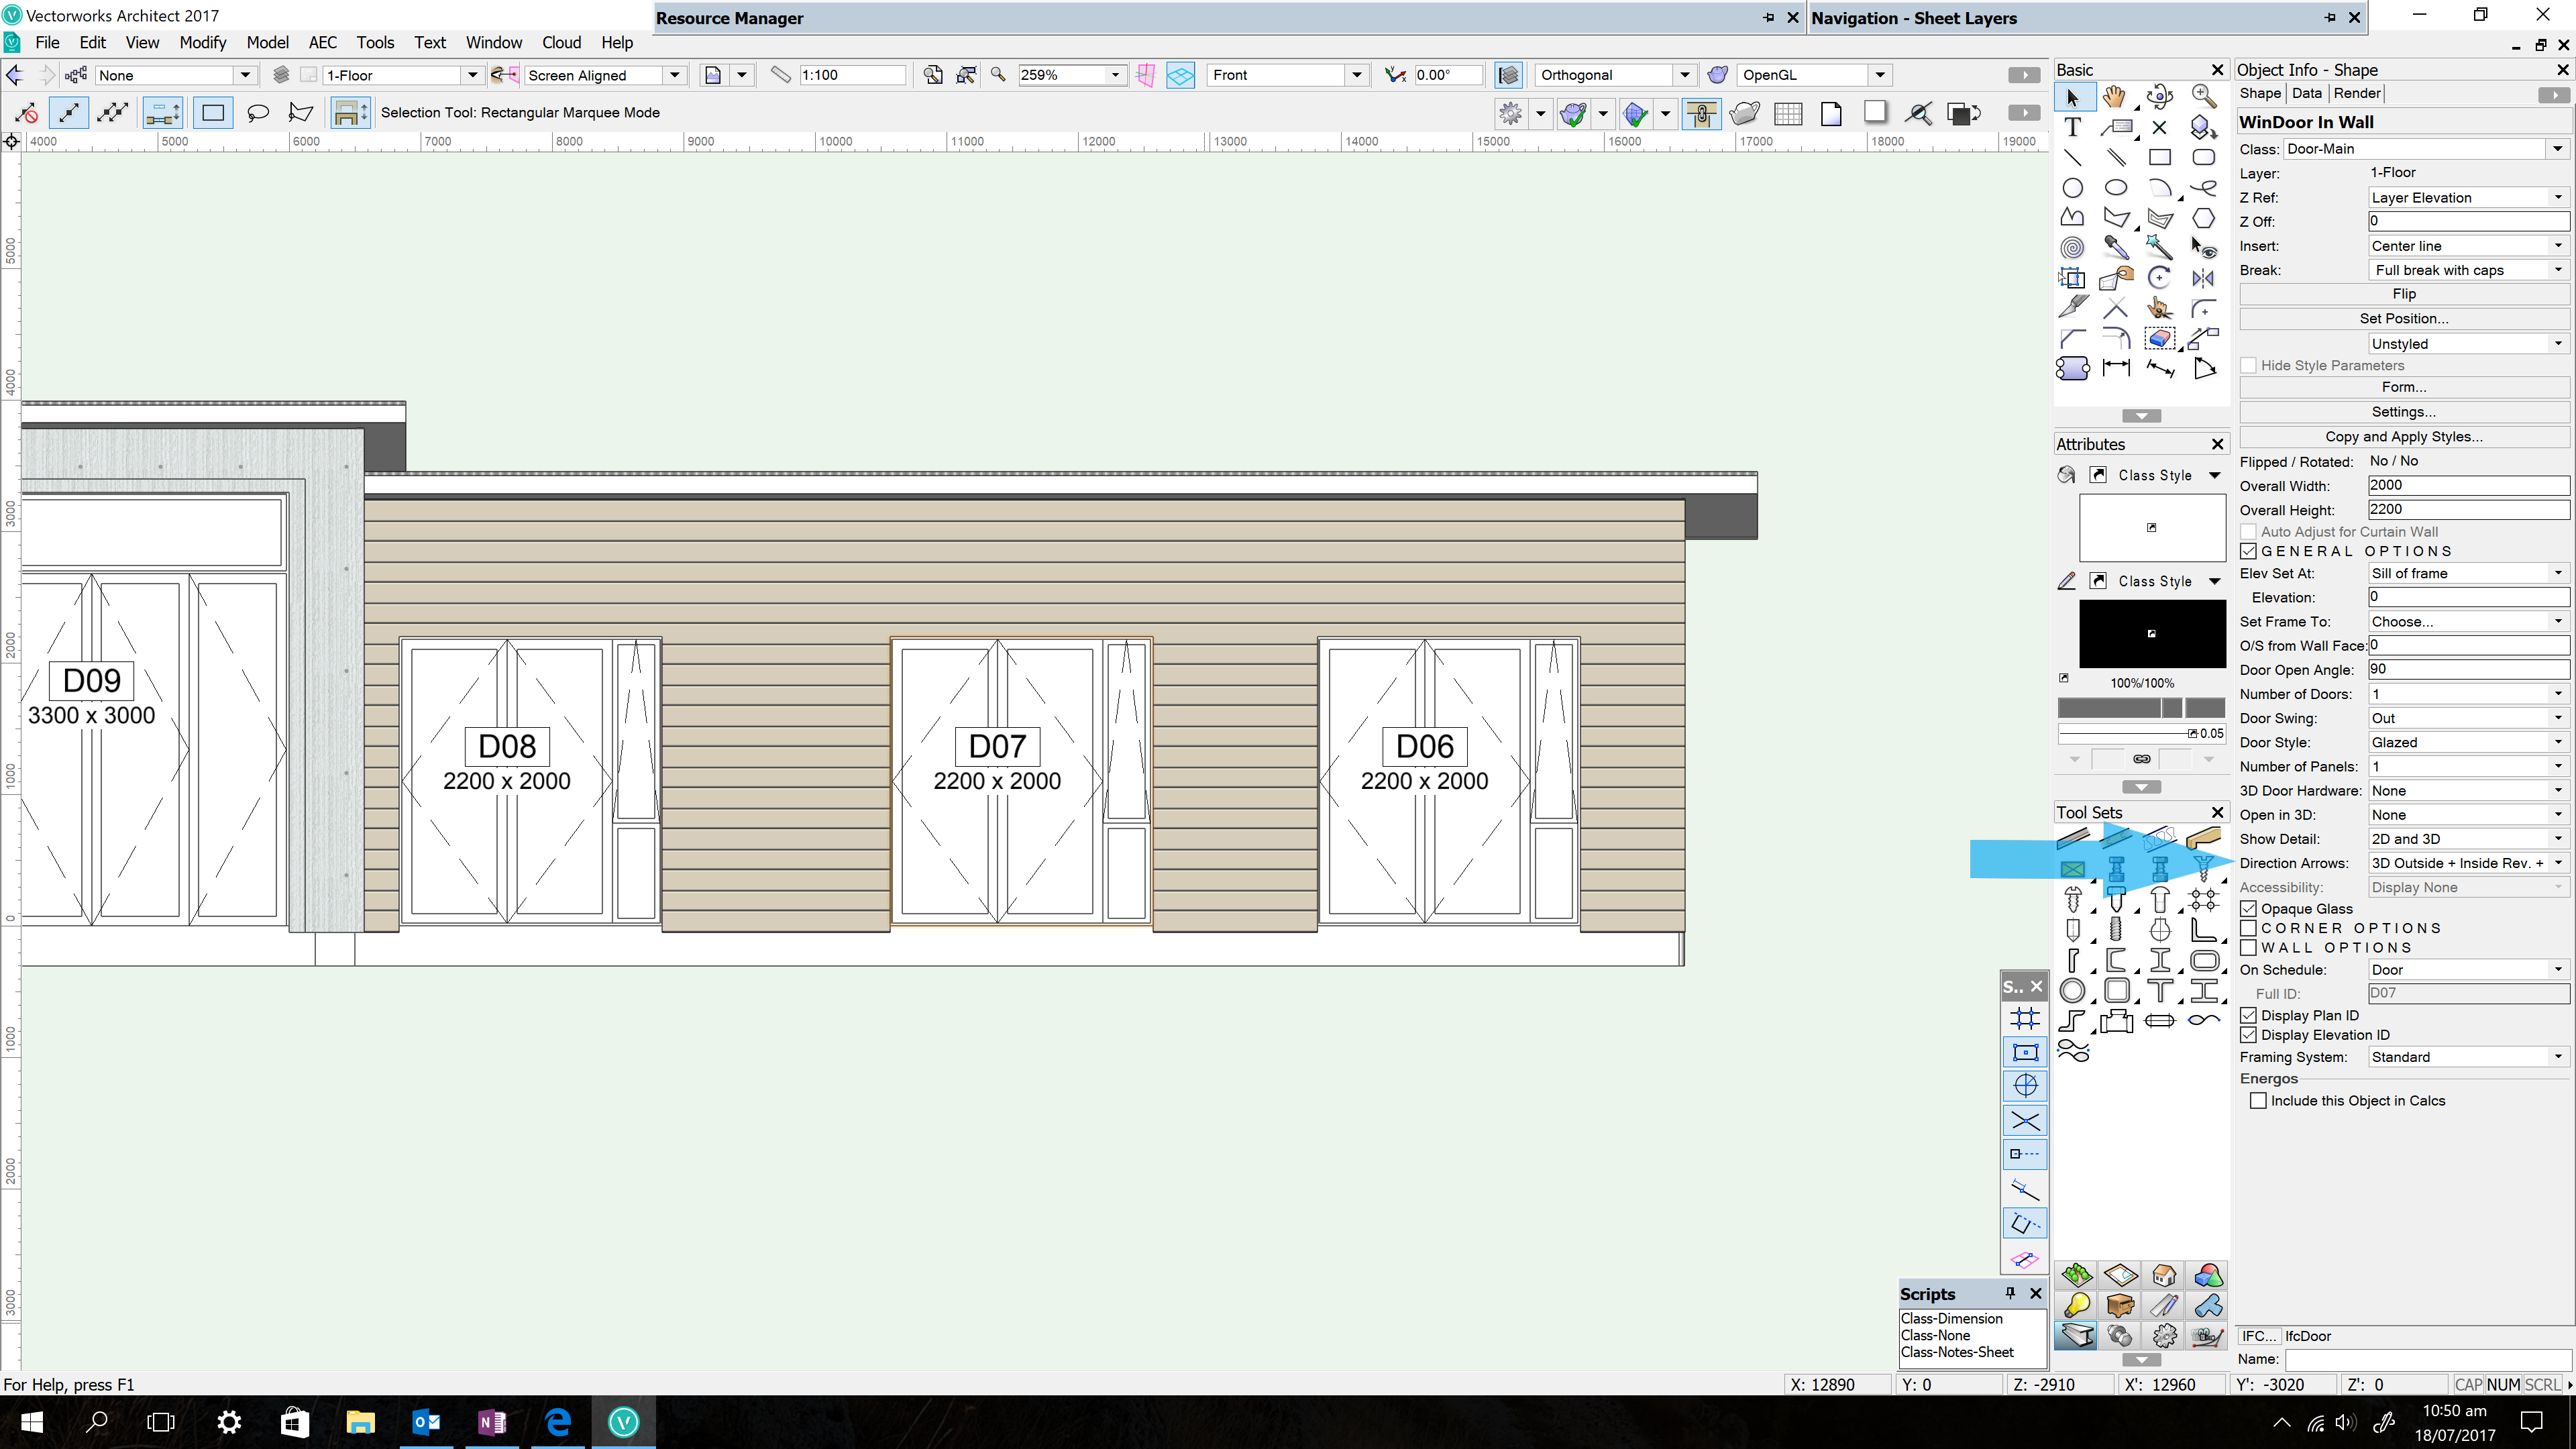
In the OIP there's a setting for WinDoor arrows for different situations, e.g. Reversed inside and out, 3D only etc.


.png.641d6e5dfe666656b85f629ba18bc124.png)
.png.d9651a3147bb6c48306def102f64712f.png)
.png.05df7617e5163dacc5bc9f283721db73.png)
.png.7a4faca050b80c82ef837b0789a1529a.png)
.png.79bf516090b5f4d03c53139a70414539.png)
.png.a4db66e2e4558816eadf81b58b67cefb.png)
.png.c1f00dd1d8da2072c365c967e7e4a5c2.png)