


MullinRJ
-
Posts
2,007 -
Joined
-
Last visited
Content Type
Profiles
Forums
Events
Articles
Marionette
Store
Everything posted by MullinRJ
-
Hello Peter, Reshaper will let you set the 3D view relative to the selected 3D Object. Top, Front, Left, Iso views top and bottom. And you can rotate the view around the primary axes relative to your current view. I believe you have a copy of Reshaper. Let me know if it needs updating. Raymond
-
Also, FWIW, Entered in Group which is also listed as 6756 might be 6755 as defined on the next line: varGetEnteredGroupHandle = 6755, // Handle read - Get the Handle of the current opened for edit group in VW document. BUT, is it? I have not used this pref yet, so I can't tell you exactly how it's supposed to work, but it looks like GetPref(6755) returns returns FALSE if you are on a Design or Sheet Layer, and TRUE if you are inside a GROUP, a Symbol, a Polyline Profile, an Extrude, i.e., inside a container object – BUT – if you enter a GROUP that's inside a Symbol Definition, it returns FALSE. Not sure I understand this last part. And here if gets weirder, if you are inside a Group inside another Group inside a Symbol Def, it returns TRUE. It's Alice Through the Looking Glass trying to find Waldo. This is all off the cuff, and doesn't answer anybody's question at the moment, so enjoy the rabbit hole, all ye who enter. Raymond
-
7013 - Try it, you'll like it 😉
-
God bless Carlotta !!! 😇
-
Yes, I would build a list of class names and their replacements, then iterate through the list. There may be a more elegant approach, but none comes to mind. There are many ways to build the list, and that may be where you achieve elegance. You'll want to restructure the example program to make the main loop into a procedure that you call for each item in your list, passing it the new and old class names. ForEachObjectInList() will do most of the heavy lifting. If you have any questions about the existing example, please write back. All the best, Raymond
-
Hi @Sam Jones, It is true, Python has its quirks, but so does the VS language. You've learned many of them over the years. In all, Python has more upsides than down. As you are very comfortable with VS, I wouldn't recommend moving for the sake of moving. Unless you you need something that Python can offer, like access to external packages, or superior list management, I'd say stick with Pascal. If you ever need Python help, you still don't have to learn it, just ask and Python help will come to you. 😉 Raymond
-
Not that I can think of.
-
Hi @Jayme McColgan, You can also change your document units briefly to be in the units you need for the numerical drawing. Might save a bit of editing. To draw in inches, precede your drawing code with: UPI = vs.GetPrefReal(152) # save document scale vs.SetPrefReal(152, 1) # Inches And follow it with this: vs.SetPrefReal(152, UPI) # restore document scale If you set Pref152 to 25.4 you will be drawing in mm, and if you set it to 0.083333333, you will be drawing in feet, etc. HTH, Raymond
-
@JBenghiat brings up a good point. You also have to test if a name conflict is with a Class Name or a name to another resource or object. The code I posted does not resolve that, and assumes the name in conflict is another Class Name. If you need help modifying the code, please write back, or have at it. You may modify the code above to your liking. Raymond
-
Hello @Peter Z, If you want to use an existing name, you would need to go through the document and change all objects existing in the old class to the new (existing) class. This can be achieved with: ForEachObject() and ForEachObject(). Here is a quickly crafted script to change one class to another. USE WITH CAUTION AND ALWAYS USE ON A COPY FIRST. PROCEDURE ChangeClassNames; { Change the name of a class to a new name. If objects exist in the OLD class, then } { change the Class Name of all objects in the document, and in the symbol library, } { that have an existing class name of kOldClass to the new class name kNewClass. } { THIS SCRIPT IS VERY LIGHTLY TESTED! } { TRY ON A COPY OF YOUR FILE AND CHECK RESULTS CARFEFULLY BEFORE PROCEEDING! } { 30 OCT 2023 — RAYMOND MULLIN } CONST kOldClass = 'oldClassName'; kNewClass = 'newClassName'; CR = c_h_r(13); { *** remove "_" characters before use *** } VAR LCnt, SCnt :Longint; procedure ChangeClass(H :Handle); { Change the class name to class kNewClass. } Begin SetClass(H, kNewClass); LCnt := LCnt + 1; End; { ChangeClass } function ChangeClass1(H :Handle) :Boolean; { Change the class name of any object that has a class of kOldClass to class kNewClass. } Begin if (GetClass(H) = kOldClass) then begin SetClass(H, kNewClass); SCnt := SCnt + 1; end; { if } End; { ChangeClass1 } BEGIN LCnt := 0; { count of changed objects on layers } SCnt := 0; { count of changed objects in symbols } if (GetObject(kNewClass) = nil) then { if New Class Name does not exist } RenameClass(kOldClass, kNewClass) else begin { if New Class Name exists } ForEachObject(ChangeClass, (C=kOldClass)); { change class name of all objects placed in document } ForEachObjectInList(ChangeClass1, 0, 2, FSymDef); { change class name of all objects in SymDef list } AlrtDialog(concat('# of objects on layers changed: ', LCnt, CR, '# of objects in symbols changed: ', SCnt, CR, 'Total objects changed: ', LCnt + SCnt)); end; { if / else } {DelClass(kOldClass);} { delete Old Class Name when done – OPTIONAL } SysBeep; { make noise when done } END; Run(ChangeClassNames); HTH, Raymond
-
Hello @Peter Z, Yes, you can use RenameClass(oldname, newname). The real work in your question is the interface. Probably the simplest way would be to create a text file with a list of old and new names then write a script to read and process it. Not sexy but not too hard to code. A fancy dialog based UI will be 99% dialog programming, and 1% code execution. Unless this is a chore that you expect to repeat a lot, KISS. Raymond
-
You can use the ForEachObject family of calls. There are four – ForEachObject(), ForEachObjectAtPoint(), ForEachObjectInLayer(), and ForEachObjectInList(). ForEachObject() takes criteria statements. The others work across Layers, with Lists, or at a Point. They take a little time to get proficient with them, but they are very powerful. If you search the forum for these commands you should find quite a few examples. Raymond
-
Thanks, @michaelk, I was looking for that earlier and couldn't find it. I would definitely start there first. Much easier than making a PIO event-enabled, but I'd still like to know how kObjXPropTextStyleSupport affects things. Raymond
-
@Sam Jones, Not sure if this is pertinent, but there is an Object Property for event-enabled PIO's that looks like it might be applicable. I don't have a way to test it now. If @JBenghiat chimes in you may get better advice. const ObjectPropID kObjXPropTextStyleSupport = 42; // NO // Controls whether parametric objects can use class text style attribute and get Text Style on OIP // // Boolean // // Set TRUE if the object supports this // // // e.g. Almost all text-related PIOs set this yes, for support by default. If I guess right, you would put it in event kObjOnInitXProperties {5} along with your other property settings with something like this: case theEvent of ... kObjOnInitXProperties: begin { 5 } result := SetObjPropVS(kObjXPropTextStyleSupport, TRUE); { 42, Controls whether parametric objects can use class text style attribute and get Text Style on OIP. } ... end; { 5 } Please post back if you get it to work, or not. I, for one, would really like to know. Good luck, Raymond
-
BuildResourceList with Current File SubFolder Symbols?
MullinRJ replied to Steven Morgan's topic in Vectorscript
Hi @stevenmorgan94, @Juliensv's method is a sound way to go, but as in all things Vectorscript, there are multiple ways to get to the same place. As luck would have it, I was playing with AddResourceToList() this past weekend, so here are two more ways to get to where you want. The first subroutine, GetSymsInFldr1, uses a WHILE loop to step through the contents of your Symbol Folder. The second subroutine, GetSymsInFldr2, uses ForEachObjectInList() to do the same thing. They are identical in function and nearly identical in size. Use the one that's easiest for you to follow, or try your hand at Julian's method. To run this example, change the value of the constant kSymFldrName to match a Symbol Folder name in your file. PROCEDURE xxx; { Two example subroutines showing how to build a Resource List of Symbol Names in user specified SymFolder. } { 24 Oct 2023 - Raymond J Mullin } CONST kSymFldrName = 'Your Symbol Folder Name'; VAR List16, ListSize :Longint; Function GetSymsInFldr1(FldrNam :String; var NumItems :Longint) :Longint; { Return a Resource List of all SymDefs in symbol folder FldrNam, and return the list size in NumItems. } Const kSymDefType = 16; Var H :Handle; ListID, I :Longint; Begin ListID := BuildResourceListN(kSymDefType, '', NumItems); { empty list of Symbol Defs } H := FInFolder(GetObject(FldrNam)); { first obj in Sym Folder } while (H<>nil) do begin if (GetTypeN(H) = kSymDefType) then I := AddResourceToList(ListID, H); H := NextObj(H); end; { while } NumItems := ResourceListSize(ListID); GetSymsInFldr1 := ListID; End; { GetSymsInFldr1 } Function GetSymsInFldr2(FldrNam :String; var NumItems :Longint) :Longint; { Return a Resource List of all SymDefs in symbol folder FldrNam, and return the list size in NumItems. } Const kSymDefType = 16; Var ListID, I :Longint; Function AddSym2List(H :Handle) :Boolean; { Return a Resource List of all SymDefs in symbol folder FldrNam. } Begin if (GetTypeN(H) = kSymDefType) then I := AddResourceToList(ListID, H); End; { AddSym2List } Begin { GetSymsInFldr2 } ListID := BuildResourceListN(kSymDefType, '', NumItems); { empty list of Symbol Defs } ForEachObjectInList(AddSym2List, 0, 0, FInFolder(GetObject(FldrNam))); { All objects, Shallow } NumItems := ResourceListSize(ListID); GetSymsInFldr2 := ListID; End; { GetSymsInFldr2 } BEGIN { Call first subroutine example and show the results. } List16 := GetSymsInFldr1(kSymFldrName, ListSize); AlrtDialog(concat('List#: ', List16, ' — List Size: ', ListSize)); { Call second subroutine example and show the results. } List16 := GetSymsInFldr2(kSymFldrName, ListSize); AlrtDialog(concat('List#: ', List16, ' — List Size: ', ListSize)); END; Run(xxx); HTH, Raymond -
Is it possible the outer PIO (Device) is overwriting the inner PIO (Socket) after the "Socket"."n_circuits" field is written to? If so, I have not been able to see where the previous data is stored. If I place a "Socket" PIO on the Design Layer and run the python script, the value for "n_circuits" is updated to 98. Only when it is embedded in the Device PIO does it not stay updated after the script finishes. Raymond
-
I launched VW 2009 on an older Mac and confirmed SetAngle() does work, but only on Rectangles and Ovals as far as I could discern. It does not work on Arcs, Lines, Images, Symbols, or PIOs. I then restarted VW 2024, and got the same results. Conclusion: The function SetAngle() is not broken, it is just severely limited in what it will operate upon. For most needs, use HAngle() instead. Raymond
-
Hi @Marissa Farrell, The Function Reference, HTML and online versions, call for a REAL number input. I haven't tried a VW version earlier than 2015 yet to see if it ever worked, but I'm about to fire up an old computer in a minute to see. More soon. Regardless if it ever worked, it doesn't seem to work now. All the best, Raymond
-
Hello @Andreas, I tried to use vs.SetAngle() on Lines, Arcs, and Rects to no avail. I tried in VW 2024 and VW 2015 with the same result. I also tried in Python and Pascal, still nothing. It appears the command is not functioning as advertised. There are other ways to set the angle of objects. Here's a short Pascal script that shows the current angle of a Symbol or PIO (which includes the Data Tag), and changes it to the user's value. Here's a short script to show how to set an angle without using vs.SetAngle() import vs # Example script to change the angle of a Symbol or PIO. Ang0 = vs.GetSymRot(vs.FSActLayer()) Ang = vs.RealDialog("Angle: ", vs.Concat(Ang0)) InsPt = vs.GetSymLoc(vs.FSActLayer()) vs.HRotate(vs.FSActLayer(), InsPt, Ang-Ang0) vs.SysBeep() Raymond
-
@koenr, You're welcome. Here is a very rudimentary Python script to save dialog's position. Lightly tested. Modify it any way you like. kOK = 1 kCancel = 2 kSetupDialogC = 12255 dialogName = "DUMMY DIALOG" scriptName = "myScriptName" def SaveDialogPos(dlogID): (_b, X1, Y1, X2, Y2) = vs.GetLayoutDialogPosition(dlogID) if _b: vs.SetSavedSetting(scriptName, 'PosX', vs.Concat(X1)) vs.SetSavedSetting(scriptName, 'PosY', vs.Concat(Y1)) pass def SetDialogPos(dlogID): (_b, defaultX, defaultY, dummyX, dummyY) = vs.GetLayoutDialogPosition(dlogID) (_b, S) = vs.GetSavedSetting(scriptName, 'PosX') if _b: X = vs.Str2Num(S) (_b, S) = vs.GetSavedSetting(scriptName, 'PosY') if _b: Y = vs.Str2Num(S) _b = vs.SetLayoutDialogPosition(dlogID, X, Y) else: _b = vs.SetLayoutDialogPosition(dlogID, defaultX, defaultY) else: _b = vs.SetLayoutDialogPosition(dlogID, defaultX, defaultY) pass def DialogHandler(item, data): if item == kSetupDialogC: SetDialogPos(dlogID) elif item == kOK: SaveDialogPos(dlogID) elif item == kCancel: SaveDialogPos(dlogID) vs.SysBeep() return item ### MAIN ### dlogID = vs.CreateLayout(dialogName, False, "OK", "Cancel") vs.CreateStaticText(dlogID, 10, 'WUMPUS', 30) vs.SetFirstLayoutItem(dlogID, 10) result = vs.RunLayoutDialog(dlogID, DialogHandler) Raymond
-
Hello @koenr, It would not be the first time I misread something, and I suspect it will not be the last. Sorry, I thought you wanted to SAVE the dialog's position, not SET its position. My bad! If you do both you can have the dialog open where you left it last time. That is what I typically do. To have persistent parameters, write the positions to an XML file that VW maintains using vs.SetSavedSetting(category, setting, value) and vs.GetSavedSetting(category, setting) return (boolean, value). You create the category and the setting strings as they pertain to your script. You can save lots of things in the saved settings file and the values will persist between open files and even between VW sessions (assuming VW shuts down properly and does not crash.) It is always advised not to store critical data in the settings file as it is meant for convenience, not security. If you are interested in trapping the kSetupDialogC item, use kSetupDialogC=12255 in your constant declarations. This event# is where you want to position your dialog, and it will only happen once, so if you move the dialog it won't jump back with your next key or mouse event. There is another constant but it is little used, kSetdownDialogC=12256 and it will be generated just before the dialog closes. You could put cleanup code there, but I have never found a need to use it. Still, it's nice to know it exists. You are correct, there is no case statement equivalent in Python, so you need to use a series of if statements, as you have done, or if / elif / elif / ... / else. They are functionally the same as the Pascal case statement. You're on the right path. HTH, Raymond
-
Hello @koenr, I always save my dialog's position when I exit the event loop, either when item==kOK, or when item==kCancel. As long as you are in the dialog the user can move it, so it doesn't make sense to save the position until the dialog handler is done and things are shutting down. As to your second question, "I see a lot about the "kEventDialogPrep" but what item is this?", I have no idea. Where do you typically see this? The value kEventDialogPrep = 9 looks like a user defined dialog item. Raymond
-
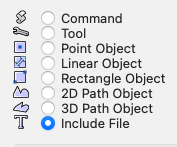
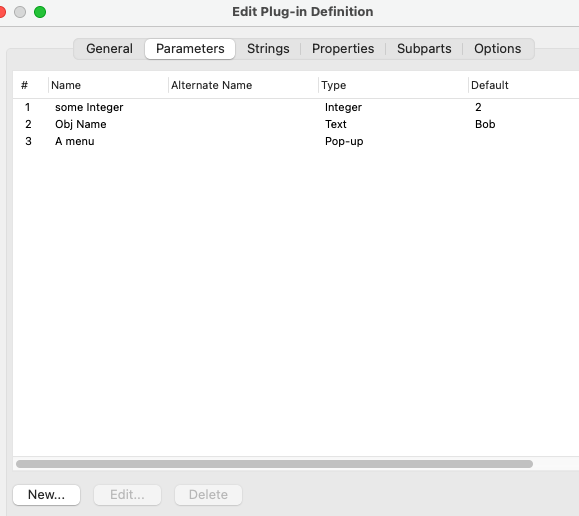
From your description, you will want to create a Plug-in object. There are several levels of complexity, from simple objects or collections of objects, to event-enabled objects. To start, open the Plug-in Manager, Cmd-Shift-Z on Mac, or Ctrl-Shift-Z on PC, or use menu Tools>Plug-ins>Plug-in Manager. There you can create one of the following types. There are three basic types, Menu Commands, Tools, and Objects. Commands (or Menu Commands) are typically procedural scripts and can be used to change VW settings, or operate on existing objects. Their advantage over scripts saved in a script palette is they are stored in the VW program and displayed in a VW menu, so they are available to all open files. Plug-in Tools are interactive and allow you to create or modify objects using the mouse. Plug-in Objects (PIOs) allow you to create custom objects more complex than the basic tools that ship with the software. Not knowing exactly what you want to draw, I will not suggest a PIO type for you at this moment. To become more familiar with how they are structured, create one and look at the interface. Once created, click on the various buttons on the bottom of the Plug-in Manager screen. The Edit Definition... button opens a dialog with 6 panes. You will create your custom variables in the Parameters pane. These parameters are the values that will appear in the OIP when your object is selected. Create some dummy parameters and note how many parameter types there are. Then open all the other panes and look each over. The other button of interest is the Edit Script... button. This is where you place your VectorScript, or Python, code. It's the same window you use when you are editing scripts in a Script Palette. The Parameters pane and and the Script Editor window are where you'll spend most of your time editing. Until you get in a little further, I should probably stop here. Poke around a bit, and send back more questions. The more complicated your Plug-in becomes, the more you will use the other parts of the Plug-in Editor, but for simple PIOs, the Parameters pane and the Script Editor will be mostly what you'll need to use. There's a lot to digest, but luckily there are a lot of people in this community willing to help. Also, if you haven't already, read the first pinned post in the Vectorscript Forum - "What do I do with a Vectorscript, anyway?" by @Pat Stanford where he references the original post by @Robert Anderson which is really hiding in the Archive section of the Forum, under the Resource Share - Vectorscript section, where nobody will ever find it, so thanks to Pat for making it accessible. It's a bit dated, but still relevant. Welcome to VW scripting, Raymond
-
Hello @Nora, Here is a sample script that shows how to use the GetLine call with a single MouseDown event followed by a subsequent MouseUp event. There is one caveat you will need to understand, if you cancel the GetLine call before it completes, say by hitting the ESC key between MouseDown and MouseUp events, the script will end prematurely and the drawing mode will not be restored. This is only a problem is the original drawing mode was ClickClick to begin with. If this creates a serious problem for you or users of your script, write back. There are ways to mitigate this vulnerability, but more code is needed. PROCEDURE xxx; { Code snippet to test GetLine() procedure. } { If you normally use the Click-Click drawing mode, this code will change the drawing mode to } { Click-Drag for draiwng one Line, then revert back to Click-Click drawing when the script is done. } { If you normally use Click-Click drawing, you will see no change in behavior when drawing the line } { in this script. } { 04 Oct 2023 - Raymond Mullin } VAR Pref0 :Boolean; ptx1, pty1, ptx, pty :Real; BEGIN Pref0 := GetPref(0); { save state of Pref0 - Enable click drag drawing } SetPref(0, True); { set drawing mode to ClickDrag } GetLine(ptx1, pty1, ptx, pty); MoveTo(ptx1, pty1); LineTo(ptx, pty); SetPref(0, Pref0); { restore state of Pref0 - Enable click drag drawing } END; Run(xxx); HTH, Raymond
-
Do you have more than 500 selected objects? Perhaps you need to create a Dynamic Array to store your handles. It can be as big as 32767 elements. If you need more, then the way the program is written needs to be changed. Add AlrtDialog(concat(NumSelectedObjects)); at the beginning of the script to see how many selected objects you have. Raymond

