


Taproot
-
Posts
516 -
Joined
-
Last visited
Content Type
Profiles
Forums
Events
Articles
Marionette
Store
Posts posted by Taproot
-
-
@Boh That's an interesting approach. I'm investigating using this for managing our keynotes.
I'm curious if you also use the worksheets as a defacto library for storing callout text standards for all of your files or if you still use the Notes Manager and then just edit within the worksheet?
-
Yes, you can do that.
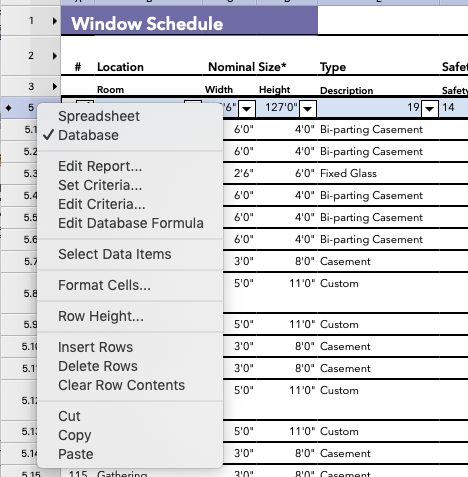
I often modify my schedule worksheets to include complimentary information - for instance, adding skylights to the window schedule.
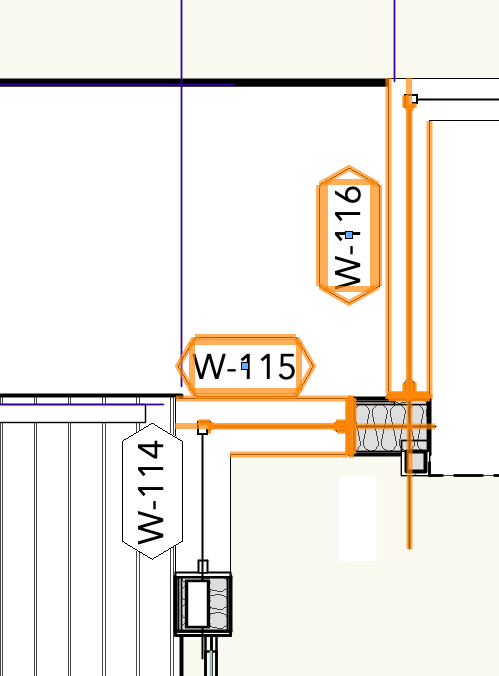
My recommendation would be to copy your existing database row and paste it into the line beneath the existing one.
The database row reports all of the records that meet it's criteria. So, for the second (new) database row, change the criteria to that which will limit it to the doors that you want to feature. That could be via the manufacturer info, or the ID label range or ....
To do this, right click (or control click on mac) on the row # and then select "edit criteria". See graphic.
If it's just a few doors and a one of a kind situation, you can also just manually add the text to the rows following the database, but I sense that you're looking for a live-linked method.
Good luck.
-
Similar to Boh's approach - instead of a design layer viewport of the DTM, you can also just create a "snapshot" of the DTM which will create a copy that you can move, rotate, etc to put in correct relation to your building. You can access that setting via the OIP when the DTM is selected. The advantage is that you can adjust the display settings of the snapshot, so you have more control over the result.
The next question that you're probably going to ask is how do you move the DTM to the correct height - given that the building is likely referenced to a Z-height of 0 and the DTM is referenced to something else i.e. 314.25 feet. The snapshot works well for this situation as well - allowing you to move it in 3D space to the correct registration while also retaining the correct contour numerical display.
This is from memory, so if you have trouble implementing the above and want to use this approach, let us know and I can clarify better how it's done.
-
 3
3
-
-
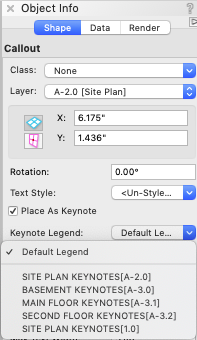
If you click on a keynote marker, it should tell you which legend it is associated with.
"Default Legend will typically place the legend on the same sheet / layer. But if you have other legends in the file, it may associate with one on a different sheet / layer instead.
I usually place one marker and then option drag it to make copies. Once you change the text of the copies, it will register as a new #, but all copies will correctly associate with the legend of choice.

-
I can confirm this behavior as well. It's a bug relative to the "Clerestory" setting.
In my file, the corner opens up at 4'-6" in height for the window with the Clerestory setting engaged.
The left window is normal, the right has Clerestory checked.
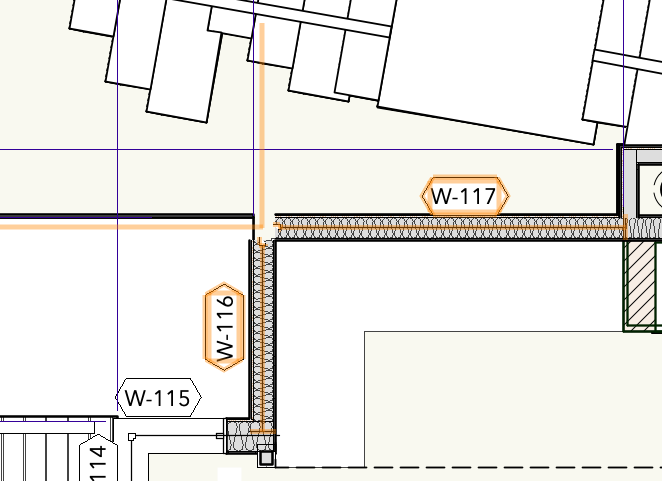
CORNER WINDOW PLAN VIEW BUG
I found this thread to report a different but related problem.
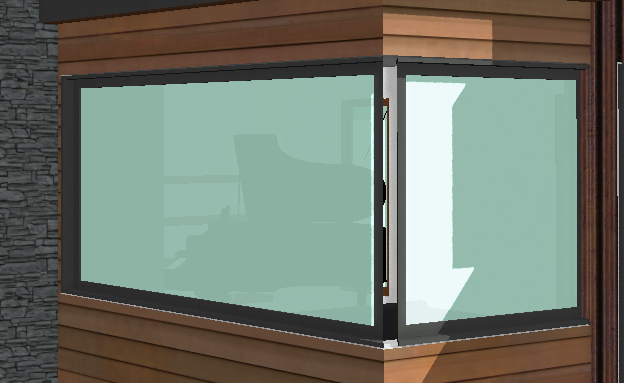
All of my corner window plan views are rendering incorrectly.
The sash / glazing line in 2d extends well past the jamb on the side of the window opposite the corner.
The following image shows regular corner windows.

This image shows a plan view with clerestory engaged:
-
1
-
-
- Popular Post
- Popular Post
We're on the doorstep of August - which means that the 2021 version release is only about a month away.
While many of us are just now getting used to v.2020, I still enjoy the anticipation of the coming release. Will the stair tool get an overhaul? Will WinDoor finally make it to the northern hemisphere? Will TwinMotion see some love ...
Here's hoping the Teaser Tuesdays are still on the calendar. Yes?
-
7
-
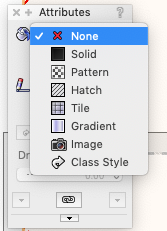
@MartinBlomberg If no colors are changing, then make sure that the fill in your attribute pallet is set to "solid" for the object (not "none").

@Boh I thought that OpenGL rendering was available for non-renderworks users. In which case, you would access the rendering mode via the Menu: View>Rendering>OpenGL
... after assigning a texture to the object.
-
@zoomer Sorry to hear that ... but hey that's a pretty good run. I'm just amazed that the light source is still good after all of those hours.
1 hour ago, line-weight said:This is exactly what I've experienced and one of the reasons I've largely given up on multiple panes. Which version of VW are you on?
@line-weight We're using VW2020 Designer (latest service pack).
Here's what the primary view pane looks like when it starts to go buggy. Part of the image displays at a different scale. In this example, I had just one other viewpane open.
-
@jmanganelli Yes, I'm inclined to spend more on the perfect screen up front. My 30" cinema display cost A LOT, but it's been going strong for 14 years and has been a great experience, so I'm inclined to go with high quality and less frequent turnover. The 43-44" size is interesting thought. I hadn't considered it, but will look into it further. Beyond that, I think I would be turning my head too much and would be tempted to sit further away (which would defeat the purpose). I appreciate the feedback.
-
@jmanganelli The GPU may be the issue. We have the cylindrical Mac Pro's but they only sport 2GB gpu's. I'm glad to hear that it's working fine for you. It's about time for us to get new computers as well (but that's a different topic).
-
I was just working on a complicated drawing that necessitated having multiple panes open at once. The functionality was great! It took two sections and a plan simultaneously displayed to understand what was going on. However, I noticed that after a while, the main drawing window didn't refresh correctly and the section displayed disjointed chunks of the image (like a puzzle before it's put together). We've seen this bug before elsewhere ... while zooming in and out the image draws correctly, but when stopped it blows apart. Suffice it to say that when I closed the other panes, the main drawing window rendered correctly again.
We use a two monitor setup (one big, one small) and locate the resource browser on the second monitor as well as our internet browser (which we use a lot during design). It works well.
However, as I mentioned earlier our displays are due for an upgrade. I looked into the monitor recommended by @jmanganelli and have concluded that we need more screen area. It looks to me like the 38" ultrawide monitors offer about the same area as my dual monitors and would have fewer cables, power supplies, etc. Is anyone using one of those setups and if so could they comment on how they like it?
-
2 hours ago, jmanganelli said:
About 6 months ago I upgraded to two 4K, 32” monitors.
Which ones did you end up going with? I'm still using a 30" Apple Cinema Display from umpteen years ago and don't know how much longer it's going to last.
And to Line Weight's question: We just use a single pane almost all of the time. I think it's just habit as we developed our working styles that way ... but it's also due to screen real-estate. With all of our pallets open the actual work area is not that big and reducing that further with multiple panes start to make it hard to work effectively.
-
Would you be willing to post a sampling of some of the classes that you use so that we can get a sense of your naming strategy?
I think the more tangible examples folks have of a system that works, the easier it will be to make one of their own.
For us, the main obstacle to developing a new set of office class standards was the fear that we didn't know enough and were just going to create a messy confused result.
Quite the opposite has proven to be true. We have a few legacy projects in our old class standard and drafting in them feels like molasses compared to our new files.
That's not to say that we got it perfect the first time. We are adding a few classes as we go, but the standards are accommodating it well.
Now that we've converted our legacy libraries to our new standard ... I've definitely learned the value of keeping most symbol geometry in the NONE class and then applying a container class to the whole. Otherwise, you end up with a whole host of legacy classes with each symbol import.
-
2
-
-
- Popular Post
- Popular Post
OK - this is just a random post to say that I really like the built-in search functions within the software. When dealing with hard to find items that are SOMEWHERE in that massive list of classes or resource browser or ... rather than browsing forever I now just routinely type in what I'm looking for and voila it shows up.
Nicely done!
-
5
-
@Boh Yes, I've come around to using page based hatches for different scaled viewports. That most commonly applies to sections and details. Formerly, I had two copies of each hatch, so that details displayed an enlarged version. Now that we're using class attributes for everything, I've found a single (compromise) hatch works pretty well. It's not quite as good (aesthetically) as it was, but it's fast, consistent and still reads well.
Have you found a better method?
I've been enjoying your posts as it seems we're at similar places in our skill development and you're often tackling the same issues I am. Your solutions are often excellent and save me loads of time in the process.
-
It's nice to see that some of the nuisances are in fact going away and have been resolved.
-
These all seem to work for me as well.
-
@E|FA Yes, it's definitely a work around.
Adding to your wishlist item.
The REVISION TOOL default attributes for the cloud won't change and appear to be locked in. They can only be changed manually for each object after creation.
Billow Size, Variability & Height settings won't change when using the eyedropper tool to 'set defaults'.
You can't set a plug-in style for this tool. Symbols won't work, etc. That needs to be fixed.
Similarly, I tried the REDLINE TOOL and Cloud settings can't be specified. IMHO the default billow size is too large for encircling small to medium sized items.
The Billow size, variability, etc of the Revision tool should be included in the settings for the Redline tool.
-
3
-
-
@EggFarkArch I know this is an old post, but I recently tried to tackle the same issue. We typically draw clumps of trees and forests on our site plan using the cloud tool. I ended up creating a custom line which works pretty well. The arcs don't meet perfectly at vertexes, but it works well enough for our use. The arcs are mapped to a polygon (polyline), so you can hide or show any of the edges.
I'll include a file with the "Cloud" style line in case it's useful to anyone.

-
3
-
-
On 3/4/2020 at 3:09 AM, kklik said:
Had a call back from the service select team and it turns out I was using a legacy "Create Animation" tool.
When updating annually I kept the same workspace environment, which I had changed to the way I like to work, so the old tool was moved along.
It was a question of editing the workspace, deleting the old one and dragging across the new tool.
Problem solved for me
This solved my problem as well. Thanks for posting.
-
I'm trying to picture the circumstance in which you would want to do this. Typically, I report symbol data to a worksheet, so it is all in one convenient list / report and doesn't clutter up the drawing. For instance: A plumbing schedule. Can you elaborate on what your intended use is?
-
@E|FA Not quite. I use the same classes inside and outside of viewports. The example I gave for the Outline class was just for perimeter emboldening of drawings.
I use many other classes in viewport annotation as well.
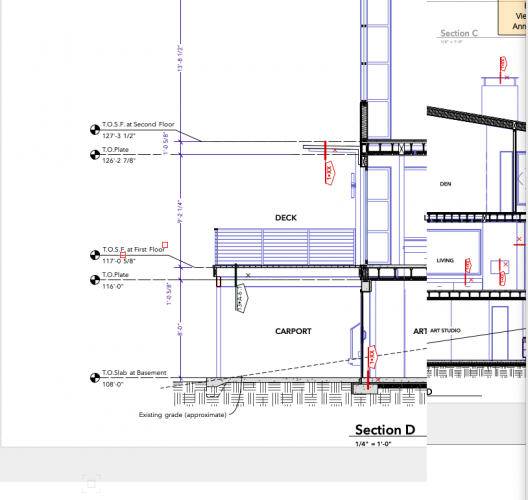
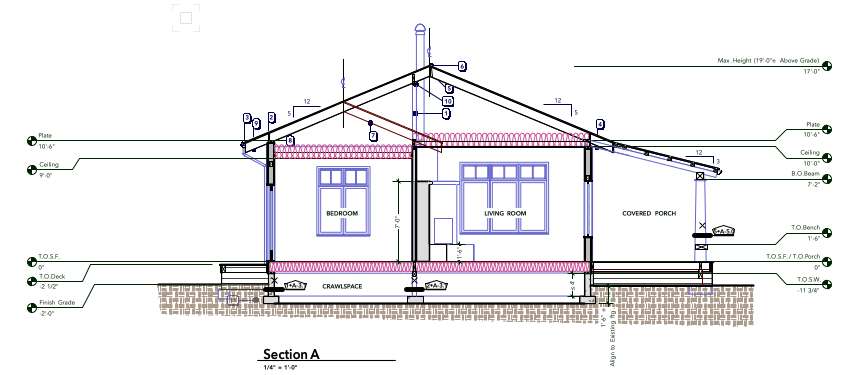
For Example - Here's a very simple section.

Classes and attributes follow materials.
The grade line = 00-2D-Outline
The elevation markers = 00-Notes-General
The soil hatch = 03-Soil
The insulation = 07-Insul Batt
and so on...
Incidentally, I really like using keynotes rather than callouts on my plans, elevations and sections.
I've classed all of the material behind the section cut to 00-2D-Section Beyond
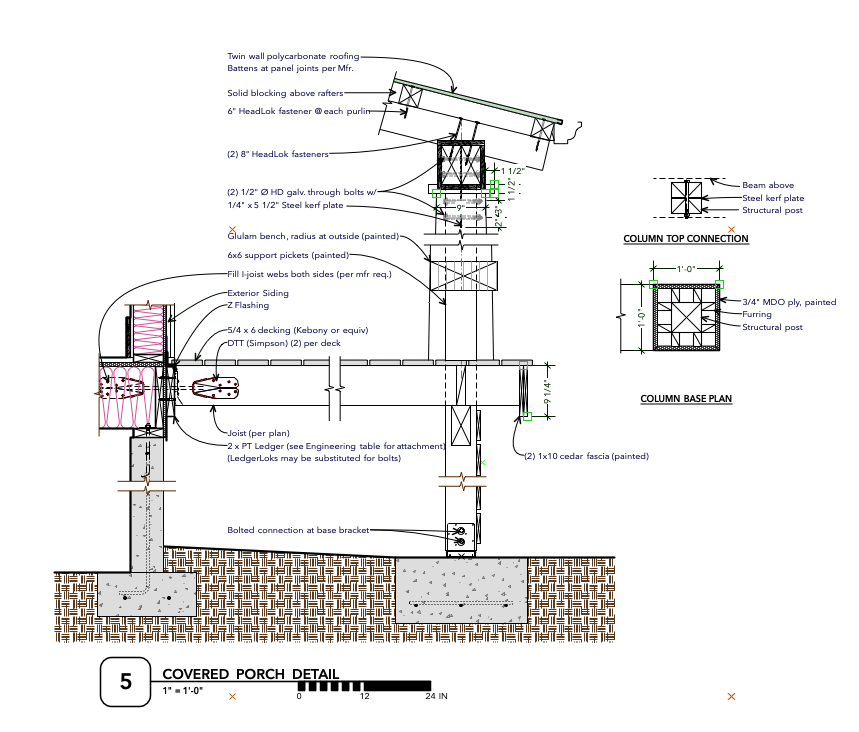
The same classes are applied to a detail.
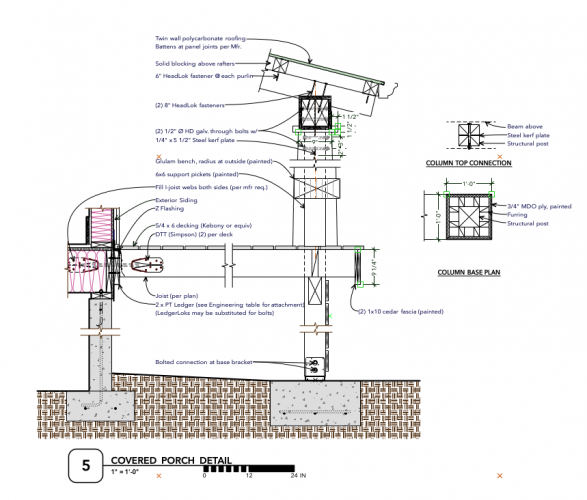
One of the main advantages to classing by material rather than individual circumstance is that attribute control can be consolidated in one place, rather than scattered about.
For instance, elements assigned to 03-Concrete like the footings in the detail above have a concrete hatch in 2D, and also have a concrete texture in 3D. So objects whether 2D or 3D will display correctly.
This makes even more sense when you start building off of classes into things like wall styles. I set the components of my walls to use attributes 'by class.'
We're discovering as we go, but the further we advance, I can see that the software was intended to be used this way.
That said, It does take some persistence to get it all to work.
-
2
-
-
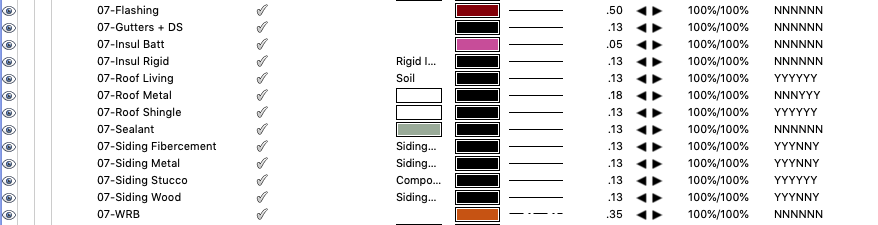
@E|FA We use classes throughout the entire set including viewport annotations. Notes, dimensions, and even masks and fills (like a soil hatch for sections) are all given attributes by classes.
There are some tricks to this. For instance:
Class: 03-Soil ... We use an earthen hatch that in the hatch settings is set to "page" instead of "world." That lets us use the same class for soil in a 1:48 scale section as a 1:12 detail and have both results look good.
Class: 00-Outline ... is a container for manual perimeter outlines of details, sections, elevations, etc. We have it set to a 0.50 line weight by default, but will manually override the line weight for say an elevation that has multiple layers of depth. That way we can turn the visibility on and off with one class and don't have to manage 3 or more subclasses for this singular function.
-
2
-
-
- Popular Post
- Popular Post
@Kennedyme just recently asked me how we set up our classes.
This spring I decided to rebuild our office standard around a new system of custom classes. So it's a timely question. I'll offer what I learned in the process, but I encourage others to share their take on this topic to better give new users a range of successful strategies in setting up their office standards.
Old Setup
Initially I used the 'User 2' standard for class names. It mapped VW's standard class names to a slightly more simplified and user friendly list. The challenge I found was that many of the names were both vague and hard-coded into the tool structure. For example, what is 'Style-1' ? But 'Style-1' was built in to the door and window tool and couldn't be renamed. That put a lot of burden on us to remember OK, 'Style-1' = Exterior Trim. Repeat that scenario throughout the whole class list and it got pretty challenging to keep it all straight.
VW has matured and now allows custom naming of classes without creating a new (redundant) class with the original name. It is much easier to work with now.
Standard vs. Custom System
If you are comfortable using an already existing class organization system, do so ... it will save you a lot of work. Specifically, one of the ones built into VW - as there are enough hidden glitches that you will have to spend some time maintaining a custom system.
A custom system allows you to tune the class environment to your way of thinking.
Done well, It allows you to preconfigure all of the class attributes in your file so that they are automatically applied and consistent throughout your drawing set.
Custom System Tips
Create a standardized system that can easily be added to over time.
As your drawings develop you'll evolve how you use the software, so leave room for adaptability.
I built our system around the CSI Division numbering system. In my way of thinking, classes represent materials.
- CSI's MasterFormat is the industry standard for material classification, so it fits nicely with material specifications, etc.
- Most people are already familiar with the material divisions, so it's intuitive for our staff to use
- Classes can become more specific and detailed over time.
- The numbering system makes for a concise naming system
- Attribute mapping makes sense when all objects within the class are the same type of material
Rather than include every division, I've just used the divisions that we need. If a specific project requires a unique material, we can add that to the system easily.
Make the system easy and intuitive to understand
I tried to keep my class naming structure to just 3 layers deep. i.e. ## - ClassName - SubClass Name. Two layers works even better for me.
Some firms prefer to abbreviate everything. I prefer names that are ordered, but easy to understand
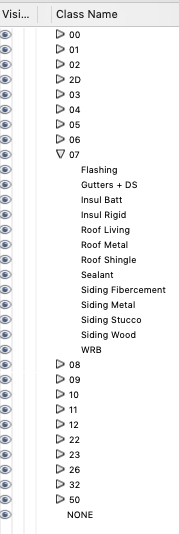
Here's a list of the divisions that I use for my template.
Division 0 & 1 are general conditions in MasterFormat. I've used some creative license to re-assign them:
Division 00 = Annotations
Division 01 = Site
Division 02 = Existing Conditions
Division 03 -> are conventional categories
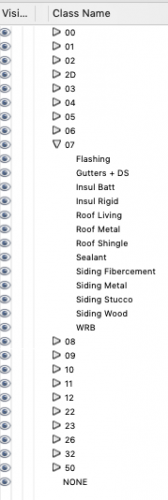
At the end of the division list, I've assigned an arbitrary Division 50 to be 'Model Specific' items like lights and cameras...
The only class that remains unchanged is "NONE". I've capitalized it to make it stand out more.
Placement at the end of the list makes it easy to find - rather than somewhere in the middle.
Rename Existing Classes
I found that the best way to make this class standard work was to start from an already complete template file and rename the existing classes to my new naming standard.
For example, I wanted the class "Dimensions" to be '00-Notes-Dimensions'
VW allowed me to rename the class and from that point forward objects created with the dimension tool correctly associated with the newly named class.
However, If I just created a dimension in an empty file it would automatically create a class named 'Dimension' for it. This applies to things like plug-in objects as well. I found it easier to rename 'Style-1' to what I actually wanted it to be rather than to delete it and reset all of my door and window symbols to a new class.
Setup Standard Attributes
Under Tools>Organization, you can setup all of the standard attributes for your classes.
Class Name Maintenance
We have a lot of legacy material (libraries, details, etc) that we need to pull into our current standard from time to time.
Since everything is currently organized with a ##-Name structure, the legacy classes all pile up at the bottom of the list. That helps us easily find them and reassign them.
We delete the offending class and then in the pop-up re-assign the objects to the correct class.
In the meantime, we're going through our old libraries and upgrading them to the new class structure. It's certainly an investment of time up front, but I can already see the benefit in consistency and time savings.
-
11


Find Replace Text issue with Callout Notes
in General Discussion
Posted
@Boh We have a similar setup - using keynotes per sheet rather than globally. I was pleasantly surprised to try out the worksheet idea listing callouts. It is pretty handy to have the entire list in one location for proofing. I sorted the list by Keynote Legend, so that I was able to keep all of the notes organized in groups.
I use the Notes Manager for General Note blocks, but typically just create keynotes on the fly to describe general callouts. In my quest to try and develop more consistent standards, I've been thinking about migrating my callouts to the Notes Manager as well. But, I have so many custom situations that need to be identified that I suspect that would be more trouble than it's worth. For a larger office - it would make more sense.
I've had some challenges with the Notes Manager 2020 - namely that my notes database has decoupled from most of my past files. Tip - don't rename your database... Or if you do, you'll have to go through the "reconcile notes" process listed elsewhere on this board.
For now, I think I'll let this one be and see what v.2021 has in store for us.