michaelk
-
Posts
6,398 -
Joined
-
Last visited
Content Type
Profiles
Forums
Events
Articles
Marionette
Store
Everything posted by michaelk
-
I might not be understanding the question. You mean a hip roof that is not at a 90º angle to the ridge so it has a "short" hip and a "long" hip? There's no need to use subdivisions! You can do this with roof faces and the Join Tool. Create a roof face for each side of the main ridge. Duplicate one of those roof faces and rotate it so the bearing line is over the right point on the angled wall. The roofs should totally overlap. Then use the join tool in the second mode. Click on adjoining roof faces to make them join. Oblique Roof.mp4
-
Modifying Bulk Stake Objects
michaelk replied to AKieran's question in Wishlist - Feature and Content Requests
Stake objects are unusual. They return a ZCOORDINATE in a worksheet but not in VS. -
excel style "Ribbon" for worksheets.
michaelk replied to hollister design Studio's question in Wishlist - Feature and Content Requests
Wait! I've changed mine based on Mark's idea.
-
Modifying Bulk Stake Objects
michaelk replied to AKieran's question in Wishlist - Feature and Content Requests
Give this a try: (Try on a duplicate file first!!!!! 🤪) PROCEDURE Test; VAR h1 : HANDLE; PROCEDURE X10 (h:HANDLE); VAR Z1, Z2, xx,yy :REAL; BEGIN Get3DCntr(h,xx,yy,Z1); Z2 := (Z1*10)-Z1; Move3DObj(h,0,0,Z2); ResetObject(h); END; BEGIN ForEachObject(X10,((PON='Stake Object'))); END; RUN(Test); Stake Height X 10.vwx -
Yes. Pick a .vwx file in the Finder. Any .vwx file. Right click on it and choose Get Info. There will be a pull down for Open with: Choose the version. Click Change All… to make that the default for all .vwx files.
-
@HarryVanson Salamander Court R3 v2024-dwg.zip
-
@Richardlt0 PLAN GEN 25.08.2008 v2024-dwg.zip
-
Add Objects to Symbol Definition Relative to Symbol Instance?
michaelk replied to Pat Stanford's topic in Vectorscript
The answer is no. 🙂 I don't have a script that can do that. -
Add Objects to Symbol Definition Relative to Symbol Instance?
michaelk replied to Pat Stanford's topic in Vectorscript
In the drawing can you identify the insertion point of each symbol? -
excel style "Ribbon" for worksheets.
michaelk replied to hollister design Studio's question in Wishlist - Feature and Content Requests
Thanks, @Tom W.!. I've tried to collect them all here: https://www.verysmallgroup.com/worksheet-formatting-scripts But I may have missed a few. I ran them as scripts for years and just recently started using them as menu commands. If you are using a Mac you have all the Control+Key shortcuts at your disposal. Game changer! Especially using Control-C and Control-V to copy and paste formatting between cells. -
If it were me, I'd be super tempted to extrude a bunch of lines 🤪

-
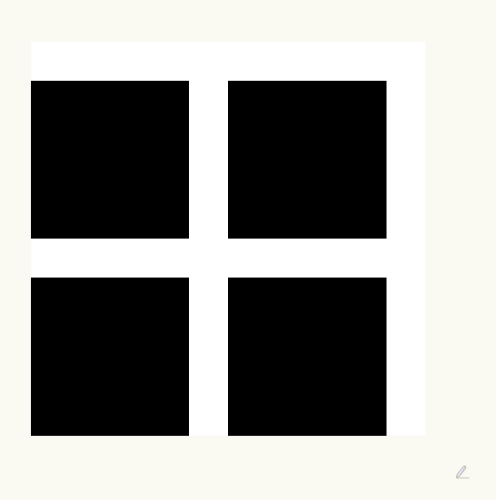
I would have thought this would work: In VW draw this: Export at an image, draw the marquee, set the size to 2.5", etc. Use that as Transparency shader, Image Mask. You can't use the attribute mapping tool if the shader is just a color, so you have to make an image that is just the color you want and use that in the Color shader. I thought that if you mapped that as a Plane Map Type in the OIP, that you would get exactly what you want. But I tried it and it's only mapping to the surface. We need a new edition of the Renderworks Recipe Book.
-
PLAN 25.08.2008 v2023-dwg.zip
-
It could be even simpler! I find it less readable this way but you could make this literally a 1 liner: WSScript_SetResStr(GetName(GetParent(WSScript_GetObject)));
-
Here's one way: You can get the wall into a worksheet with a simple script. Import the script palette in this file into your file. Use the database call =RUNSCRIPT('Get Wall Name') You will get a warning that a worksheet script is trying to run. Always allow. Wall Name in Worksheet.vwx
-
I'm in the stock released version of 2024. (721259). Just confirmed the option is there for both Spotlight and Architect.
-
I heard about it on this great podcast. 🙂
-
Agreed 🙂. If not for @DanJansenson 's book way back in the day I would never have figured it out either!
-
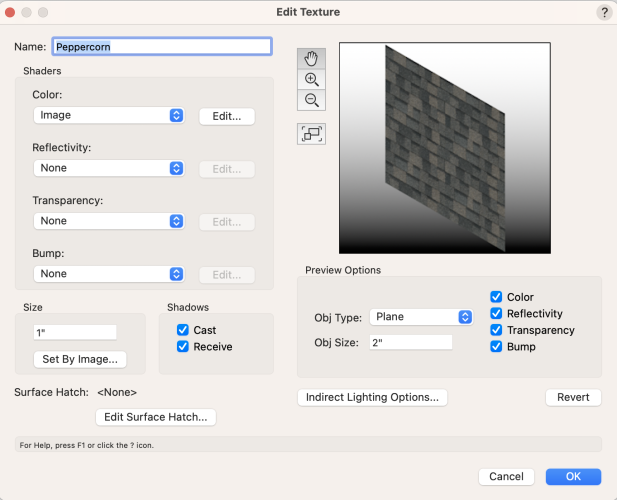
Just to be clear: The size field on the left is the width of one repetition of the texture image in the real world. The preview size is just for the preview while editing.
-
It is confusing! Object size in preview options is ONLY the size of the preview in that window. It has nothing to do with how it will look in the "real" world. If you change the size on the left to 10' then the 2" preview on the right will show just a few pixels of part of one shingle. So after changing the left size to 10' you will want to change the right side preview size to 10' or 20'.
-
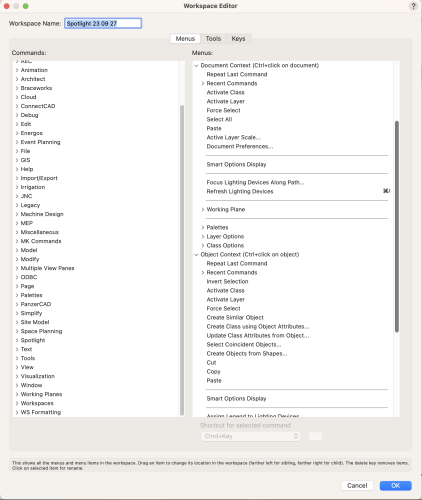
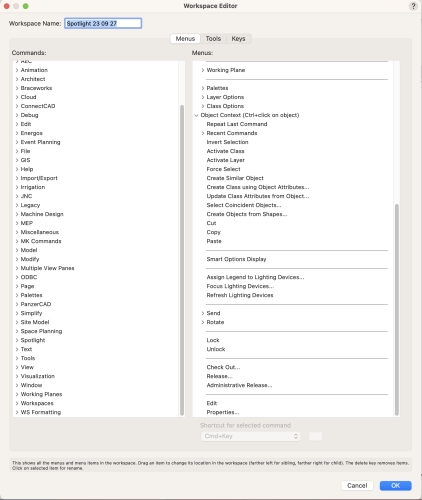
I thought I was in an architectural workspace. Guess I've been working in a Spotlight workspace for a while. 😜 This started off as a stock workspace in 2024. This is the Document Context Object Context:
-
I'm not seeing that in the workspace editor. Clicking on an empty space while in viewport annotations has (always?) offered and option to jump to a design layer. But I don't see it in the contextual menu options in the workspace editor.
-
I still have it in the the architectural workspace.

-
Sounds like a perfect problem for a script to solve. Dust off those PASCAL books!
-
I don't think there is. If you edit the texture from the resource manager you can see the size is set to be 1". That means the preview on the right side will be 1" wide. It probably needs to be 10 or 12 feet wide. I think you will need to change it for every texture. I don't know of any way to batch edit textures.