


Kevin K
-
Posts
888 -
Joined
-
Last visited
Content Type
Profiles
Forums
Events
Articles
Marionette
Store
Posts posted by Kevin K
-
-
@katebjohnson I had sent you a message, but maybe you did not see it.? Basically I had mentioned it would be good to post a file, or part of a file that shows the wall and door you want to place the sign above and the image of the sign….that way we can help you to achieve what you want. There are several ways in VW to do what you want to do.
-
@Kevin Allen Did you mean It would be good to use CM?...If so, that would not have worked in this instance because I had to lace the image totally behind the 3d model.
Perhaps I misunderstood your comment 😉
-
Tom
Exactly so !.
You can, of course, create an image prop of the particular image, but it still, as you noted, is a pain to spend a lot of time moving the image prop around to get it just right.
I usually go that route, but in. Cinema 4d it is so elegant and happens in realtime, on the fly.
I am not even implying doing this necessarily in a VP as a finished product, but rather setting a rendered view on a design layer, in shaded mode, and watching the results right in front of you in realtime. THEN if you like it, you can set up a viewport with appropriate RW settings for a final Rendering.
Again, in my case, I created quite a few Renderings for this project, interior and exterior, and it was necessary to move that original background image around a bit to get the desired results....
In case you are interested....a little slideshow of the various Renderings...
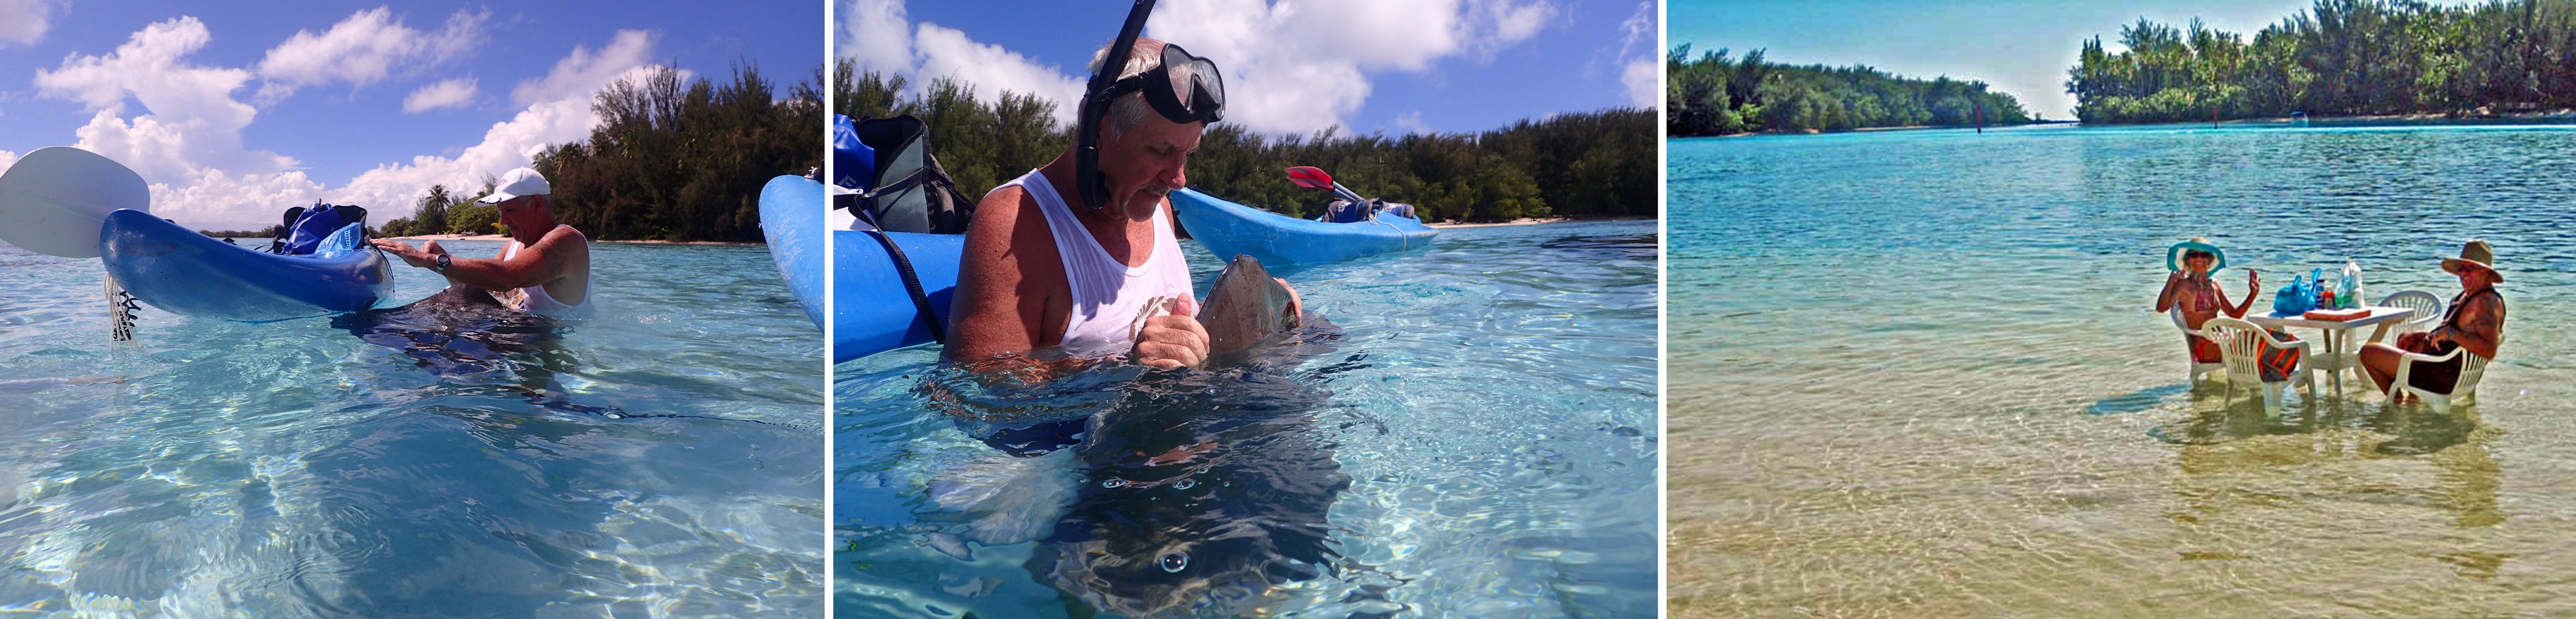
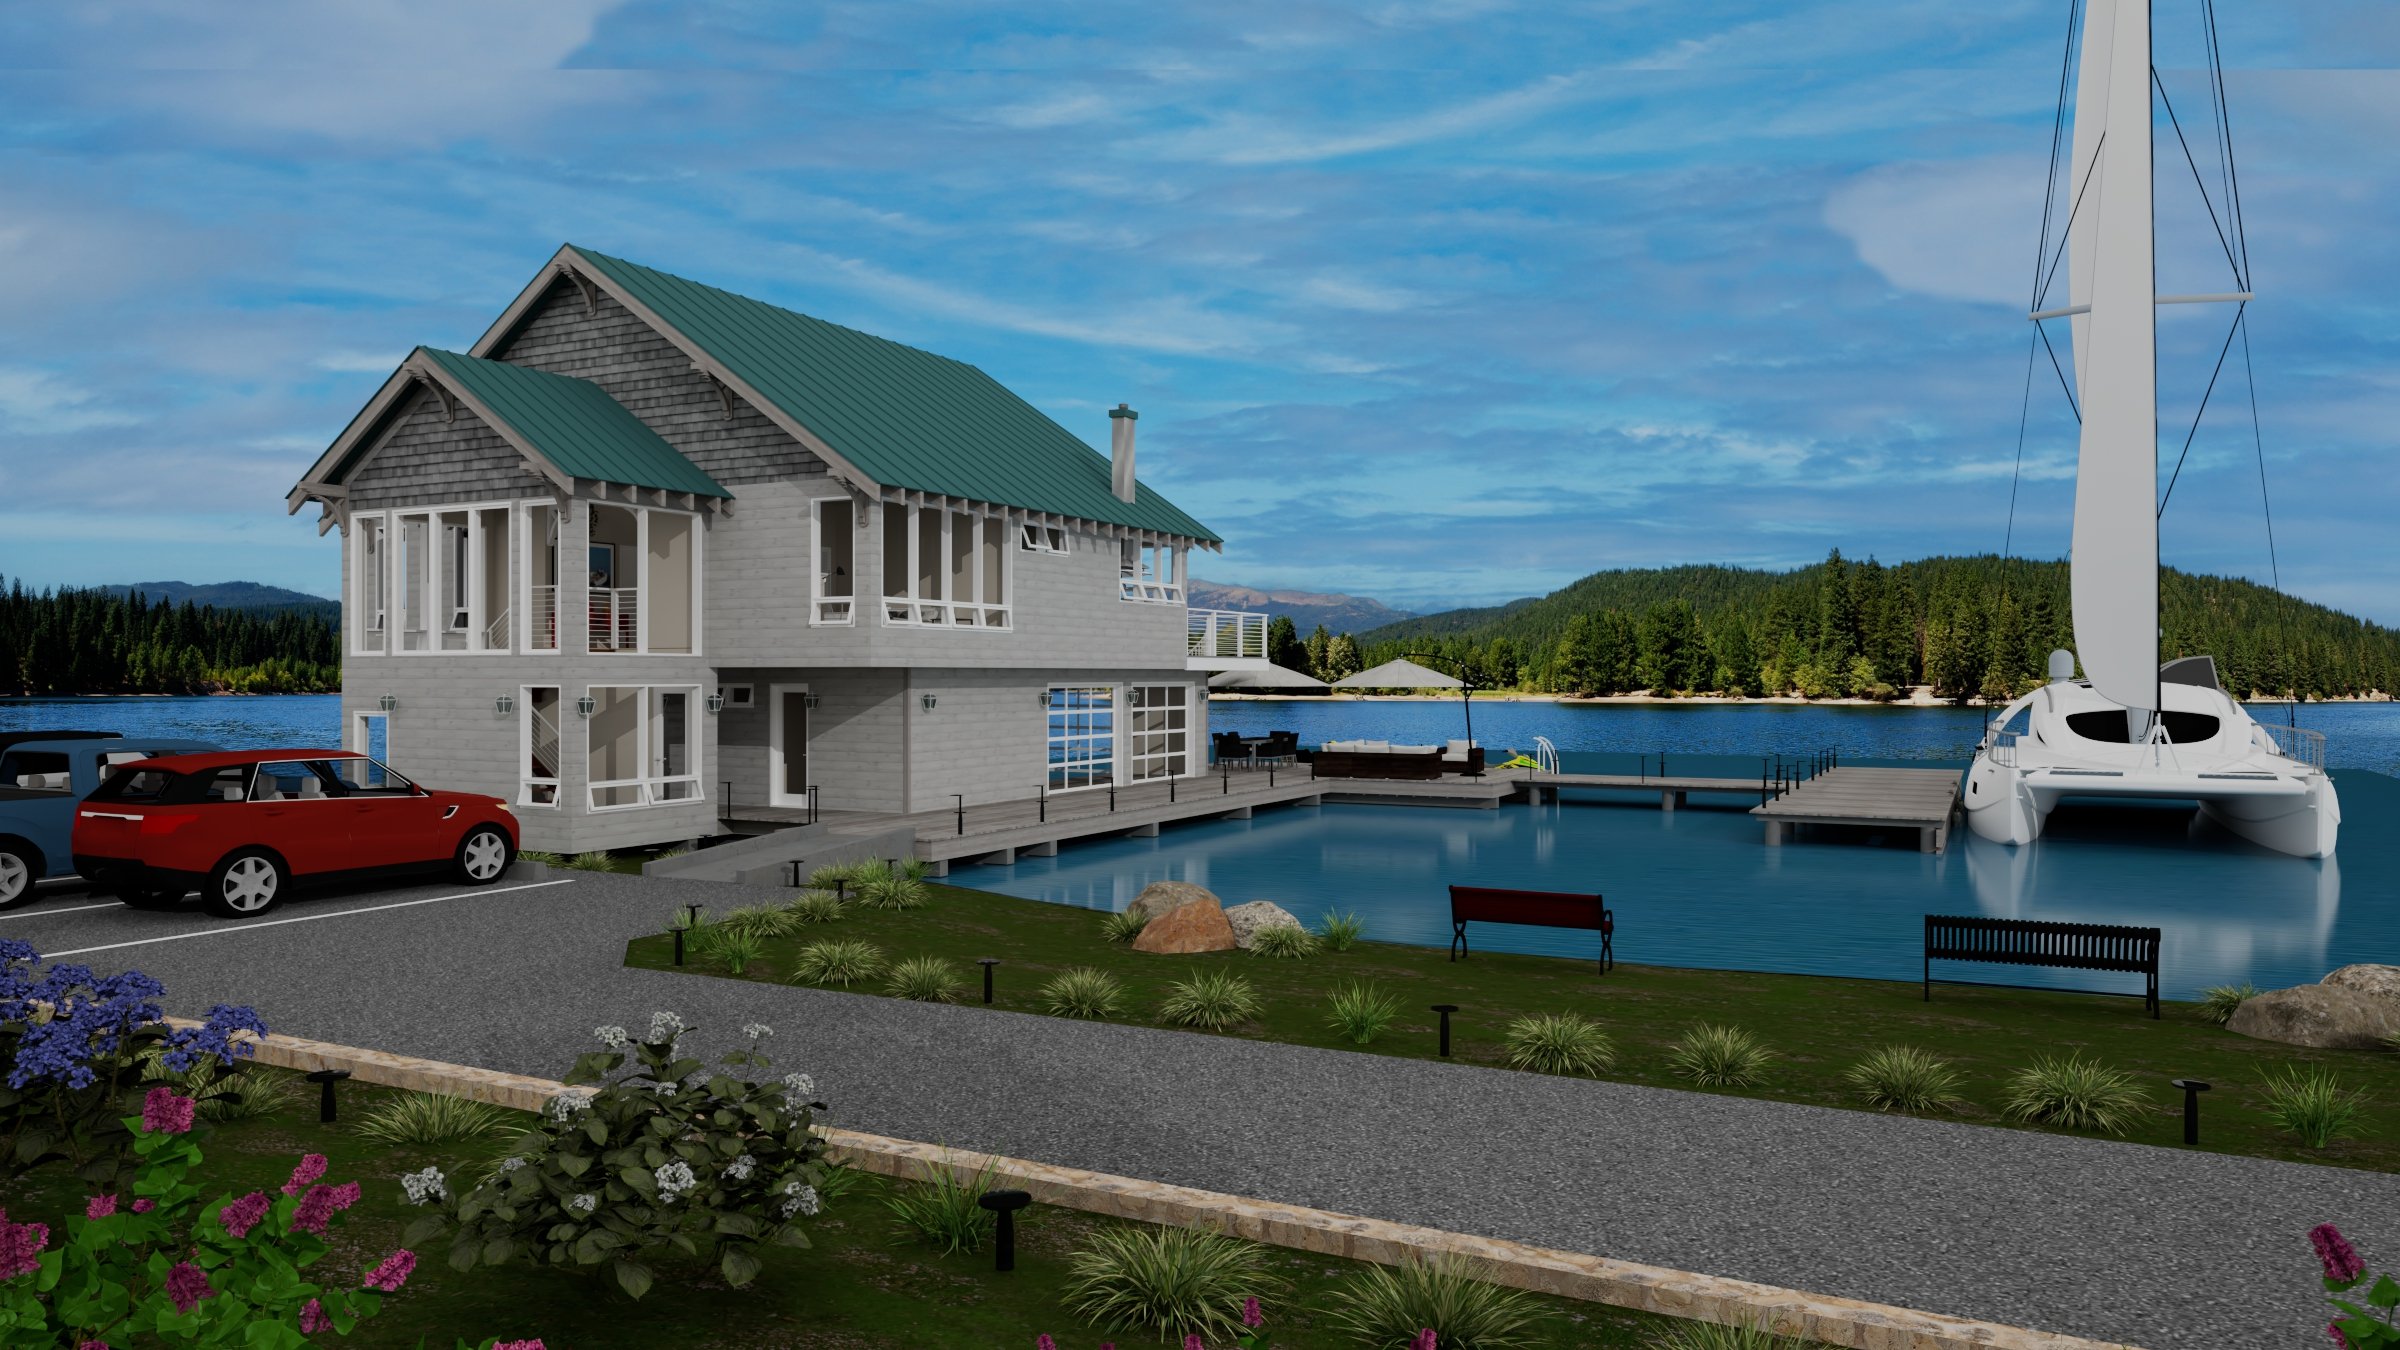
https://www.kskeys.com/boathouse
-
I believe this would be really great option when using an image for a background.
I recently designed a Boathouse and was imagining a nice background image of a Lake environment to put in the background for Rendering purposes.
I was having a difficult time finding an appropriate HDRI image, so I elected to search around online to try to find a panoramic image I thought would work well
as a background.
The issue is, there are no intuitive, easy controls for the placement of a background image in VW...like raising the 'Z' height of the image to, for example in my case, get
a realistic horizon line, etc. for the lake water, and / or moving the image left or right to best suit the rendered scene.
I hate to bring this up, but Cinema 4d (a disctant cousin of VW 🙂 ) is able to do this very thing...even allowing to stretch, fit or crop the background image as well as match the overall camera exposure settings, all in realtime, so you can tweak things as you see fit .
It is really slick how it works.
Anyway....a valuable wishlist item, seems to me.
Here is an example of what I am alluding to. In c4d I was able to slightly adjust the background image of the lake to fit the rendering:

-
 2
2
-
-
Jon, you could just message me with a link to the file...dropbox, or whatever you use..you dont need to post it here directly in the Forum.
-
Jon
Ok, got ya.
Yes, you would probably need to have a lot more spot elevations to mitigate some of the issues you are having.
I am not familiar with the Emlid software, so that is greek to me 🙂
You can draw your own polys using two methods...
1) go to the settings for the site model and select 'recreate from source data' and you can add any 3d data you wish
2) double click the site model and select 'Edit Site Model Contours', either existing or proposed, and you will get this dialogue box:

Just chose the Site Model Contour, and you can draw your own.
You just need to be mindful if you use this option that you are not crossing over or violating existing counter data.
Just curious....would you be willing to upload that file so I could take a gander at it? I may be able to make some constructive suggestions....or not 🙂
-
Jon, what rendering setting did you use for those images?
Also….not quite clear, but did you import survey data From a surveyor?? Or did you make your own?
Also….I have found that using continuous 3d polys is preferable to stake objects or 3d loci, in my opinion.
-
- Popular Post
- Popular Post
@George Hux, sadly that is the case. The grass shader does work, but best on very small areas, and yes, it takes forever to render, depending on your choice of rendering options and resolution. Not sure how large an area you are dealing with, but you may want to find a decent looking seamless grass texture and live with that.
I know that is not what you wanted to hear 😞
I have a few textures that I use on my site models that look ok....especially from a distance.
Like this:

For my renderings when showing a lot of grass, I export my VW file to Cinema 4d, which can apply huge areas of different grasses, etc in seconds and will render very fast. But....you would need another software app like c4d to achieve that.
Happy to share that texture if you feel it would be acceptable for what you are doing.
Let me know.
-
5
-
@Habitat43 Uh.......you may not want to go there 🙂
-
 1
1
-
-
@mattryan so sorry!!! I had to put out some fires, so I apologize for the delay.
Anyway....cutting to the chase:
1) you will be better served if you use "pad with retaining edge", as opposed to just a pad.
Reason being is using that option will give you a much nice vertical face.
That said, with VW 2022 you CAN'T OVERLAP YOUR PADS!) You can simply just nudge them over like 1/16" our so so they dont touch.
I know you are working in meters, but just use something similar like 2 mm. IF you don't do this your site model will show all kinds of 'conflicts' in the OIP.
You will need to practice this a bit but the Pad with retaining edge allows you to 'pull up or down' a top or bottom edge of the pad, and you need to do this in an isometric view so you can actually see in realtime how much your are moving the various edges.
Again, in 2024 pads can overlap!!
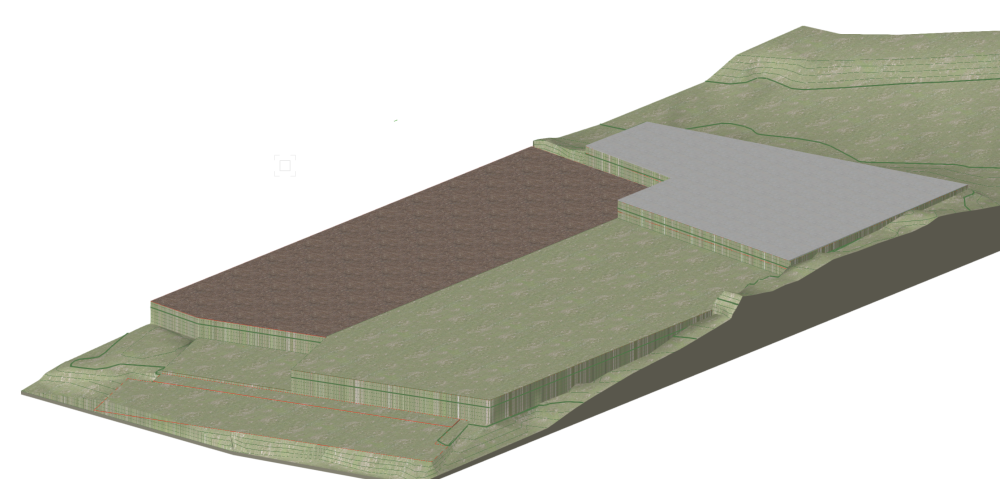
2) I showed a few of your slabs in the screenshot noting the vertical faces to a COPY of your site model. I didn't touch the original. There is some voodoo with your site model, because it is not showing the Mesh Site Model edges....just to top surface within is not normal 😞
I placed some concrete on the top slab and some fill dirt on one of the lower pads, and a sort of grass and flower texture on the rest of the site model surface, just for grins 🙂
Zoom in and you can seee some of you very subtle pad elevation heights on the lower portion of the site model.
Anyway, again, sorry for the delay getting back to you.
I also attached an actual 2022 file where I demonstrated some of what I was alluding to, with the vertical faces, etc.So study that a bit.
Hopefully your head won't explode from my lack of explaining this very well 🙂
-
1
-
-
Dave....you made my day!!! 🙂
-
2
-
 1
1
-
-
@mattryan Ok, thanks for the upload. I will have a look and get back to you shortly.
Yeah, for site modeling, etc it would suggest you updating to 2024. Lots of improvements.
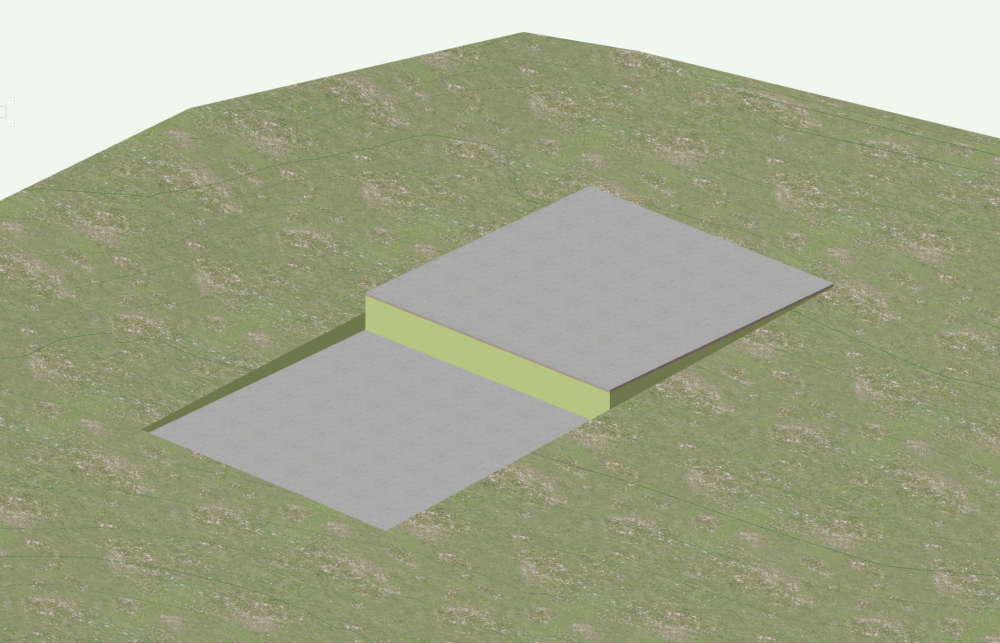
For example, I had a site model from a previous project I was helping someone with, just to use as an example for what you were trying to achieve.
I did it in 2024 and in seconds I was able to more or less recreate what you were wanting to do 🙂
Vertical sides where the pads intersected!
I will open your file in 2022 and see what I can do.
Here is a screenshot from my little example file using 2024.
I placed some concrete slabs where the cuts were, but just ignore those 🙂
-
@mattryan seems like nobody has responded to your issue yet.
It is difficult to problem solve this sort of thing without actually having access to your file.
Could you, if the file is not too huge, upload the file, or upload a new file with just the site model and any pertinent data associated with the site model?
What version of VW are you using? Resolving your issue becomes a lot easier in 2024 because there have been a lot of improvements over previous versions.
Also, judging from your screenshot the site model looks kind of rugged….sort of ‘spiky’ which happens if you don’t set the mesh crease angle to an appropriate angle setting.
-
It seems to have worked fine when I was screen sharing with Dick Jenkins. He used two different textures for the jambs and sash, both interior and exterior, but as I noted, I had him set it up giving the respective classes the textures.
-
Matt
Actually, I was able to set things right pertaining to the issue, when I was assisting @Dick Jenkins over the weekend.
Try using class settings instead of the texture option, and see if that works .
-
Sorry…..auto spell typo….i meant ‘dessert’……not the arid, hot, desert. 🙂
-
As a little metaphor…….VW is the meat & potatoes………c4d is the desert:-)
-
@M5d I sort of posted my wish list item without checking other forum related items.
My bad 🙂
Actually that scene was created in VW for the most part, but was rendered in C4d.
-
Ok, I realize this will be a monumental wish list item, and probably won't arrive until 4 or 5 Christmas' from now, but I suppose it never hurts to ask 🙂
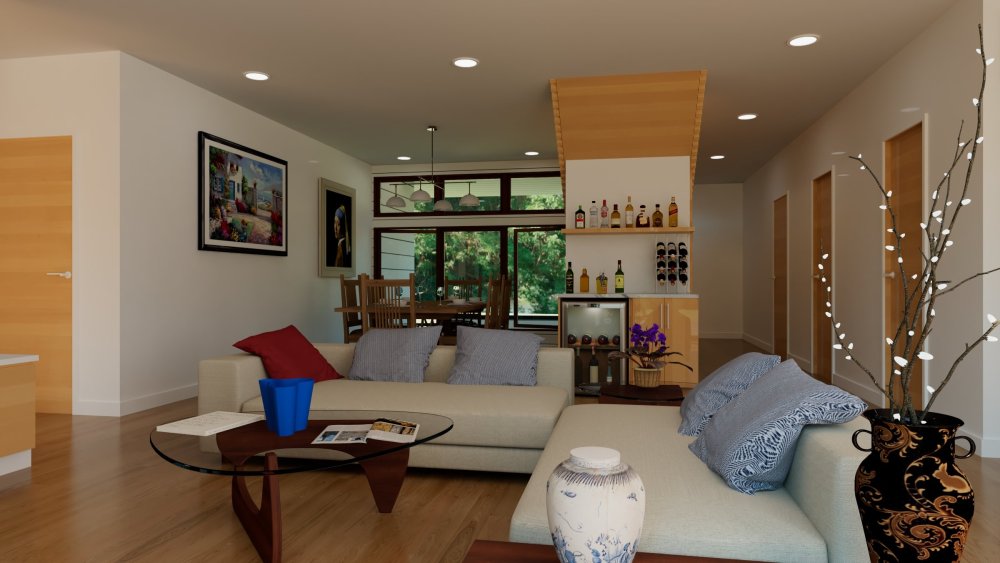
So, in Cinema 4d / Redshift there exists this fabulous item called an IPR (interactive preview renderer). It has its own window viewport which is constantly refreshing the view while utilizing the higher quality rendering engines in VW, like Custom, Realistic, and Redshift.
Basically, it allows you to see EXACTLY how, in realtime as you zoom, rotate the view, etc, the lighting, reflections, glass transmission, etc will appear BEFORE you pull the trigger for the actual rendering!
It is just indispensable, especially for interior renderings.
No more waiting 45 minutes for a render to complete only to realize it ain't quite right and you need to wait another 45 minutes etc, etc (or more!) to procure another rendering.
For example, subtle things like the glass transmission value in the bar fridge glass, noted in the rendering below, so you will be able to actually see the bottles of wine and the Corona and Heineken beer bottles inside the bar fridge.
Without the IPR option, it may take you another few tries (and a lot of render time!) to get it right.
Anyway, as mentioned, just a small wish 🙂
-
4
-
-
Tom
I am clueless to what you mentioned, regarding any new features, etc.
Probably @Stephan Moenninghoff would be able to shed some light on that topic.
Of course, it is Sunday here in the US so he is probably still in bed 🙂
-
Tom
Good question....I am still ruminating on that topic 🙂
-
It is most often user error.......Tom and I can both attest to that 🙂
-
2
-
-
Tom
I concur totally with your assessment. InteriorCad xs still has the edge in the big picture. I mean, how can anyone live without that pesky 'NC Macro' !! 🙂
That said, I will say that VW has made HUGE improvements to the Cabinet tools, which will prove to be really good for folks that don't own InteriorCad xs.
I have been using both, depending on the complexity of the Project.
-
Oh, Tom...btw are you still using InteriorCad, now that they have made some fairly major improvements to the Cabinet tools in VW??


Custom windows not rendering correctly in Shaded view
in Troubleshooting
Posted
@leecalisti There is definitely some voodoo going on in that file, seems to me.
I could not get that styled door to have clear glass.Perhaps someone else had better luck.
The file I attached did work, and I even added another slider door that has the glass a bit darker, just to test things out a bit, but they are all UNSTYLED.
Feel free to make them styled if you wish, but no guarantees you will be able to modify them to your liking.
But check the settings on those doors and exactly how I configured them. That may be of some help.
Personally...I dont use styled anything for several reasons. Not everyone would agreed with that...but I don't care 🙂
I just make a door or window and simply copy it and change any parameters to my liking and drag them and insert them as needed in the walls. It is pretty quick.
It is more difficult to make global changes to styled doors and windows.
Anyway......mess around with the attached file and see how it goes.
Wall Sample-Kev.vwx