


MullinRJ
-
Posts
2,017 -
Joined
-
Last visited
Content Type
Profiles
Forums
Events
Articles
Marionette
Store
Everything posted by MullinRJ
-
Rotating a symbol around it's insertion point
MullinRJ replied to GVRT's topic in General Discussion
Now it's official. You two are bound by Script-ure. ;-)
- 26 replies
-
- 2
-

-
- spotlight
- vectorscript
- (and 2 more)
-
Rotating a symbol around it's insertion point
MullinRJ replied to GVRT's topic in General Discussion
Oh, but it IS a "script order factory", and the chefs are lined up at their keyboards. You'd be amazed what you can get with a "please" and "thank you" around here. Right Pat? and Mike? and Wasn'tISam? This place isn't even the right place. If you want some real attention try posting questions in the VectorScript or Python fora. ;-) Raymond- 26 replies
-
- 1
-
-
- spotlight
- vectorscript
- (and 2 more)
-
Rotating a symbol around it's insertion point
MullinRJ replied to GVRT's topic in General Discussion
Gadzooks, With the Symbol Insertion tool selected, make sure your symbol insertion mode is set to "Insertion Point" (fourth button in its group). It can be toggled, intentionally or inadvertently, by pressing the "O" key when the Symbol Insertion tool is active. HTH, Raymond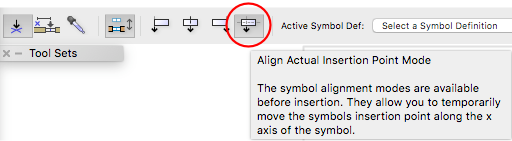
- 26 replies
-
- 1
-
-
- spotlight
- vectorscript
- (and 2 more)
-
Sam, Can you post some sample code? This is not something I want to mock up from scratch to investigate. Off the top of my head, I don't know if it can be done. It's been a while since I built a List Box and I don't remember what it did or where it is. Maybe I'm suppressing some painful memory, or maybe I'm just getting old. Raymond
-
You're welcome, That works, too. And, it's better written. I hope you'll keep trying your hand at scripting. It's a great tool and makes VW extremely powerful. If you get stuck with anything, post your questions here. This forum is incredibly helpful. Hope to see around. Raymond
-
Hello Marc, There are two problems. First, you have an extra "END" in the middle of the program that needs to be removed. Second, when you make individual references to the handles in your array you need to add a subscript to indicate which one you want. Eg. where you have MyH := h; you should have MyH[index] := h;. I marked these below. Make these changes and it will work. HTH, Raymond PS - Your code may be indented on your computer, but the example above is not. If it isn't, doing so will help you see mismatched BEGIN/END's more easily. Procedure Individual_Scale; VAR x,y: REAL; h: HANDLE; i,j: INTEGER; MyH: DYNARRAY [] OF HANDLE; BEGIN x:=RealDialog ( 'Skalierungsfaktor','0.5'); y:=x; h:=ActLayer; j:=NumSObj(h); ALLOCATE MyH[1..j]; h:=FSActLayer; FOR i:=1 TO j DO BEGIN MyH[i]:=h; { need array reference [i] } h:=NextSObj(h); END; { END; <= this END shoud not be here. Remove it. } DselectAll; FOR i:=1 TO j DO BEGIN SetSelect(MyH[i]); { need array reference [i] } Scale(x,y); SetDSelect(MyH[i]); { need array reference [i] } END; FOR i:=1 TO j DO BEGIN SetSelect(MyH[i]); { need array reference [i] } END; END; RUN (Individual_Scale);
-
Pat, I believe an extra blank line at the end is only needed when you are using $INCLUDE files, and the blank line ensures adjacent files don't create a syntax error when all the text is merged together. I pasted your code into a text file with the file terminating right after the last semicolon and it ran perfectly with menu item "Run Script..." and also with the "Text File... CMD-5" option in the VectorScript Editor. I can only assume @cberg copied a little too much, or little too little. Hard to tell w/o the error message. Raymond
-
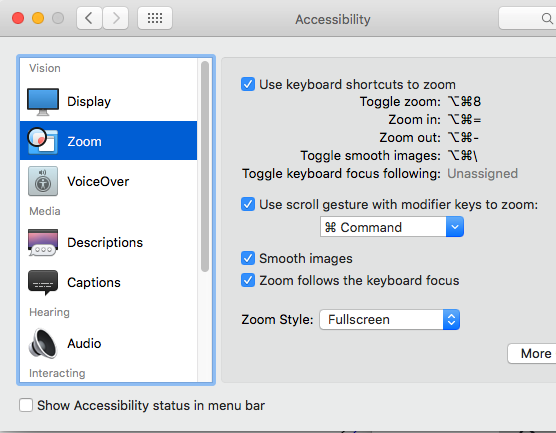
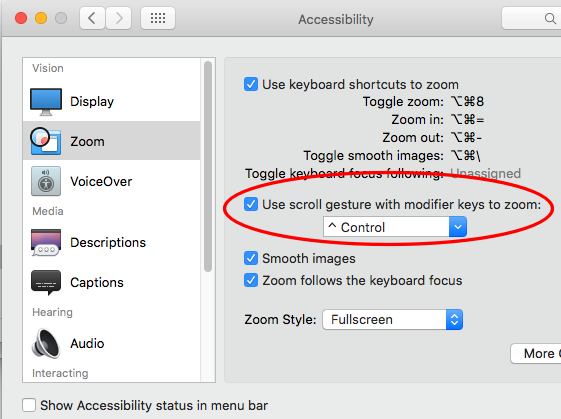
In the Mac's System Prefs > Accessibility > Zoom, check the "Use scroll gesture with modifier keys to zoom:" checkbox and choose one of the 3 modifier keys. When you hold that key down and roll the mouse wheel your screen will zoom about the cursor. I use the the Control Key, since VW uses the Option Key on the Mac for almost everything. This is a HUGE saver on aging eyesight and a lot cheaper than those fancy goggles. 8-) Raymond
-
Mark, You could also script a tool that would place a symbol where you click, then move it in the vertical direction to a 100 mm elevation. Raymond
-
Gentlemen, Here's a small file with a custom WS function that returns the active layer name to the cell it's placed into. It should simplify having to type the layer name in manually. If you change a layer's name, the function adjusts automatically when the WS is recalculated. If you're like me, and you sometimes use a worksheet to gather info without placing it on the drawing, then all you need to do is change the Active Layer, open the WS resource, and recalculate to get stats from the current active layer. You'll only need one WS resource for this kind of use. If you want to place a WS instance on multiple layers, then the way Michael set it up in his example file (with 1 WS resource for each layer) will work, but you if use the ActiveLyr function from my example you won't have to type the Layer Name into each WS resource. HTH, Raymond WS ActiveLyr.vwx
-
duplicate objects inserted into walls w/o duplicating the walls?
MullinRJ replied to michaelk's topic in Vectorscript
Hi Pat, Don't make me laugh (too late). When I read Michael's second post this morning, I thought, "better" way?!? What's wrong with Copy / Paste? I've been using it since 1990 and it's never let me down. And before you threw my name onto the Coliseum Floor, I thought maybe hDuplicate() would work, so I tried it on a single window in a wall. It seemed simpler, but it wasn't working. Nope, this wasn't better, and real work got in the way, so I shelved it. After reading your second post (and laughing) I recreated the file and tried it again. The duplicate and the original windows seem to lock themselves to each other when hDuplicate() is used. I can't drag the duplicate window around after I create it. The new window doesn't cut the wall properly in Plan, though the OIP says it is a "Window In Wall". Lastly, I can't delete it. Select it, yes; delete it, no. If I delete the original window, then both delete – very odd. They seem joined at the hip. Perhaps this is a bug. I don't know if hDuplicate should work on Windows in Walls. Naively, I think it should. I'll send it in and see what comes back. So, after spending more than an hour pushing dead code around, I tried your approach — Copy / Paste (in Place). It works like a champ. The two windows act as separate entities, interactively and programatically. I'm giving your approach 2-thumbs-up. Michael, do what Pat says. He's usually right*. ;-) Raymond * When he's finished his morning coffee, he flies back from Columbia (Maryland). He never has to launder his bed linens, he just creates new spreadsheets. When asked to solve vector problems, he is never wrong, and his answers always follow the Right–Hand–Rule. He IS the Most Interesting Man On The Forum! -
halfcouple, The code needed to do the symbol replacement is very short and easy –IF– you use the right call. As a seasoned Vector-Scripter I knew there was a call that would swap out the handles of one symbol definition with another, but it took me more than half an hour to find it. "SetHDef" It's not listed with the Symbol routines, but rather with the Object Editing routines. I think it should be listed with both (and others), since it serves multiple object types, but that's another issue entirely. Using SetHDef will literally save you tons of work if you try to manually place a symbol were the old one was and then delete the original. If the existing symbols have Attached Records and/or Names, these will be preserved. The symbol's Position, Rotation, and Flip State are also preserved. And best of all, the original Stacking Order is preserved. If you try to preserve all of these attributes manually, your code will get pretty complicated quickly; and that doesn't include anything you need to do with the User Interface (UI). Here's a short script that swaps all selected symbols with the one named at the top of the script. It has no UI – that's the hard part, and where you will spend most of your time writing scripts. PROCEDURE ReplaceSymbols; { Replace selected Symbols with the symbol named in constant "NewSymName". } { This method preserves: Position, Rotation, Flip State, Name, Attached Records, Stacking Order, and Visibility. } { 03 Jun 2017 - Raymond J Mullin. } CONST NewSymName = 'YourNewSymNameHere'; { new sym - change as needed at the moment } VAR NewSymDefH :Handle; function SwapSym(H :Handle) :Boolean; { swap symbol instance H with NewSymDefH } Begin if (GetTypeN(H) = 15) then SetHDef(H, NewSymDefH); { swap Symbol Definitions } End; { SwapSym } BEGIN NewSymDefH := GetObject(NewSymName); { Handle to new symbol name } if (NewSymDefH <> nil) then ForEachObjectInLayer(SwapSym, 2, 0, 4) { Selected, Shallow, Editable Layers } else AlrtDialog(concat('Symbol "', NewSymName, '" does not exist. Check spelling.')); Sysbeep; { I'm done - tell everyone! } END; Run(ReplaceSymbols); As to crafting a UI, once you decide how your script/tool should run, i.e., whether you use a dialog to pick the new symbol, or pick your new symbol interactively AND whether you work on an existing selection or select symbols with your tool, you can write back for more advice on how to implement it. In the mean time play with this script and tweak the constants in the ForEachObjectInLayer() statement. There a quite a few variations in how that statement works. To change the symbol that does the replacing, modify the symbol name in the CONST section at the top of the program. It's not elegant, but it works. Good luck, Raymond
-
Hi Miguel, If the Wall tool were a Plug-In-Object, then perhaps, but it is built into the program and I don't think it can be accessed that way. Of course, I don't really know, but my first try using your approach failed. Perhaps someone with more insight will enlighten me. Thank you, Raymond
-
In VW 11.5 and earlier, the VS command SetWallWidth() set the width of the Wall tool. In VW 12.0 the command was declared obsolete. The VS command SetWallStyle() was introduced in VW 12.5. Though setting a WallStyle does allow me to set the wall width for the Wall tool, the command is not honored in VW Fundamentals, yet VW Fundamentals does support WALLS. The problem I am having is trying to write a script that will work in a VW Industry package and also in VW Fundamentals using non-deprecated commands. Luckily, SetWallWidth() still works in VW 2017, but I would like a solution that will work when the deprecated function no longer compiles. Currently, is there a proper way to set the width of the Wall tool via script so that subsequent uses of the tool will draw walls with the desired width in all VW products? TIA, Raymond
-
First, do what Pat says. Additionally: If the object is a Polygon, you are good to go. If the object is a Polyline, AND, there are NO holes in the Poly, you are good to go. If the object is a Polyline, AND, there ARE holes in the Poly, the Poly outline will export, but the holes will not. This has been a shortcoming of VS Export from the earliest days of MC/VW. Raymond
-
Gonda, You only need one instance of the variable conversion. I showed two instances to illustrate with, and without, the units showing. Try: save163state = vs.GetPref(163) # save Show Units setting vs.SetPref(163, True) # Show Units ON S = vs.Num2StrF(your_VARIABLE_here) vs.SetPref(163, save163state) # restore Show Units setting If you are going to format a lot of values, you should turn the above snippet into a user defined function. HTH, Raymond
-
Dom, In Sam's original post he said he wanted the RADIUS of an ARC formed by 3 points. Your solution provides a CIRCLE through those points. With my inability to read things precisely the first few times through, I thought he also wanted the ARC defined by those points. I finally finished a script that returns the ARC that starts at the 1st point, proceeds through the 2nd point and ends at the 3rd point. If Sam doesn't need it, maybe somebody else will. I should have quit with the RADIUS solution. Here's a VW 2014 file with my script loaded in a script palette. Arc By 3 Points v2014.vwx Run the script and click in the drawing 3 times to provide 3 points. The script will draw the ARC passing through those points and place 2D Loci at the three click points and at the arc's center, then it will wait for you to click 3 more times for another arc. To end, press the ESC key or click 3x in the same place. If anyone can find a way to simplify this solution please post back here. Raymond
-
Well, Gonda, actually there is. ;-) Try this script: import vs # show how to turn the units suffix ON and OFF when using Num2StrF() CR = chr(13) # Carriage Return # main # vs.SetPref(163, True) # Show units S = vs.Num2StrF(3) vs.SetPref(163, False) # Hide units S = vs.Concat('With units: ', S, CR, 'Without units: ', vs.Num2StrF(3)) vs.AlrtDialog(S) HTH, Raymond
-
A pleasant update: I just received an email regarding the bug report I submitted 4 days ago – this issue has been fixed and should soon be available at a store near you. Thank you VWI. Your efforts do not go unnoticed. And Pat, thanks for grabbing the bull by the horns. If you had not have had to dismount mid-ride, you'd be spreading the good word here. Raymond
-
Sorry Sam, I ran out of time. If no one posts a script by the time I get back, I'll finish mine. The hard part is determining whether to turn left or right at the first turn. Raymond
-
Almost done with the script. As far as I know, the only set of 3 points that do not form an arc are 3 collinear points, unless you are willing to entertain arcs with infinite radii. Back shortly with a script... I guess now is a good time to ask, "Are you looking for a 2D solution, or one for 3D?" Raymond
-
Hi Sam, Manually? Draw lines between points 1&2, and between 2&3. Rotate each line 90° (CMD-L). Extend the lines until they intersect. That is the center of the arc through those 3 points. Measure the distance from the intersection point to any one of the original points. That is your radius. Do you need an answer in script form? Raymond
-
Gonda, Have you tried Num2StrF()? The "F" is for FORMATTED. Description: Function Num2StrF converts a specified REAL value into a string. The numeric value will be converted and displayed in the current unit settings of the drawing. Raymond
-
Pat, I agree. PushAtrrs/PopAttrs is broken for saving and restoring the document text size, but I do not know whether the PUSH or the POP is to blame, or possibly both. When the PUSH/POP scope is exited, the saved document text size is rounded to the closest integer POINT value before it is reapplied. I wonder if it is being saved as an INTEGER type instead of a REAL. Here's the script I used to show how the text size changes before, during, and after the Push/Pop commands. It is in Vectorscript, but I suspect the Python calls will fail equally. I will test before I submit it. PROCEDURE TestPushPopTextSize; { Show how text size is Pushed and Popped. } { 05 May 2017 - Raymond J Mullin } VAR TxtSz, InitTxtSz :Real; { text size variables } function DocTxtSize :Real; { return the Document Text Size in POINTS } Const mmpp = 25.4 / 72; { mm per Point = 0.3527777... } Begin DocTxtSize := GetPrefReal(57) / mmpp; End; { DocTxtSize } BEGIN { save initial document text size } InitTxtSz := DocTxtSize; AlrtDialog(concat('Initial Document Txt Size ', InitTxtSz)); { let user change the size } TxtSz := RealDialog('Your Text Size Please:', concat(InitTxtSz)); if not DiDCancel then begin PushAttrs; { show text size AFTER PushAttrs } AlrtDialog(concat('Pushed Text Size before change ', DocTxtSize)); { change to User's size inside Push/Pop } TextSize(TxtSz); { show text size AFTER PushAttrs } AlrtDialog(concat('Text Size after change ', DocTxtSize)); PopAttrs; { show text size AFTER PopAttrs } AlrtDialog(concat('Popped Text Size ', DocTxtSize)); end; { if } { restore initial document text size } TextSize(InitTxtSz); AlrtDialog(concat('Restored Text Size ', DocTxtSize)); END; Run(TestPushPopTextSize); This script restores the Document Text Size manually before it exits. The same technique can be applied as a workaround for anyone wanting PushAtrrs/PopAttrs to work as it should before it gets fixed. I will submit this as a bug along with this script. For anyone who is interested, GetPrefReal(57) returns the text size in mm. To convert this to POINTS, divide the return value by 0.3527777777777. TextSize() takes POINTS as its argument. Raymond
-
OR, change the text size outside the scope of the vs.PushAttrs / vs.PopAttrs commands. Raymond