


MullinRJ
-
Posts
2,024 -
Joined
-
Last visited
Content Type
Profiles
Forums
Events
Articles
Marionette
Store
Everything posted by MullinRJ
-
Eduardo, You can construct any grouping you want. The two RadioButtonGroupBoxes split your dialog in half. If you want all four groups active at once, then don't use RadioButtonGroupBoxes. Use GroupBoxes instead. One GroupBox for each set of buttons that need to toggle independently from the others. Remember, only one RadioButton can be set in one group at one time. The dialog handler will take care of turning them off as you turn others on. Only you know how many groups you need. That is part of designing the dialog. Sketch it out on paper first if that helps you visualize it. To read a RadioButton's state, use GetBooleanItem(). If you want independent operation of all the buttons, perhaps you want to use CheckBoxes instead. With CheckBoxes, more than one can be set at a time. You also read them with GetBooleanItem(). HTH, Raymond
-
Eduardo, Create a GROUP for each set of Radio Buttons. CreateGroupBox(dialogID :LONGINT; itemID :LONGINT; text :STRING; hasFrame :BOOLEAN); The dialog mechanism will treat the radio buttons in each group as individual sets and toggle them independently of each other. Here's a quick example, PROCEDURE ExampleRadioButtonGroups; { Example of Radio Button groups in a Modern Dialog. } { Radio Buttons placed within a Modern Dialog act as single set. To have } { multiple sets of Radio Buttons, place each set in its own GroupBox. } { } { This script does nothing but toggle 4 sets of radio buttons independently. } { The indentation used in this code is not necessary, but only shows the } { logical grouping of the dialog elements. } { 01 Sep 2018 - Raymond J Mullin } VAR id, result :LONGINT; PROCEDURE Dialog_Handler(VAR item :LONGINT; data :LONGINT); BEGIN END; { Dialog_Handler } BEGIN id := CreateLayout('Radio Button Groups', FALSE, 'OK', 'Cancel'); CreateRadioButtonGroupBox(id, 4, 'Retângulo', TRUE); CreateGroupBox(id, 5, 'Group 1', FALSE); CreateRadioButton(id, 6, 'RB 1'); CreateRadioButton(id, 7, 'RB 2'); CreateRadioButton(id, 8, 'RB 3'); CreateRadioButton(id, 9, 'RB 4'); CreateGroupBox(id, 10, 'Group 2', FALSE); CreateRadioButton(id, 11, 'RB 5'); CreateRadioButton(id, 12, 'RB 6'); CreateRadioButton(id, 13, 'RB 7'); CreateRadioButton(id, 14, 'RB 8'); CreateRadioButtonGroupBox(id, 15, 'Oval', TRUE); CreateGroupBox(id, 16, 'Group 3', TRUE); CreateRadioButton(id, 17, 'RB A'); CreateRadioButton(id, 18, 'RB B'); CreateRadioButton(id, 19, 'RB C'); CreateRadioButton(id, 20, 'RB D'); CreateGroupBox(id, 21, 'Group 4', TRUE); CreateRadioButton(id, 22, 'RB E'); CreateRadioButton(id, 23, 'RB F'); CreateRadioButton(id, 24, 'RB G'); CreateRadioButton(id, 25, 'RB H'); SetFirstLayoutItem(id, 4); { RadioButtonGroupBox 1 } SetFirstGroupItem(id, 4, 5); { GroupBox 1 } SetFirstGroupItem(id, 5, 6); SetBelowItem(id, 6, 7, 0, 0); SetBelowItem(id, 7, 8, 0, 0); SetBelowItem(id, 8, 9, 0, 0); SetRightItem(id, 5, 10, 0, 0); { GroupBox 2 } SetFirstGroupItem(id, 10, 11); SetBelowItem(id, 11, 12, 0, 0); SetBelowItem(id, 12, 13, 0, 0); SetBelowItem(id, 13, 14, 0, 0); SetRightItem(id, 4, 15, 0, 0); { RadioButtonGroupBox 2 } SetFirstGroupItem(id, 15, 16); { GroupBox 3 } SetFirstGroupItem(id, 16, 17); SetBelowItem(id, 17, 18, 0, 0); SetBelowItem(id, 18, 19, 0, 0); SetBelowItem(id, 19, 20, 0, 0); SetRightItem(id, 16, 21, 0, 0); { GroupBox 4 } SetFirstGroupItem(id, 21, 22); SetBelowItem(id, 22, 23, 0, 0); SetBelowItem(id, 23, 24, 0, 0); SetBelowItem(id, 24, 25, 0, 0); result := RunLayoutDialog(id, Dialog_Handler); IF (result = 1) THEN BEGIN END; END; RUN (ExampleRadioButtonGroups); Have fun, Raymond
-
Boh, It's possible you unintentionally copied some extra characters from the browser to the script editor. This has been a problem in the recent past. Try again. It worked for me this morning. If it still doesn't work, try this ZIP file: Pat's PIO Field Script.zip HTH, Raymond
-
Olá Eduardo, In your code for the OK button (where item = 1), you have 4 statements where you really want 2. I've numbered them here: 1: BEGIN {1} IF GetEditInteger(id, 6, AltR) AND GetEditInteger(id, 8, LarR) THEN ALT := AltR; {2} LAR := LarR; {3} IF GetEditInteger(id, 11, AltO) AND GetEditInteger(id, 13, LarO) THEN ALT := AltO; {4} LAR := LarO; END; The structure you are trying to achieve requires more BEGIN / END statements, as such: 1: BEGIN {1} IF GetEditInteger(id, 6, AltR) AND GetEditInteger(id, 8, LarR) THEN BEGIN ALT := AltR; LAR := LarR; END; { first IF } {2} IF GetEditInteger(id, 11, AltO) AND GetEditInteger(id, 13, LarO) THEN BEGIN ALT := AltO; LAR := LarO; END; { second IF } END; { OK button } BUT... This won't work either, as both IF statements will evaluate to TRUE (even the boxes you don't type into will return 0) and ALT and LAR will have AltO and LarO in them. To get the right set of values into ALT and LAR you will have to test the RADIO BUTTONS, as such: VAR ... RectOval, Boo :BOOLEAN; { add these to your global variable list } ... 1: BEGIN { OK button code } GetBooleanItem(id, 4, RectOval); { get RADIO BUTTON selection } IF RectOval THEN BEGIN { test RADIO BUTTON selection here } Boo := GetEditInteger(id, 6, ALT); Boo := GetEditInteger(id, 8, LAR); END { Rectangle } ELSE BEGIN Boo := GetEditInteger(id, 11, ALT); Boo := GetEditInteger(id, 13, LAR); END; { Oval } END; { OK button } Note: I do not have to test Radio Button 9, since the dialog handler makes sure the buttons are in opposite states, and both buttons cannot be TRUE at the same time. Testing RADIO BUTTON 4 implies the state of RADIO BUTTON 9 will be in the opposite state RADIO BUTTON 4. LASTLY, after you exit your dialog, you need to decide which object to draw. Again, test the global variable RectOval to draw the right shape, like this: IF (result = 1) THEN BEGIN GetPt(pX, pY); if RectOval then Rect(pX-LAR/2, pY-ALT/2, pX+LAR/2, pY+ALT/2) else Oval(pX-LAR/2, pY-ALT/2, pX+LAR/2, pY+ALT/2); END; For a robust script, you should add code to handle what to do if bad data is entered into one of the INTEGER fields, but for the most part this should get you up and running. Hope to see you back with more questions. Happy scripting, Raymond
-
@Nuno Antunes, I forgot to mention, the script palette with "ActiveLyr" does not have to be open for the worksheet to function properly, it just has to be in your file. Raymond
-
Hi Nuno, The worksheet uses a custom function (or a user defined function) to supply the name of the active layer and that is the VectorScript "ActiveLyr" you see in the "ccc" script palette of my original file. So, you also have to copy the VectorScript "ActiveLyr" to your file for the worksheet to work properly. You may copy it into one of your script palettes, or import the "ccc" resource (script palette) to your file and the "ActiveLyr" vectorscript will come with it. You never run this script directly, you only call it from within a worksheet, but it does have to be in your file for the worksheet to function, the way I've set it up. I probably should have named the "ccc" script palette "Wks Scripts". That might have made it more obvious you needed it in your working file, too. If you still have questions, please write back before September 2019 and you should get a pretty prompt answer. :-p HTH, Raymond
-
I have no way of verifying if this is a good conversion. Try it and see. Draft 1.8-Backup-20180602203117.zip Raymond
-
You are welcome, Julia. Welcome to the world of scripting. While you are trying the One-Beep approach, let me offer another flavor. You can very easily make the script BEEP in the other direction, when LAYER PLANE mode is made active, if that is more to your liking. This line controls the BEEPing. if GetPref(1099) then SysBeep; and it beeps when GetPref(1099) is TRUE, or when SCREEN PLANE mode gets set. If you'd prefer the script to BEEP when LAYER PLANE mode gets set, then use this line instead: if not GetPref(1099) then SysBeep; the "not" keyword reverses the logic and says to BEEP when GetPref(1099) is FALSE, or LAYER PLANE mode gets set. If you find that you use this script a lot, the next step for you is to turn this script into a MENU COMMAND, add it to your workspace, and assign a Keyboard Shortcut to it. So instead of placing a copy of this script in every file you use, you will place it in the VW Plug-ins folder where it becomes a systemwide command. It's a little more work to set up, but well worth the effort if you want to work as efficiently as possible. When you figure out which flavor of the script suits you best, write back and I, or someone else here, will assist you to make it a custom Menu Command. All the best, Raymond
-
change middle button and right mouse button function
MullinRJ replied to Enmaani's topic in General Discussion
Years ago I used to swap right and middle button functions with the Logitec Control Center (mouse driver). I think it stopped working for me because my Mouse got too old and I fell into a software/hardware/OS support gap. I would look for Mouse Drivers that support this if you can't get there inside VW. -
Hi Lupin, Yes, it can be made to BEEP in both directions, but the intention of the BEEP is to indicate which way the script has run. When you hear the BEEP, you know without looking the menu is set to SCREEN PLANE. When you don't hear the BEEP you know without looking the menu is set to LAYER PLANE. I think you got the direction of the beeping backwards, but that assumes you copied the script exactly as it is above. However, this is very unimportant. If you just want to know the script has run because you hear the BEEP, then change your script as follows: { This script will toggle the "Active Plane Menu" between "Screen Plane" and "Layer Plane", } { and BEEP each time the script is run. } { 20 June 2018 - Raymond J Mullin } SetPref(1099, not GetPref(1099)); SysBeep; Notice I removed the IF statement on the last line but left the SysBeep command. The script will now toggle the 1099 preference value to its opposite state, and then BEEP, every time. HTH, Raymond
-
Well, that's the first time I've seen that ObjVar used, though a quick search shows it appeared in VW 2014's documentation. I learn something new every day, even when I don't want to ;-) However, it does say "for use with SDK objects ONLY". Have you tried with VS or Python PIOs? If SDK Only, then it's true, the VS engine can only handle one task at a time without interruption. I can live with that. Thanks, both, for the info. Raymond
-
Dom, I think you can only get your approach to work if you split your code in two. Your first script will contain everything up to, and including, your RESET calls. When your first script ends, VW will then reset all of the objects you marked to be reset. Your second script can then execute the DMTBN( 'Export PDF') call. It's a very sequential process, but your "Export" call cannot begin until all of the PIOs get reset, and they will not reset until after your script ends. Therefore you need two scripts that you will will launch sequentially. Not entirely elegant, but easily accomplished. HTH, Raymond
-
Here you go... Raymond aktuell_RBL_Haus Heinrich v2015.vwx
-
IIRC, when you select ALWAYS ALLOW, it is only for that session of VW. After VW restarts you will be presented with the question again. It took me a little while to figure out the scope of these selections, but I kind of like this level of intrusion. I don't have to worry about leaving the back door open forever if I forget to close it. For files of my own creation, I click ALWAYS ALLOW and keep working. If I am going to work on a questionable file, I can restart VW and I am covered again. Not ideal, but very workable. Raymond
- 3 replies
-
- 2
-

-
- worksheets
- vectorscript
- (and 1 more)
-
SetFillBack() is the call to edit a single object's background color. There is no SetFBack call, it was a typo. These calls are all documented in the Script Function Reference. If this were still a book printed on paper, you'd carry it with you everywhere, Consider it the VW Programmer's Bible. HTH, Raymond PS - Pat, thank you for the compliment. Also, in your previous example you set the Fill BG color to WHITE. Shouldn't it be set to BLACK? SetFBack(h, 0, 0, 0);
-
You must also be careful here, too. SetFPat { FILL Pattern } 0 = No Fill 1 = Solid Fill using the BACKGROUND color { VW uses this as the default for SOLID FILL } 2 = Solid Fill using the FOREGROUND color In contrast: SetLS { LINE STYLE, the equivalent of the Pen's Pattern } 0 = No Pen 1 = Solid PEN STYLE (pattern) using the BACKGROUND color 2 = Solid PEN STYLE (pattern) using the FOREGROUND color { VW uses this as the default for SOLID PEN } And then there is that negative value thing to contend with, too. Good luck with all of this, Raymond (Make it confusing once, and it stays confusing forever. I wish I knew who to thank for this 😉 )
-
murad, Since you are new to scripting, you should try what we all have done to learn by example – draw some objects of interest, then export a script to a text file. The Export options can be found under the File menu. In your case, draw some walls (30 cm thick), with your desired line weight (18 mils?), and add some hatches. After exporting this as a script, you can find the relevant code deep in the middle of the file. Look for the comment "Object Creation Code". That comment will appear several times in the script (at the beginning of object creation, before each layer in the file, and at the end of object creation), but it will get you close. This is a really good way to get your feet wet. Good luck, Raymond
-
Opening multiple files in separate windows in VW 2018
MullinRJ replied to Jainsworth's question in Troubleshooting
Pity. It's a feature I use all the time. Perhaps another PC user can offer advice to help you. Raymond -
Opening multiple files in separate windows in VW 2018
MullinRJ replied to Jainsworth's question in Troubleshooting
Jainsworth, Welcome to the VW Forum. On the Mac, I uncheck the "Use Application Window" menu and I get individual windows for each file. I think you can also tear a TAB away and a new window will be created when you release the mouse button. I can only assume it is the same on the PC. Here's the menu as it is on my Mac. Each time I open a file it opens in a new window with "Use Application Window" unchecked. HTH, Raymond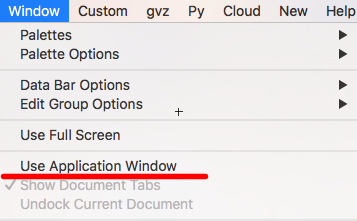
-
Gotta run, but I have 1 quick thought and no idea how it will affect viewports. Have you tried ResetObject()? This is a lot of what programming is about when you are learning, and after 30 years scripting with MC/VW I'm still learning. When in doubt, try something, anything, and take notes. Good luck, Raymond
-
Martin, IFF [sic] you really want to GROK the whole VectorScript experience, you'll have to procure a copy of "Hitchhikers Guide to All Things VectorScript (and Python, too!)." However, it may be a bit easier to download a copy of the SDK from the VW site: http://www.vectorworks.net/support/custom/sdk/sdkdown and look for this file: .../SDK/SDKVW(build#)/SDKLib/Include/Kernel/MiniCadCallBacks.h In it you will find long sloppily typed lists of extremely esoteric and somewhat arcane factoids. When you find yourself standing precisely in Ra's shadow, notice the following illuminations: const short ovViewportXPosition = 1024; // double read only - the X coordinate of the viewport on the sheet layer - Public for VS const short ovViewportYPosition = 1025; // double read only - the Y coordinate of the viewport on the sheet layer - Public for VS That is how I know 😉 If this doesn't help, ... Raymond
-
Martin, ObjVars 1024 & 1025 are marked as READ-ONLY. Try getting the Bounding Box to find out where it is, then use HMove() to move it to where you want. The difference between the desired point and the existing point is the amount you need to move it. HTH, Raymond
-
halfcouple, This is an old issue, and I remember answering it before. What I didn't remember was how long ago I posted a response. See this post from 7.5 years ago. Since my post, I added another line to BEEP when the preference is set to TRUE. This lets you hear an audible BEEP when the "Active Plane Menu" gets set to "Screen Plane", and nothing when it gets set to "Layer Plane". Click reduction AND Glance reduction rolled into one. { This script will toggle the "Active Plane Menu" between "Screen Plane" and "Layer Plane", } { and BEEP when "Screen Plane" is active. } { 23 Apr 2011 - Raymond J Mullin } SetPref(1099, not GetPref(1099)); if GetPref(1099) then SysBeep; If the last option in the "Plane Mode" dialog is selected, "Screen Plane or Working Plane", then my script toggles the "Active Plane Menu" between "Screen Plane" and "Working Plane". If anyone needs help turning this into a Menu Command, please write back. HTISH, (Hope This Is Still Helpful), Raymond
-
I found an old email (GBTML*) with a reference to the Developer Wiki on how to edit a VST to be event-enabled. http://developer.vectorworks.net/index.php?title=VS:vstGetEventInfo Thank Ryan and Conrad for writing this down. Raymond * God Bless the Mailing Lists 🙂
-
I have run down that dead-end alley, too. Life would be so much more colorful if it did. Thanks, Raymond
