


Tom W.
-
Posts
5,073 -
Joined
-
Last visited
Content Type
Profiles
Forums
Events
Articles
Marionette
Store
Posts posted by Tom W.
-
-
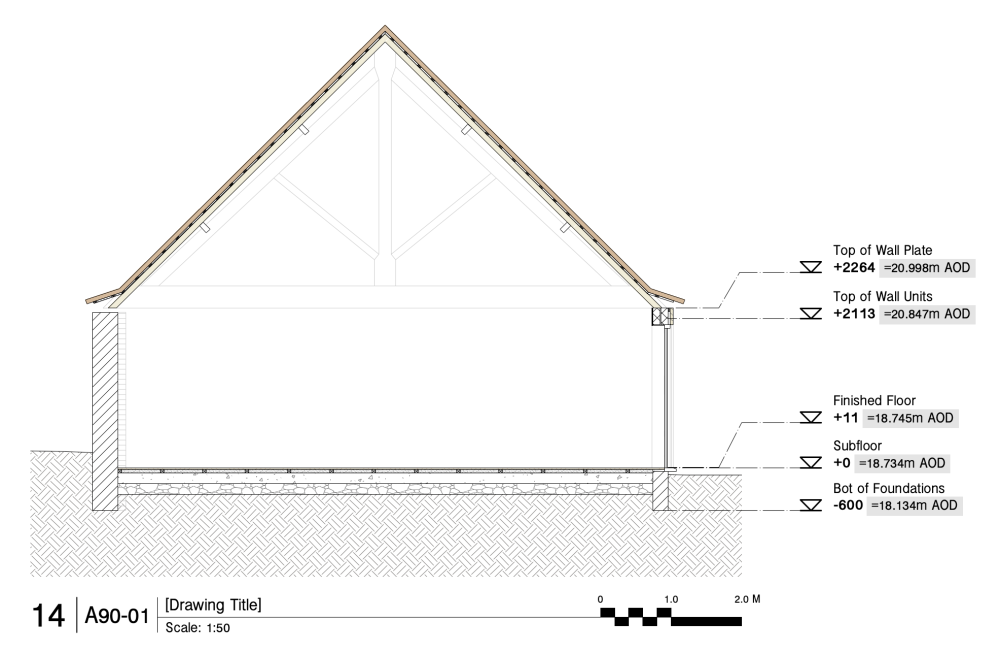
Ok I think I understand. I have set up a file to use Stories + I've edited my Elev BM so it's now getting all its values from the Story info plus the Project Elevation. Before, my Elev BM looked exactly the same but I was typing in a Reference Elevation plus a note. My Project Elevation is the real world elevation of the subfloor i.e. the zero for the model. So I guess if I need for whatever reason to raise the subfloor by 25mm I just edit the Project Elevation + the Story Elevation + the Elev BMs follow suite...
(Yes this is a single storey building! I just wanted to see how automatic Elev BM placement worked compared to adding them manually which I how I've done it until now).
-
It would be great to get some additional info on the new 'Project Elevation' setting in Document Setup. As far as I understand it, you can reference it in the marker layout in Elevation Benchmarks but that is the only part it plays in a document - is that correct? In Elev BMs what does it allow you to do that you couldn't do before? I have modified one of my existing Elev BMs so that it now uses the Project Elevation to return the same data, just in a different (albeit more straightforward) way but it would be good to see some other examples. None of the stock Elev BMs in the VW libraries are using the Project Elevation as far as I can see. Just interested to learn more. @SBarrettWalker? Thanks.
-
13 hours ago, Christiaan said:
Made worse by the fact that you then need to close the Edit Gate dialog window before you can see how the gate has flipped. Awful stuff.
Agreed! See:
-
 2
2
-
-
1 hour ago, line-weight said:
For a beginner ... it's well worth being aware that as soon as you do a push-pull operation on an extrude, you generally lose the option to go back and edit the 2d source shape - I try and keep this in mind and do edits to the 2d source shape rather than push-pulling, if possible; it's a less destructive mode of editing.
I think that's only if you use the 2nd mode of the tool. If you use the first mode the Extrude becomes a Solid Addition or Solid Subtraction.
1 hour ago, line-weight said:Occasionally in this scenario, if it's something I know I'll want to pull around a lot, I'll make a subdivision because that allows you to select groups of nodes in a similar way to the 2d reshape too.
That's an excellent suggestion + would be perfect for what @apswoodwork is wanting to do (assuming I understood the question correctly 🙂). I must try to remember to do it myself now + again!
-
1
-
-
17 minutes ago, line-weight said:
The OP needs to explain more clearly what their question is.
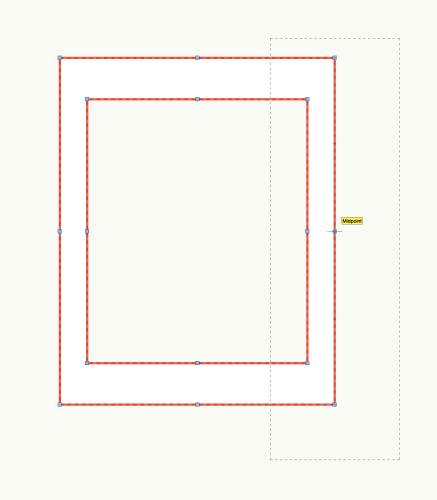
I understood they were saying that in 2D you can take a polygon like this...

... and use the Reshape tool to grab half the handles + widen the shape without affecting the width of the side members:
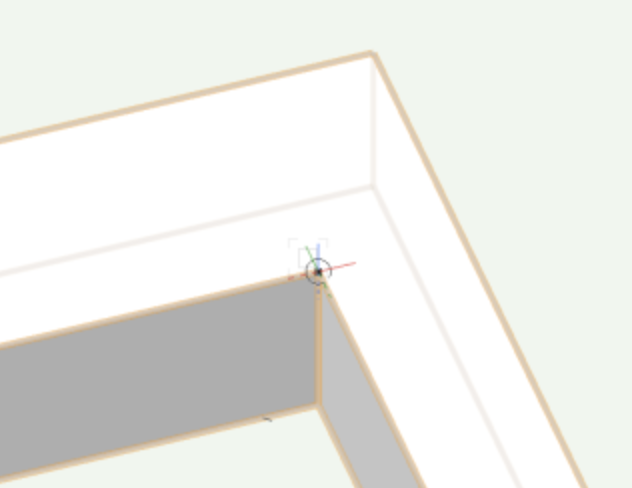
The question was, how do you do a similar thing once the shape has been extruded into a 3D object:

At least that's what my original answer above was based on.
-
1
-
-
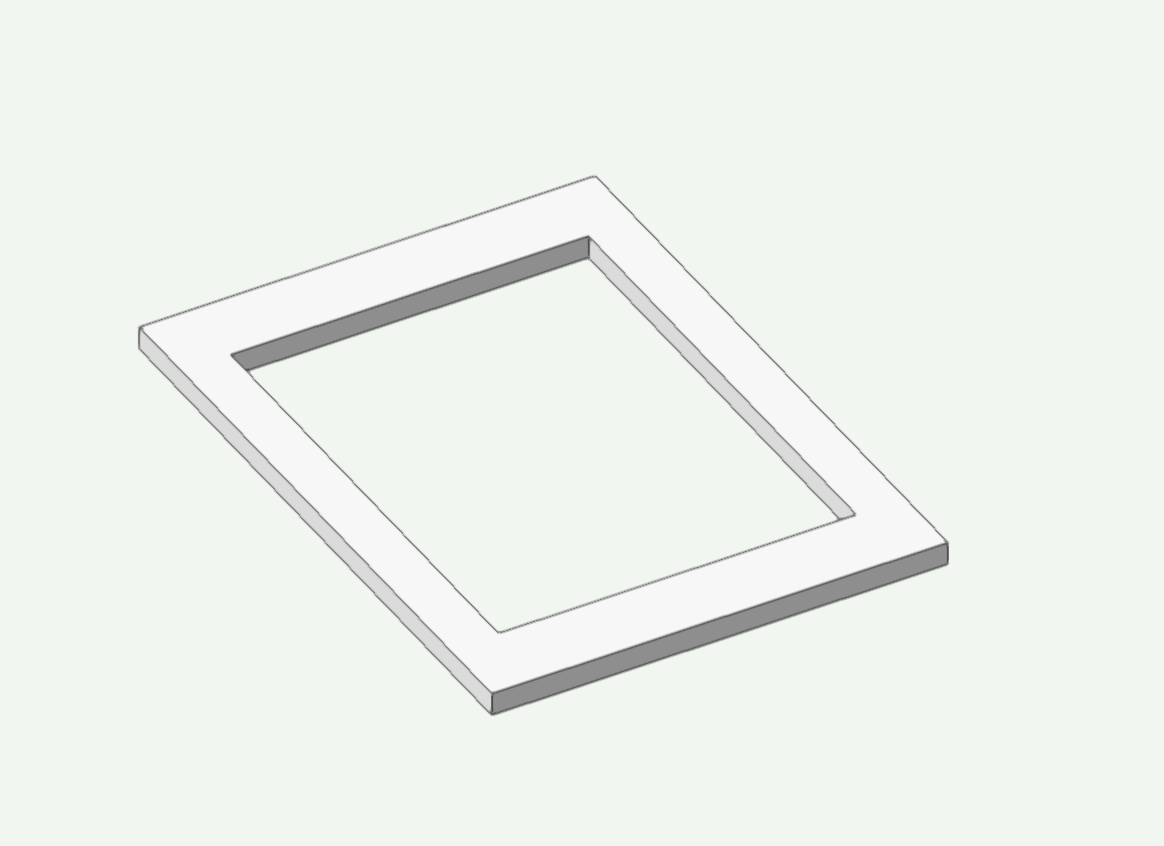
I think there are two different things going on here. The OP was talking about resizing the outer frame which isn't an EAP because the top rail + stile are different profiles:
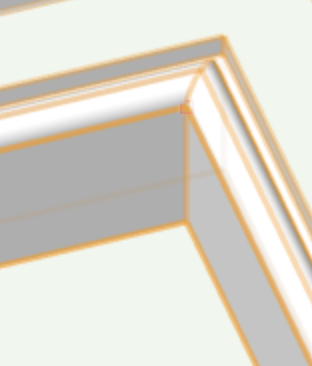
But the inner moulding is no doubt an EAP in which case you have options for editing the profile as @VIRTUALENVIRONS demonstrates or the path if you want to resize the object:
-
1
-
-
I don't know why the cuts across the top of the object aren't working. Is it the same if you draw a much larger cut i.e. from above the object to below the object? You don't need to click from edge to edge.
The fill-at-an-odd-angle thing is happening because when you cut a polygon in half it goes from being a single closed object to two 'unclosed'/open objects. See the 'Closed' checkbox in the OIP. After making each cut you need to 'close' the objects by checking this box in the OIP. I don't know if there's a setting somewhere that makes the cut objects closed by default as it's a bit of a pain forever checking this box...
I assume you're using the second mode of the tool: the tool bar is off-screen in the video.
-
26 minutes ago, zoomer said:
For everything complex multi object editing I use the Modify Tool.
Do you mean the Reshape Tool? Yes, I use this most times as well for resizing/reshaping things.
-
4 minutes ago, zoomer said:
I do no more remember what the reasons was but at some early point of my
VW career I decided that Selection Mode 3 is not good for me and since
years, I only use Mode 2 !
I think it may have to do that the extra snap markers were disturbing,
unreliable or not consistent between object types.
And that it my lead to accidental geometry edits, when I usually just want
to move or resize things in a basic way.
And when I do need more complex edit options,
I double click on the object and use Modify Tool anyway.
But the last years,
Selection Tool in Mode 2 did everything I expect from a Select/Move/Drag Tool.
I never missed something.
Is the only advantage of using the second mode over the third mode that if you want to move multiple selected objects by dragging them you don't run the risk of resizing them by accident? For me, I regularly want to resize multiple objects at the same time so the benefit of having the third mode permanently active outweighs the risk of resizing them by mistake when I actually want to move them since this never seems to happen to me anyway!
But like I say, separating the Interactive + Transform modes in to two separate mode groups should affect any of these workflows, just make it a lot easier to toggle between interactive + transform quickly...
The main takeaway so far is that not many people seem to be using Transform mode yet so perhaps my question doesn't really affect them...? If you @zoomer only currently use mode 2 + start using mode 4 as well then at least toggling between the two modes only involved a double U tap each time. For me using mode 3 + mode 4 means a single tap once + a triple tap the second time...
-
5 minutes ago, EAlexander said:
I use the first two modes the most and rarely use the third. How can you not accidentally resize things all the time? It's true, we all use the tools differently.
I reset the Tilde hotkey to let me scroll through the options. Been doing that for so many years, don't even think about it anymore.
Don't you dare suggest they kill those modes... I already lost screen plane amd I'm still angry about it 😂
Ha ha ok! This was why I thought I'd post a discussion about it rather than charging straight in with a Wishlist item. But if the mode groups were split between Interactive + Transform would that compromise the way you (or Pat) work at all? All the options would still be there, just rearranged slightly. If you are not using Transform mode at all it may even be an improvement for you as would reduce the amount of clicks when cycling through the modes.
I have literally NEVER used the first two modes + have never accidentally resized an object when moving it! 🤷♂️ I do use Move by Points a lot though...
Thanks for the feedback.
-
38 minutes ago, Nikolay Zhelyazkov said:
- Yes, this can be done with the custom linked text options. You should have Latest Date as an option there, when you edit the TBB layout and select a text object.
I really like TBBs! I think they are a really impressive feature. Be great to have this degree of functionality/customisation with other objects in VW!
-
10 hours ago, Eric Nickerson said:
I regularly toggle between the 1st and 2nd mode and never use the 3rd mode. It's funny how everyone gets used to different stuff. In 2023 and previous I would use my hotkey to go from 1 to 2 then hit the hotkey twice to skip past 3 and back to 1. Now in 2024 I am struggling a bit with mode 4. If I want to get back to mode 1 by hitting the hotkey past 4 the widget stays on when I get back to 1. I'm not sure if this is ok yet as I am still getting used to the widget. I do rather like mode 4.
I think I would like mode 4 to be it's own toggle separate from the first mode group.
Mode group 1: interactive scaling
Mode group 2: Marquee
Mode group 3: Transform mode (by itself - on or off)
Mode group 4: Translate/reposition
Mode group 5: Object/working plane
I get where you're coming from but I'm not sure how this would work. If the three Interactive modes formed Mode Group 1 then one of those modes would need to be active at any one time. If Transform Mode was in a mode group all of its' own, would activating it (by hitting the O key) automatically disable Mode Group 1...?
That's why I was kind of thinking that Mode Group 1 should have two modes: Interactive (mode 1) + Transform (mode 2) with the U key toggling between them. In mode one (Interactive) you'd have access to the sub-modes relative to that mode e.g. 'Disabled Interactive Scaling Mode' or 'Single Object Interactive Scaling Mode'. And in mode two ('Transform') you'd have access to the sub-modes relative to that mode e.g. 'Translate + Rotate Mode', 'Re-position Mode', 'Align to Object' + 'Align to Working Plane'.
Hmm...
Thanks for the feedback/ideas!
-
1
-
-
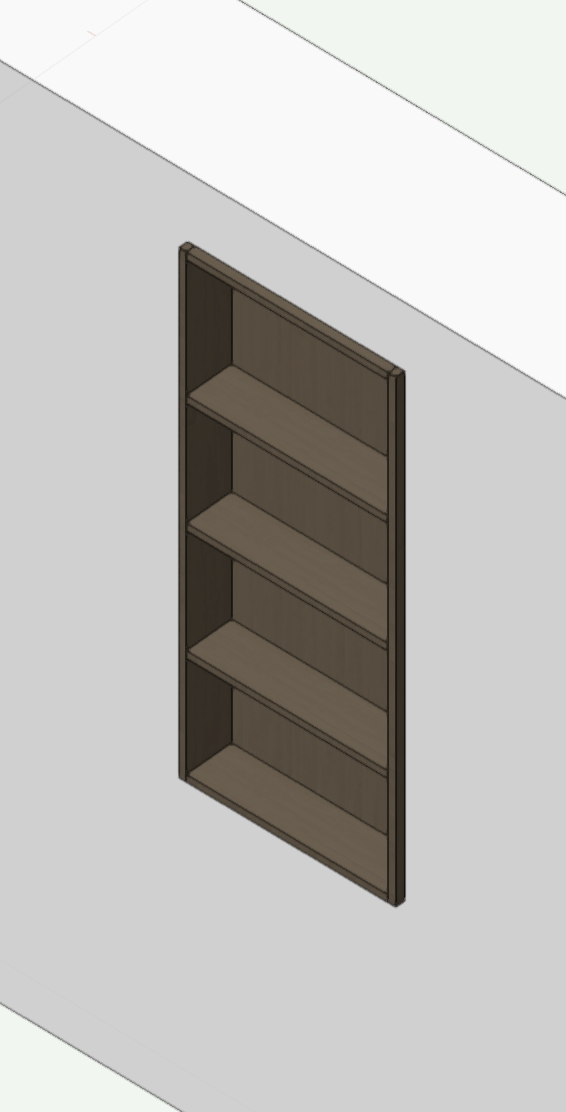
The real problem for me comes when you then want to insert a Door/Window/etc into this vertically stacked assembly + you have to line up multiple holes to make it work. But imagine the Wall Closures interface if you had three different wall build-ups within the same Wall object + wanted to punch a Door through all three of them...?
-
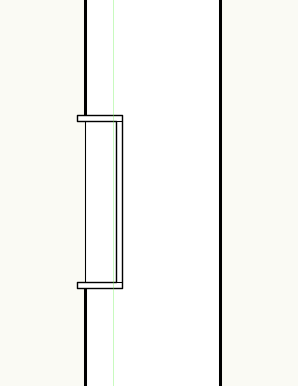
I'm not familiar with Custom Cabinets but couldn't see a way to do it, other than running Command-K + converting it into a symbol then adding a Wall Hole Component to clip the recess into the Wall in 3D...
-
2
-
-
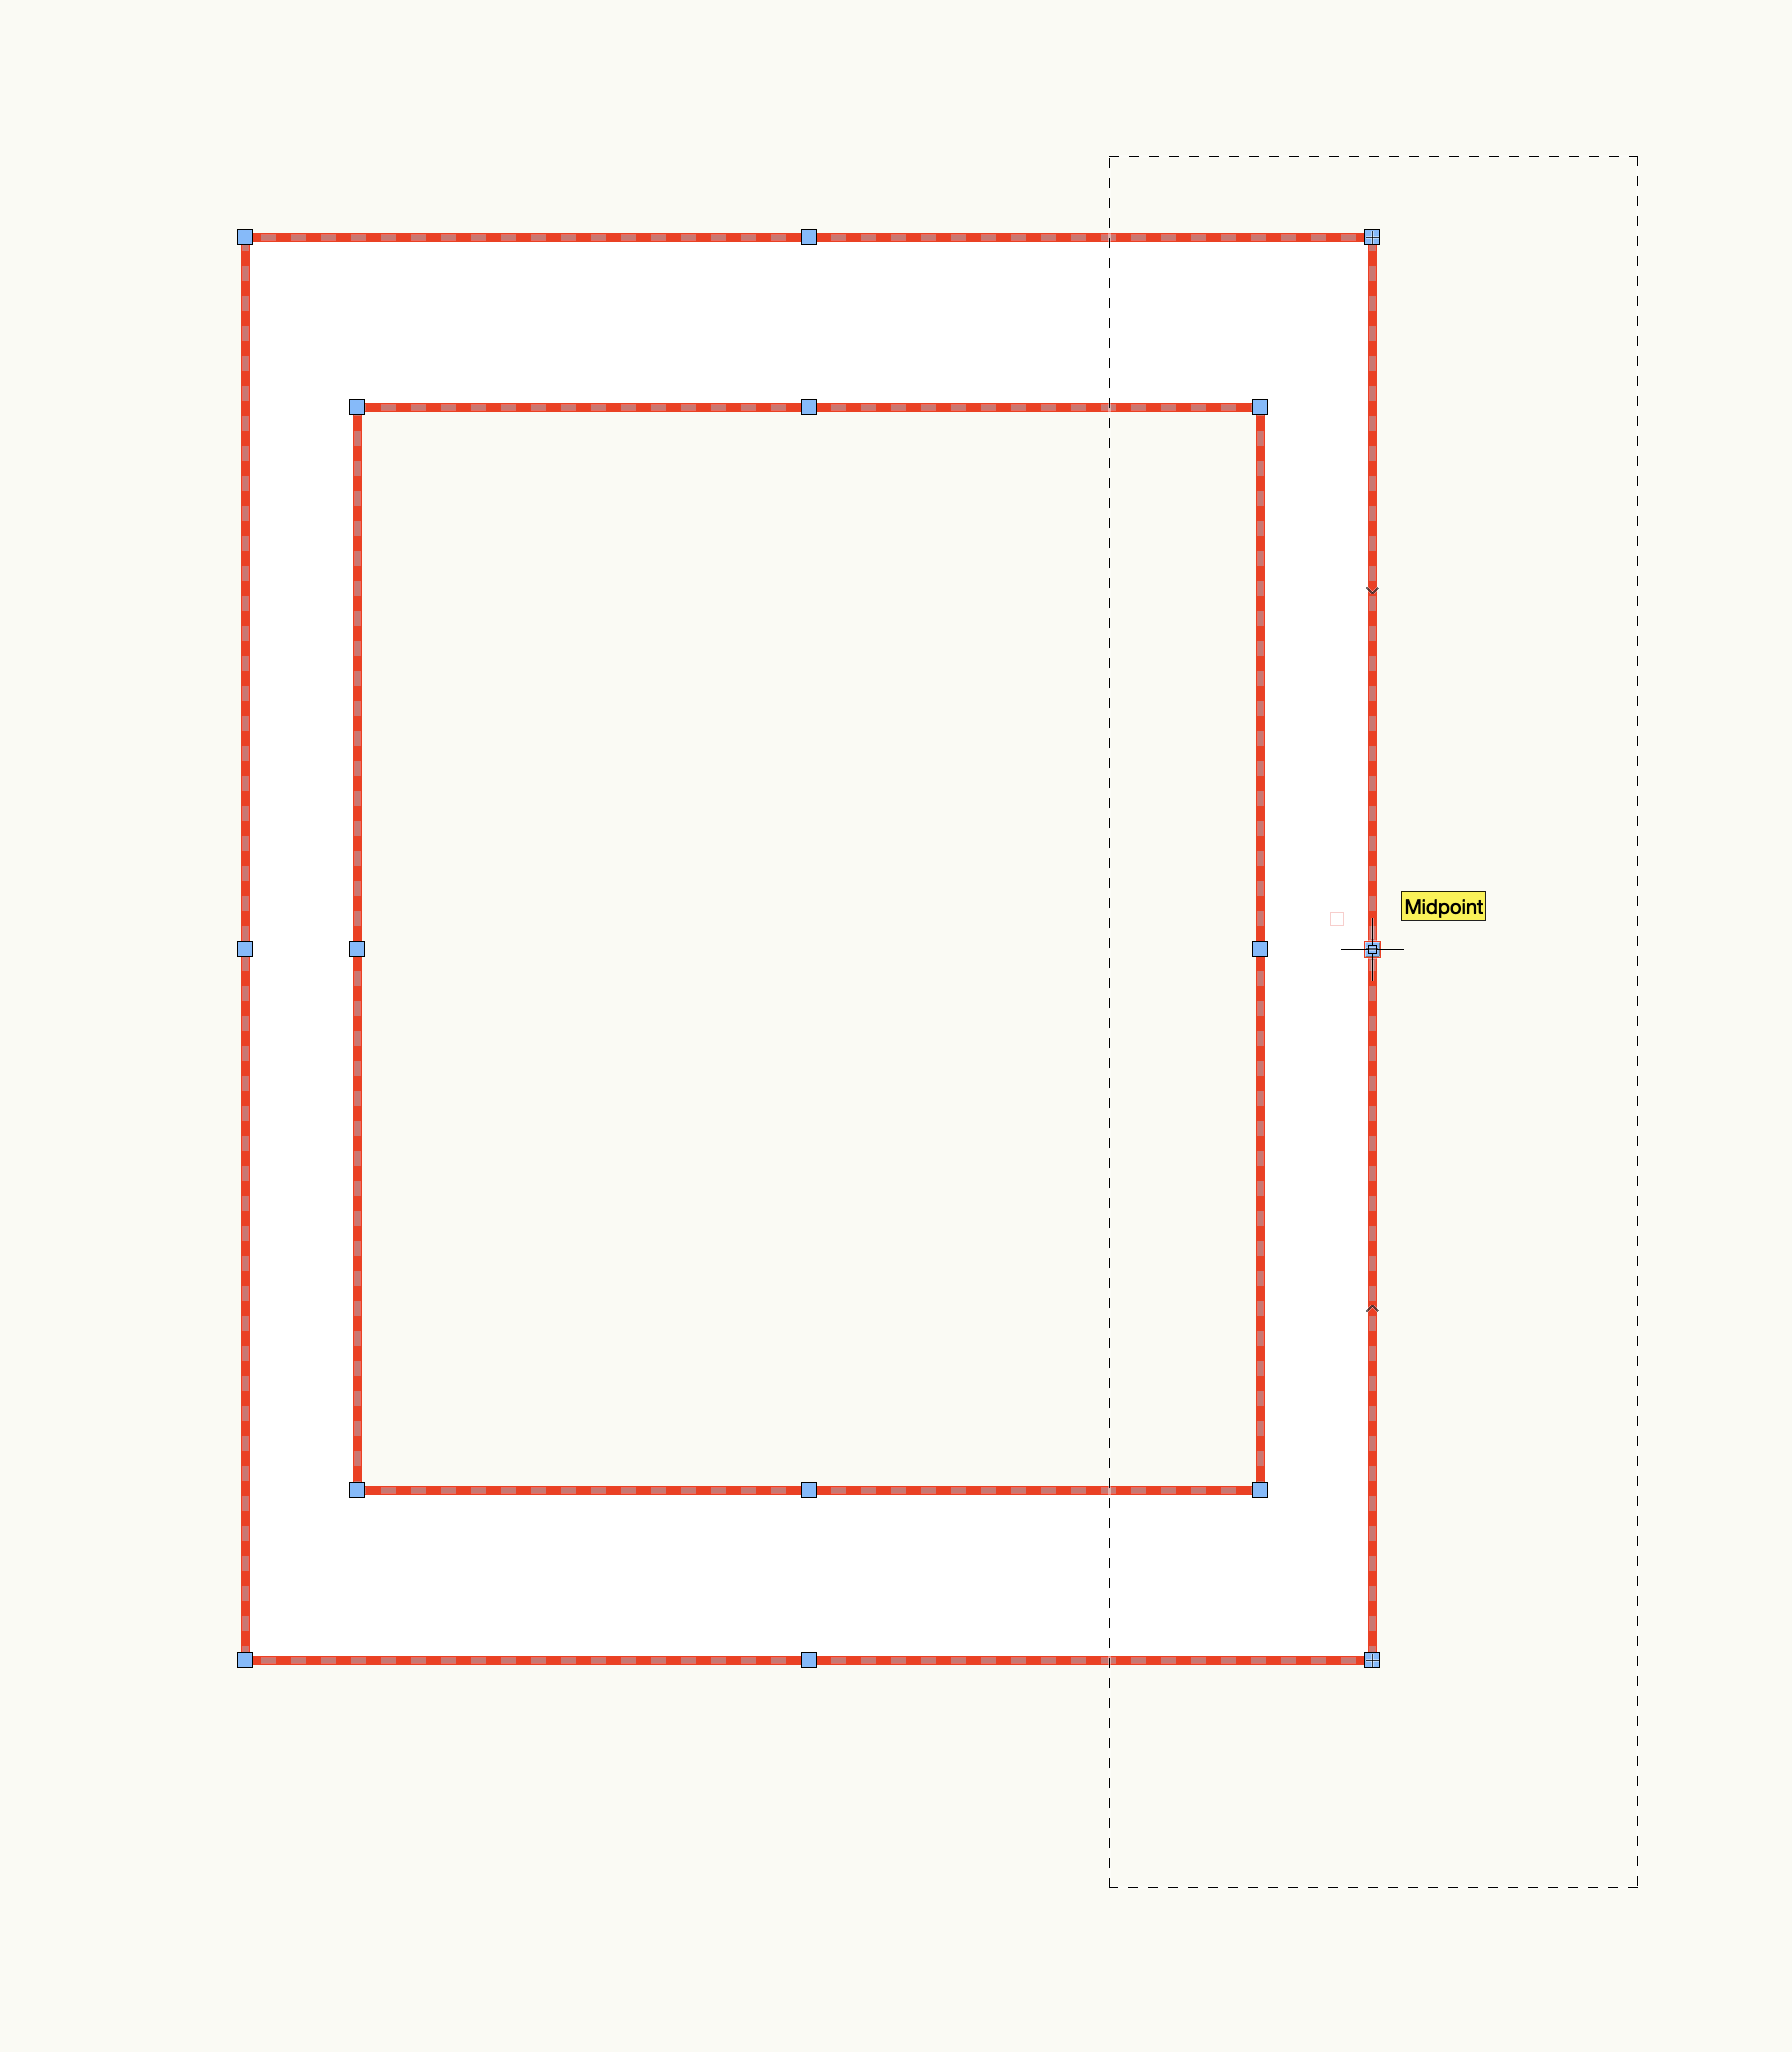
8 hours ago, apswoodwork said:
I use the reshape tool to alter 2D frame widths without it rescaling the frame widths, but I can't work out how to do that in 3D.
The basis is I need to change the overall widths on doors and frames without the sections (ie the 25mm side rail width) being scaled up or down with the overall size.
If the 3D object has 'history' one option is to edit the 2D shape it was created from (with the Reshape Tool as you describe). So for example if you drew the frame as a 2D shape initially then extruded it outwards, you could double-click on the Extrude to get back to the original 2D shape to edit it.
Or if it is a Generic Solid I would just use the Split Tool in the 2nd mode to cut it in half, move one half apart to make it wider, then use Push/Pull to join the top + bots rails back together then use Add Solids to make them a single object again.
Or you can Push/Pull the outer edge of the frame whatever distance you need then Push/Pull the inner edge the same distance going in the same direction.
8 hours ago, apswoodwork said:Also, can I combine the frame and internal moulding to be as one?
Yes use the Add Solids command (right-click object context menu or Model menu).
-
2
-
-
You can make a Section-Elevation Line that looks like that but it will only be linked to one Viewport so will display the same drawing number in both markers:
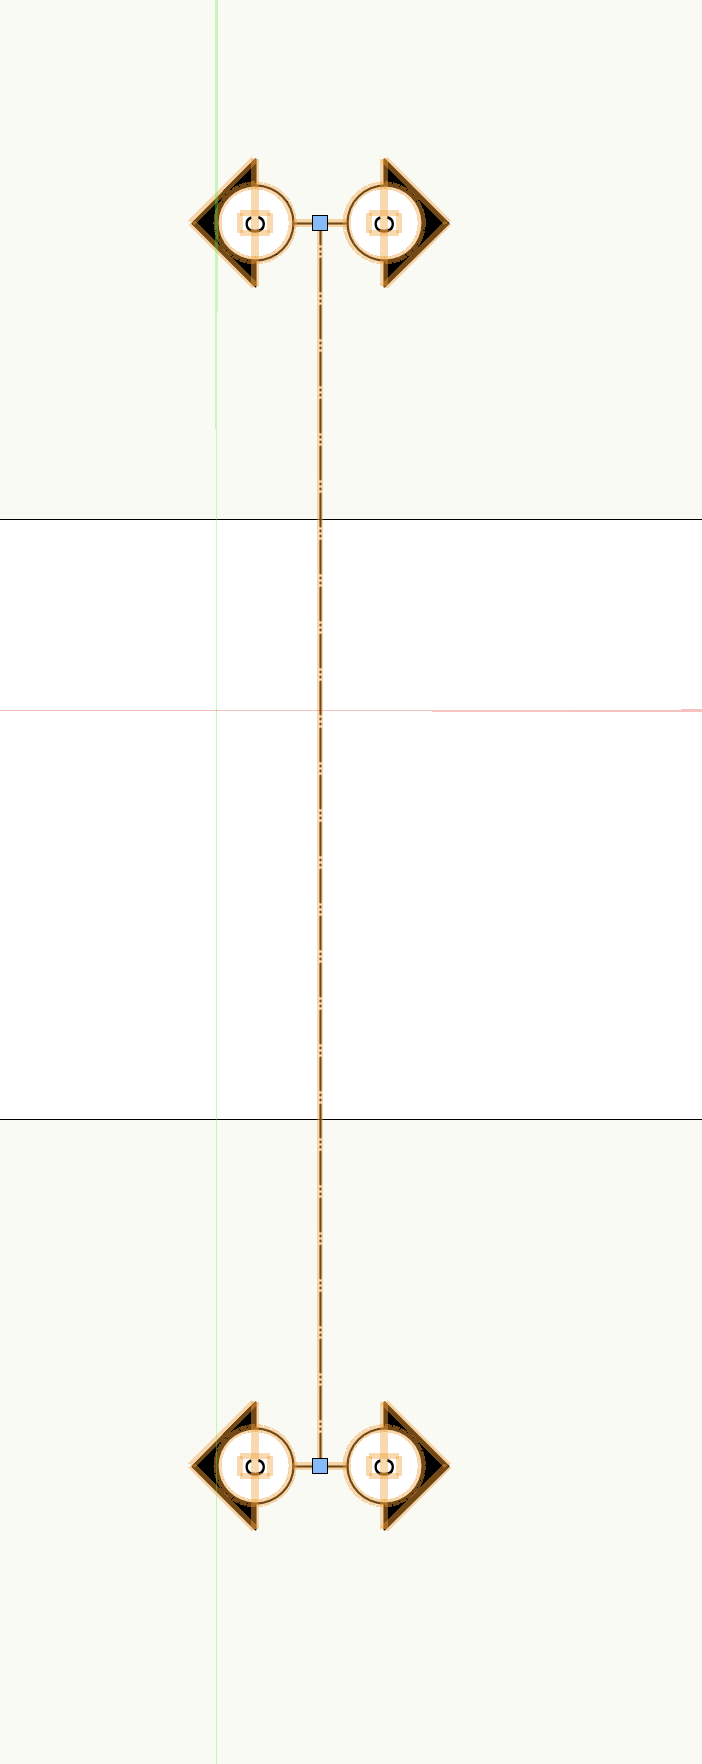
To have it auto-coordinate you would need to have two separate Section-Elevation Lines drawn on top of each other:

-
2
-
-
14 minutes ago, E|FA said:
I think a better Wishlist request would be a way to toggle backwards between the UIO[] toggle modes throughout the interface.
I have long thought this too. I've been using Smart Options Display instead for Reshape Tool + Move by Points as it's quicker than cycling through all the modes using the U key, especially since it got a bit snappier in VW2024 (although perhaps I imagined that...).
But I kind of feel the Selection Tool is a special case. Modes 3 + 4 should be in their own mode group with holding down the Option key activating the opposite one like the Eyedropper Tool, or mode 4 should be in a mode of its own like Tobi says. The other tools I use all of the modes more or less equally whereas the Selection Tool feels like it has redundant modes that could be relegated somewhere else.
-
2
-
-
Does anyone actually use 'Disabled Interactive Scaling Mode' or 'Single Object Interactive Scaling Mode' for the Selection Tool? Up until Update 4 I never strayed from the third mode ('Unrestricted Interactive Scaling Mode') so it was never an issue for me: I just completely ignored the first two modes. But now we have the wonderful fourth mode - 'Transform Mode' - I am regularly toggling between the third + fourth modes. Or rather, toggling between the third + fourth modes via the redundant first + second modes... What I would really like to be doing is toggling back + forth between 'Unrestricted Interactive Scaling Mode' + 'Transform Mode' with a single click.
I was going to post a Wish about this but thought I'd better check first: does anyone actually use the first two modes or could they happily be relegated somewhere else...?
Another option might be to hold down the Option key to activate the fourth mode temporarily...
I would like to move between the 3rd + 4th modes far more quickly + easily than is currently the case.
-
1
-
-
13 minutes ago, Nikolay Beshevliev said:
Do you know how to log a bug?
I've had lots of experience thank you 😆
Will do it now...
Thanks for getting back to me.
-
1
-
-
@Nikolay Beshevliev you've been so helpful I wonder if I can ask another question...
I am using a data mapping that uses Class-based Objects to attach a Record Format to objects in these classes. If I make one of the classes active + create an object the record is automatically attached. Alternatively, if I have an existing object + I place it in one of the classes using the 'Class' drop-down in the OIP for that object the record is attached. However, if I change the object's class by right-clicking on the new class in the Navigation Palette + selecting 'Assign to Selection' the record is not attached. Is there a reason for this or is it a bug?
I ask because I use 'Assign to Selection' to change an object's class more than any other method + I was confused as to why the objects weren't taking on the record format in the process. In order to make the data mapping 'stick' I have to move the object to a different class then reassign it to the right class but do it via the OIP this time.
Hope that all makes sense. Thanks.
-
I think with a database report you will need to use one of the Plant user fields or other existing data field for your notes (or attach a custom record) + get your report to return that field.
-
You need to use three separate Walls one on top of the other. You can't do this with a single Wall
-
1
-
-
No easy way but luckily we have @Pat Stanford on hand with a worksheet script which allows you to create a worksheet where you can edit the default field values for records attached to symbol definitions. See:
-
1
-
-
You need to expand the worksheet to create an extra row then right-click on the new spreadsheet row (6) + select 'Create Report...':
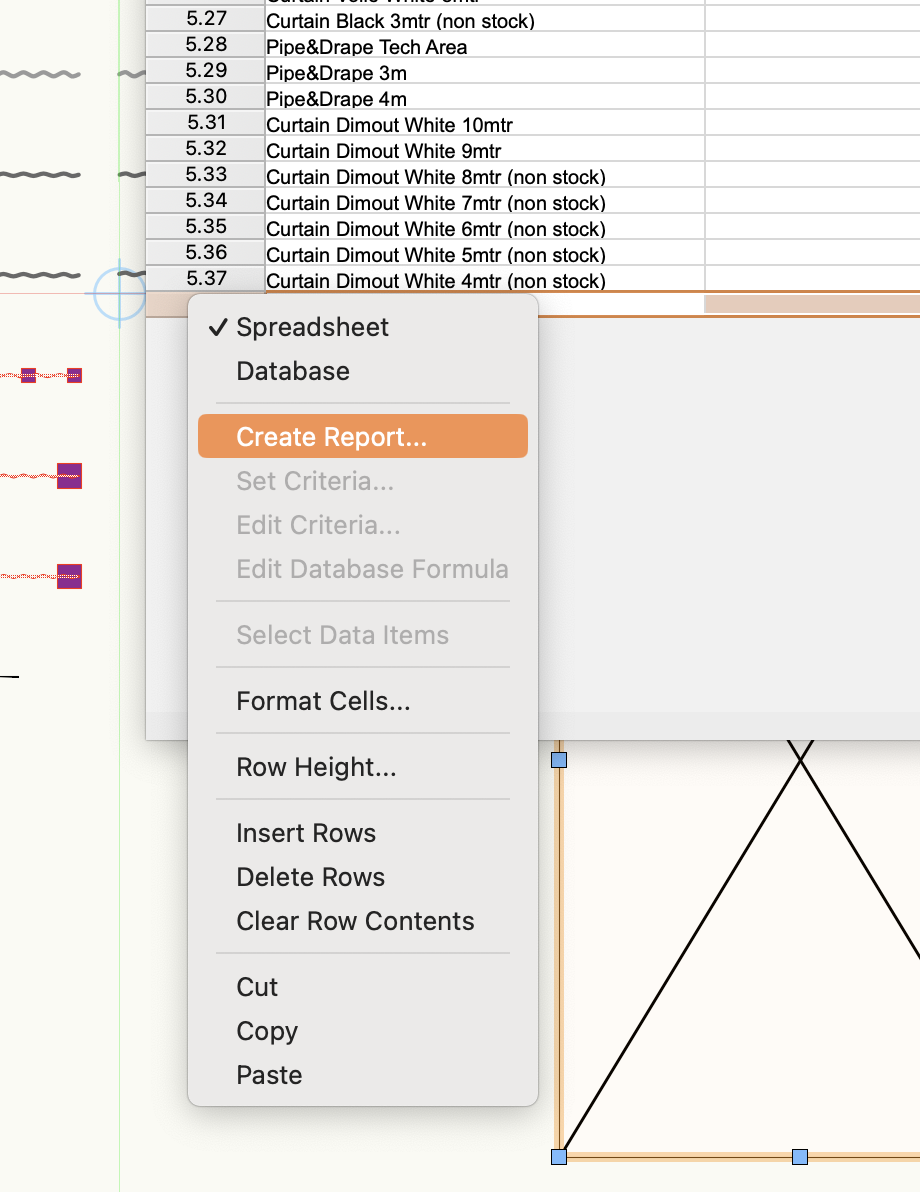
Maybe have a look at recent Coffee Break on Worksheets by @michaelk: https://university.vectorworks.net/mod/overview/view.php?id=6579
-
2
-


VW2024 'Project Elevation' setting in Document Setup
in General Discussion
Posted
Thanks @rDesign I did actually see that thread at the time + incorporated Sarah's 'fancy' IF/THEN statement into my EBMs (which makes me realise I should have already known about the ternary (@ Colon) operator that @Pat Stanford utilised in another thread recently, but that's another story...).
What I'm asking about though is the 'Project Elevation' setting in Document Setup which as far as I know is new to VW2024 so came after those posts. I have seen very little mention of it.