


MullinRJ
-
Posts
2,021 -
Joined
-
Last visited
Content Type
Profiles
Forums
Events
Articles
Marionette
Store
Everything posted by MullinRJ
-
Michael, You are right, but the point I was trying to make is that when you apply a TextStyle, there are two ways to do it – 1) keep the insertion point fixed and move the text block relative to the insertion point (as is done with SetTextVerticalAlign), or 2) keep the text block fixed and move the insertion point relative to the text block (as is done with SetTextVertAlignN). VW uses the latter method of adjusting the Vertical Alignment when a TextStyle is applied. You were probably expecting it to use the first method. I believe your confusion exists because your example does not show enough detail to see what is really happening with the vertical alignment settings. SetTextVerticalAlign() and SetTextVertAlignN() both work perfectly, but you need more than one line of text to show the difference between "Top Baseline" and "Bottom Baseline" settings. When there is only one line of text, the TOP and BOTTOM Baselines (of the text block) are the same, since the ONE line of text is both the TOP LINE, and the BOTTOM LINE. With two or more lines in a text block, the TOP and BOTTOM Baselines are different. The following example should show the difference. I modified your second code example to create multiple (2) lines of text, not one. Now when the Vertical Alignment is set you should see a difference for all five vertical alignment values. Forgive me if I removed too many blank lines. Procedure Test; CONST kVTopTextStyle = 'V Top Text Style'; kVTopBaselineTextStyle = 'V Top Baseline Text Style'; kVCenterlineTextStyle = 'V Centerline Text Style'; kVBottomBaselineTextStyle = 'V Bottom Baseline Text Style'; kVBottomTextStyle = 'V Bottom Text Style'; kString = 'Text Style: '; CR = chr(13); VAR h : HANDLE; s : STRING; BEGIN { Create 5 Text Styles. All Left Justified with the same font, font size, and face. } TextFont(GetFontID('Arial')); TextFace([Bold]); TextSize(24); TextJust(1); TextVerticalAlign(1); { Vert Top Aligned TextVerticalAlign(1) } h := CreateTextStyleRes(kVTopTextStyle); MoveTo(0, 0); BeginText; Concat(kString, CR, kVTopTextStyle) EndText; SetTextStyleRef(LNewObj, Name2Index(kVTopTextStyle)); { ******************** } TextFont(GetFontID('Arial')); TextFace([Bold]); TextSize(24); TextJust(2); TextVerticalAlign(2); { Vert Top Baseline Aligned TextVerticalAlign(2) }{ I think this one has a bug } h := CreateTextStyleRes(kVTopBaselineTextStyle); MoveTo(40', 0"); BeginText; Concat(kString, CR, kVTopBaselineTextStyle) EndText; SetTextStyleRef(LNewObj, Name2Index(kVTopBaselineTextStyle)); { ******************** } TextFont(GetFontID('Arial')); TextFace([Bold]); TextSize(24); TextJust(3); TextVerticalAlign(3); { Vert Center Aligned TextVerticalAlign(3) } h := CreateTextStyleRes(kVCenterlineTextStyle); MoveTo(80', 0"); BeginText; Concat(kString, CR, kVCenterlineTextStyle) EndText; SetTextStyleRef(LNewObj, Name2Index(kVCenterlineTextStyle)); { ******************** } TextFont(GetFontID('Arial')); TextFace([Bold]); TextSize(24); TextJust(1); TextVerticalAlign(4); { Vert Bottom Baseline Aligned TextVerticalAlign(4) } h := CreateTextStyleRes(kVBottomBaselineTextStyle); MoveTo(120', 0"); BeginText; Concat(kString, CR, kVBottomBaselineTextStyle) EndText; SetTextStyleRef(LNewObj, Name2Index(kVBottomBaselineTextStyle)); { ******************** } TextFont(GetFontID('Arial')); TextFace([Bold]); TextSize(24); TextJust(2); TextVerticalAlign(5); { Vert Bottom Aligned TextVerticalAlign(5) } h := CreateTextStyleRes(kVBottomTextStyle); MoveTo(160', 0"); BeginText; Concat(kString, CR, kVBottomTextStyle) EndText; SetTextStyleRef(LNewObj, Name2Index(kVBottomTextStyle)); END; RUN(Test); HTH, Raymond
-
Michael, You are seeing the effects of SetTextVerticalAlign() vs SetTextVertAlignN(). My guess is you want SetTextStyleRef() to use the former and SetTextStyleRef() is using the latter, so the text does not move when you apply a TextStyle, but the text insertion point does move, as it is supposed to. You would be better off not using Text Styles and forcing the attributes you want manually. Raymond
-
The indices are assigned when new names are created, either manually, or when a script runs. When names are deleted they create a void in the list and the indices may be reassigned as new names are created. I would not try to predict the method. Just use Name2Index() to get the RefID of the TextStyle (or other named resource). It should be good until you delete that name or reopen the file. Raymond
-
Michael, The names of the text styles are kept in the Name List, which is a list of all the unique names in the document, except the layer names. Like class names, object games, script names, their index number reflects their position in that list. Name2Index() returns the number associated with a name in that list, and can be expected to be different in every file. HTH, Raymond
-
Distance-angle mode in Python Scripting?
MullinRJ replied to David Bengali's topic in Python Scripting
Hi David, I don't think there is. That shorthand way was integrated into the VS Compiler way back in the Dark Ages before "Vectorworks", or "VectorWorks", yes, in the early MiniCAD years. It is definitely not a typical Pascal convention for number entry. It's not something I would expect to have been migrated to the Python engine. Raymond -
Distance-angle mode in Python Scripting?
MullinRJ replied to David Bengali's topic in Python Scripting
Hi David, You might use the vs.Ang2Vec() function to convert Polar coordinates to Cartesian coordinates. import vs P = vs.Ang2Vec(45, 1) # return XY coordinates of 1 distance unit at 45° vs.Message(P[0], ' ', P[1]) vs.SysBeep() Depending on what you are trying to do, this may or may not make you happy. Raymond -
Directly Edit 3D Rotation Values
MullinRJ replied to Daniel B. Chapman's topic in General Discussion
Hello @Daniel B. Chapman , I may have a Plug-in command that does exactly what you are asking for. It's called Reshaper. The attached picture shows a 3D Symbol in a FRONT view that is rotated (90°, -10°, 30) in the X, Y, and Z axes respectively. Reshaper shows those rotations (red rectangle). With Reshaper, you can edit your symbol in either 2D or 3D based on your current view, and you can view or set the symbol's 2D or 3D Position, its FLIP state, is Lock state, its Scaling Factor(s) (in relative or absolute values). Reshaper also shows you how many instances there are of the symbol in the file (those placed on Design and Sheet Layers) and those placed in other symbols. This is only one of about 30 dialogs that Reshaper contains to edit objects in VW. Most dialogs add significant editing capabilities over those presented in the OIP. If you send me a Personal Message (PM) I'll tell you what I need from you so you can try it out. All the best, Raymond Mullin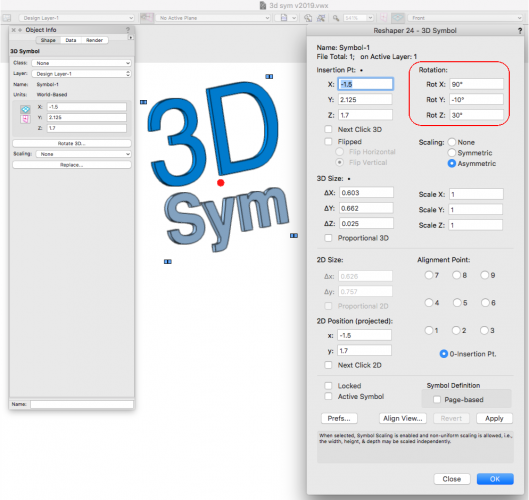
- 1 reply
-
- 1
-

-
VW 3D Steel shapes, rotation, ungrouping impossible
MullinRJ replied to LarryO's topic in Vectorscript
Hi Larry, It's not buggy, it's just semantically picky. VERY PICKY. It's the nature of all programming languages. They do exactly what you say, and not what you think you said. In this case you probably want to rotate the flange about its insertion point, and not the User Origin. I wasn't thinking about how you wanted to use it, just that it could be rotated. For my next guess ... Try this at the end of the sample script: GetSymLoc(LSActLayer, x, y, z); { get the insertion point of the PIO } SetRot3D(LSActLayer, 0, 45, 0, x, y, z); { rotate about the PIO's insertion point } DISCLAIMER : I don't know exactly how you are applying your code, so this may not work out of the box. Some assembly may be required. Don't try this at home, unless you are self-isolating. If I guessed wrong, please write back. I got a million of 'em. 😉 Again, HTH, Raymond -
VW 3D Steel shapes, rotation, ungrouping impossible
MullinRJ replied to LarryO's topic in Vectorscript
Larry, Try this: Procedure T; VAR BeamHandle :HANDLE; BEGIN BeamHandle := CreateCustomObjectN('Wide Flange - 3D', 0, 0, 0, FALSE); SetRField(BeamHandle,'Wide Flange - 3D','__series_2', 'AISC (Metric)'); SetRField(BeamHandle,'Wide Flange - 3D','__size_2', 'W200 x 22.3'); SetRField(BeamHandle,'Wide Flange - 3D','Length', '3000mm'); SetRField(BeamHandle,'Wide Flange - 3D','__current_series', '2'); SetRField(BeamHandle,'Wide Flange - 3D','__current_size_2', 'W200 x 22.3'); SetRot3D(LSActLayer, 0, 45, 0, 0, 0, 0); END; Run(T); I modified Julian's code a little. The BeamHandle variable is used to build the object. After it's built, you can reference it from the viewpoint of the drawing and get a handle to it as it sits on the design layer. If at first you don't succeed, start changing things. HTH, Raymond -
VW 3D Steel shapes, rotation, ungrouping impossible
MullinRJ replied to LarryO's topic in Vectorscript
Thanks, Julian. I got back in just as you posted your last answer. Nicely done. This is a great forum. Gotta love it. Thanks, Raymond -
VW 3D Steel shapes, rotation, ungrouping impossible
MullinRJ replied to LarryO's topic in Vectorscript
Hi Larry, It sounds like you are trying to work with a Hybrid PIO, one that contains 2D and 3D parts. They can only be rotated around the Z-axis. That said. I just placed a "Wide Flange-3D" object in a blank drawing and was able to rotated it manually in all 3 axes, and I wrote a one line script to rotate it 90° around the X-Axis. It executed successfully. I then ungrouped the object in the drawing which yielded an extrude of the flange shape. Based on your description it sounds like we are talking about two different objects. Can you post a small file with the object in it and a fragment of your script that is causing problems? I'm sure Pat Stanford will answer your question before I get back to it. : p (You go Pat) Oh, I was using VW 2019 when I tried the above. Please specify the VW version you are using, too. Thanks, Raymond -
-
@greenjeanne13 , You are very welcome. I'm going to go back to my nap. Pat seems to have everything under control. Pat, U da man!!! ; ) Snoozy
-
Damn you Pat Stanford. You are always one step ahead of me. 😛 Raymond
-
@greenjeanne13 , You need to use the Workspace Editor to make the change back. Select menu Tools > Workspaces > Edit Current Workspace... Select the Tools tab. Click on the triangle next to Basic so it is pointing down. Click on the triangle next to View Draw so it is pointing down. Select the fist item Selection so it is highlighted (this is the Selection Tool). At the bottom of the dialog where it says "Shortcut for selected command", The popup menu should say Key, type an "X" in the text field to the right. You will get a message if that key is assigned to another tool (I'm guessing it is assigned to the X-Ray key. Click YES. Your Selection Tool hot key is repaired. Now select the Keys tab. The text field next to X-Ray is now blank. Enter B to restore it to the original key, or pick another key, but pay attention to any dialog that pops up when you type a letter. If you you don't mind losing a hotkey to a tool you don't typically use, Click Yes, otherwise choose another key. Click OK when you are done. HTH, Raymond
-
Larry, Only a few days ago I was faced with the same problem and I wrote these lines to show/hide the control points in the OIP. It goes in event 41 (kObjOnWidgetPrep). The +1 is necessary because vsoParamName2Index() returns a 0-based index, but vsoWidgetSetVisible() is 1-based. Welcome to VectorScript. { Show/Hide ControlPoint parameters in OIP } WidgetID := vsoParamName2Index(PIOName, 'ControlPoint01X'); { the first CP name } for I := WidgetID+1 to WidgetID+16 do vsoWidgetSetVisible(I, pshow_Ctrl_Pt_values); { hide ControlPoints 1-8 } Also, "show_Ctrl_Pt_values" is a Boolean PIO parameter (a checkbox) that I use to toggle the visibility. HTH, Raymond
-
Where is the Vectorscript Language Guide in VW2019?
MullinRJ replied to LarryO's topic in Vectorscript
Hi Larry, I'm not sure from which year this hails, but you are right, not much has changed at this level. https://developer.vectorworks.net/images/7/72/VectorScriptGuide.pdf Raymond- 1 reply
-
- 1
-
-
@Wizard12 , This may be overly simplistic, but you can check the existence of a name without building a list with: NameExists := GetObject('Your test name here') <> nil; or if you want to also test if it is a Symbol, then: H := GetObject('Your test name here'); if (H <> nil) then begin if (GetTypeN(H) = 16) then begin { name exists and it's a Symbol } end else begin { name exists and it's NOT a Symbol } end end else begin { Name does not exist } end; HTH, Raymond
-
Hi Pat, You forgot option 4. ...` 4. Everything you observed is spot on; it didn't always work this way; and you are losing your memory. which is consistent with programming too long and .... losing your memory. : p I am having similar occurrences to what you and Julian observe while editing a PIO I am currently developing. For the most part, making changes to the PIO code does not create any wrinkles, but edits to the parameter list, either adding or subtracting (and possibly reordering) parameters, results in very odd behavior – like all of my OIP buttons failing to display, and / or ControlPoint fields that I've explicitly hidden now show up. I have not been able make the PIO rectify itself, so I restart VW without even trying to cajole it to behave. I've not tried what Josh suggests, but I will when I edit my parameters again and if I get a favorable result I'll post back. Raymond PS - If you do file a bug, I'll vote it up.
-
Larry, The code you wrote from scratch is not beeping, but you call two built-in PIO's at the end of your script and access their "Size" parameters (as shown in the OIP) using "size" as the parameter name. This is the wrong parameter name. When you access a parameter from a PIO, VS always uses the name in the left hand column of he Plug-In Manager, but the OIP always displays the name from the Alternate Name column when it exists. This can be confusing if the names are the same as they are in this case. The "Size" parameter from the OIP which in this case is the Alternate Name for the parameter, belongs to "size_1", which is the actual parameter name for both Built-In PIO's. To access the "Size" parameter in both of these PIO, you need to use the "size_1" parameter name. It is parameter #2 in the Plain Washer (Inch) PIO, where you are accessing parameter #7 "size". In the Nut (Inch) PIO, the "Size" parameter is again #2, "size_1", where you are accessing parameter #22 "size". The real clue comes when you look at both parameter lists using the Plug-In Editor and the alternate name for both parameters named "size" is "__NNA_DO_NOT_CHANGE". I don't know if you opened either of these plugins in the Plug-In Manager, but if you haven't, do so. This description may make a lot more sense. Bottom line – you are accessing parameters in Built-In Plugins that should not be changed; hence the beep. HTH, Raymond
-
Hi Michael, Any way that works is a good way. But if you have TextWrangler, or BBEdit, you can paste the formula in a file and when you double click on a parenthesis (left or right) the program will highlight all text between it and its matching parenthesis. Extra and missing parentheses are very easy to spot this way. Very handy tool for just such occasions. Raymond
-
@Digbaddy , After you get lost in Michael's anatomically perfect answer, there are some ways to reduct the length of the overall expression. Since your expression evaluates a series of stair step conditions, you don't need to test both sides of each step every time. You only need to evaluate the AREA as it crosses over each threshold value, as such: =if(AREA>=1500, AREA*0.45, if(AREA>=900, AREA*0.4, if(AREA>=600, AREA*0.3, if(AREA>=450, AREA*0.2, if(AREA>=300, AREA*0.15, if(AREA>=200, AREA*0.1, 0)))))) Additionally, you can factor out the AREA* term from each nesting of the compound IF and only return the scale factor for each AREA range, which you then multiply with the AREA outside the IF construct, like this: =AREA * if(AREA>=1500, 0.45, if(AREA>=900, 0.4, if(AREA>=600, 0.3, if(AREA>=450, 0.2, if(AREA>=300, 0.15, if(AREA>=200, 0.1, 0)))))) But, if you are really picky (like someone I won't mention) about minute details, you can replace each >= operator with a < operator by reversing the logic, like this: =AREA * if(AREA<200, 0, if(AREA<300, 0.1, if(AREA<450, 0.15, if(AREA<600, 0.2, if(AREA<900, 0.3, if(AREA<1500, 0.4, 0.45)))))) The character count for each IF expression is as follows: 254 (Michael's answer), 155 (my 1st answer), 132 (my 2nd answer), 126 (my last answer). They all evaluate essentially the same, but the shorter expressions are easier to read and modify. The only difference between Michael's answer and mine, is that I return "0" for areas < 200, and Michael returns a "-" character for that condition. Take your pick how you want to handle that condition. HTH, Raymond
-
You're welcome 🙂
-
@Sam Jones , There are a lot of "ResList_" calls that I've never used, so I don't know if you cay build One List to rule them all, but I will say that the way you don't want to go really isn't that hard to implement, and once built, it stays perfectly registered between Symbol Name and Source List. Also, extending this approach to handle several lists would be quite easy. Here's a very quick sketch of how it could look. Of course, it's not tested. I wouldn't want to deprive you of all the fun. 😉 It assumes you won't have duplicate symbol names. Hopefully you don't, but if you do, one entry will point to list 1 and the other will point to list 2. If you want to specify your directories by absolute path, use BuildResourceListN() instead. Type SymNameRec = Structure SName :Dynarray of Char; LID :Longint; end; { SymNameRec } Var I, NumItems1, NumItems2 :Integer; ListID1, ListID2 :Longint; SymArray :Dynarray of SymNameRec; BEGIN ListID1 := BuildResourceList(16, <folderIndexA>, <subFolderNameA>, NumItems1); ListID2 := BuildResourceList(16, <folderIndexB>, <subFolderNameB>, NumItems2); Allocate SymbolArray [1..NumItems1+NumItems2]; for I := 1 to NumItems1 do begin SymArray[I].SName := GetActualNameFromResourceList(ListID1, I); SymbolArray[I].LID := ListID1; end; { for } for I := NumItems1+1 to NumItems1+NumItems2 do begin SymbolArray[I].SName := GetActualNameFromResourceList(ListID2, I); SymbolArray[I].LID := ListID2; end; { for } SortArray(SymArray, NumItems1+NumItems2, 1); ... HTH, Raymond
-
Sam, For 2D objects that have a rotation attribute, HAngle() will return an object's rotation, and the object can be Screen or Planar. It used to work only on Lines, Arcs (sweep), and Symbols, but now it works on Rectangles, Ovals and Rounded Rectangles, in addition to Arcs, Symbols and PIOs. HTH, Raymond
until