


Grethe Connerth
-
Posts
162 -
Joined
-
Last visited
Content Type
Profiles
Forums
Events
Articles
Marionette
Store
Posts posted by Grethe Connerth
-
-
Hi everyone,
thank you all heaps for your feedback and input. It's an interesting one.
Honestly, I got desperate, so I put in the effort and developed a spread sheet.
Whilst I meanwhile have maaaaany pages, I thought I’d share at least an excerpt containing 7 RW Styles on different subjects in the attached PDF files below.
- Apologies in advance on any mistakes I may have made on transferring details. -
Ok, so the files show RW Styles I found in VW files which were made available on VW Video tutorials and also were posted here on the VW Forum.
The main contributing forces were the two Obi-Wans @Luis M Ruiz and @JimW. And I take my hat off to you both.
Thank you for all your hard work, effort and huge amount of patience you bring to this game. Especially to my many questions we had in 1:1 correspondences. I could not survive without your insights which have been and still remain to be absolutely essential to my ongoing, or shall I say rather never ending, learning curve.
In order to find my way back to where things originated from - as you mentioned Luis "it is hard to remember what makes each style different", I try to be as organised as it gets ... which is a bit of a curse … ;0))
Here starting with naming all related elements the same way - backgrounds, textures, folders, files, ...
It helps - especially when exporting RW Styles, related textures, ... and all. They then don’t override accidentally others with the same name, which may have only slightly different settings.
In addition showing the name of the author and having a weblink to the tutorials is always a must.
Intense? A bit much? I agree.
So when I print it all out I can simply compare the RW Styles. Of course a possibility to export these details into a work sheet or report or so would reduce the amount of manual labour on these. And I am sure there may be a more simplified overview for comparison possible. But I only started on this a few days ago, so please go easy on me ... ;0))
Enjoy!
Cheers,
Grethe
-
 2
2
-
-
Hi guys,
thank you all for your input, ideas and feedback. I'm glad to see there is a general need in place.
I tried the way you suggested @Benson Shaw, it seems a bit of a work around with having to adjust the screen plane rectangle, maybe also because I haven't used this before and try it out more, but it's a supportive step.
Correct @Andy Broomell, mainly the camera related Viewport crop would be great for the Aspect Ratios, and the lack of snapping to the corners of VPs is nutty.
If anyone is interested my post on the VW Forum's 'Wishlist Feature Content Request' from a few days ago is called 'Viewport Crop Options'.
Let's see how we go.
Cheers,
Grethe
-
1
-
-
Dear VW team,
I wish it would be possible when creating a new Viewport to have the option to create a crop right there and then, for example in the shape set by the camera settings - 'Aspect Ratio 16:9'.
This by choice or default.
Reasons for my wish are:
1) when being on the sheet layer and I want to move a Viewport that has no crop object within, it is more difficult to snap to the corners of the VP in order to position it on my layouts
2) when trying to place a rectangle into the open Viewport Crop to have my VPs match the shape which has been created by the Aspect Ratio, it also does not snap to the corners of the VP, whilst it does snap to the 3 snaps on each side
Hope this makes any sense, please let me know in case there are any questions.
Happy days from Melbourne OZ.
Grethe
-
2
-
-
Hi @Boh
thank you for the visuals, that makes total sense now.
I think I will send a post to "Wishlist - Feature and Content Requests" as I'd like to see when creating a new Viewport that a crop would be automatically created in the shape set by the camera settings - for example 'Aspect Ratio 16:9'.
Happy days from Melbourne OZ.
Grethe
-
Hi @Boh
thank you for the explanation.
I may have to look this one up on 'VW Help' as I am not 100% sure I understand.
Oh, BTW - did you see my note to you on the other blog about the now available SP3 update on 3rd of April?
OzCad mentioned they would send out an alert so that it shows up in VW program's messages ( Bell on right bottom corner ).
Well up until now nothing has shown up there but their website does, but I didn't receive any alert or email about it which I think should happen automatically.
Anyways, it's out now and I hope you got it also.
Cheers,
Grethe
-
I have experienced this green crop Object in the past. My notes would be:
1) What is the purpose of this green rectangle 'Add Reference Crop Object'?
2) I find when creating Viewports there should be a check box where one could add a Crop Object or VW could be adding one by default.
3) Also when going back on the sheet layer trying to place a Crop Object into a VP then drawing an object it never snaps all that well to the current size of the VP.
-
Hi Jim,
the problem remains even after the SP3 installation on my VW 2018 version.
Any ideas ?
G
-
Dear VW lovers,
would anyone know if it is possible to export Renderworks Style Settings into a worksheet or excel spread sheet?
I have multiple Renderworks Styles and currently I am creating screenshots and copy paste them into a file for comparison.
This is a huge effort and I would love to have a faster and more convenient work around for this.
Any input is much appreciated.
Cheers,
Grethe
-
2
-
-
Hi BOH !
I just contacted OzCad again re SP3 and this is their reply:
It went live on Friday so please ;check for updates'.
If you have already installed the US one you'll need to directly download SP3 from here and then run the updater.
http://www.vectorworks.net/downloads/ServicePack?major=2018&servicepack=3&vendor=OZCAD
Hi Asemblance - Re 'Message Centre' alerts
I have the same thing happening - no alerts there and also it showed up to be 'up to date' when checking and before I installed the US version by mistake.
OzCad's reply:
We will get a message out to the Message Centre soon.
Have a great day!
Grethe
-
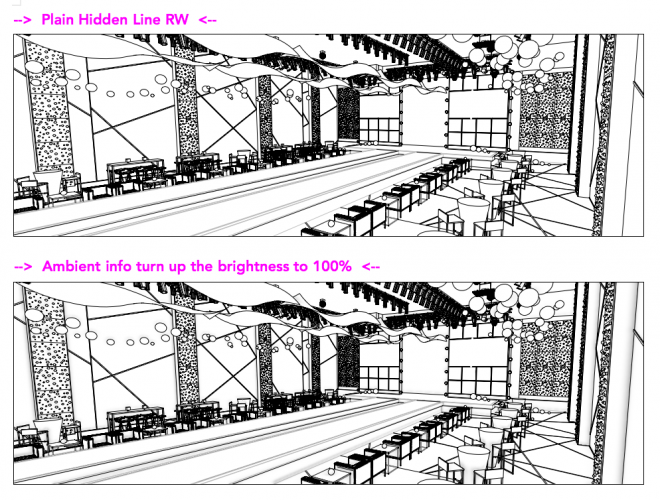
Hi Kevin,
Yes it did wash out all greys!
And it shows some shadowing in the corners, which I can test and play around in the Lighting settings.
But you know what? I love it !!!
It looks even better than the plain Hidden Line RW Style.
I rendered the Viewport showing the side view also and it did a great job.
Perfect ! Legend !
Thank you Kevin for this simple work around !!!
Grethe
-
3
-
-
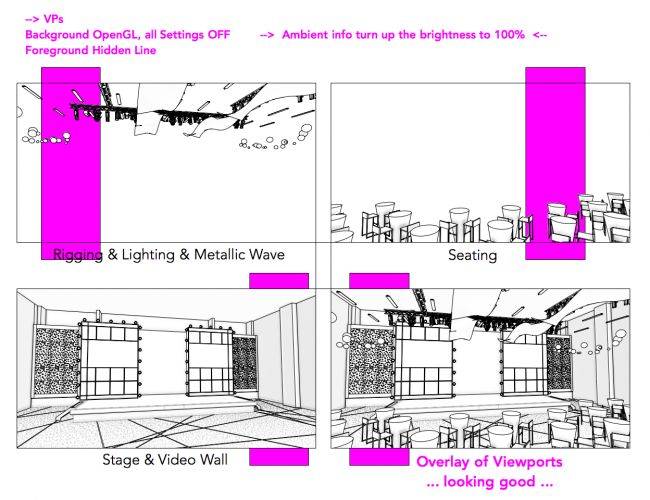
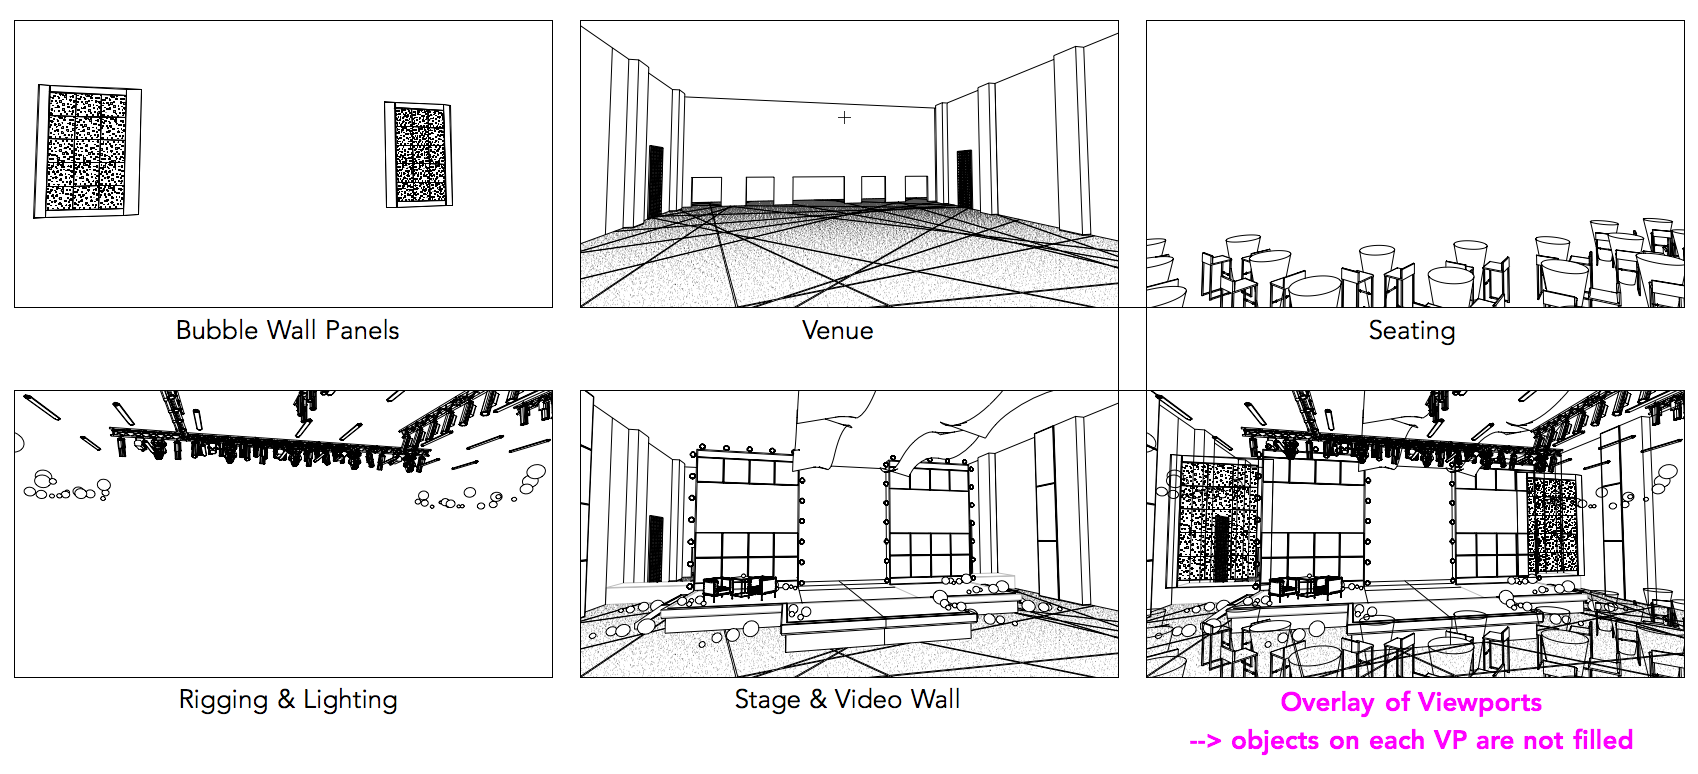
Hi Kevin,
thank you for your fast reply and also the VW Test file which was very helpful.
I tried your suggestions and it took a few test, I had to turn off all the Lights and also combine the Bubble Panel Walls VP with the stage VP as it didn't overlay correctly with all the walls and so forth.
--> new VPs attached
It looks good and clean, even though I was aiming for a black & white render only without the Greys from OpenGL.
Reason being as all my other explanatory Renderings are Hidden Line only.
Yes you have a very good point.
I was wondering this also, especially as I have other VPs with Hidden Line Renderings and they seem to be working even with all the objects in there.
See screenshot of a different scene / VP attached --> Hidden Line with one single Viewport
Maybe I have to throw away this particular VP, re-create this View into a new VP and then render it all in one with Hidden Line.
Cheers,
Grethe

-
3
-
-
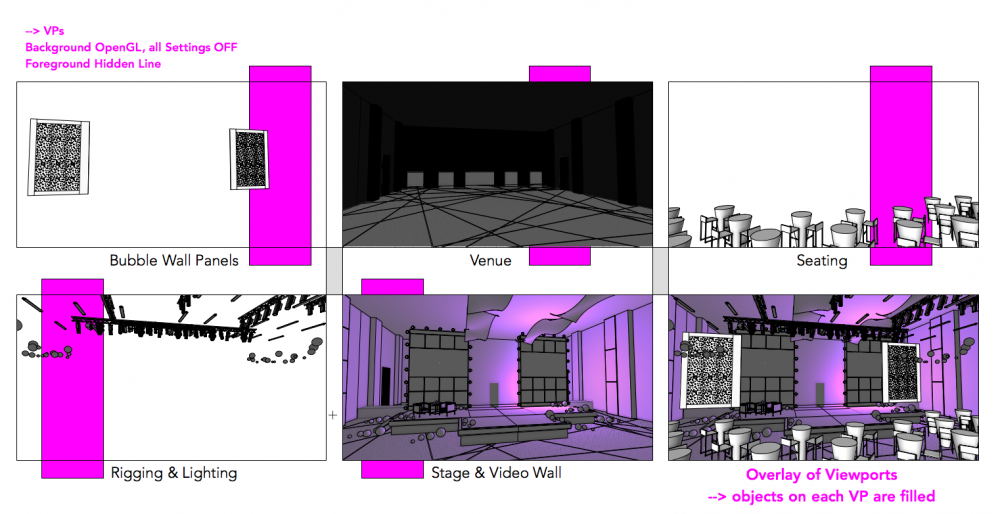
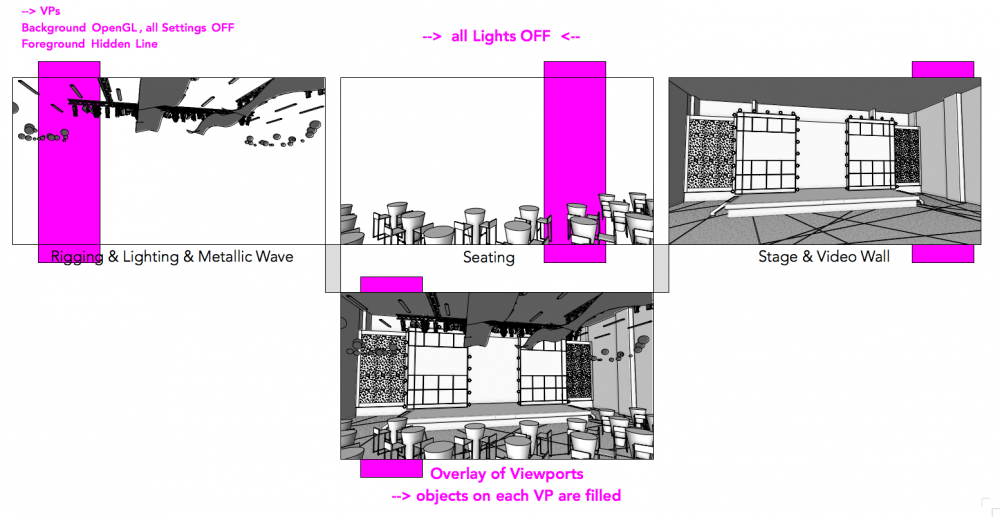
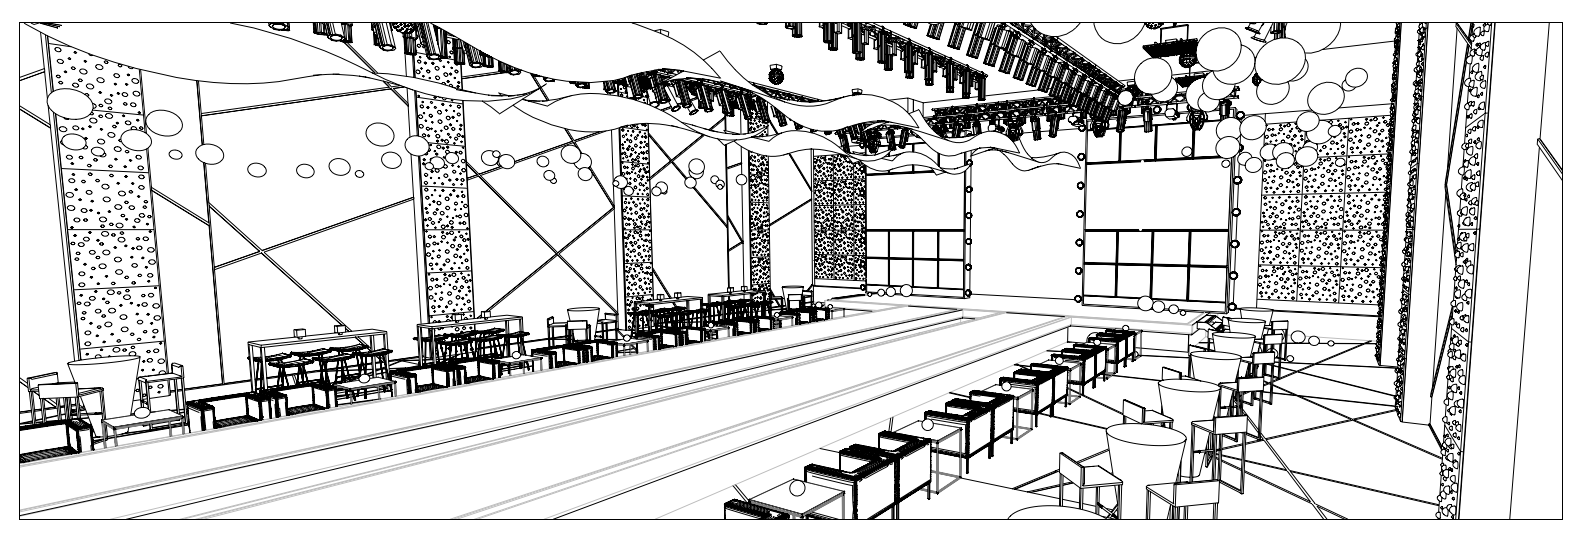
Dear VW Lovers,
I am creating a Viewport with Hidden Line RW Style.
Unfortunately the process of rendering is not possible, meaning it not only renders indefinitely but also the VW program becomes none responsive. This probably due to a lot of detail in the drawing.
As a result I have to 'Force Quit' the program and start again.
After many times of trying I am now working around the issue like this:
Viewport on-top of Viewport
- splitting the drawing into multiple Viewports with different Design Layers visible
- thereafter I overlay one Viewport on-top of the other
--> Problem
Any objects in a Viewport are not filled. --> Which results that you can see through all the objects on any VP.
I would like to be able to create a VP that 'closes' the objects and nit the whole VP. Like when you give an object a fill through the Attributes.
Only when I give the VP a fill through the Attributes palette the whole VP becomes filled and not only the objects.
I have attached a screenshot of the individual Viewports and the one on the right hand side bottom holds the sandwiched Viewports.
Here it shows that all objects have no fill.
I would be grateful for any input and work around.
Cheers,
Grethe

-
Dear VW lovers,
I had a similar problem last year.
When rendering either the background in the VP showed up completely black or the whole scene/VP was black.
Have a look at the renderings attached and if you like have a read in the posts where we discussed it all.
Cheers,
Grethe

-
Hi Art,
thanks again for info.
OzCad mentioned that actually it should not be possible to install the US version over the Australian license.
But I simply have to install our OZ version over the US one - no re-install of VW 2018.
Hi Boh,
OzCad said the Australian SP3 version will be out next week.
However I would not be able to tell you if you need to use the US or the OZ version.
Cheers,
Grethe
-
Hi Art,
Thank you that's a valid point.
I thought about that yesterday, but still installed it ... ;0)) hope it'll be ok ...
Was asking our local OzCad support team a few days ago when SP3 will be available and they said it was just a few days away.
So I just had a look at their website re Updates but it's not there just yet.
http://www.ozcad.com.au/downloads/
http://www.vectorworks.net/downloads/ServicePack?major=2018&servicepack=2&vendor=OZCAD
I'll just pop the question again to OzCad this morning, as we are a bit but only days behind every time.
I'll post tier reply here once I have feedback which usually they get back to me really quickly.
Stay tuned.
G
-
Good morning Boh,
I had the same issue yesterday.
1. Simply go to the link that JimW provided above that says 'HERE' mentioning the summary of corrections and you'll land on the VW Service Select page 'Vectorworks 2018 Service Pack 3 Release Notes'.
2. There on the left hand side click on 'PRODUCT UPDATES'
3. on the next page that opens chose your current VW 2018 in the drop down window
4. and click on 'DETAILS below
And this leads you to your download page for SP3 Windows & Mac.
Hope it helps.
Cheers from Melbourne/OZ,
Grethe
-
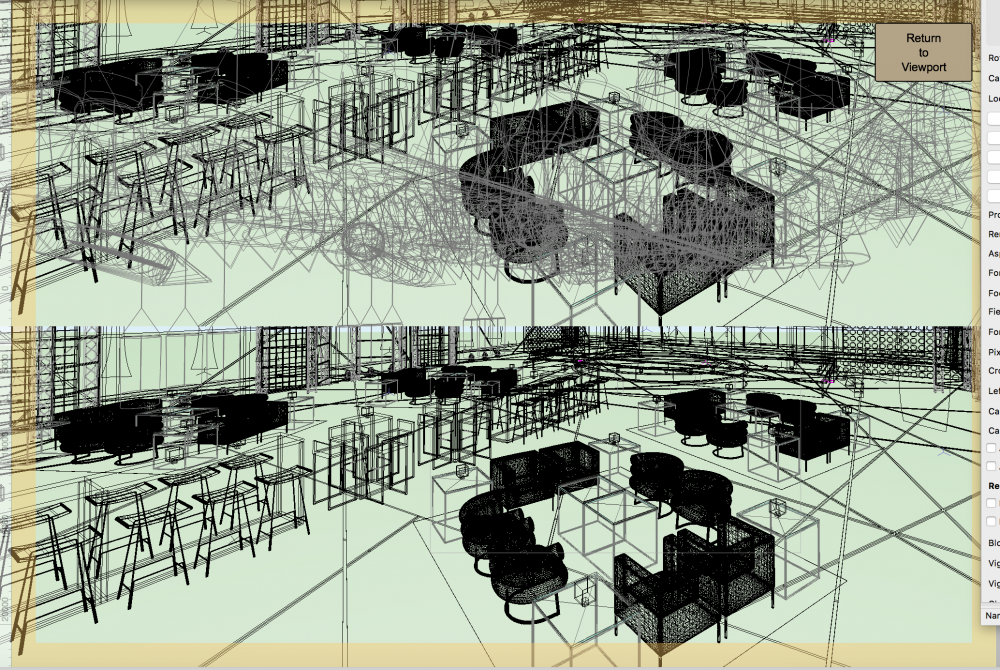
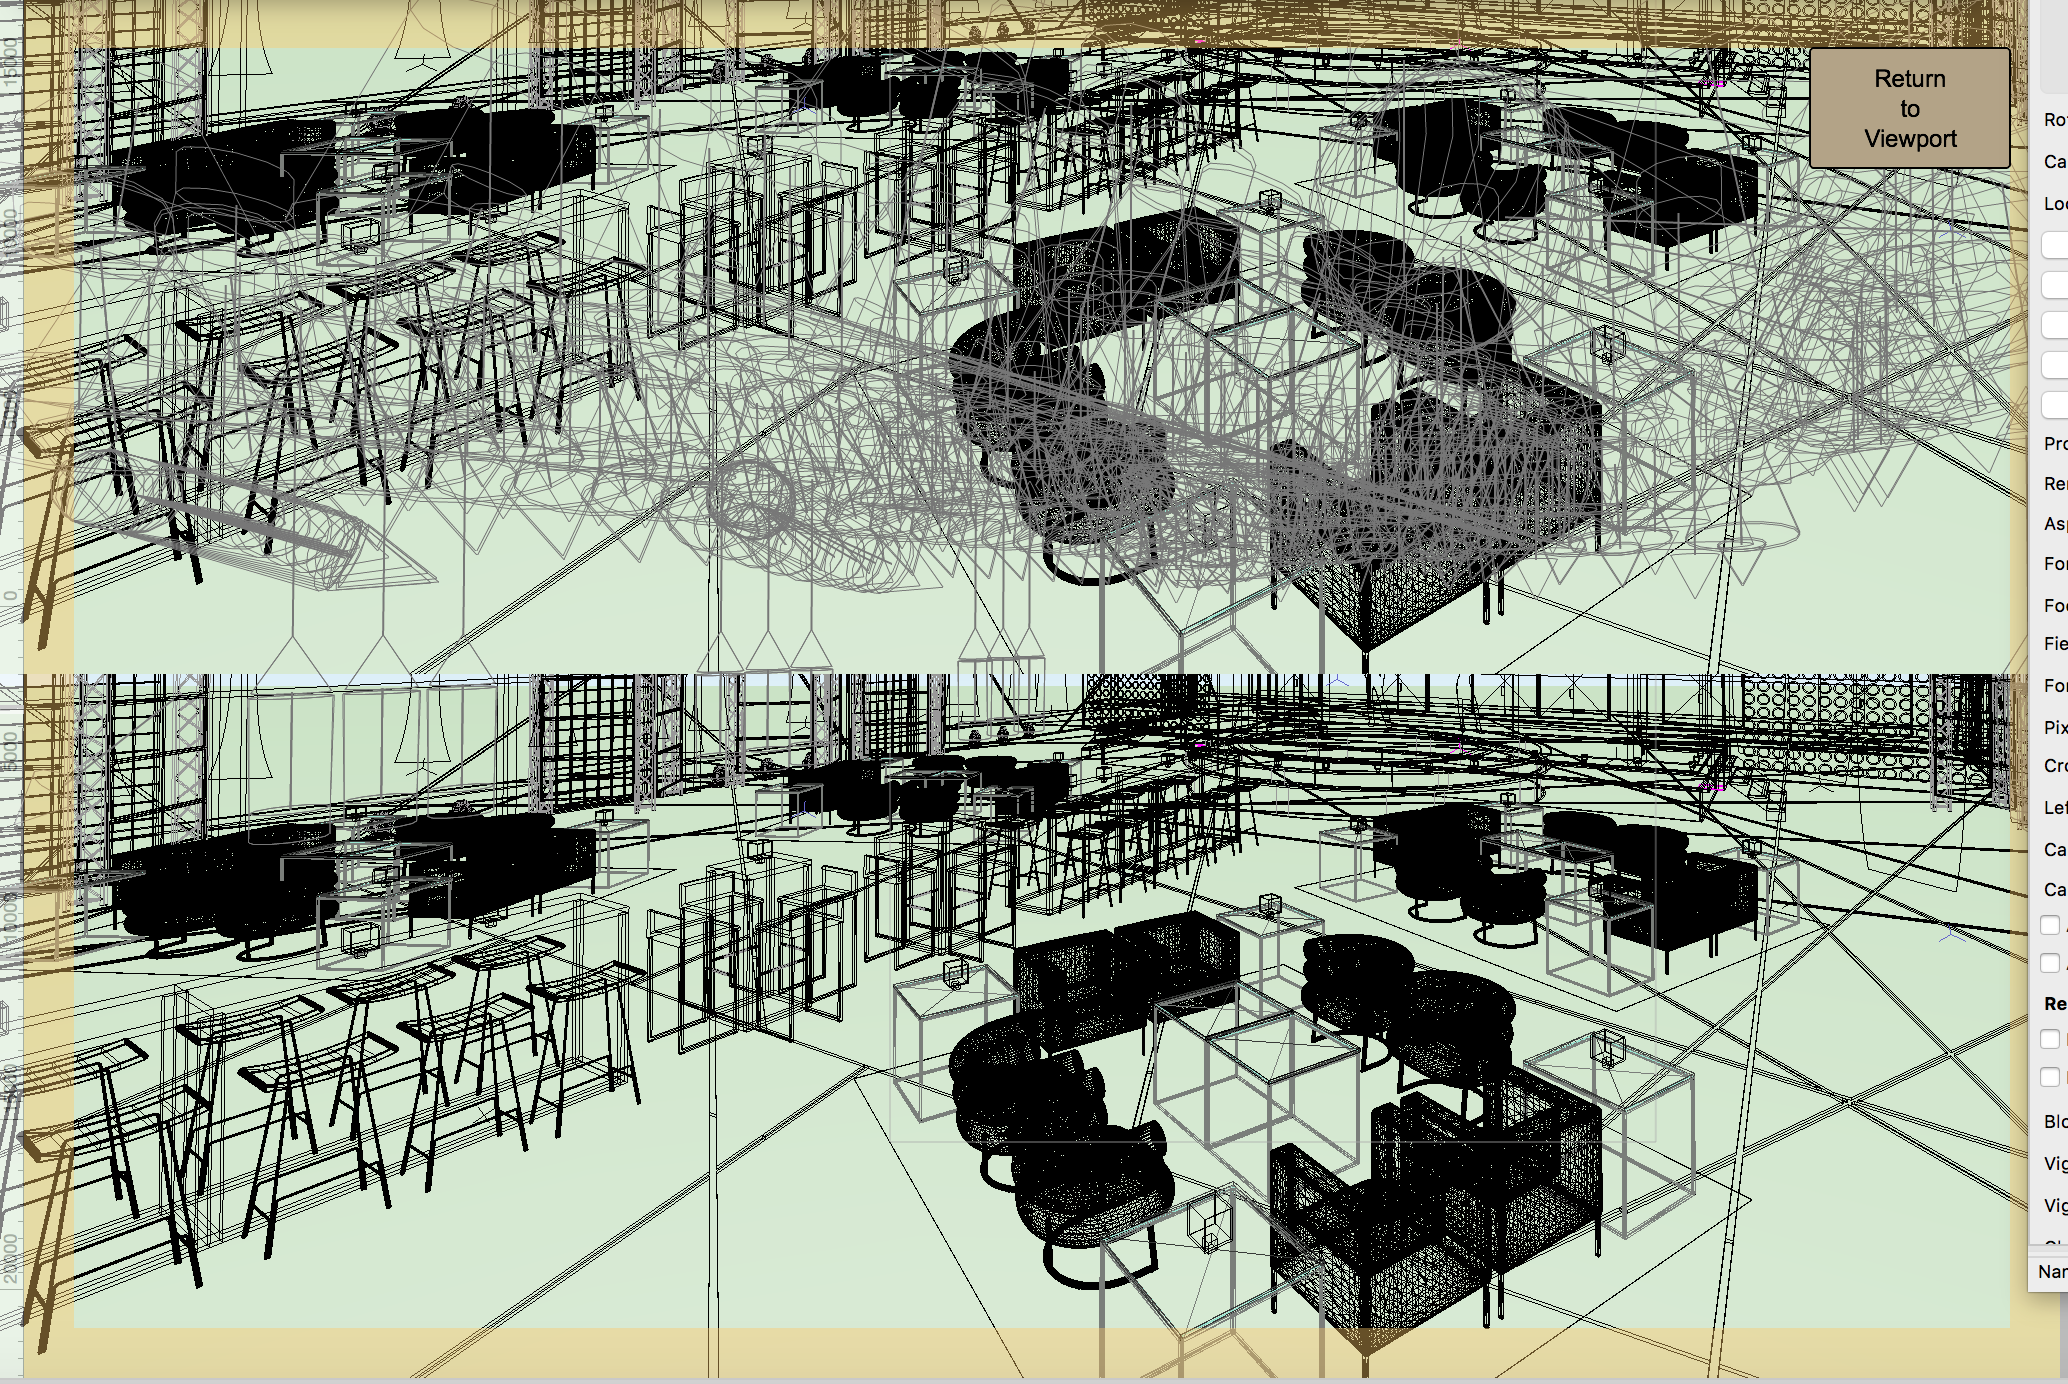
Ha ....!
Found a brand new bug I haven't seen since I started working with VW back in ancient 1997 ...
I just opened a Viewport 'Camera' in order to go change the view.
And for some reason the scene showed up TWICE above each other in the open VP !!!
See screenshot attached below where you can see the seating, then on the mid sections the windows have been cut in half but you can still see the rigging and lighting start, which then has an overlay of the furniture again ... strangest thing.
Has anybody experienced this before? Just wondering.I saved everything, closed the file & program, made a duplicate and am now continuing working.
Cheers,
Grethe
-
Hi Jim,
Fab Fab Fab!!! Thanks for this.
You guys have been very busy looking at the looong list of things.
The ones I can relate to are mostly Title Block issues and the many crashes on various matters I have experienced in the past.
- 'OIP Hardscape controls not working' <-- I assume this one is related to any floating tools that don't respond to '+' or '-' activations ?
Seems to be working better already having installed the new SP3 just now.
This was in the conversation on t he Forum --> Basic Tool Pallet and Tool Set Bar always resizing
- Snapping Fails in Referenced Design Layer Viewport in Rotated Plan View : JBC
Yeah, very proud, this is one I had flagged, great to se it's being fixed.
Well done everyone at the VW team !!!!
Cheers,
Grethe
-
Hi Art,
I totally agree!
It 'kind of works' when you have 2 files open and drag one file onto your second monitor.
Of course all your tools are not there then.
So when you go on your MAC to your System Preferences > Displays > Arrangement and tick the box 'Mirror Displays' you have both screens with your VW program and files. Not sure if that is what you were after.
However - I experienced that with these settings the mouse on my laptop becomes very sluggish and ineffective to work with the speed and responsiveness I am used to. So not that perfect after all. ;0))
G
-
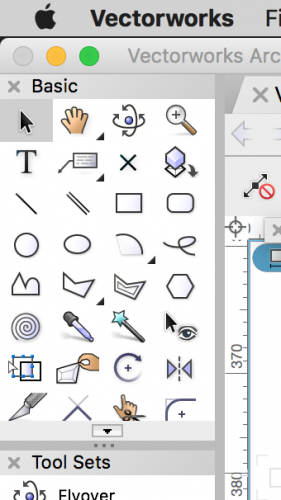
Hi everyone,
thank you all for your replies and input, which is much appreciated.
"Application Window" - interesting, never used that one before.
I tried it - the RED DOT was back ! Great !!!
BUT - all my tools were undocked and floating.
Initially I thought not bad. But when I tried to place the Tool Palettes back to dock, they did not suck themselves back to the sides of the VW Application Window.
After multiple times of try & error toggling various settings in 'Data Bar Options' and 'Palette Options' I got them all back - but it only worked by enabling "Use Application Window" again. So I am back to square one ;0((
Cheers,
Grethe
-
Hi Art,
thank you for your reply.
Apologies for the wait in my reply, I was in the midst of endless rendering ...
Ok, so program closed, then re-started. The result is that:
- YES - the greyed out RED DOT is there right from opening the program --> see screenshot
- and is still there when I open a VW file --> see screenshot
Interesting thought process. No I checked - saving, no warning message, or updating resources happening.
It has been there for some time now. I thought it might be there since I installed the new VW 2018 version as it was unusual that I can close all my other programs with the RED DOT and thought it had been there eat the VW 2017 version, but I may be wrong.
Cheers,
Grethe
-
To all VW Lovers,
I am working with my Apple MAC and have the possibility in all my other programs to close a program by clicking the RED DOT at the top left corner of the page.
However VW's RED DOT whilst visible is greyed out and cannot be clicked.
Q&As
1. Is there a setting within VW to activate the RED DOT?
2. Whilst this only closed the program - is there also a setting possibility to activate this RED DOT to also QUIT the program?
This instead of having to go to the menu at the top and click Quit which is annoying ;0)
Looking very much forward to your input.
Cheers,
Grethe
-
Definitely happening on my end as well ... really annoying.
Apart from saving a file before using the Purge command, I now also create a duplicate file and save it with a new file name something like ' Project Name - Duplicate prior to Purge & Date... "
This way I can always go back in case I changed my mind or just want to double check on some things.
Cheers, Grethe
-
Awesome Jim !!!!!
Thank you for putting this together!!!
This new video is probably the most comprehensive of all I have seen over the past.
Also thank you soooo much for making the files available.
You're a legend!
Grethe


Rotate text within Dimension
in Wishlist - Feature and Content Requests
Posted
Great and very useful idea.
I'm all for it!
G