


bbudzon
-
Posts
662 -
Joined
-
Last visited
Content Type
Profiles
Forums
Events
Articles
Marionette
Store
Everything posted by bbudzon
-
Martin Mac Ultra Performance Shaper problem
bbudzon replied to mhersland's topic in Vision and Previsualization
So, I just received confirmation that framing/shaping/shutters are not currently implemented for GDTF devices in Vision. They are implemented for Vision's native litfile devices. We are working with our GDTF developer to work on getting this feature added to Vision's GDTF implementation. I will do my best to post updates here as they arise. The only "workaround" I can think of here is to issue a Vision Fixture Request for the Martin MAC Ultra. This will be added to our content teams queue of devices that need to be created, but will allow for you to use this device as a litfile rather than a GDTF where framing/shaping/shutters should work properly. -
I'm glad that information has helped 🙂 I also noticed you were on Vision 2021. I thought it might be worth mentioning a pretty cool new feature in Vision 2022, which is a Performance & Quality Slider in the Vision Application Preference dialog. This makes adjusting settings super easy, while still allowing an "advanced mode" that lets you tweak the settings to your individual needs. Lastly, we recently found some performance differences between Vision's native "litfile" devices and GDTF. We are hoping to resolve those GDTF issues which should help the performance of GDTF in Vision even further without degrading performance 😉 I hope you have a good rest of your day!
-
So, it took me a while to figure out why you were running into issues with the file you DM'd me. At first, I could still not reproduce your issue. However, after revisiting your screenshots above, I realized this can only be reproduced when Dynamic Shadows Vision Application Preference is set to Objects & Fixtures. So, I can indeed reproduce the problem. And you are correct. It appears the fixture's own geometry is blocking part of the light. In theory, moving the light emitter in the GDTF Fixture Builder should've solved the problem. I will need to get the appropriate content creators and engineers to investigate this more closely. However, I would like to discuss Vision's Dynamic Shadows setting in a little more detail. It is probably the least understood setting in Vision and its effect on performance (and therefore quality) can be massive when shadows are enabled. If you truly need the Dynamic Shadows set to Objects & Fixtures in Vision, there may be nothing more to do than to continue playing around with the GDTF until it works. I do not think this is a bug in the rendering code as I believe other GDTFs work properly in this regard. I believe this bug is in the content (GDTF) itself. The file you DM'd me was quite detailed! It looks great! There are also a good number of lights in that file. I'd like to ensure you're getting the best performance and quality out of the product and that requires a bit of a balancing act. Increasing quality and enabling certain features has a negative impact on performance. And often increasing performance requires disabling features or lowering the quality. Setting Dynamic Shadows to Objects and not Objects & Fixtures will still allow your lights to interact with your set design; which seems to be your ultimate goal in having shadows enabled. All stage elements, curtains, character models, floors, walls, etc etc will cast shadows properly. So, unless you are really needing/using lighting devices as set pieces, I doubt that lighting devices casting shadows will be necessary. In my experience, most lamps won't cast light onto other lighting devices in any significant way, but there are exceptions (which is why the Objects & Fixtures option exists). The only drawback to using Objects and not Objects & Fixtures is that while objects will cast shadows, fixtures will not. One advantage of using Objects and not Objects & Fixtures is you will not run into issues with lights "blocking" their own light. But, I want to discuss the ramifications of Objects & Fixtures in a little more detail as well as I noticed that your Shadow Quality was set to Low. This was likely necessary because when you use Objects & Fixtures, any time a single lighting device pans or tilts, all shadows for all devices must be updated. This is incredibly expensive. So, using Shadow Quality Low would almost be required as you would be updating shadows so often that you'd need to do everything possible to make those updates "as fast as possible". When using Objects and not Objects & Fixtures, a single lighting device panning or tilting has no effect on shadows of other devices and so only that single lighting device needs a shadow update. By using Objects and not Objects & Fixtures, you could likely increase the Shadow Quality to Medium (or even higher) getting a better "look" and most likely better performance at the same time. And this will sidestep the issue of lights blocking themselves. It's honestly a win win win. Better quality, better performance, and a workaround to your issue. I hope this information helps. More often than not, setting Dynamic Shadows to Objects will get the job done and using Objects & Fixtures is not necessary as it has little to no difference in the final rendering. I'd highly recommend giving it a shot. In the event that you do need fixture shadows in the final rendering, you can try playing around with the GDTF more while we try to do the same internally. If I have any updates on that front, I will do my best to follow up and post them here!
-
Ahh, I will work with the forum admins to see if we can add GDTF and VSN to the allowed uploadable formats 🙂 I ran the following test with your GDTFs and shadows off. Perhaps, this is why it is working for me and not for you. I tried enabling shadows, but ran into some bugs that I believe are specific to GDTF and not Vision's native litfiles. We generally recommend running with shadows off anyway, as this drastically improves performance. Public GDTF.mov Perhaps, you could upload your MVR file to the forums since that format is allowed? I might be able to better and more easily reproduce your issue if I have your precise MVR document.
-
Macbook with the new M1 chip
bbudzon replied to Greg MacPherson's topic in Vision and Previsualization
We have done a lot of internal testing running various offline editors with Vision on an M1 machine. Note that Vision 2022 SP2 was just released and has added support for running natively on M1. This is the release we did the most testing with. While various offline editors were used, it is my understanding that the GrandMA3 Offline Editor with the VizKey does not yet work on Monterey. So, please keep that in mind. -
That is an odd looking movie!! Not what I'd expect for sure 😛 Can you post the GDTF and/or the MVR file so I can take a look? I wonder if this is an issue with the fixture, the fixture's geometry, or the scene's geometry.
-
Beam multiplier and canela settings saved with v3s file
bbudzon replied to DBLD's topic in Vision and Previsualization
@DBLD, In Vision 2021, there was an issue where a fixture using a "lightmap" in the backend would ignore the Color Temperature field even though it was editable. After further investigation, there were also some fixtures that didn't use a "lightmap" but would still ignore the Color Temperature field even though it was editable. In Vision 2022 SP0, I wrote a "quick fix" that disabled the Color Temperature field in some cases so it could not be edited. This made the UI a little more intuitive while I tried to work on a more proper fix for Vision 2022 SP2 as the changes were larger and riskier than I initially expected. With Vision 2022 SP2 now tested internally and released to the public, I wanted to share some updates. Vision 2022 SP2 reverts the "quick fix" that was shipped with Vision 2022 SP0; meaning the Color Temperature fields that were editable in Vision 2021 are now editable again in Vision 2022 SP2. I've updated the rendering code to account for the Color Temperature field being edited in all of the cases I could find or account for. So, editing this field should now work regardless of whether or not a "lightmap" is being used in the backend, whether or not "Force Emissive" is checked, and whether or not the fixture is an "emissive" fixture by default. In short, if the Color Temperature field is editable it should now always have an effect on the rendering when it is changed; including undo/redo/cut/copy/paste/drag'n'drop. If there are any cases where a device seems to completely ignore edits to the Color Temperature field, please post them here so we can work to resolve them. Note that if a device changes color when the Color Temperature field is edited, but the result is not what you expect, then this may be a different and independent issue from the one being discussed here. While this was a pretty concentrated fix regarding the Color Temperature field being completely ignored, I hope this still improves the experience and workflow in our product. Other issues related to "Color Temperature" but unrelated to "ignoring Color Temperature field edits" are still being investigated and we are working on definitive steps to reproduce as this is the first objective when debugging and sharing issues. -
Thanks for testing all of this out! It does seem like the scaling is causing issues and Qt (Vision's UI Framework) has been known to have issues with HighDPI in the past. I can't believe I didn't think of this myself, so shout out to Kevin 😛 All of your testing results make perfect sense. Most of us also run dual monitors at the VW office, so it being tied more to the DPI scaling is logical. I think the next step for us is working on reproducing this on a machine internally and then getting setup with a development environment where we can debug and try to fix the issue in code. Either way, based on your findings and my experience with HighDPI bugs in Vision in the past, I'm hopeful that we can get this resolved. Historically, Qt has some methods that don't take HighDPI into account. When there are alternative methods provided that do take HighDPI into account, we try to move towards those. But, in the event an alternative is not available they provide a "getter" that gives us the scaling percentage/ratio. So, often times, it's just a matter of doing some extra math in UI/dialogs/pixel related code. It's hard to say if we find a fix when it will ship, especially as SP2 is right around the corner. But, given the details in your report we should be able to bump this up in testing/coding priority 😉 I'll start working with the various departments to get a dual monitor HighDPI setup where we can debug the code and hopefully it will be a quick/easy fix!
-
@ajemutt, @TomWhiteLight is correct that you can always assign these video inputs Vision-side if you would like. You should also know that if you are going to be using the LED Screen (or any other kind of screen/projector) in VW you can use the Edit Array Image (or Edit Screen Image) dialog to Select Vision Video Source. Once inside of the Select Vision Video Source dialog, you can select a Capture Device. The Capture Source Name is not really sent to Vision. It is mostly used VW side for organizational purposes. But, the Capture Source Number will identify the source uniquely in Vision. So, if 2 screens have Capture Source Number 1 and another screen has Capture Source Number 2, then when this file is sent to Vision you will be prompted for 2 sources; a source for Capture Source Number 1 and Capture Source Number 2. Capture Source Number 1 will be displayed on the first two screens in this example and Capture Source Number 2 will be displayed on the last screen in this example. Similarly, if you are just going to be using extrudes or any other custom geometry in VW, you can attach a special record to this geometry through the "Spotlight>Visualization>Select Vision Video Source>" as you have discovered. Simply select the Capture Device radio button and assign a Capture Source Number. Again, the Capture Source Name is not really sent to Vision. It is mostly used VW side for organizational purposes. But, the Capture Source Number will identify the source uniquely in Vision.
-
Thank you for sharing this!! I'll start working with some of our teams internally to see if we can figure out what might be going on. Please provide us updates if/when you have them and I will try to do the same!
-
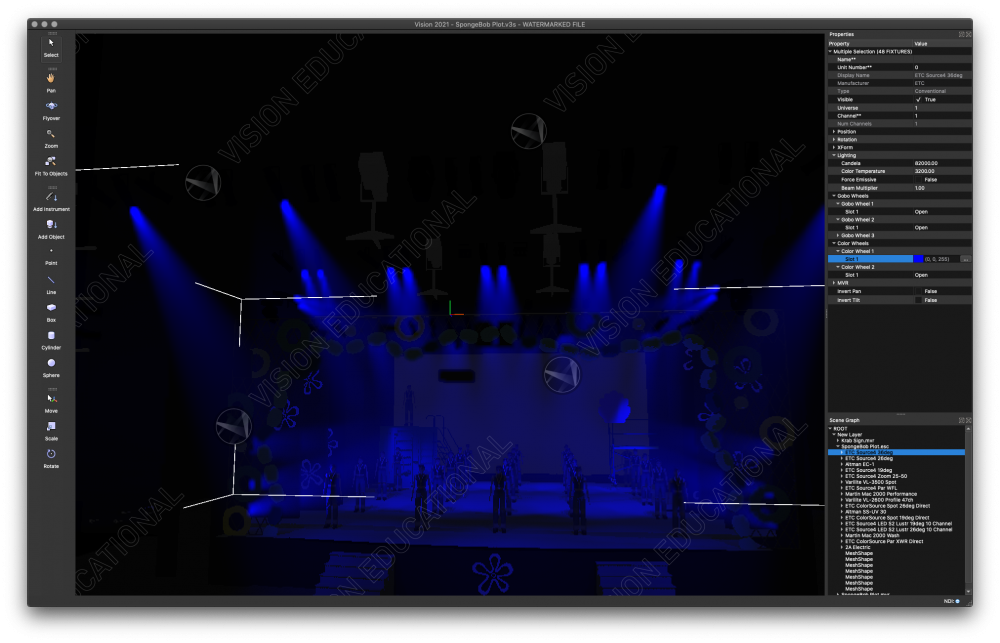
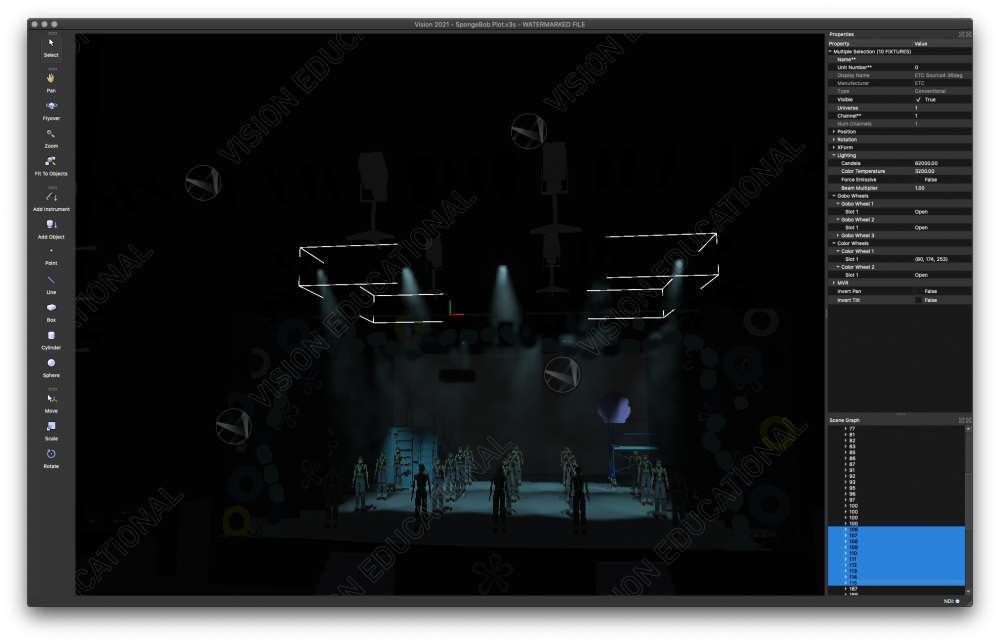
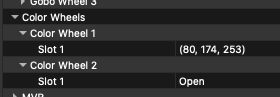
Most of your ROOT/Global Document settings seem good! So, I don't think that is the issue. Digging deeper, I decided to run some more tests. In this test, all I did was open your V3S, select the S4 36deg group, and assign them a gel of 0, 0, 255 for full blue. This was the result: So, that seems correct and what I would expect! Perhaps, you can try this test and at least make sure this works. I started looking around in your document more and noticed a few lights that look like this: This screenshot has that "steel blue or medium lavender" color to it that you had in your original screenshot. Upon further investigation, it became evident that the colors assigned to these fixtures are the cause: I'm not sure if you just entered these RGB values incorrectly or if our stock content is incorrect. But, either way, adjusting some of these values should hopefully fix your issue. I'll work with our content teams to determine if our stock content has the correct RGB values.
-
Hmm, that is odd! A quick test on my end and I cannot reproduce. It may be tied to some of the document settings. Perhaps, you can try recalling the defaults? If you can post your VSN that may be helpful as well.
-
@DBLD, I thought I had responded to your initial post. I just reached out to our content guys to see if I should open a ticket, but one was already opened and lo and behold, I've been informed that the issue is resolved! I think we are still working on verifying the fix, but if you run a Library Update in Vision to pull down the latest litfiles and content, that should hopefully take care of your issues!
-
It is my understanding that dpi only has an effect when printing the image. So, you should be good to make the image whatever dpi you'd like. To the best of my knowledge, only the resolution will have an impact on the renderer.
-
Inconsistencies in Vision...
bbudzon replied to Charlie Hegelheimer's topic in Vision and Previsualization
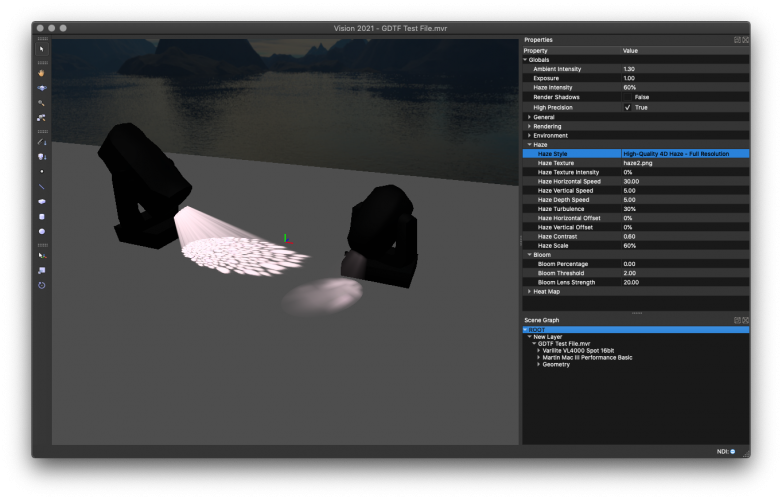
Not a problem at all! These are items that notoriously increase vertex count and unnecessary amount. Some users will just not send them over. Some users will use a single large box extrude to emulate a truss. Some users make custom symbols for trussing that are low poly count and "realtime render" friendly. So, it does make sense that not sending truss (and crowds) to Vision helped. But again, Vision tries to be very good about large vertex scenes via it's deferred rendering technique. So, I'm also not surprised it didn't make a huge difference. It makes the largest impact when shadows are enabled, but most only run with shadows for rendered movies/stills. Great! As a test, I inserted a Varilite VL4000 Spot 16bit and a Martin Mac III Performance Basic into a vision scene. It took me a while to figure out how to control these from the light board, but I once I figured it out I had no problem getting gobos to render in either fixture. One thing you may need to keep in mind for the VL4000 is the "16-bit linear control of edge functions". This 16-bit value straddles channels 6 and 7 (6 is high byte, 7 is low byte). When I have the edge control set properly, I get the following rendering: If I leave the edge control set to 0% on channels 6 and 7, it results in a very "fuzzy" gobo that is almost indecipherable from an open slot: So, please make sure you are controlling the edge function properly. You never said whether or not you tried setting Haze Texture Intensity to 0% or not. When this value is between 1-100%, it enables "4D Haze" which can cause performance issues and is generally reserved for render movies stills. We are always working to improve the application and have some really neat things that will ship with 2022 that will make it easier to get the performance/quality that Vision is capable of. One issue we've seen over the years is that many times the issues are user error. However, we take responsibility for this as our settings are not intuitive. Keep your eyes peeled with Vision 2022 😉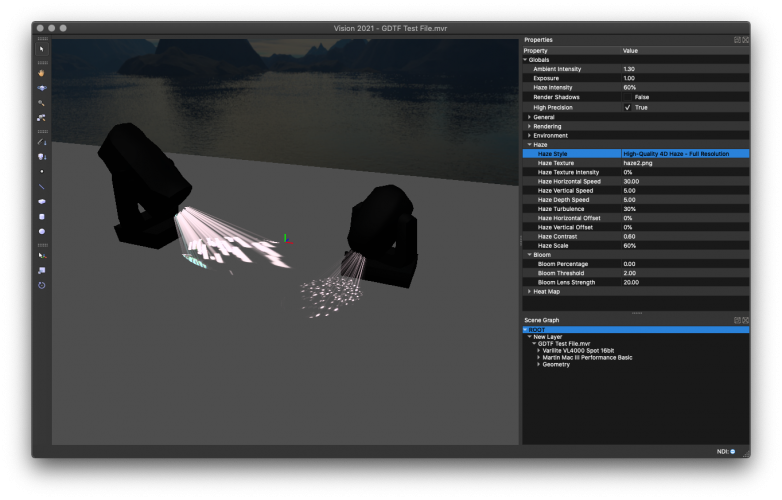
-
In most cases, 256x256 or 512x512 will be all that you need. I find it is a good balance between performance/functionality and quality. Basically, you want the image to be as small as possible while not degrading the quality visually. If the object in the scene is very small, maybe 128x128 or 64x64 would be enough that the quality would still appear sufficient or good. The reason you want to use the smallest image possible while maintaining visual quality/fidelity is to help performance. Increasing the texture image resolution to obtain better quality has diminishing returns. So, for a small object in the scene, a 16x16 image will probably look significantly better than an 8x8 image. But, a 4096x4096 image may not look visually any different than a 64x64 image as the object in this example is small. Similarly, if an object is not the focus of the scene, it may be okay to use an 8x8 image instead of a 16x16 image (or a 256x256 instead of a 512x512) because it's just not that important and the eye will not be drawn to the unimportant item anyway. It is all a big balancing act; tis the world of a realtime-engine content creator. One last pro tip; GPU's are optimized for powers of two. When possible, try to stick heights and widths that are 1, 2, 4, 8, 16, 32, 64, 128, 256, 512.... you get it 😛
-
Inconsistencies in Vision...
bbudzon replied to Charlie Hegelheimer's topic in Vision and Previsualization
It sounds like you've done a lot and have learned quickly! Very impressed! It's hard for me to say why the performance of your file is subpar. Your settings seem pretty sane for a file with 600 lighting devices and you've already discovered the Force Emissive feature which can help with fixture count drastically. You also mentioned that this file has performed well in the past and that only recently have you run into performance issues. So, I am hopeful we can get you back to that enjoyable performance. If I had to guess... I'd say that your biggest hit to performance is one of the few you have not yet mentioned; Haze Texture Intensity. I'm not sure why this would have changed, but if this document setting for haze is set to anything between 1-100%, then Haze Texturing will be Enabled. This is the 4D portion of the haze, if you've seen that in the UI. By setting Haze Texture Intensity to 0%, it will disable the 4D algorithm which provides an even wash of haze for beams of light and saves significant amounts of time in the rendering engine. If this does not help, maybe we can exchange files and screenshots to see what may be going on. Tweaking Vision settings is definitely something I am most familiar with 😛 In regards to the time to change Texture Quality, there is a lot of different things going on here that most users aren't aware of. For starters, any Texture Quality that is Medium or above uses a concept we call a Dynamic Cache. Any Texture Quality that is Low or Very Low uses a concept we call Static Cache. If you switch from any Texture Quality that is Medium or above to Low or Very Low, we must essentially reload the file clearing out the dynamic cache and building the static cache. This is true in the reverse direction as well. Changing Texture Quality from Low to Very Low or Medium to High would not trigger this "full rebuild" of the static and dynamic caches. My guess is that the some odd hour you are waiting when changing to Low or Very Low is spent on a progress bar for rebuilding the static cache. If the static cache is taking this long, it tends to imply that there are many many vertices in the scene; ie a very high poly count. Vision leverages a technique called Deferred Rendering which generally nullifies any performance hit from high vertex counts. This was important for Vision as it's main "input" is meshes from VW. And VW being as detailed as it is, often includes meshes that are not truly designed for realtime rendering. But, even with this deferred rendering technique, there is a limit and certainly you will always get better performance when the vertex count is lowered. The biggest offender of high vertex counts is the geometry that VW uses for truss. One way to determine what is causing the static cache rebuild to take a long time is to only send over bits and pieces from VW to Vision, checking as you go. One other fairly quick test that helps check rendering performance (but not load time / rebuild performance), is simply unchecking the Visible flag for an entire layer. This obviously will not decrease load times or make the static cache rebuild any faster. But, if making a layer that contains a bunch of trussing invisible drastically improves render speeds, it is likely the case that this layer contains more vertices than is necessary. In regards to your fixture questions, I may need to call a content person to this topic 😂 My best guess is that for the VL4000, the wrong profile/personality is being used on the light console or in Vision. Try to make sure the right modes are selected for the device and that the DMX Footprint (or Num Channels) matches. For the Chorus Lines, make sure that the broken behavior is not tied to the Force Emissive flag. In truth, the Force Emissive flag was a hack written by engineering in an attempt to lighten the content teams workload. Normally in Vision, if a fixture causes performance issues, the content team would create two versions of the fixture; the real version that emits light and beams and an "emissive" version that only the lens will glow. Engineering found a way to automate this for most fixtures via the Force Emissive flag; so that the content team only needs to create the "real" version. If the Chorus Lines are broken for other reasons, we may need to correct content files or engineering source code in order to address the issue. Hopefully some of this information helps. Please provide updates and let me know how things are going. Me, being a software engineer, can mostly help with things like performance / quality tweaking settings and workflow related things like how multiple selections work, faster patching, RGB meshes, and such. Tackling problems like gobos not working or Vision not seeing DMX can be much more difficult and may require getting IT, Content, and/or various other departments involved. -
spotlight gdtf/mvr -> vision = no patch data
bbudzon replied to fuberator's topic in Vision and Previsualization
I wanted to run some tests once I got back from break. It appears in my testing that the patch information comes from Vectorworks to Vision just fine. I used both GDTF and Litfiles in my MVR testing. One thing to note that may be confusing you, GDTF fixtures will not show up in the Patch Window in Vision. This is a limitation of Vision's GDTF implementation and something we are looking to resolve. That being said, when a GDTF fixture is selected, you should see proper Universe/Channel in the Properties Palette. -
Colour temperature of fixtures in Vision
bbudzon replied to DBLD's topic in Vision and Previsualization
Unfortunately, we have not been able to reproduce these issues in house and are still working on tracking the issue down. -
This topic more involves the quality of rendered meshes and how to setup RenderWorks textures in VW; not so much rendered light. That being said, there are a few things you may try any one or any combination of the following: Increase Haze Quality Increase Resolution Quality Increase Surface Light Quality Use Haze Style None, Low-Quality Haze Texture, or Low-Quality 4D Haze (creates a sharper look, but looks bad when pointed at camera) Use Haze Style High-Quality 4D Haze - Full Resolution (usually reserved for rendered movies, can cause performance issues) Note: When using 4D Haze Styles, Haze Texture Intensity can be set to 0% to increase performance.
-
Model far away when opening in Vision
bbudzon replied to ajemutt's topic in Vision and Previsualization
There may be some reason why this is happening. I can at least explain how it works. There are also some improvements you may be able to make to your workflow that will make things easier and look/perform better. Send to Vision uses the older ESC file format. You should consider using Export MVR instead. Here is a good topic covering the benefits: My guess is that there is some piece of mesh way off in no man's land. What Vision tries to do whenever opening (not merging) a non-V3S file format is calculate the bounding box of the entire scene and then fit that into view. If you are not aware, the Fit to Objects tool is incredibly helpful for quickly navigating to an object(s) of interest. This often has to do with the Look At Point being off in no man's land. The Fit to Objects tool workflow helps with this as it ensures the Look At Point is near the things you are "looking at". This is what I would expect. But, this will only work properly if there is no odd ball geometry off in no man's land. You can quickly "break" this new file by putting an extrude way far away from the rest of the scene. One way you may be able to "diagnose" your original file is by selecting the New Layer underneath ROOT in the Scene Graph. This will draw a bounding box for the entire scene. If this bounding box is not what you expect, you can select various items in the Scene Graph until you find the "offending" item. And I think a lot of people are not aware of the Fit to Objects tool in Vision. I find it quite critical to navigating the scene quickly and intuitively. Without the Fit to Objects tool in your workflow, a conscious effort must be made to understand where the Look At Point is and how it behaves. Fit to Objects alleviates much of this need. Hope this helps! -
Beam multiplier and canela settings saved with v3s file
bbudzon replied to DBLD's topic in Vision and Previsualization
I had a chat with content and realized why things are being done the way they are. The "quickfix", as I stated previously, was to simply disable the Color Temperature field. This was intended to hold us over and allow for a more intuitive UI until we could investigate a real fix. What I'm investigating now is how we can handle both a Lightmap AND a Color Temperature in Vision source code / rendering engine. The Lightmap provides certain effects that content cannot remove without breaking the fixture. So, this must be handled in code. Luckily, the ground work is going pretty well. Whenever there is any update on this, I will do my best to post them here! @DBLD, if you need a "fix" sooner than this, you can kind of hack things up in 2021 to work. I was hoping to avoid posting this, but I hate to leave you hanging. There is a par.png file included with Vision installations. I would back this up before you do anything. But, if you open the par.png in paint / photoshop / gimp and paint the white sections an amber-ish color, you'll get closer to the look you are going for. Please note; this may break other things and may need to be manual "undone" by hand when some of my fixes ship. Perform this "hack" at your own discretion. -
Beam multiplier and canela settings saved with v3s file
bbudzon replied to DBLD's topic in Vision and Previsualization
So, just an update on this: Just a few lighting devices in Vision leverage a concept called a Lightmap. This is something entirely in the backend and something that is not seen or editable by the end user. Anytime that a Lightmap is present, Vision ignores the Color Temperature field and uses the Lightmap image instead. Part of the issue being reported is that Vision was not making it clear to the end user that this was the case. The Color Temperature was filled out with a value that didn't really make sense and it was editable when it should not have been. The solution is in Vision's code base we need to handle populating the Color Temperature field as read-only when a Lightmap is present. This way, it is clear the field cannot be modified as it will have no effect. So, @DBLD, the solution to your problem is to use a different fixture / fixture mode. If one does not exist that does the Color Temperature stuff you need, you can request it through the Fixture Request form for Vision. I'd have to check with our content team, but in theory, we could provide a molefay that does not use a lightmap and therefore would have an editable Color Temperature field that would allow you to set it to whatever you want. -
Note: I made a small change to the guide. In the past, I suggested that Image be selected for Transparency shader if you want to send this to Vision. This did work with Vision well, but it caused issues in VW. Now, you should use Image Mask for the Transparency shader. This allows both VW and Vision to render properly.
-
SP4 Vision 2021 DMX connection problem
bbudzon replied to ajpen's topic in Vision and Previsualization
A new "cut" of Vision 2021 SP4 was just released. This includes the hotfix for the MA3Net error.


