


Tamsin Slatter
-
Posts
1,890 -
Joined
-
Last visited
Content Type
Profiles
Forums
Events
Articles
Marionette
Store
Posts posted by Tamsin Slatter
-
-
Great. We'll take a look tomorrow.
-
I notice you do have an active Service Select contract, so please do send your file to uktech@vectorworks.net and we'll manage it within the tech support team.
-
@Laura Stone You're very welcome to share the file if you wish, and I'll take a look.
-
@Laura Stone Check the settings on the Site Model also - which layers are is that set to work with? The Landscape Area has to be able to "see" the site model design, and the site model has to be able to "see" the layer that contains the landscape area. Also, check the Landscape Area settings to make sure you have the landscape area set to work with the Site Model.
-
As Jonathan says, this is the case in Vectorworks 2021.
Here's a video in which I tell you all about it!
-
 1
1
-
-
Anything that is in your User Folder will be migrated when you upgrade to the next release. Vectorworks includes a Migration Manager, which runs when you install the next release (if you allow it), or you can run it at any time. It's under the Tools menu.
-
On the Space Settings, click Advanced Settings. Here, you can choose which properties you wish to have available on the Object Info palette.
-
3
-
-
Hi Lisa
It sounds like OneDrive is set to just keep the server copy and not sync to the local hard drive. Make sure Files on Demand is turned off (this stops the syncing to the local hard drive.)
-
It works on Roof Faces. You can ungroup a Roof and it will become a series of Roof Faces.
-
We have also noticed this in Vectorworks 2021 and have queried it with our engineering team.
-
13 hours ago, Michal Zarzecki said:
@Tamsin Slatter, @Pat Stanford I haven't tried either of these. I have been using the standard workspaces from the outset. When I said I migrated one, I am actually not sure now. When VW prompted for migration I just went for it, so assumed that I did migrated the Workspace too.
I will try both proposals first thing. I can't work like that. the single Landscape Area I wanted to change and update the schedule took me 45 minutes, due to constant crashes. Not productive, I'm afraid 😭. And frustrating.
Are there any other things one needs to take into account or do when going from one version to another? To be honest, I haven't come across such issues with any other program. Even the GNU-licensed ones are more stable [despite being free and user made].
The UK tech support team will contact you this morning @Michal Zarzecki.
-
Have you checked that your graphics card is set up to work with 2021?
If you call tech support in the morning, they can talk you through the process.
-
VB-175107
VB-175105
(Note that these are internal links and serve only as a reminder to Vectorworks staff that the bug has been reported.)
-
Thanks for sharing your file. I hadn't spotted that. I am sorry to say that the Image scaling issue is still there in 2021, but I will file a bug for this straight away, using your excellent example file. Also, the issue with the None class is the same. I will file that in a separate bug report.
Regarding referencing resources, here is the article you need from Vectorworks Help >>
-
1
-
-
Hi @Tbai
Thanks for posting this and for attending this morning's LI session.
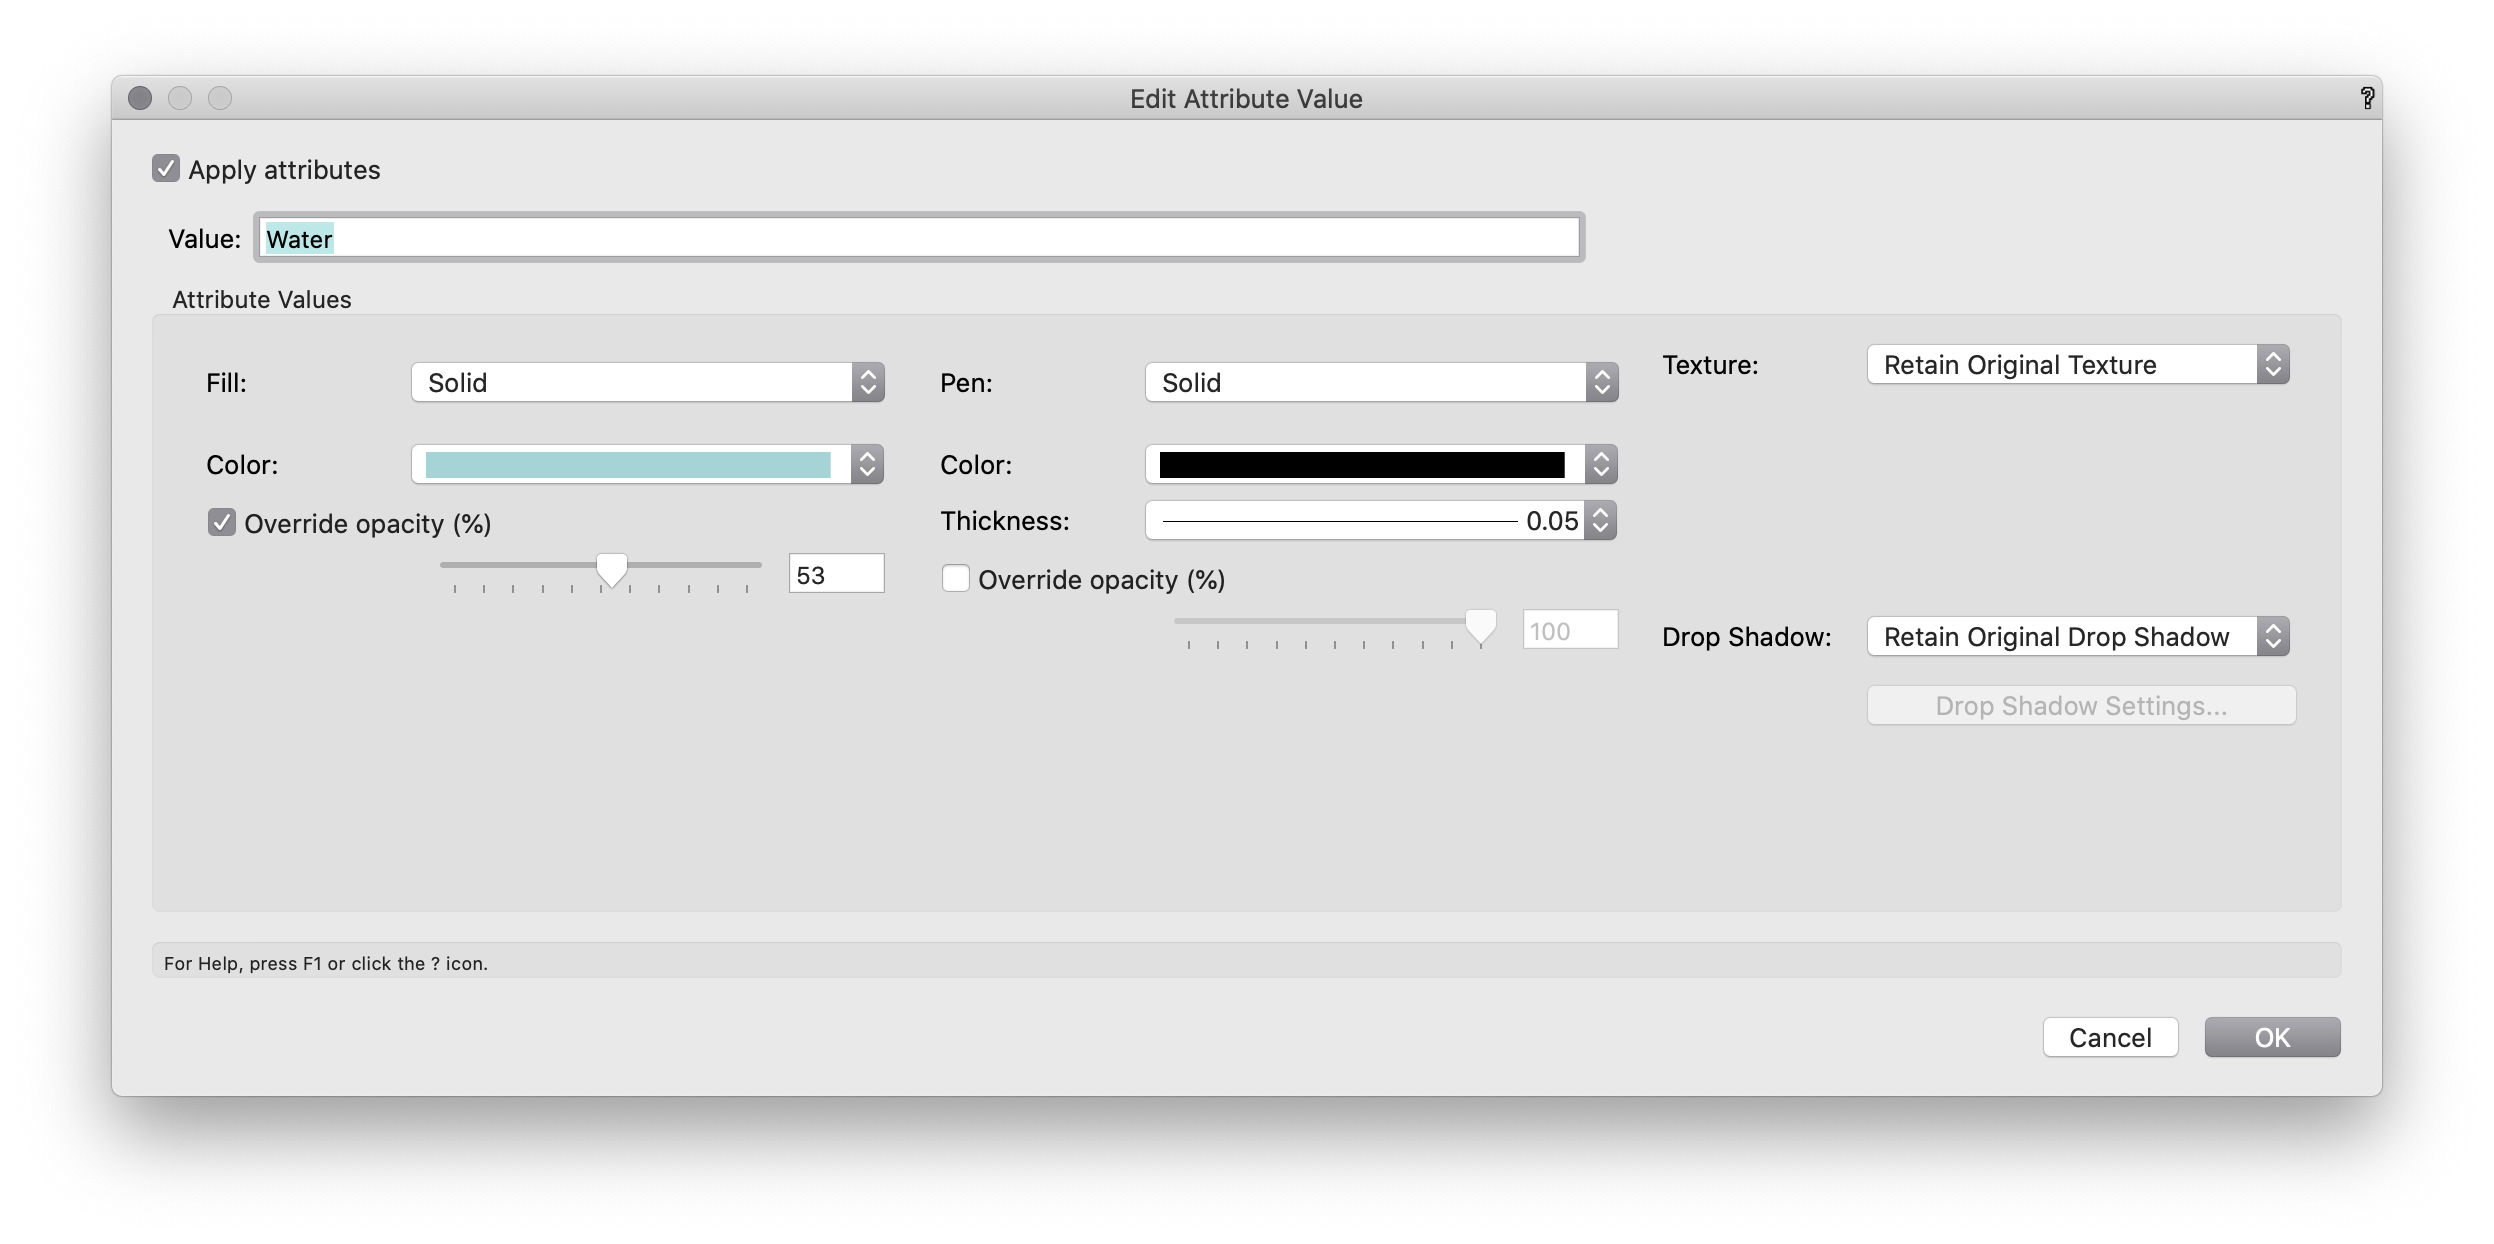
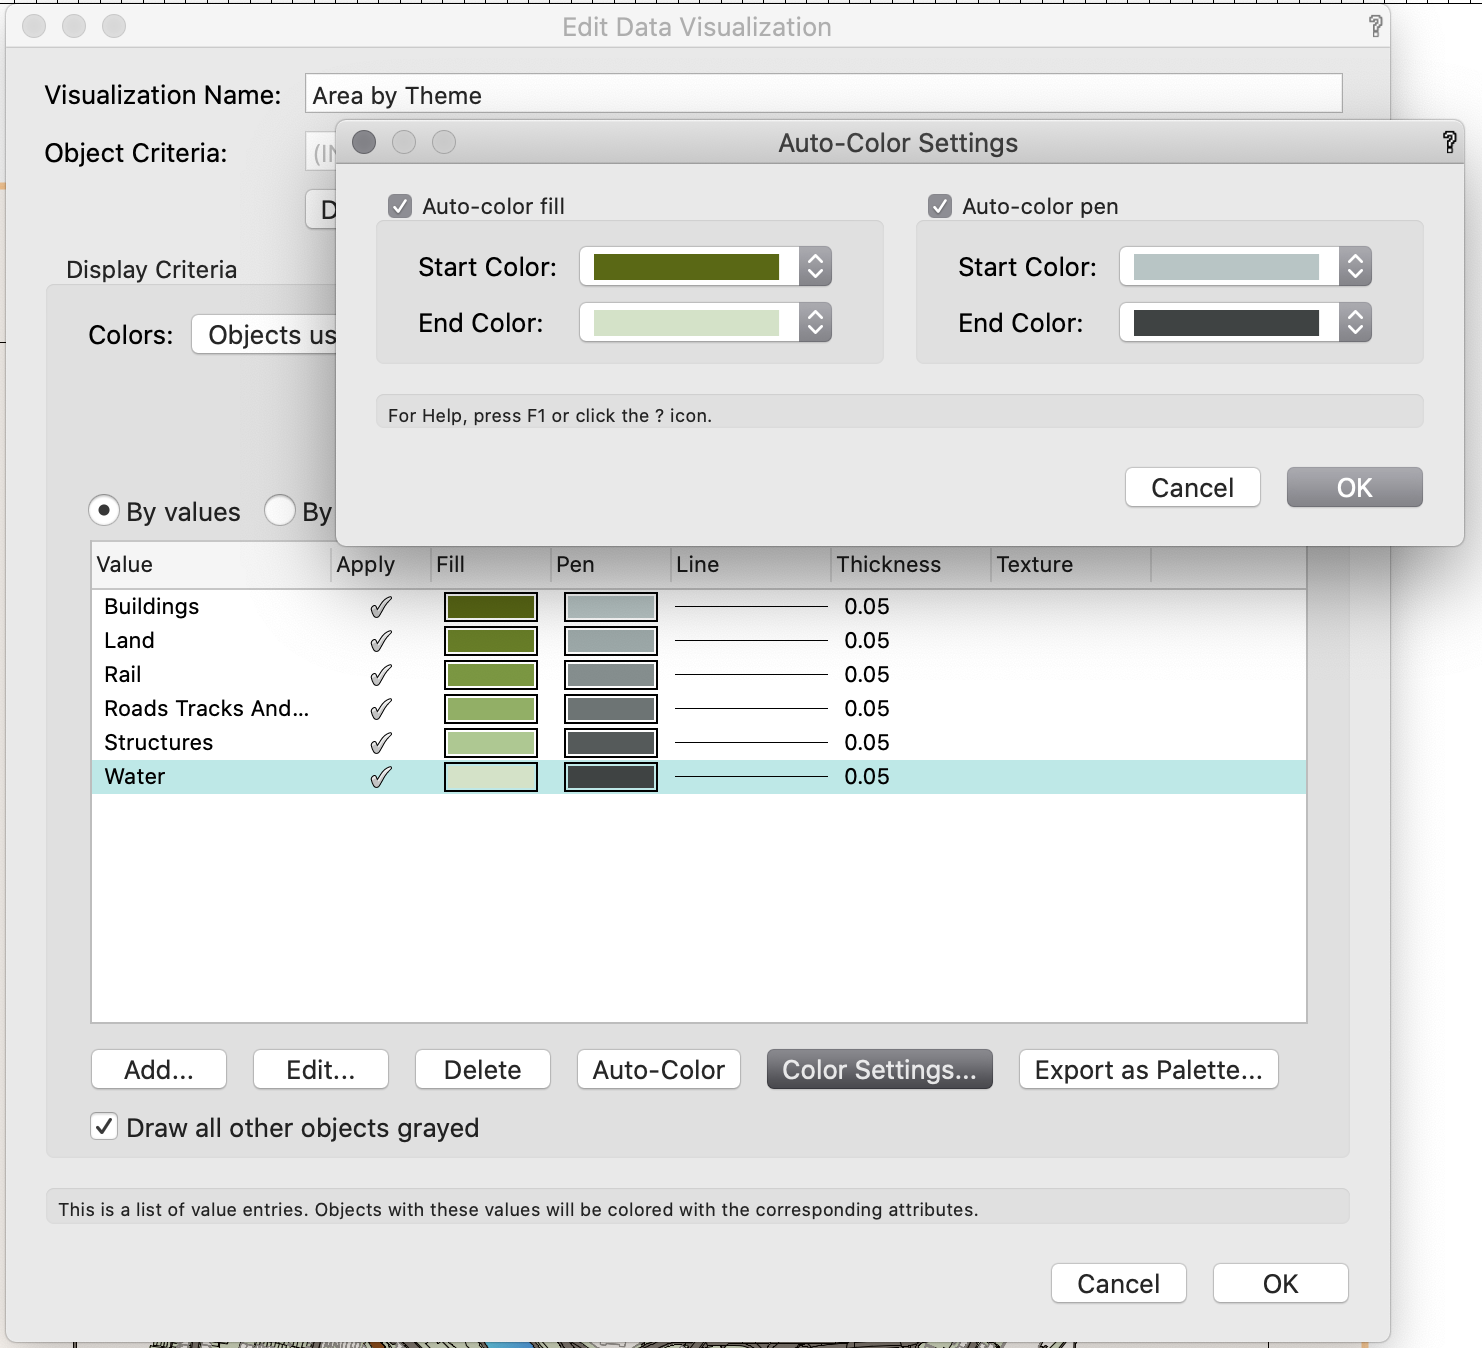
Data Visualization in 2021 DOES include the ability to override the opacity on fills. It also offers the chance to create a blend of colours between two selected colours, and to export these as a named colour palette.


If the fill is something that requires a named resource (such as a hatch or image), then the resource would need to be the same across a file set. Another option would be to have a resource file, that is used to reference resources into a number of files across the project. But this comes with a health warning. Referencing resources in this way can be disastrous unless everyone is well aware that editing a resource will cause it to update across the entire project!
-
@jpccrodrigues All I can say is hold that thought...
-
I have downloaded the file and made two changes:
I reshaped the long hardscape that was closest to the kerb (curb). It had an extra vertex, which was shooting to 0. I removed it and brought the kerb in line with the curved hardscape. I also changed the elevation on the curved hardscape to 0 - it picks up its elevation from being aligned to the roadway.No crashes for me... Hope this helps.
-
I've had a look at the Roadway, and notice that it is created as a Roadway (Custom Curb). I am not sure that this is supported with the aligned slab - but I will check.
Meanwhile, I replaced your roadway with a Roadway (Poly), and now the hardscape aligns. I also edited the components, and set the alignment to be the top of the component, so that the top of the hardscape grades to the top of the curb (kerb).
Hope that helps.
-
1
-
-
Thanks for sharing this feedback.
Have you tried using the Grade tool? It won't solve all your desires, but a network of grades can have each connection point set to a specific elevation or you can set a specific grade to calculate the elevation at the connection points.
To view the elevation of the site at a specific point, the Stake tool will report the surface of the existing or proposed site. It doesn't show the direction of fall, but it does provide the elevation. You can move it across the surface and it will update.
-
2
-
-
Thanks for sending the file through... I am looking at it!
-
Hi
Could we have a look at the file please? Preferably the 2020 elements and the 2021 version, then we can try to work out what's going wrong.
-
The symbol you are editing may be made of multiple symbols, so it could be that you are just editing a different element within the symbol. Have another go, making sure the cursor is positioned exactly over the element you want. The library symbols are not locked, so you will be able to get to the geometry.
To completely "explode" the symbol, so it is no longer a symbol, in a 3D view, choose Modify > Convert > Convert to Group. Then Ungroup to get to all the elements. Note however, that with a hybrid symbol, this will discard the 2D element. Similarly, if you were to run Convert to Group on a symbol in Top/Plan view, you would lose the 3D elements.
I hope that helps.
-
1
-
-
To which video are you referring? The Landscape Area tool has had some significant changes in Vectorworks 2021.
-
The Wall tool (and other architectural tools) are not included in Vectorworks Fundamentals.
You can find a complete list of what is included in each edition of Vectorworks, here:
https://app-help.vectorworks.net/2021/eng/Commands_Tools2021.pdf
Issues with VW2021 Landscape Areas
in Troubleshooting
Posted
I think the issue is that you have the plants set to By Instance. This means that if you update the style, this will NOT override those landscape areas that have already been drawn.
The by instance and by style options give you control over which can be edited for each individual landscape area, and which should be controlled by the style definition.