taoist
-
Posts
1,138 -
Joined
-
Last visited
Content Type
Profiles
Forums
Events
Articles
Marionette
Store
Everything posted by taoist
-
-
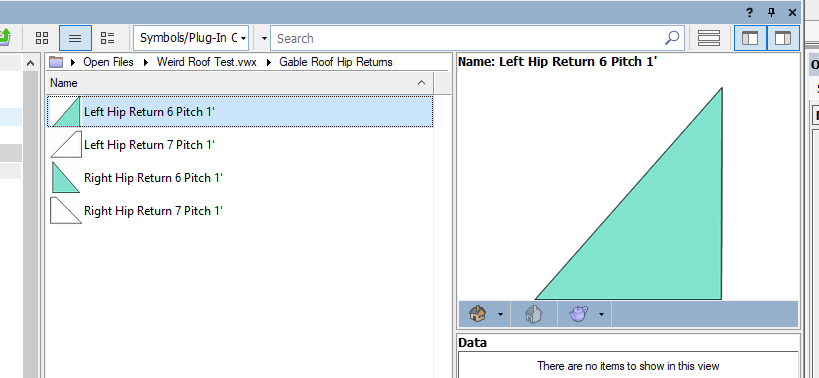
In the process of creating Gable Roof hip returns. This includes full hip returns. Doing for major roof pitches, for now. That is, no fractional roof pitches. Saving as symbols. Have left and right hip returns Placement is done in Top/Plan View click on outer corner of roof, and they show in 3D. Really would be great to have this an an option for gable end roofs. Being a Residential designer, need is warranted. taoist
-
Connect Combine Tool & Roof Faces Not working as expected
taoist replied to taoist's topic in General Discussion
TIP: Roof Faces have no options for Soffits and such. VW Architect; Use the AEC>Create Roof, set the soffit settings (check the box) Now, Ungroup the roof which will show individual roof faces Soffit settings will be there. Use connect combine tool if connecting roof face to another roof. taoist -
Connect Combine Tool & Roof Faces Not working as expected
taoist replied to taoist's topic in General Discussion
UPDATE: Using Nvidia GTX 1650 Video Card. Updated Drivers using Studio instead of Gaming Drivers. Not sure sure what drivers were installed originally. Noticed that OpenGL Detail setting was set to low. Set to very high and now the connected roof faces with valleys show in 3D as well as 2d. Must use roof faces to connect to main roof. Create roof does not work for other roofs to connect to main roof unless you ungroup. Main roof stays as create roof. Make sure that eave heights are the same (unless you want them at different elevations) or you will not get expected results. FWIW taoist -
I use rectangle tool to create roof outline. AEC>Create Roof, set parameters, does what I expect. Do the same for a smaller roof that needs to connect to main roof resulting in valleys. Connect combine tool does not work unless smaller roof is ungrouped or drawn as roof faces. When I use connect combine tool, smaller roof face outlines in red, connect to main roof which outlines in red, the the small roof dissapers. However, if I put mouse at small roof location, orange outline shows. Main roof still shows. Main roof and small roofs are in Roof Class and Roof Layer Any ideas as what is causing this?? I have watched multipe videos and the tool does not work as the videos show. VW 2019 Architect, Renderworks taoist
-
Wall Projections & Wall Recess VW 2022
taoist posted a question in Wishlist - Feature and Content Requests
Be able to apply textures, materials to these and report height, length, thick, area, volume with costs. There ability has been around for quite some time, but the final phase seems to have been forgotten. Please complete the process for such great tools. taoist -
Want to make a big hit with VW users? Wall style tool needs to be able to have horizontal offset ability for wall componets. Currently, each components horizontal location is based on previous wall component. Need the ability to overide or edit each componets horizontal "stack" location independant of previous component or use of air spaces. This way one would be able to have multiple components at the same horizontal componet location. Think brick or stone for lower portion of wall, soldier or stone cap, then siding all in same component space but stacked vertically. taoist
- 1 reply
-
- 2
-

-
Thanks to all in your reponses.
-
Thank you. By Material I mean the new Materials in VW2021. Can the materials be used in formula calculations, in this case takeoff?? Square Feet or area for the paint area and the paneling area of the wall. I know one can apply a texture, but that is not a Material in VW2021 speak. I am using VW2019 Architect and want to know how far or well integrated the new Materials are. Appreciate any input.
-
Do not know if this is in the correct question arena. Is it possible to assign Materials to an extracted surface?? Example: Wall split into to 2 surfaces. Lower for paneling upper for paint.
-
Construction drawings, residential design workflow
taoist replied to Christian Fekete's topic in Architecture
Archicad has this Residential Template. Here is link https://www.contrabim.com/residential-template -
Here is a sample of what I am talking about. This is from Allplan. Allplan is part of Nemetscheks CAD software.
-
I understand the frustration regarding level types. Yes, the implementation could be easier. Show a cross section of the structure based on what one wants to build with labeled levels. Editable level names of course. Footings Slabs Foundation walls 1st level floor sytem 1st level walls 1st level additional levels as mentioned in below example 1st level ceiling 1st level roof Ability to set vertical references for windows doors etc. We need to have templates or have VW ask us how many story(s) building, and what levels would we like implemented with what heights. That is what they are currently trying to do without asking. Lets say we have a residential design that has different levels (multiple floor elevations) within a given story. Lets assume a 1 story home. We have our main level, we have a sunken living room level (floor elevation down 7") from main floor, we also have a raised kitchen level (floor elevation up 7") from main floor. We would need to have these different levels with individual offsets (vertical elevations) within the 1st Story. How would one go about defining the vertical offsets of the (3) floor levels (platforms) within the Story without levels? We could label them as level 1 for main floor, level 2 for sunken floor level 3 for kitchen floor. This would not inform us or anyone else which number is relative to which level. Create (3) separate slabs for each level with own offsets? Seems tedious. Maybe name them as Child levels as they are not at same elevation as the Parent (main floor) level? Maybe name them as sub levels as they are not at the same elevation (vertical offset) as the main level? Food for thought
-
I am in. Regarding posters comment Architect vs Structural Engineering. I understand but do not agree. Many of us are actual contractors/builders with real world in the field experience. While Vectorworks Architect is a great Design Tool, it needs to get some tools up to speed. Other Architect software has this truss ability and then some. We should not have to spend time designing what we need for framing purposes, roofs or otherwise. FWIW JMO
-
Ryan, It is for framing only. Studs, plates, blocking. It is a separate drawing than Floor plan walls, assuming you are using walls (defined or others) where you usually control the drywall texture. As far as I know, if you make changes, you must regenerate. I myself do not use it, as it is inadequate for my needs. A lot of users have requested the Tool to get some serious attention. As far as use goes, depends on ones needs.
-
Updated Wall Framing & Joist Framng Tools
taoist posted a question in Wishlist - Feature and Content Requests
While Vectorworks has made tremendous progress with features over the years, it is truly lacking in framing tools. Builders & Contractors need to have tools that work or at least give the ability in function as to how walls and floor joists are used/built in the field. I know this question has been asked many times. Floor joists should automatically cut around stairwell openings and double up the support members as an example. Should have options for number of sill plates as well as number of rim joists. Wall framng needs more options for corner studs and where interor walls meet exterior walls. Also, number of jack studs for openings, header height placement override instead of using OIP for openings. How many sill plates for windows, etc... We all know other software does all of this. Our beloved Vectorworks needs to get up to speed on this. There is more to a building than "Design". For those of us who primarily do residential work, this is a must for takeoff purposes. This should be all part of BIM as well. FWIW- 1 reply
-
- 6
-
-
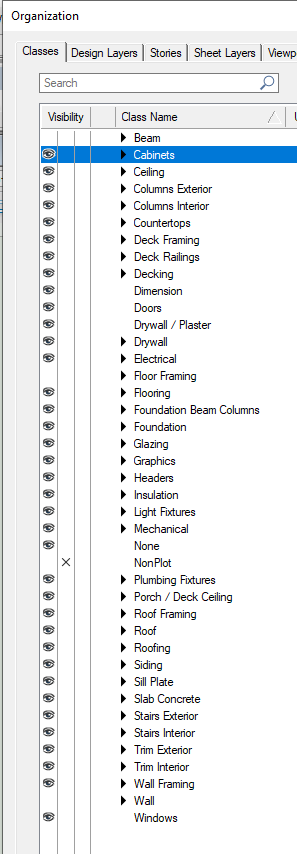
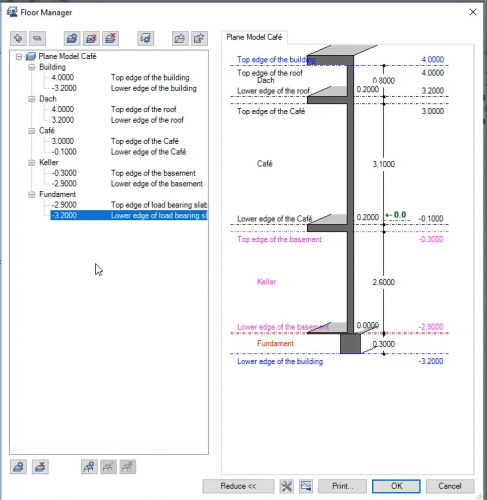
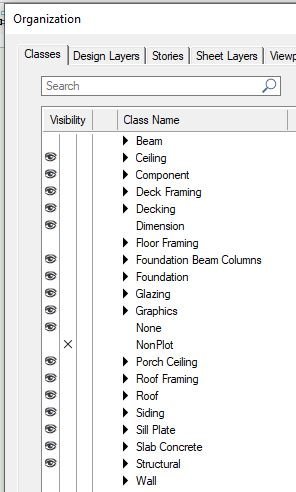
Here is updated Classes list. It is a WIP (Work in Progress)

-
Here is screen shot. I am doing this from a Builders/Framers perspective.
-
Here is a sample of one of the Templates I use. It uses Story's, Leves, Layers I find it easier to use Layers to turn of o one in place of classes. I am working on simplifying classes, also. 9' Foundation_2x10_9' 1st_2x10_9' 2nd_V2.sta
-
How do I model a Saltbox Roof (Asymmetric gable)?
taoist replied to MaltbyDesign's topic in Architecture
I do not find it Automated. One still needs to Manually enter Layers, Classes, Levels. Then, one is able to use what they have setup. I still have drawings when I used layers, classes only. Still had to manually enter all those. This is all part of good Design. I recall from years ago when were going to frame a house we would layout a Story Pole of the house. Floor Joists (1st Story) Shoe Plate Cripple Studs Window Sill plate(s) Headers Top Plates Floor Joist (2nd Story) Cripple Studs Shoe Plate Window Sill plate(s) Headers Top Plates Etc... -
How do I model a Saltbox Roof (Asymmetric gable)?
taoist replied to MaltbyDesign's topic in Architecture
Just curious. Why AutoCad for 2d? Why not Vectorworks -
How do I model a Saltbox Roof (Asymmetric gable)?
taoist replied to MaltbyDesign's topic in Architecture
Another reason for Roof Tool upgrade. We should be able to have a Multi Story Roof Option. Also, more choices in roof styles, even profiles. FWIW -
Tom, I am a PC user which means Windows 10. Main reason, a lot of other things i do with a computer, no equivalent software for a MAC. You are correct, does not make a difference, which OS (Operating System) Normally, max of (2) Story's, with Full foundations. In regards to levels; Lets say you have a specific height you want the tops of your windows to be at above the subfloor. Create a Level for that height. Then use that Level as reference for your window elevation (Vertical) placement. Levels can be used for just about anything that requires a vertical elevation height within a story. Levels are universal. Adjust each level on a per Story basis. That is, lets say top of basement windows are even (level) with top of foundation wall. Then on 1st level (main) you want windows at a different height. Remember, levels are reference, not a design layer. Nothing gets drawn in a level. Levels are a guide if you will. I suggest using Method 2. that I outlined. This way, you are able to "see" what layer you are drawing/creating on. Also, remember whatever class is currently showing , whatever you draw will be put in that class. So, if you want whatever you are drawing to be in a different class, then change/create to that class first. Otherwise, you will need to edit later.
-
Tom W. What is it you are having trouble with?
-
Depends on how you work. I have found no difference in my work to setup the different models per se. All require a vertical layout of Story's, Levels & Layers, or just Layers as in Method 1.l Even with just using Layers, one still needs to do this. Once done, save as a template. Initially it may seem a little confusing if you are used to doing Layers only, you draw on the respective Layers. You are able to "see" what Layer you are using via Navigation Palette. There is no Menu tab for Levels in Navigation Palette. You do not "switch" to another Level. In method 3. there is only (1) Layer per Story. I use the slab (concrete for foundation), (top of subfloor, wood framed floor systems) as my reference for the Story's. Assuming all classes are visible; Method 1. Layers only method, change the elevations of the layers. Visibility is by Layers, regardless of what is on the given Layer. Easier to "see" as you have the use of the Navigation Palette for the Layers. If you change a Layers elevation, you will need to change all Layers above it. Method 2. Story's, levels, layers for each level - again, one draws on Layers and you are able to change Layers, Levels, Story(s) Elevations Visibility is by Layer. "seeing" is as in Method 1. Might consider it as best of both Method 1. and Method 3. Method 3. Story's, Levels, (1) Layer per Story - What you draw on a given Story Layer (Walls, cabinets, fixtures, etc..) are only things on that Layer. Everything else is referencing a Level. Levels visibility is controlled by classes, not Layers, other than the (1) Layer per Story. "Seeing" (Navigation Palette) is minimal due to all that you have is (1) Layer per Story. So, in a (2) Story Project (assuming full foundation), you have 3 Layers, maybe 4 if you want to put roof on separate Layer. Story's are "containers" for Levels, Layers within a given Story. When one adjusts a Story, everything adjusts with it assuming you have top and bottom references (Bounding) set correctly. Easier if all Methods are created and saved as a Template instead of doing on the fly. This way you spend more time drawing in place of creating and editing. One is always able to Edit (make changes) if need be. FWIW