


Pat Stanford
-
Posts
12,718 -
Joined
-
Last visited
Content Type
Profiles
Forums
Events
Articles
Marionette
Store
Posts posted by Pat Stanford
-
-
Podcasts are much easier to do when you are underemployed rather than overextended. 😉
But we will see what we can do.
-
@Nicolas Goutte Thanks for that information. I was not aware of Refresh Libraries.
How many of us do you think you would have to put together to know everything about VW? 😉
-
For some additional background on setting up User and Workgroup folders see the following threads. Perhaps the biggest hint I can offer is that when you create a NEW file in the User or Workgroup folder, it will not be seen until VW is restarted. You can add and remove resources from existing files without requiring a restart, but the list of files appears to be cached on startup.
-
 1
1
-
-
Select the window and look at what type of object it says it is in the Object Info Palette. If it says Window then the window was not actually inserted into the wall. It should be Window in Wall.
If it is a Window, drag it out of the wall and then back in. Make sure that the tip of the cursor is within the boundaries of the wall when you release the mouse or it will not insert and become a Window in Wall.
-
OK, since @MullinRJ shamed me into this, I will go back to one of my standard lines:
I understand WHAT you want to the script to do. What I don't understand is WHY you want to script to do it.
Please explain what you are trying to accomplish and we can often provide a better solution than the WHAT you are asking about. If learning to script is the WHY, then that is great and we will be ready to help. But if it is something else, there may be another way to get what you want (but if you try sometimes, you just may find, you get what you need.) 😉
-
1
-
-
Faceting of 2D curves is based on Vectorworks Preferences:Edit pane:2D Conversion Resolution. It is probably set to Medium or Low. Set to to High or Very High and see if that helps.
-
Turn off the Class named "Ceiling-Main" in the viewport and you should get what you want.
If you need the swing hidden instead turn off the class named "Sills"
-
1
-
-
Right Click on the viewport and choose Edit Crop and draw the rectangle.
Since you already have it drawn, you may be able to Copy and Paste In Place and avoid redrawing it.
-
1
-
-
There was a discussion on the scripting forum earlier this week (or last week, I can't keep track) about using Coincident Constraints to simulate this. Search for Coincident and you should find it. The basic trick is that you need to use Lines with coincident constraints at their ends rather than a single polyline to get the functionality you are looking for.
Alternatively, edit your workspace and add the Flowchart tools (Node and Link) from the Tools:Text tool set and see if that will do what you want.
-
It appears that you can not access the Purge command via a script. In the archives we tried back in 2010 and could not find a way then either.
-
In looking at this further, I don't think this is easily doable via a script. You can probably get the Purge dialog box to open, but the user will still need to select what to purge and click OK.
You might be able to use one of the Build Resource List commands to get a list of all the symbols and then check each one in series to see if it is in use. If you do this make sure you start at the bottom of the list and work up so you don't change the list order as you delete items.
If none of the above makes sense, this may not be a great place to try and start in learning scripting.
My week/month/year is slammed, so I don't have the multiple hours it would probably take for me to try and write and debug this. If you use symbol folders it gets even more complicated.
Good luck.
-
First, you have a Styled door, so you need to click the Convert to Unstyled button to make it editable. You probably don't want to start with a door with a swing (unless I am misunderstanding what you mean by barn door. I am thinking a big slab that rolls on wheel on a track above the door.
If your slab is a symbol, you should be able to click the Use Symbol Geometry button and then select the symbol from the Resource Manager. You may need to edit the symbol to get the insertion point in the correct position for what you are trying to do.
-
1
-
-
OK,
Here is a screen shot and I have uploaded my edit to the file for you to look at.
Note that I had font substitutions happen. I don't have Calibri and one of the other fonts, so they were substituted with Arial.
 linetypes Pat.vwx
-
It depends on how fancy you need to be.
If you only need the look, then insert a door with the proper dimensions and format it as an Opening or Cased Opening. Then draw the "door" as a separate piece.
If you really want it to be a single door object, then create the "door" (moving part) as a symbol and use the "Use Symbol Geometry" option in the General pane of the Door Settings. Read the help on Use Symbol Geometry for the details.
In either case you will have a door object that you can set the parameters on and use to report in a schedule if you need that.
-
1
-
-
My guess is that it is not square meters, but rather square millimeters.
My suggestion would be to draw a very simple site model in a new blank file and try the slope analysis on that. Something that is simple enough that you can manually calculate the area and see if you can figure out the required conversion factor.
Once you have the database of all of the slopes, you will use the SUMMARIZE function on the Color column to collapse them into a single summarized subrow. Click on the disclosure triangle on the database header row (3, not 3.1, 3.2, etc. If you don't see the header row, go to the worksheet View menu and make sure Database headers is checked.) and check the Summarize Items check box. You probably also need to check the Sum Values check box to get the total for all of the Summarized subrows.
-
2
-
-
Only you can decide what is acceptable.
On the test file you sent, the text appeared to be the same size as what was on the design layer in the drawing, so I thought that was what you wanted.
-
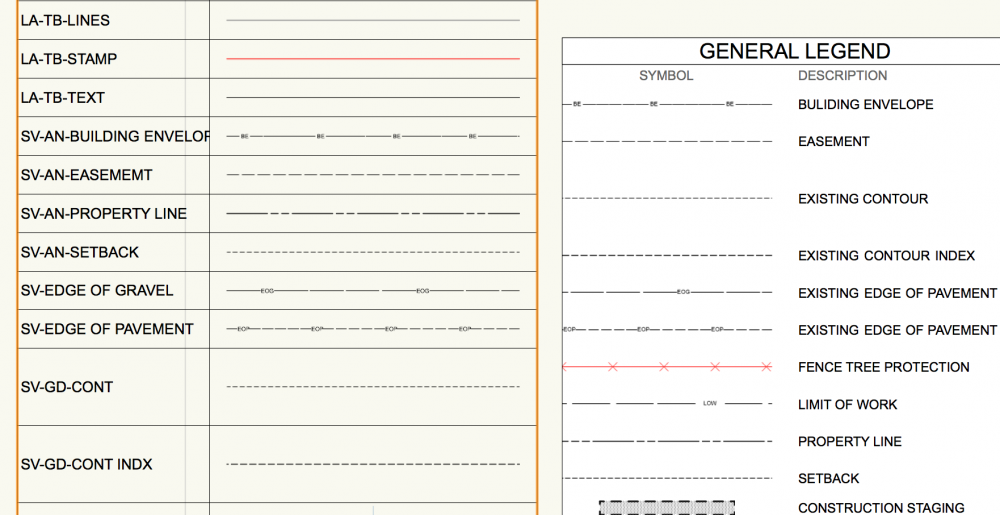
Try this:
Create a worksheet and database with criteria to limit to just the lines you want. I just used Type is Line to get all the lines.
In Column A enter a formula of =C which will give you the class. I then Summarized on this to get only a single instance of each line type.
In Column B enter a formula of =Image
Select all of the subrows and set the Row Height (in the Format menu) to 26 pixels.Select the database header for Column B and go to Format:Cells:Image. Set the Image Size to Fixed with dimensions of 26 x 200 pixels.
Place the worksheet on the drawing.
To me, the line types appear to be very close to the line types already on the drawing.
-
If you are using Saved Views, the rendering mode is saved (or can be saved) as part of the Saved View.
If you have multiple saved views, the easiest way to change them is to go to the Organization Palette. Select all of the Saved Views you want to change and then click the edit button. From the Edit Saved View dialog box, uncheck the "Restore Render Mode and Options" box. Click OK.
Now your Saved Views will use whatever rendering mode was set before they were invoked.
-
If they were extrudes, you select the object, right click and choose Edit (or double click to enter Edit mode). Select the profile object and look in the Attributes Palette to see if it has a fill of None. If it does, change the fill in the Attributes Palette.
-
1
-
-
It is still available to add to your workspace. Use the workspace Editor and look in the Legacy tools.
-
You need to make a Texture out of the image.
You don't need to import the image into VW first.
Go to the Resource Manager, click the New Resource button and choose Renderworks Texture.
Set the Color to Image and select the image file you want to use. Set the Size to be appropriate for the texture. Depending on what your image is you may also want to adjust the Reflectivity, Transparency and Bump.
More information in the VW Help files.
-
3
-
-
Locate the symbol in the Resource Manager. Right click on the symbol and choose Edit Symbol Options...
Check the Insert In Walls check box. You probably want the On Edge rather than the On Centerline options.
-
1
-
-
Can you post a test file with your line types and I will take a look tonight or tomorrow.
-
1 hour ago, MullinRJ said:
Hi @Pat Stanford , you guessed it. I initially got hung up using "0". Once I used -1, it got easier. The second and third modes, Collinear and Parallel were much easier to guess how they worked, and with the tech note using symbol wasn't too hard either.
Not to make two points of the same object coincident, but the call uses two points on an object to define an edge for Parallel, and Collinear. I'm not sure that's wha you mean, though.
Raymond
Parallel and Collinear are exactly the options that I could not think of when I was looking at the call.
Thanks for the deep dive.

Script to work on visible layers only?
in Vectorscript
Posted
There was a new call added a few years ago.
VSEL for Visible Selection State. This only handles objects that are both visible (not in a hidden layer or class) AND selected.
Change your SEL above to VSEL and you should be good to go.
Other steps may be required for other scripts. Especially ones that use something like BLAH:=FSActLayer;