


Jeff Prince
-
Posts
3,028 -
Joined
Content Type
Profiles
Forums
Events
Articles
Marionette
Store
Posts posted by Jeff Prince
-
-
@VWNovice9 How did you model the roof shape depicted in the photo?
If it's a solid, you could just copy the roof and modify it to become one of the beams.
-
I can’t see your image and I imagine you meant to type Glulam and not gulag 😉
You can extract the curve from your ceiling and the finish drawing the elevation of the beam by offsetting the curve and connecting the ends. From there it’s a simple extrude to the depth of the beam. Make it a symbol and array duplicates into place.
-
2 hours ago, gangotti said:
I figured out it was the margins that were causing the issue.
Margins will get you part of the way there. You might want to look into:
- how you have your geometry placed. It's always a good idea to place Loci in the opposite corners of the page so your title block doesn't move around on you if you change sheet sizes.
- "Sheet Size" fit/vs explicitly selecting a sheet size
- "sheet fit mode"
- wether or not you want VWX to make a border for your title block or not.
-
post the file and someone will look at it.
Troubleshooting from screen shots is a PITA.
-
57 minutes ago, Greg Rosenke said:
I'm a visual learner.
Don't convince yourself of that, it's a trap.
We all learn in a variety of ways, it just so happens that in the graphics industry we use pictures to communicate.
-
You need to change your “grey level for greyed layers” in the print settings IIRC. I think the default is 60%. Whatever it was, cut it to 30% or 40% and you should be good.
-
31 minutes ago, Greg Rosenke said:
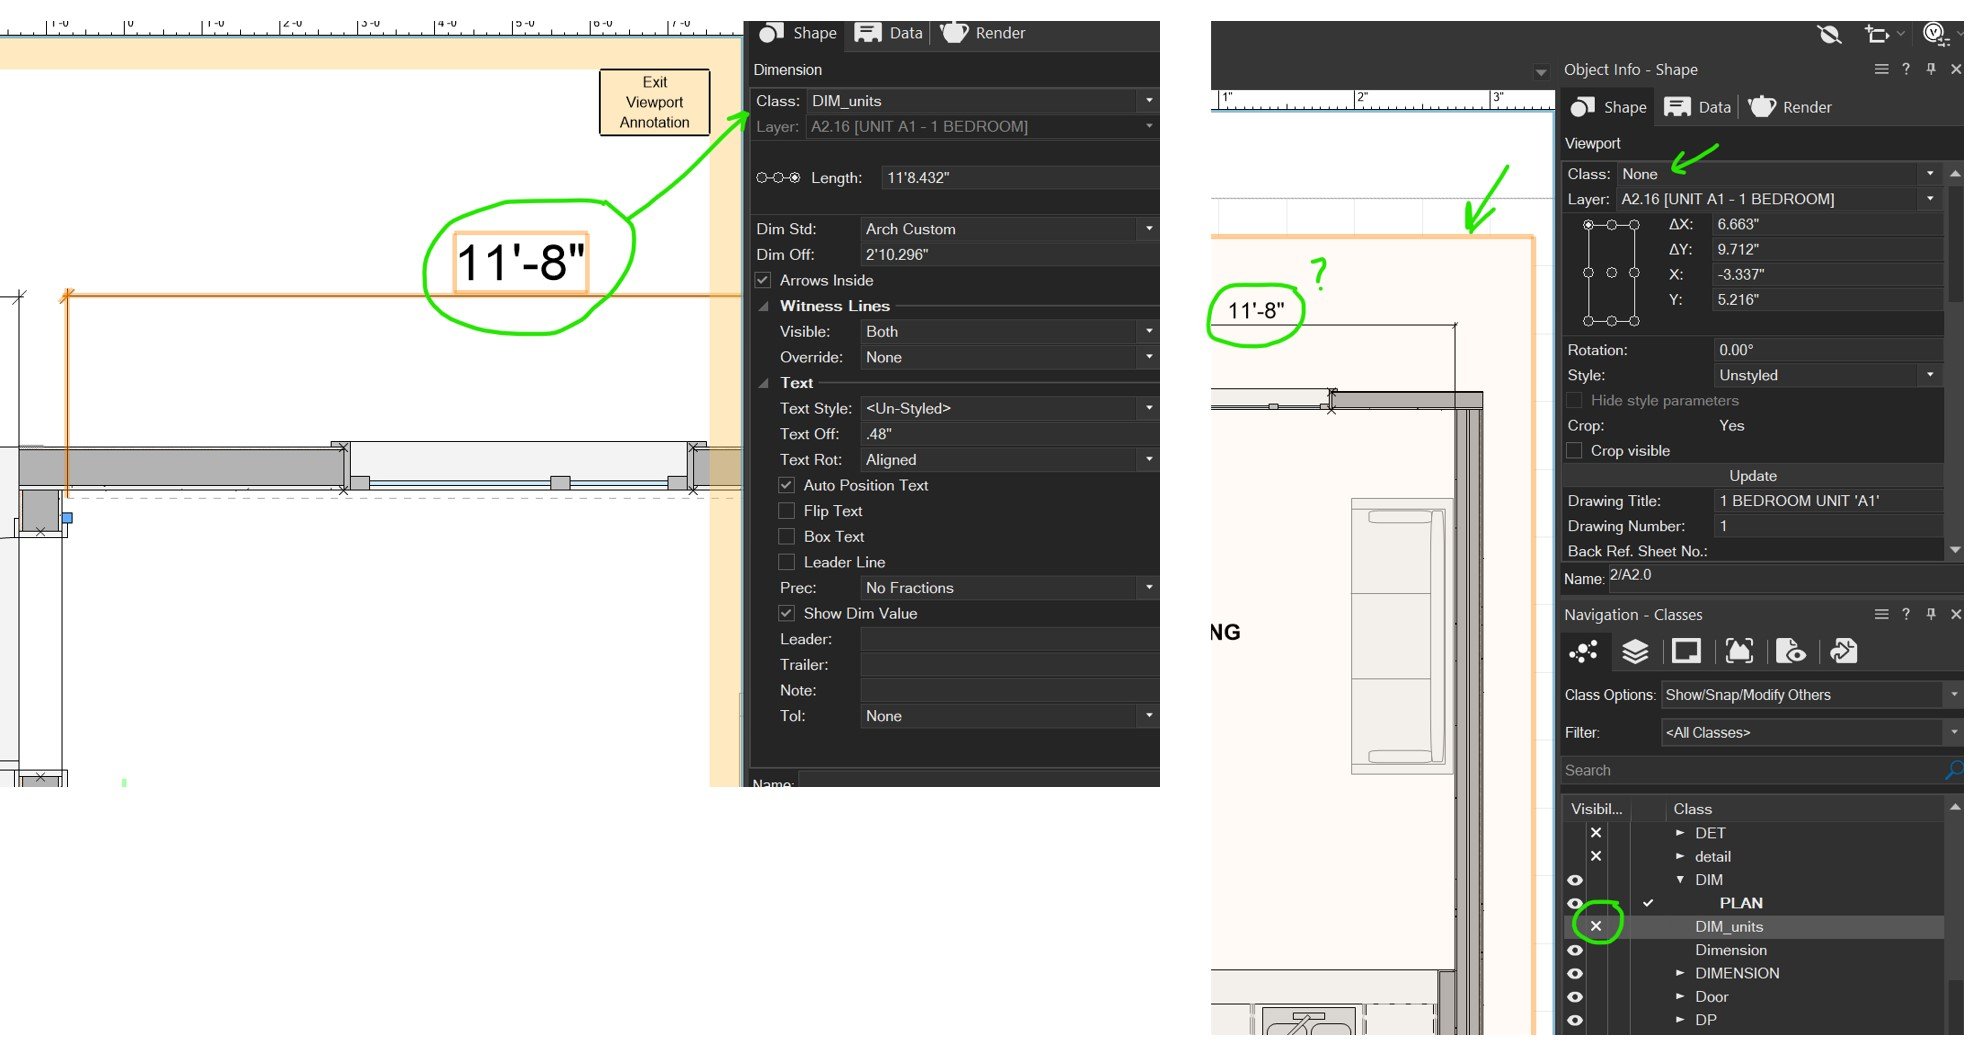
@Jeff Prince I tried all your suggestions and still no change. Please see my screenshots.

you need to select the viewport.then look at the OIP (object info panel)., not your navigation panel.
Find the class button there and set it accordingly.
-
 2
2
-
-
Your workflow is correct.
Make sure that class is not active and your issue should go away.
correction...
Select your viewport and go to the OIP.
From there, click on the classes button for the viewport.
Turn off the class from there.
-
6 hours ago, BartHays said:
Yes, exactly my point.
So why integrate a tool into my professional design software that I can't claim copyright to or guarantee is copyright-free?
Because people who can't design will buy the software and think it will make them an architect?
Designers across many industries make mood boards made of stock images, magazine clippings, screen shots, and such as part of their process don't seem to see the use of AI any different. I doubt being caught in a lawsuit is likely nor will it stop the behavior.
Seems to be the industry trend.
Hype reminiscent of the .COM era with investments in dubious companies flying around everywhere.
-
1
-
-
You guys need to post VWX file that actively behaves this way instead of videos alone. I’m willing to bet it’s something in the file, I see this all the time with my training clients.
-
1 hour ago, Jack2022 said:
Finding bad hardscapes resolved the moray issue and it now looks good. Still takes a long time to update site model but once done I it looks correct.
Some hardscapes had thin extensions down to 0 where stakes were poorly aligned.
I didn't know you could crop site models so will try in an idle moment in the future.
I was sure there was a way to snap/align to top of hardscape or bottom. Can you remind me where? struggling to find via google.
sounds like you are back on the path to success. I’m away from a computer right now, but I build my hardscapes so the they build from the top of finish downward and alignment hasn’t been a problem. I also place all my hardscapes that need to alight with each other in the same DL to avoid confusing VWX. -
1 hour ago, Jack2022 said:
I have tried to split the site model into 4 to reduce load on VW but the edges don't meet cleanly where the cut in contours were made.
you can get them to meet cleanly by including data beyond the edge of your desired site model and then set your crop at the desired edge of the model. That being said, your site model doesn’t look so large as to require such an approach, it probably just needs to be cleaned up and checked for inefficiencies.-
2
-
-
1 hour ago, E|FA said:
Bump
Same as it ever was...
Same as it ever was...
Same as it ever was...
Same as it ever was...
Same as it ever was...
Same as it ever was...
Same as it ever was...
Same as it ever was...-
1
-
-
How you model it should reflect how you will build it. Most "curved" windows in simpler buildings are smaller rectangular units mulled together.
Are you actually having a custom curved window formed whose frame will actually be curved?
If so, @Tom W. 's suggestion of Deform/bend will work.
If not, model it how it will be constructed by taking your individual rectangular units and rotating them in plan view to fit the "curve". Mirror will be your friend here.
Oh, and you file did not contain the problem window or wall.
-
Copy and paste one of these LA areas in to a new file and post it here, that will help on the troubleshooting a lot.
If you look at the Tag Class, does the the specified Fill look like the one you see in that screen shot you posted?
If your Plant Style contained within the Landscape Area does not have a common name, you need to edit the Plant Style and provide one.
-
8 minutes ago, PNWPaul said:
Vectorworks will then be able to read it.
…sometimes -
1 hour ago, averilcb said:
Newbie here. I'm working on a planting plan, and an image keeps showing up behind my text on the plant labels- how do I get rid of it? I've looked everywhere!
Also, some of the plants don't have common names already entered. How do I add those?
post a file with these problems, hard to tell what’s going on based on your description. -
Yes, listen to @markdd
Titleblocks in Vectorworks, when properly constructed, are powerful. Just at the fundamental level, your title block should get its Sheet Number and Title from the Sheet Layer values. The other dynamic/linked text in a title block can report the total number of sheets, date, various bits of project information, and even per sheet issue and revision data.
…but all of that capability is lost once you break the title block into a group or something other than a title block object.
-
1
-
-
39 minutes ago, Dave Donley said:
Hello @Jeff Prince and @Benson Shaw
We are updating the library used to import LAS and LAZ files and these imports should be fixed in the next major version of Vectorworks.
That's great news.
It would be better if it could come out during the 2024 product cycle. We've been suffering for a while here 😞
-
2
-
-
21 minutes ago, E|FA said:
I attach a custom record for this purpose because I'll also have other object types that need to be tagged. My workflow is to build the existing conditions model, select all and attach the record and mark everything as "existing". I save a copy of this file for safety. I then go through and mark anything needed as "demo". It turns out that I don't need the "New" data attached because everything not already marked is new. I'm sure there are flaws with this system, but it works for me.
That’s a great strategy-
1
-
-
11 hours ago, Tom W. said:
Incidentally, if you prefer your snaps in the pre-VW2024 position you can unpin them from the view bar + they will return here.
Have you found a way to rearrange the 'ribbon' and/or resize the elements?
It's funny how they made stuff that you don't need (titles for sections of ribbon elements) or made larger things that should just be an icon (current render mode, visualization, etc).
I don't get why they keep changing the location of commonly used tools forcing users to retrain where things are. It's especially problematic when you have to bounce between versions of the software or train people. I guess that justifies having to refilm all the training videos from the last decade 🙂
-
1
-
-
Vectorworks sometimes does that when editing meshes.
You might have better luck importing and editing .USD.
-
1
-
-
1st thing to do is become familiar with all the data fields already present in Wall Styles.
There are fields for Acoustic and Fire Ratings that you can make use of and then report to a Data Tag.
For instance, if you put a value in the default Fire Rating field, you can configure a data tag to display it with this definition:
#IfcWallStandardCase#.#Pset_WallCommon#.#FireRating#
But you should do some lessons before diving too deeply into custom data tags....
You might want to watch "Refurbishment Workflows", which will demonstrate some record format and data vis techniques
https://university.vectorworks.net/mod/overview/view.php?id=4355
Just compare the contents of the video against the data that is housed within wall styles already before going crazy creating record formats.
For instance, you could repurpose the Wall Style "Function" field to "user-defined" and house the "Existing - Demo - New" status of a wall. You could use classes and/or layers to organize walls and visualize them. You could even add a small component to your walls to hold data values if you wanted to really exploit the system toward easy and rapid editing of data throughout a model, but that can be risky if you don't understand the implications. You will find there are lots of ways to do what you want. Just be consistent and try to use what is provided by VWX out of the box within the intended use cases and you should be ok.
So after watching the video and if Wall Styles, classes, or layers don't offer the desired places to house your data, you can attach a custom record format to wall objects.
Try to use what the Wall Style provides though, otherwise you will have to attach records to every wall you create. Magic wand is your friend if you go that route.
And now you should have an understanding of data, where it's housed, and how it can be visualized.
Dive into Data Tags and Reports to see how you can retrieve that data and use it for annotations, schedules, and more.
Here's one of the many videos introducing the Data Tag customization topic...
https://university.vectorworks.net/mod/overview/view.php?id=3018
It's a lot to learn and some of it can be a bit cryptic at first when you retrieve records or create calculations for reports and data tags (see example above).
However, if you follow the tutorials and experiment a bit, it becomes easier. Just don't expect to take one 60 minute class and have an immediate mastery 🙂
There are lots of examples on the forum of custom data tags, visualizations, and related workflows.
I wouldn't burn too much time on the forum until you have watched some of the introductory classes.
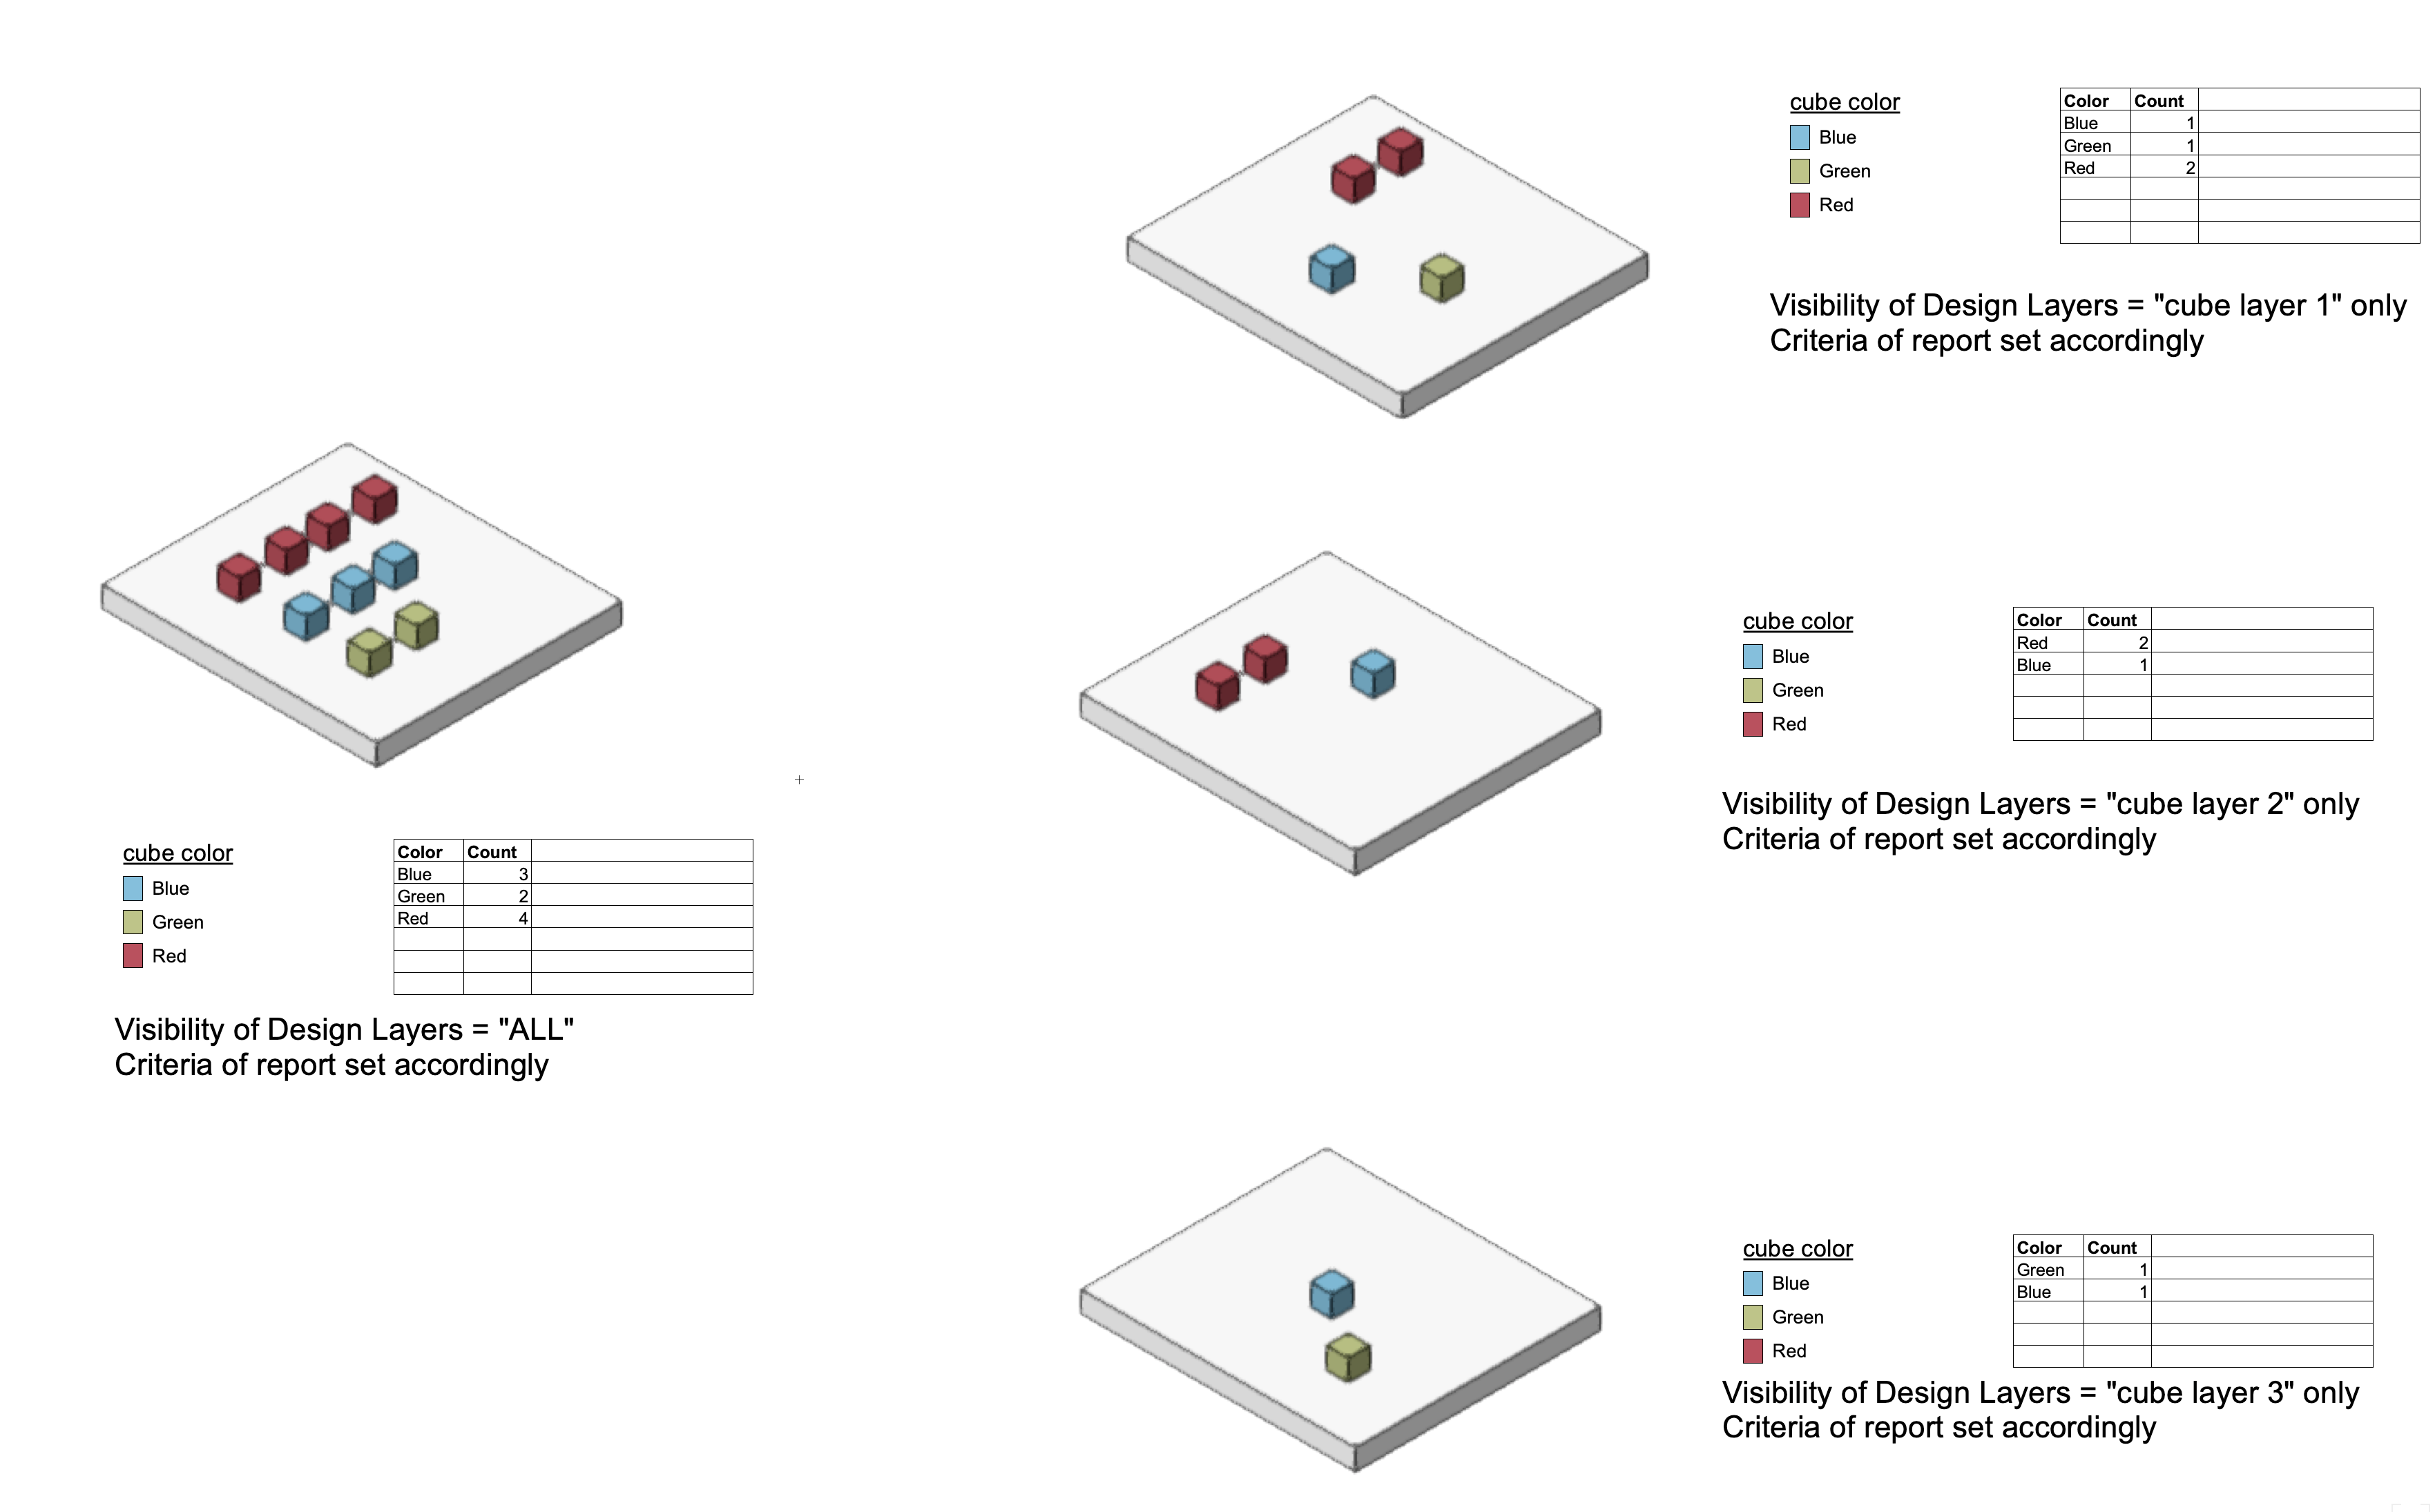
Here are a few file for you to play with that illustrate some things...
The Wall Styles file does some of the things you are interested in.
The Cube file shows data visualization technique of Design Layers

-
4
-
-
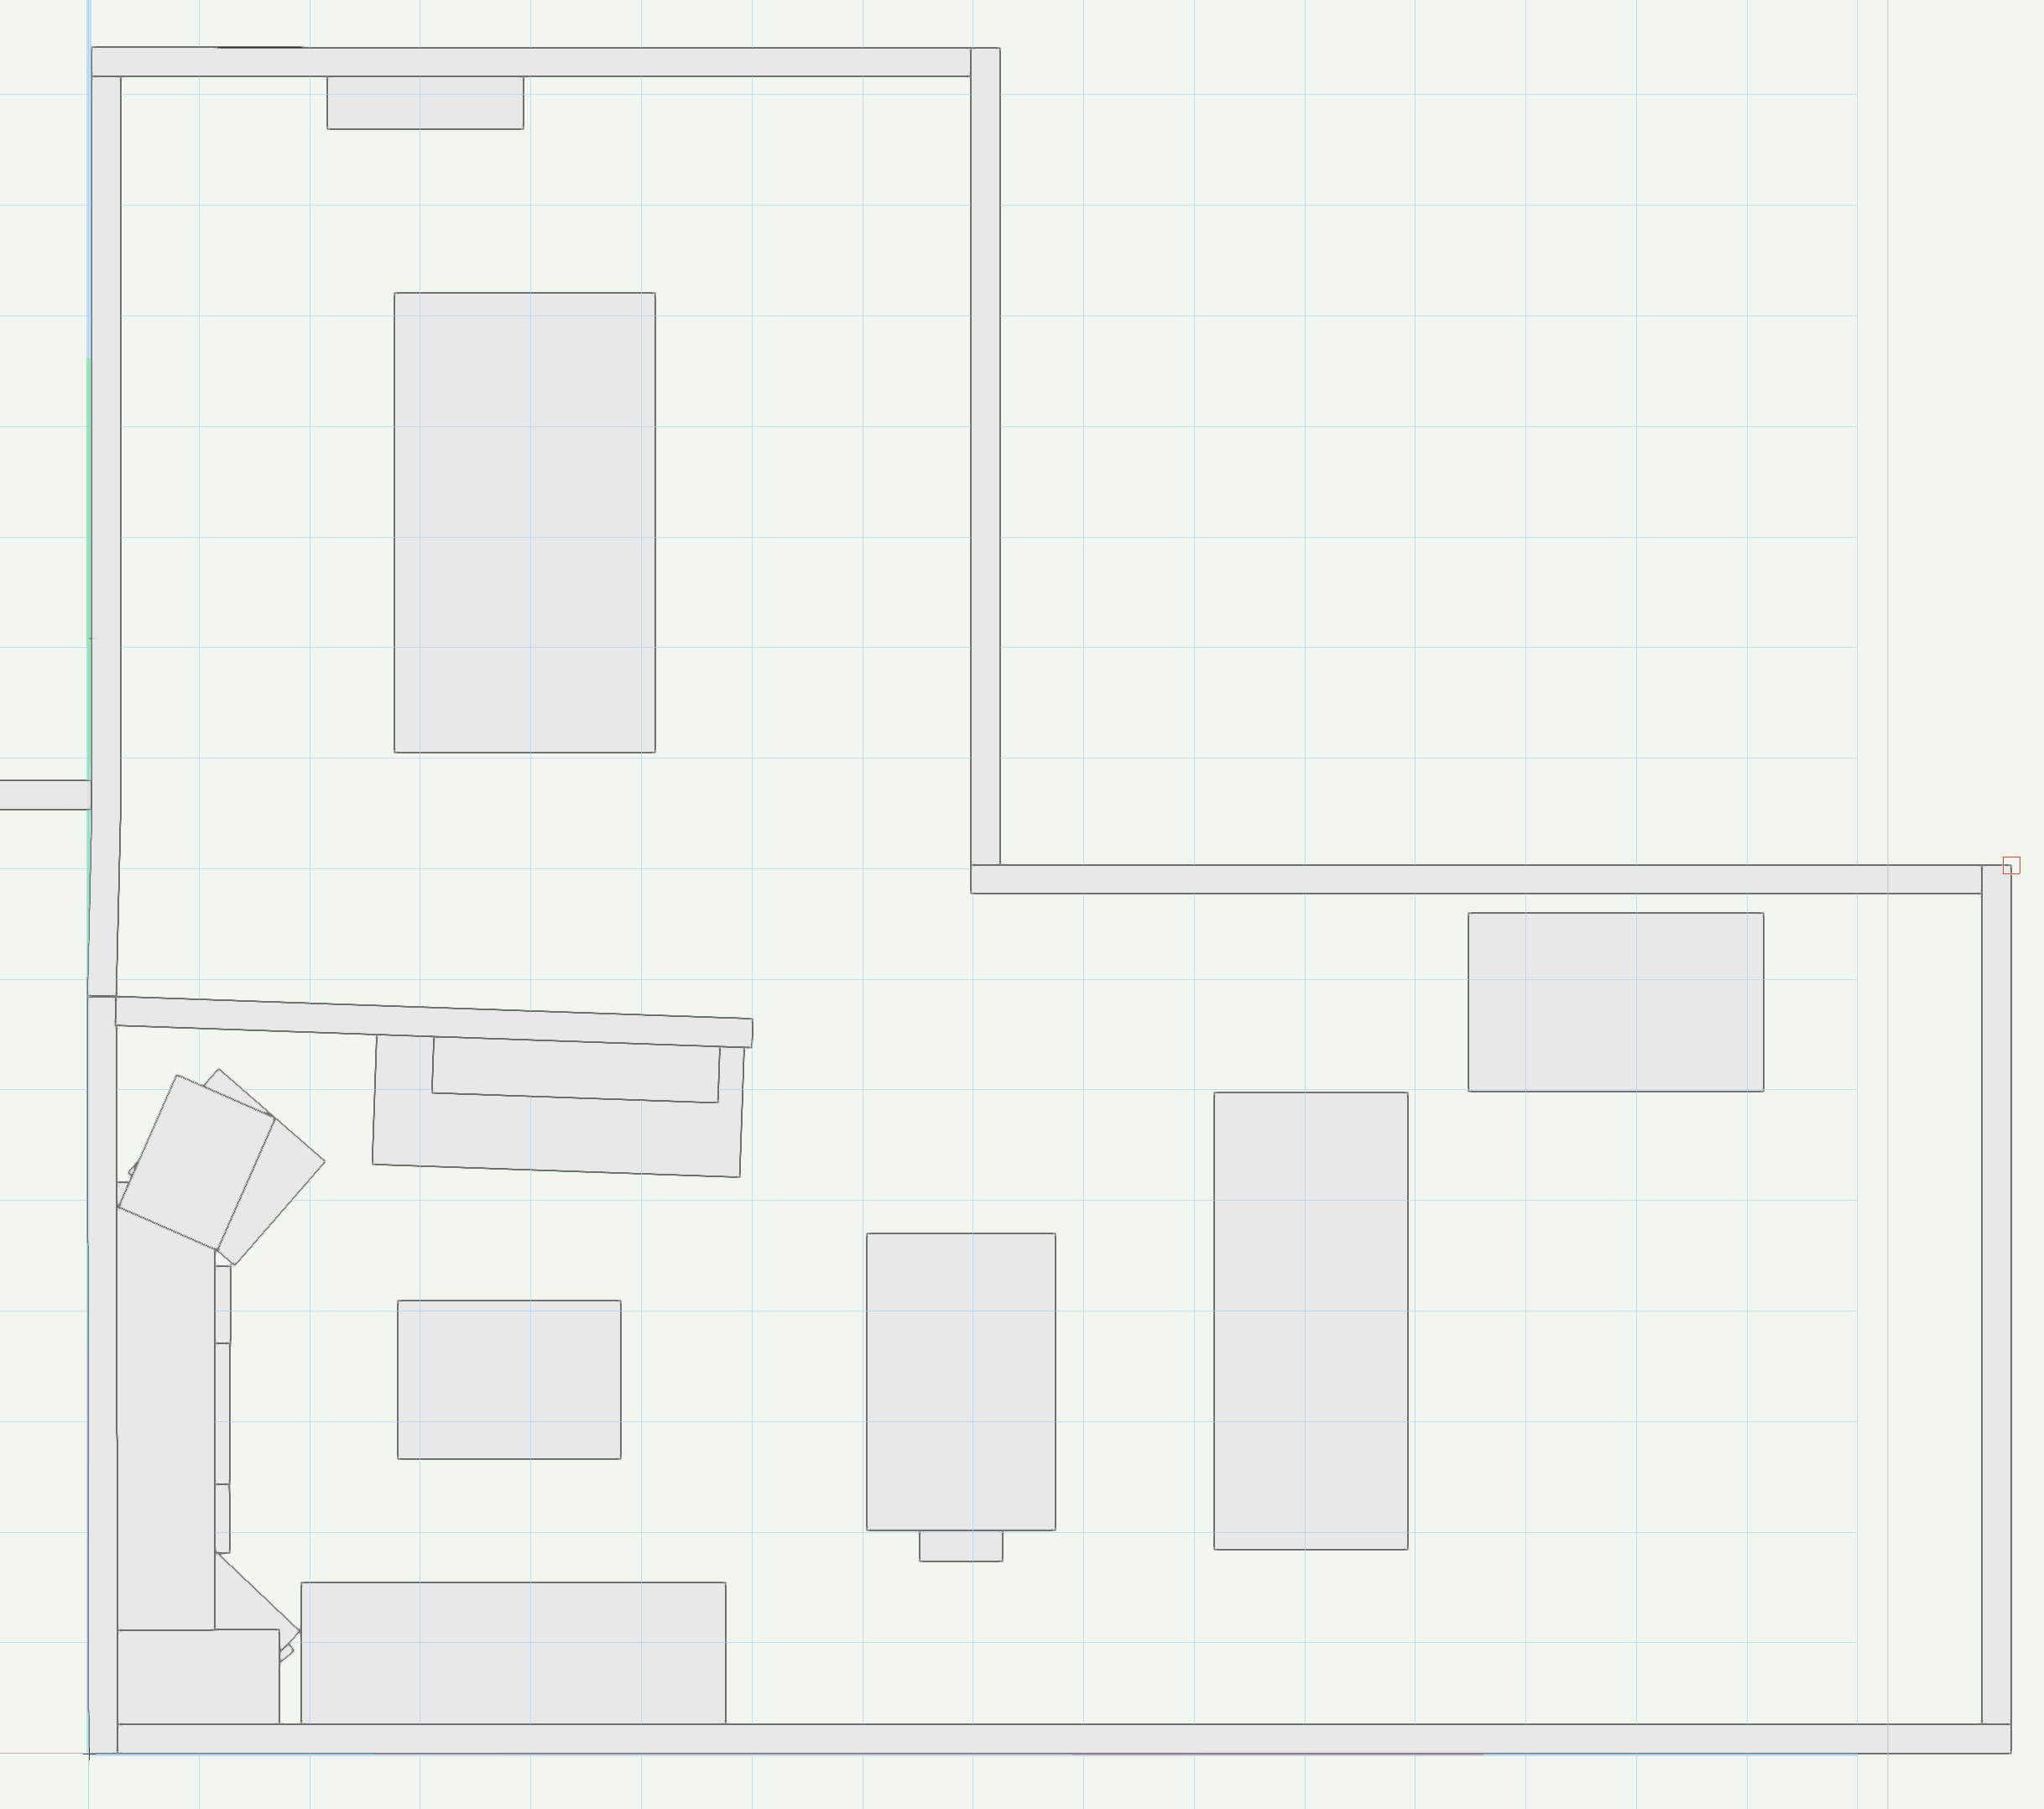
You could try Vectorworks Nomad and see if it is sufficient for your needs.
It captures and normalizes objects like walls, window and door openings fairly well with flat surfaces instead of bumpy scans. Desks, cabinets, chairs, and such it makes boxlike representations of. Partial height walls, level changes in a floor, and cabinets at angles other than 90 degrees can give it a bit of trouble. You can export a USD file to Vectorworks and use that to place real walls and such manually. It's not going to be perfect, but you can snap to things and such
I imagine scan to BIM will be here soon. However, those claiming to do it now with sophisticated AI are just paying slave wages to people in the developing world to do it manually... and you get what you pay for in that regard.
Here's a partial scan of a house. Note the lower left corner is a kitchen with 45 degree cabinet/appliance units in the corners. It had some trouble there and one of the walls isn't straight. However, the rest of the building is pretty good and faster than the manual method of measuring if you take a few overall dimensions to cross check against.
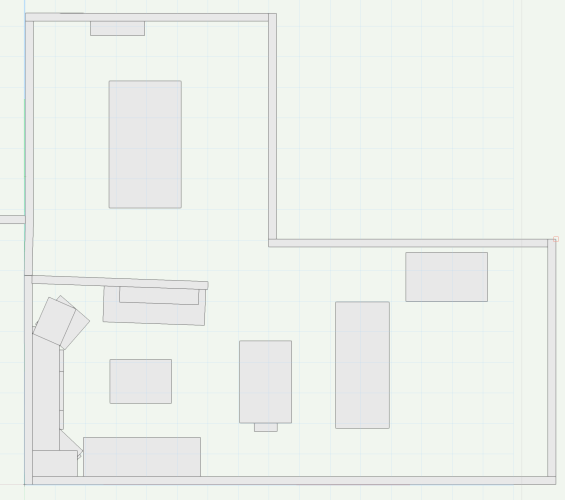
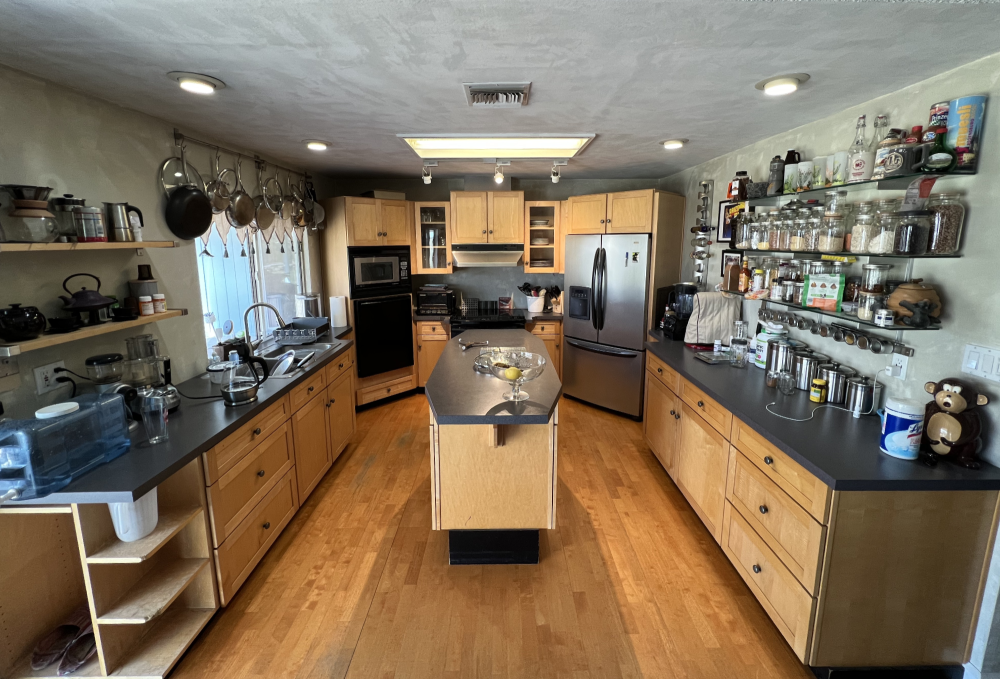
Here's the perspective view of the kitchen

and the reality....
-
4
-


I heart OBJ
in General Discussion
Posted
Glad you enjoyed the thread so much , there are a bunch of others in the forum if you use the search feature.
images-
It seems a bunch of my content has been deleted, hence you can not see them.