
mgries
-
Posts
135 -
Joined
-
Last visited
Content Type
Profiles
Forums
Events
Articles
Marionette
Store
Everything posted by mgries
-
Another Space Tool wishlist item would be to allow multiple independent boundary objects per space. Hear me out folks... For starters, the Gross vs. Net function built into the Space Tool is virtually useless. Area definitions are way more complex than this tool would like you to believe. The building code has 3 definitions alone (Building Area, Gross Area, and Net Area). Each jurisdiction has their own versions of Gross and Net to add to this. Then there's BOMA, etc. for marketing. The bottom line is that Space Tool boundaries need to be defined in many distinct ways, and so the simple Gross/Net algorithm that the tool offers cannot reconcile all this. As a workaround, we end up making multiple spaces for each space, and put them on separate classes (A-AREA-BLDG, A-AREA-GROSS, A-AREA-NET, A-AREA-PLNG, etc.) Then at least, we can create very helpful worksheets to track all of our Area related tabulations. It's a lot of work, but it does pay off for commercial projects, where there's a lot of complex building info. to document. Having so many separate spaces to organize is a big headache of course. If the Space Tool provided multiple boundaries, each independently class-able, it would improve the workflow immensely. Matt
-
oops... I did not mean to put this in resource sharing! Can an administrator please move this to the general discussion category? On second thought...this should go in Architecture category thanks!
-
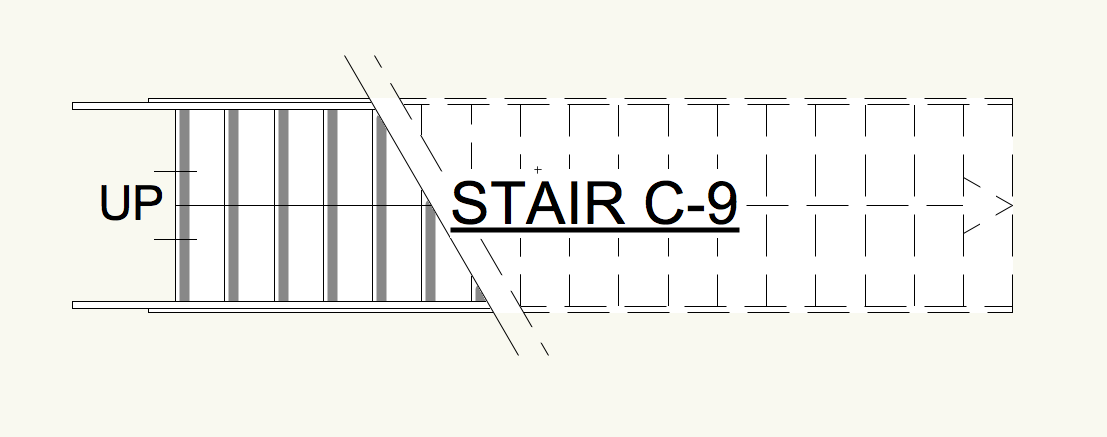
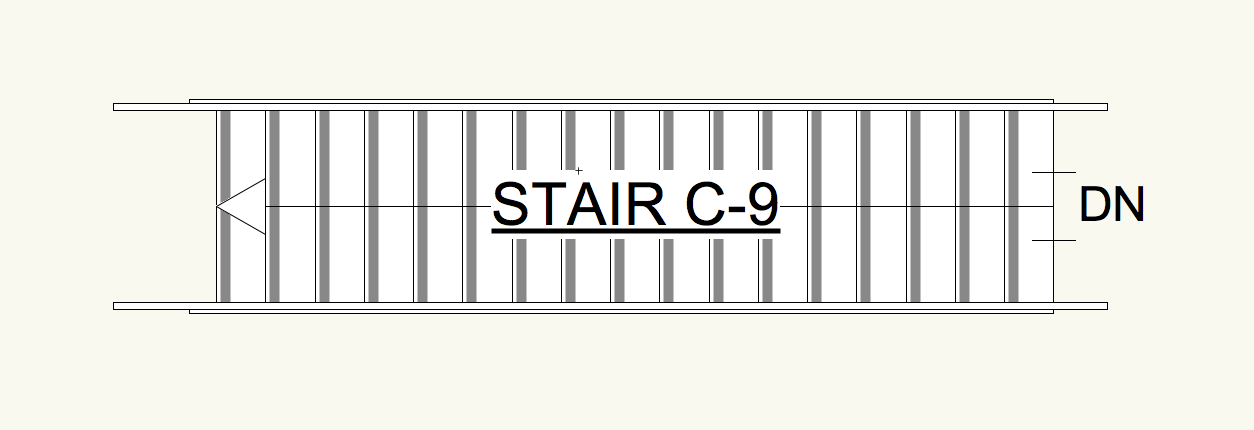
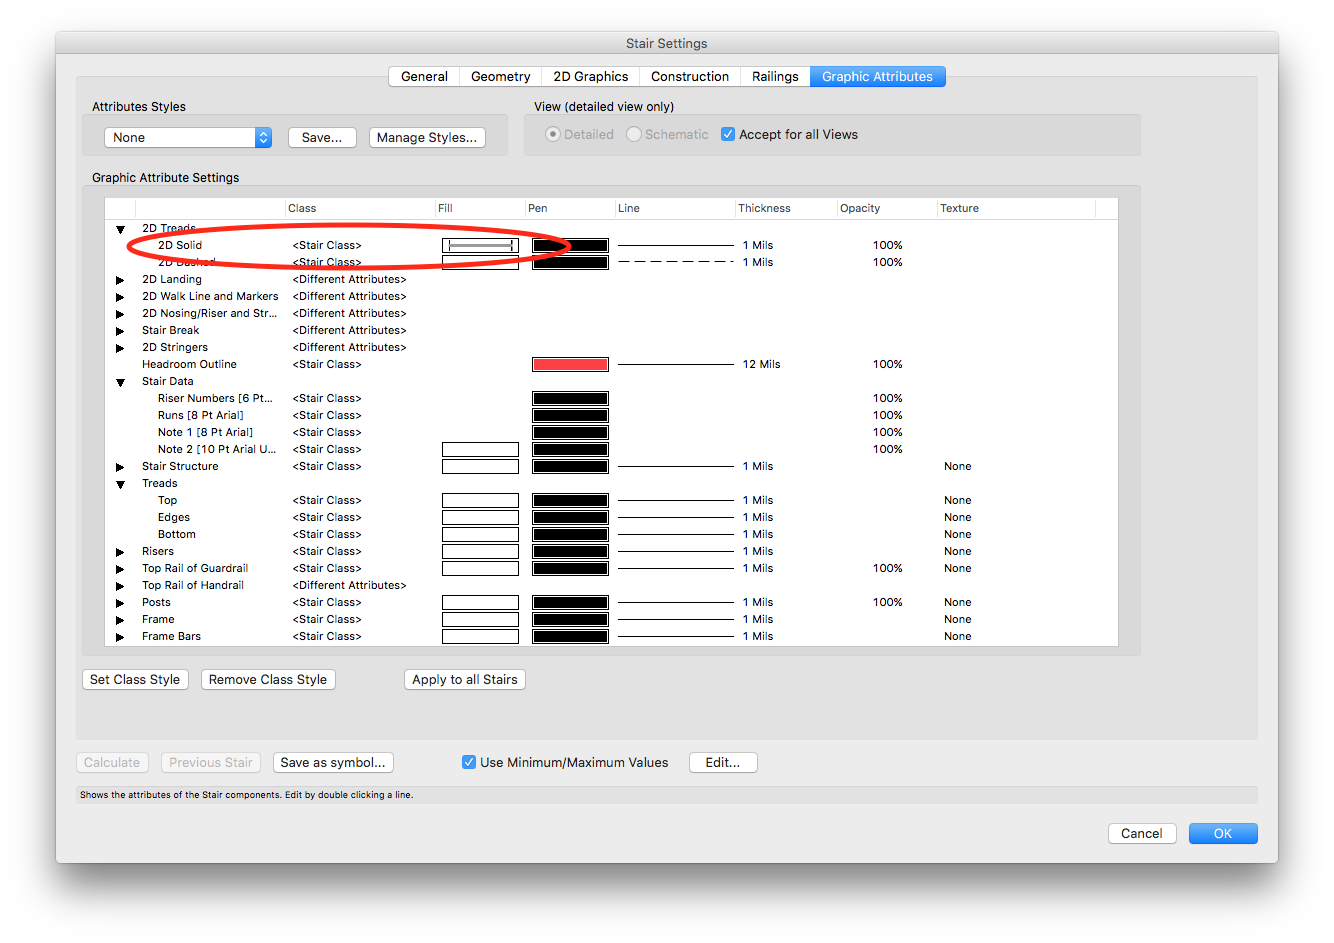
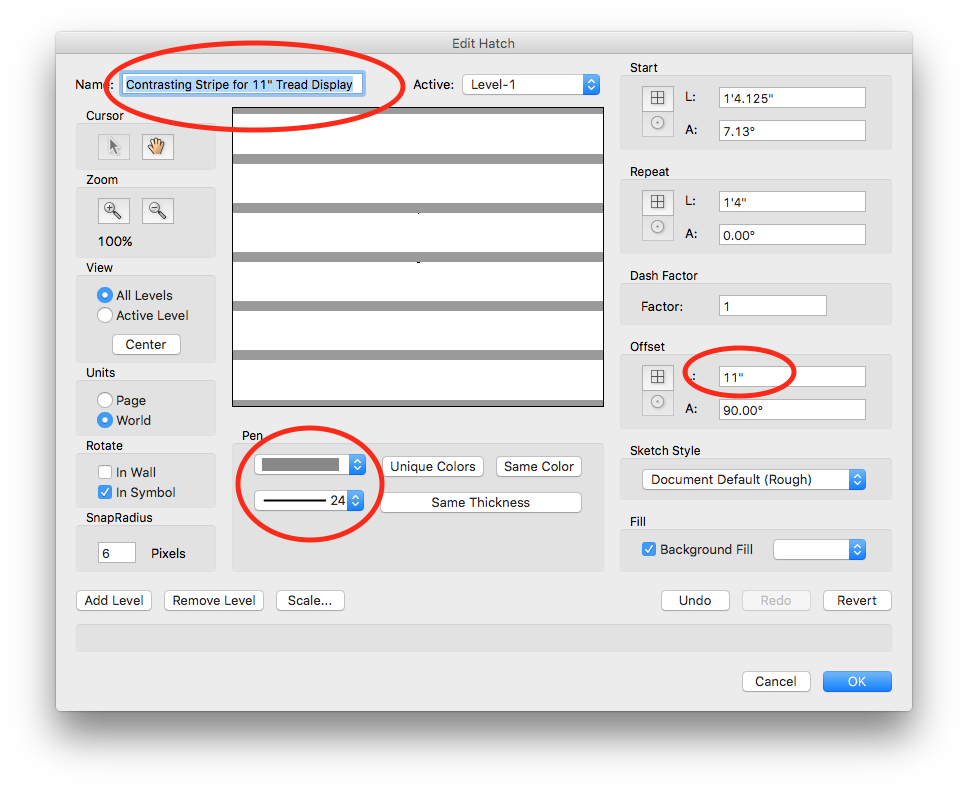
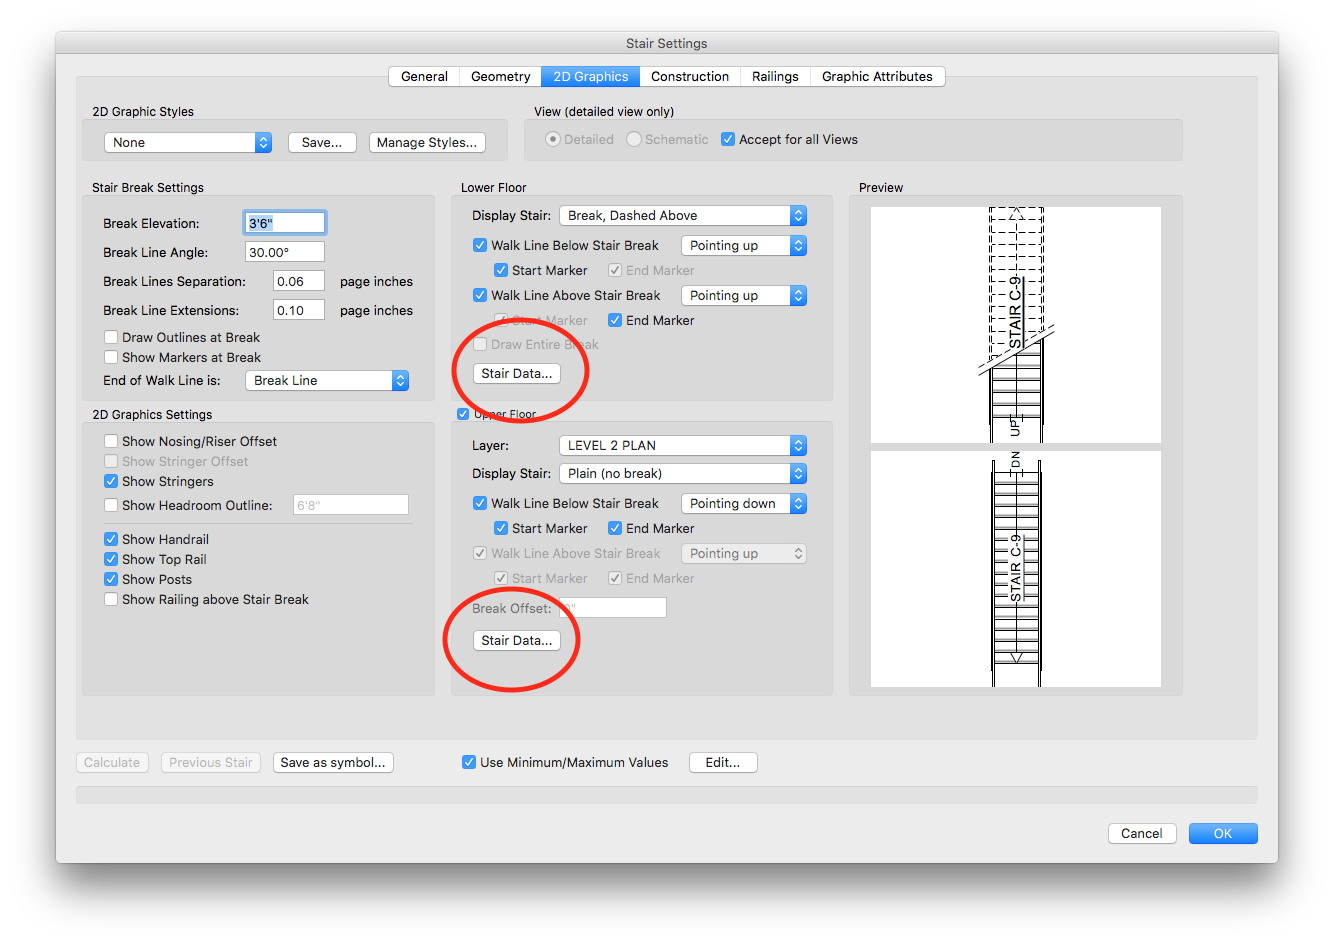
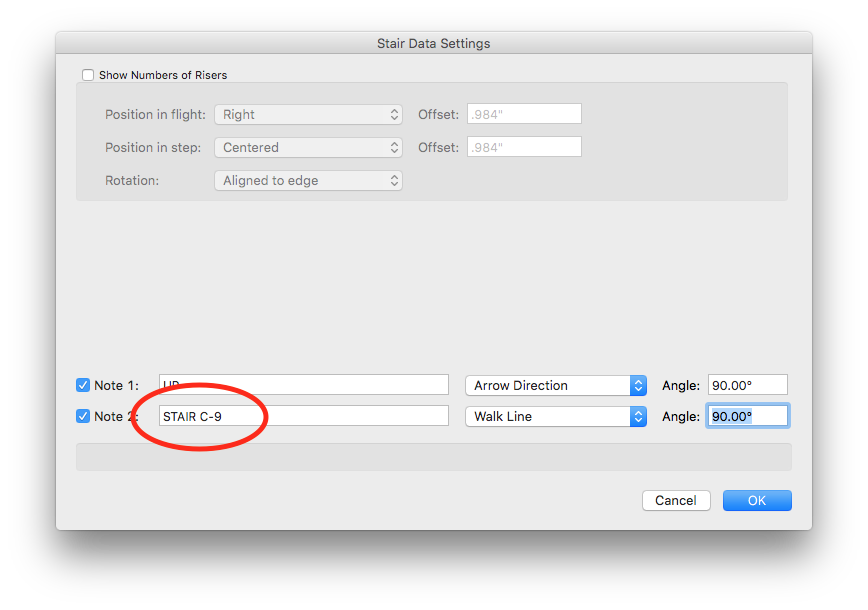
I figured out a neat work around to build contrasting stripes into the stair tool. I couldn't find anything on the forum on this topic. I'm wondering what the forum gurus think, and if there are any other techniques out there worth sharing. Please see accompanying screenshots. I've also included the vwx file. Method: I created a hatch to be applied to the "2D Solid" Tread graphic attribute. I made the hatch using gray colored parallel lines set 11" apart, with a lineweight that translates into 2" thick gray "stripes". I played around with the orientation until the first line of the hatch was inset from the tread edge by 2". The affect is that the edge of the 2" thick stripe ends up inset 1" from tread edge. This hatch works for 11" treads only, so it would need to be modified for different tread depths. Also, while I was at it, I wanted to bake a Stair I.D. label into the tool. I ended up using Note #2 in Stair Data for this. Not ideal. Is there a better way? Matt Stair with Contrasting Stripe.vwx
-
@michaelk, Tools > Custom Modification is definitely the way to go...thanks!
-
This sounds "fun", but it would not allow any sort of batch editing with respect to class reassignment, correct?
-
-
Unfortunately, in most cases, I cannot justify deleting the classes that many of the objects have been incorrectly assigned to, as these classes are otherwise being used for many other types of objects...such is the nature of entropy. do you know here can I find a simple class reassignment script? I'll check out the worksheet forum too...thanks!
-
Is there a Record.Field data format to call up the class, then? Or are you saying that I'm stuck with 2-way functionality when it comes to class and layer management? I would settle for a script to simply change the class of all plug-in objects to the same class, I suppose. No worksheet needed...although the worksheet would be useful to at least analyze the situation. I work in an office where I've inherited some very polluted/disorganized files, and I'm trying to help clean things up in an efficient manner. I'm also trying to get others on board in helping out in this effort, otherwise, I'm going to be forced to do all of this myself. Thanks, matt
-
@Pat Stanford, maybe another dumb question but...now that I have my "class" column, what do I need to do to be able to edit this from the worksheet? If you look at the screen shot, you'll see that the entry value is grayed out. I've never understood what determines gray vs. active fields when using PIO worksheets. Is there a way to change this? Thanks, Matt

-
wow...I feel dumb thanks Pat!
-
@Pat Stanford, the script super useful, thanks! I have one issue that I can't figure out however. I'm trying to create a housekeeping worksheet for Elevation Benchmark tool. One column I want to have is the class. This will allow me to quickly make sure that all the markers are on the right class, throughout the whole file. I've done this with other plug-ins in the past. But for some reason, there doesn't seem to be a way to call up class or layer info. regarding the Elevation Benchmark tool. Am I missing something? thanks, matt
-

opening in walls with curved corners and flat top
mgries replied to Andrew Mac's topic in Architecture
Mac, There was a great wall opening tool from the Vector Depot website, which I've attached. Only problem is, it doesn't work in later versions of VW. It was a valuable tool for me when I was on 2013. When I move to v2016, I had to let it go. It accomplished exactly what you're looking for, so maybe someone on the forum who understands scripting can update it for the later releases. Here's how it works: After creating the opening in the wall, you could select from a bunch of different shape profiles in the OIP, or it allowed you to select from one of your own profile symbols. I used this all the time for Spanish Colonial projects, which rely on lots of fancy arch and scroll profiles when making opening in typical plaster walls. The tool also allows you to add an opening ID, which comes in handy if you need to create an open ventilation schedule. Before I had this tool, I used the "3D Wall Hole" method previously described. I find it to be very tedious. The wall opening plug-in is definitely the answer you're looking for. Below, I've copied the actual listing from Vector Depot to give create to its inventor: A tool to create several styles of wall openings. When a door is too much this tool fits the bill. Creates openings with various top shapes. Even creates round openings. Petri Sakkinen VW 2008 or higher Wall Opening.vso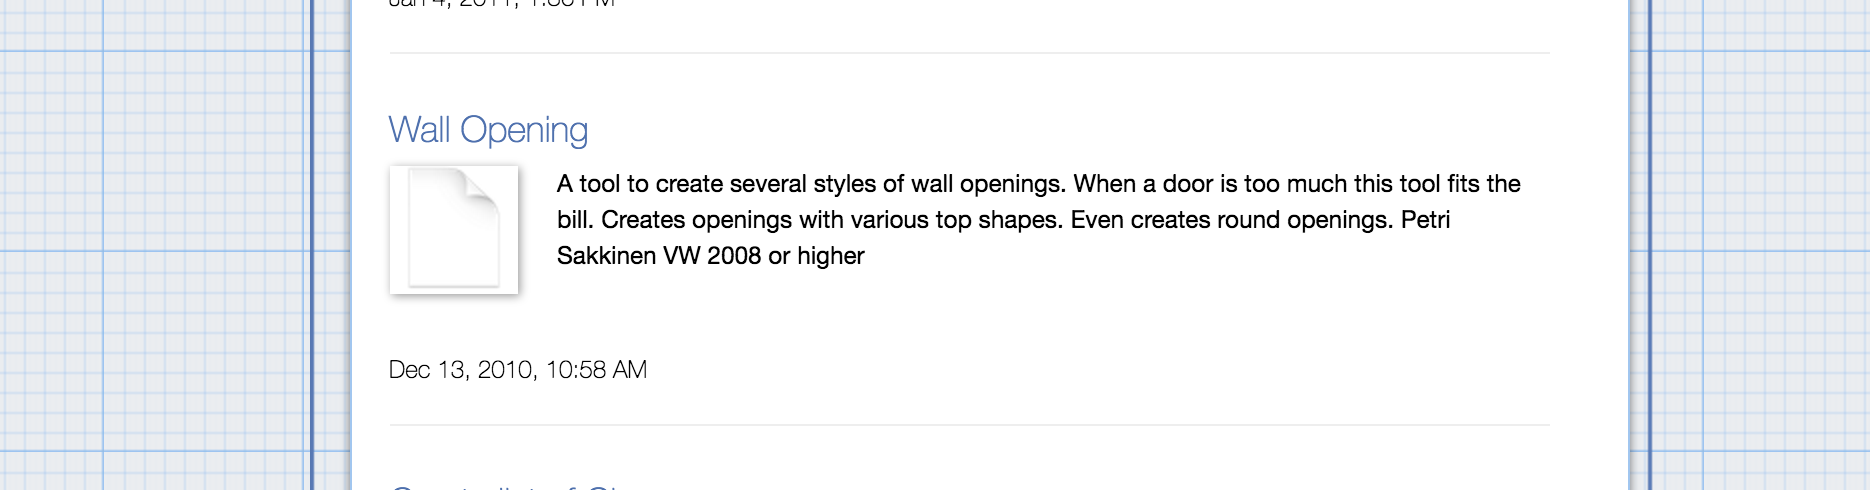
-
Revision Data display is not behaving on Sheet Border
mgries replied to mgries's topic in General Discussion
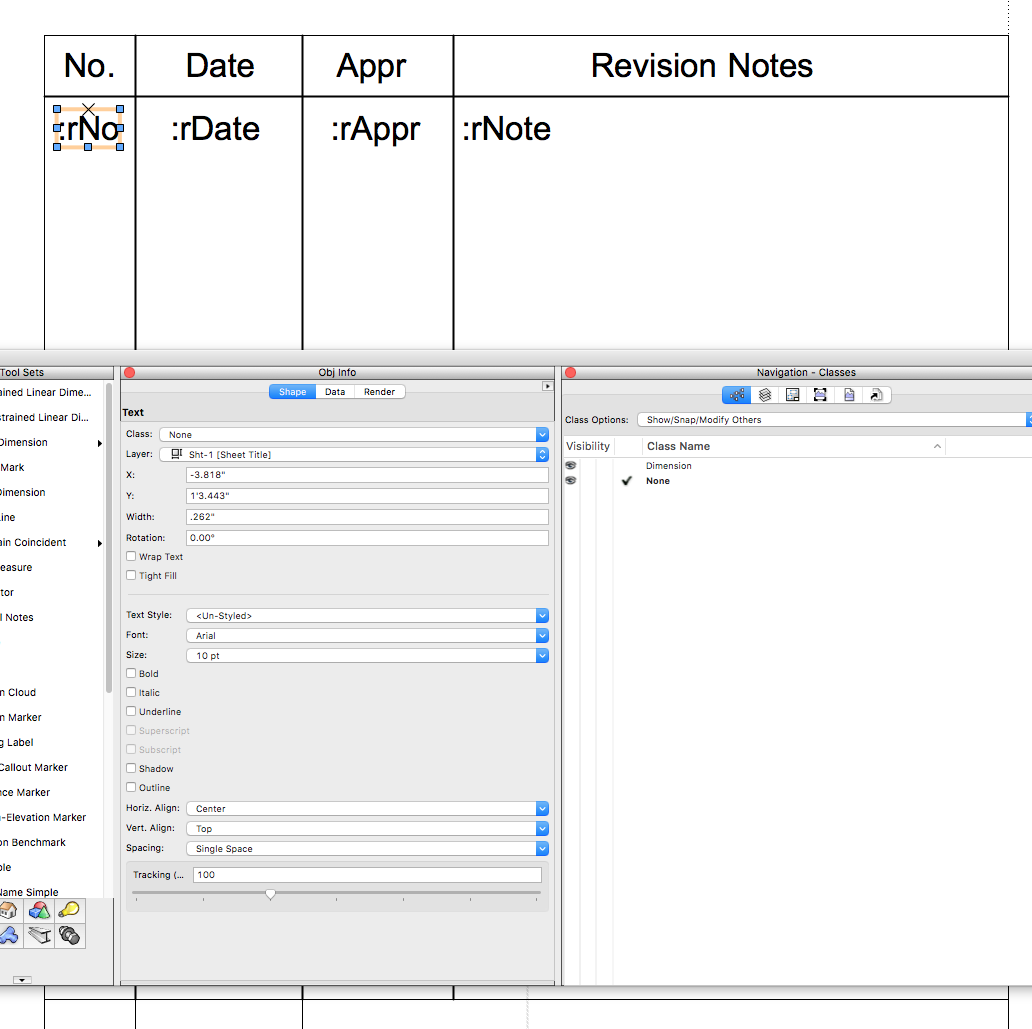
Thanks Pat, I was actually just logging in to report my own fix to the issue, which is not mentioned in your earlier response to James. So I guess there needs to be a #7 added to your earlier response. The problem for me, so it seems, was that I wasn't including an ":rNote" as one of my fields in my title block symbol. Instead, I was using ":rAppr" to fill out my description. Apparently, if ":rNote" is missing, it screws up the whole alignment control. Deleting other fields, like ":rAppr" or ":rZone" doesn't seem to make a difference. Very weird. So word to the wise, make sure to include the ":rNote" field in your titleblock symbol, even if you choose not to apply any text to this field in the sheet border plugin. mg -
Revision Data display is not behaving on Sheet Border
mgries replied to mgries's topic in General Discussion
Yeah, it feels like a bug. It's certainly bugging me. -
Revision Data display is not behaving on Sheet Border
mgries replied to mgries's topic in General Discussion
@michaelk, I played around with it a bit more. It's the actual border element from the plugin that's seems to be creating the mysterious alignment with the second rData: entry, not the page. -
Revision Data display is not behaving on Sheet Border
mgries replied to mgries's topic in General Discussion
This same issue does not apply to the second example I posted, created by another user. In the file "Issue and Revison Data Worksheets", the OIP parameters control spacing and vertical alignment as expected. -
Revision Data display is not behaving on Sheet Border
mgries replied to mgries's topic in General Discussion
I'm in v2016 with SP6 -
Revision Data display is not behaving on Sheet Border
mgries replied to mgries's topic in General Discussion
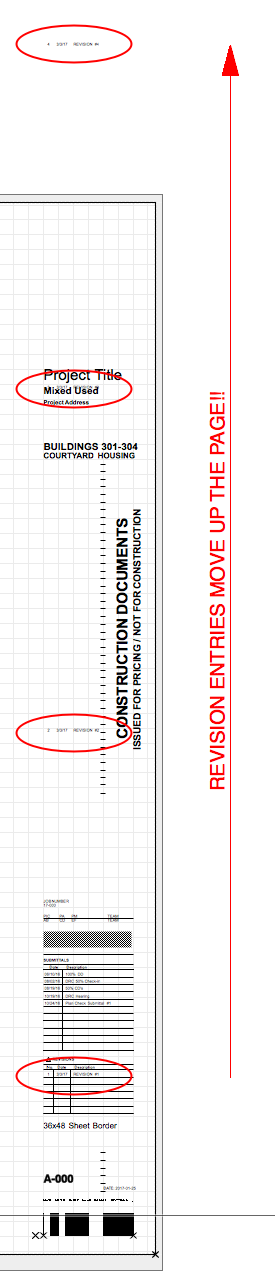
ok, this is really weird... so I messed around with my title block symbol a bit, and I've discovered that NO MATTER WHAT, the SECOND Revisions entry is always justified along the center axis of the page! Look at this new screenshot. I put the the rData: text about an inch above the center of the sheet, and lo and behold, the distance and direction between the first and second entries establishes the spacing for all subsequent entries. say what???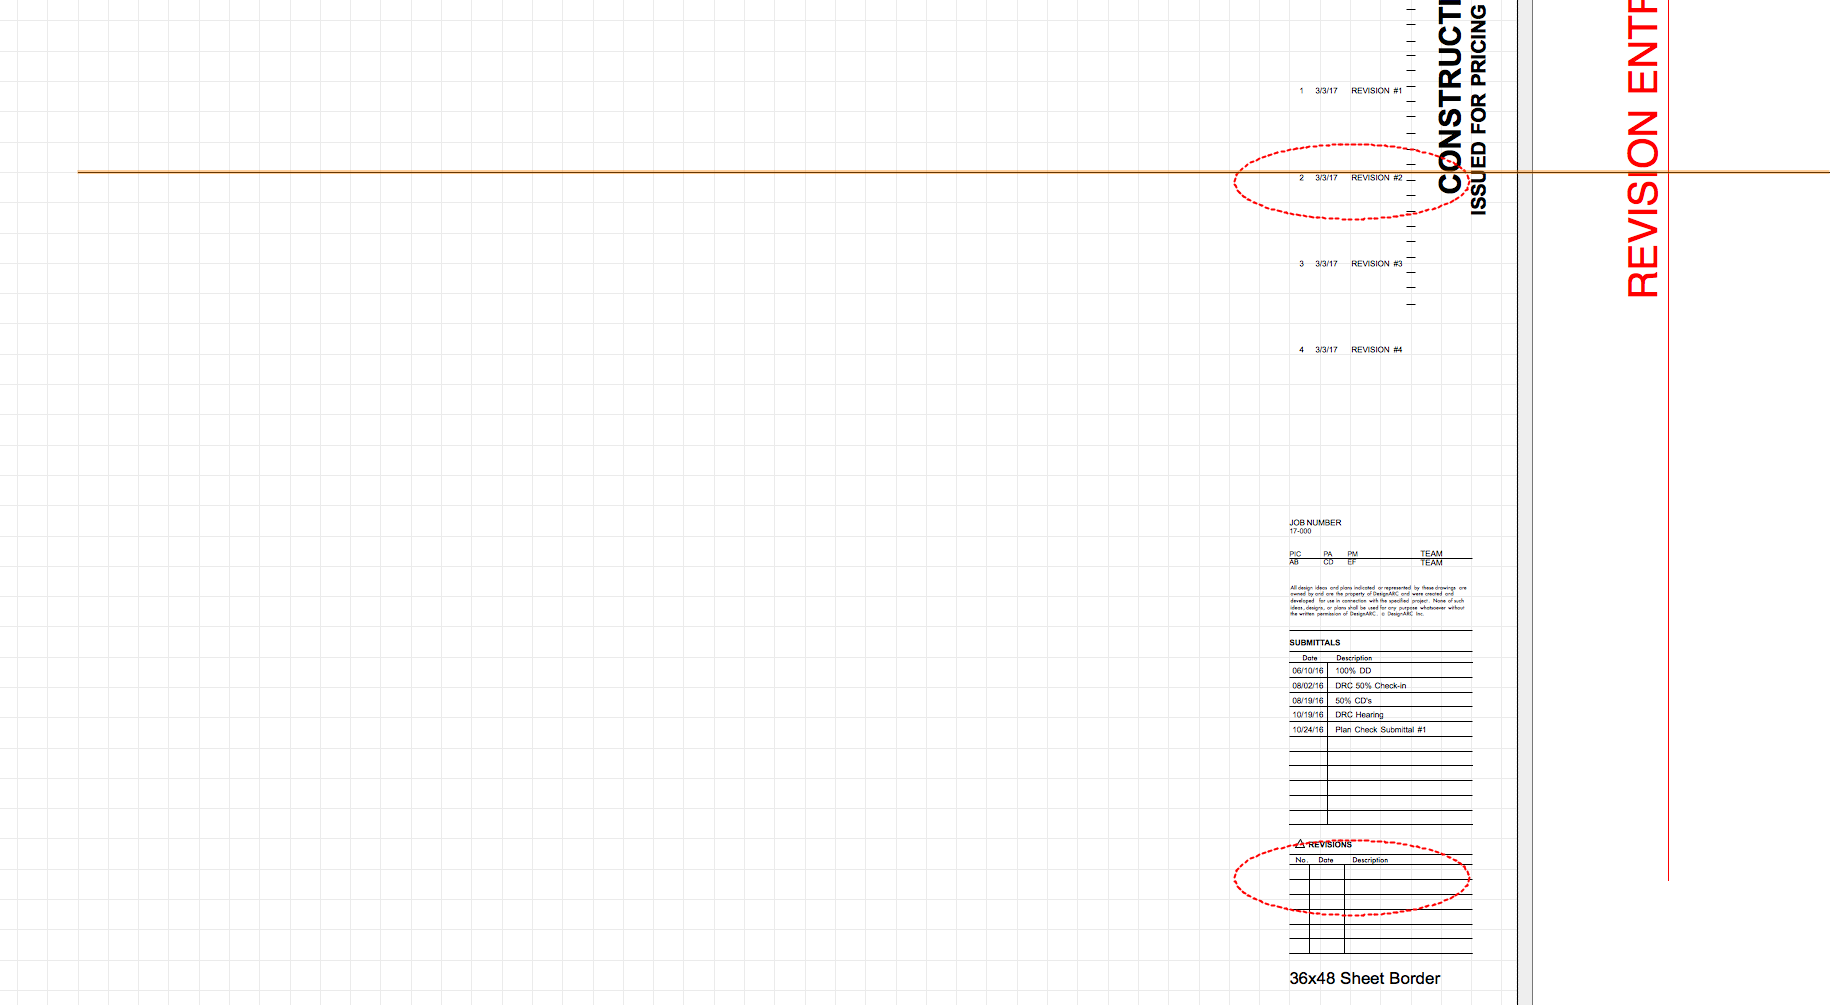
-
Revision Data display is not behaving on Sheet Border
mgries replied to mgries's topic in General Discussion
mk, Here's proof this can and should work. Attached is an example I found (i think somewhere on the forum) with correctly stacking Revisions text. On my file, the rDATA: text seems to be completely unaffected by "Vertical Alignment" and "Spacing" OIP parameters. thanks, mg Issue and Revison Data Worksheets.vwx
-
Revision Data display is not behaving on Sheet Border
mgries replied to mgries's topic in General Discussion
mk, those are reasonable work-arounds, but that doesn't explain why the revision data is behaving the way it is in my file. There's no good reason for the text to fly up the page the way it is. ...or is there? It seems very close to working the way I would expect it to work. All that's missing is forcing each new line of text to stack under the former. thanks, mg -
Custom Title Block - Multi-Line Text Fields Don't Automatically Wrap
mgries replied to rDesign's question in Known Issues
Hi, I'm having a closely related issue regarding my custom title block "revisions". It's not a wrapping issue, but rather a text line stacking issue. I made this post about it: I'm hoping someone could take a look and help me figure this out. Thanks! mg -
Hi, I'm having a different issue regarding my custom title block "revisions" field. I made this post about it: I'm hoping someone could take a look and help me figure this out. Thanks! mg
-
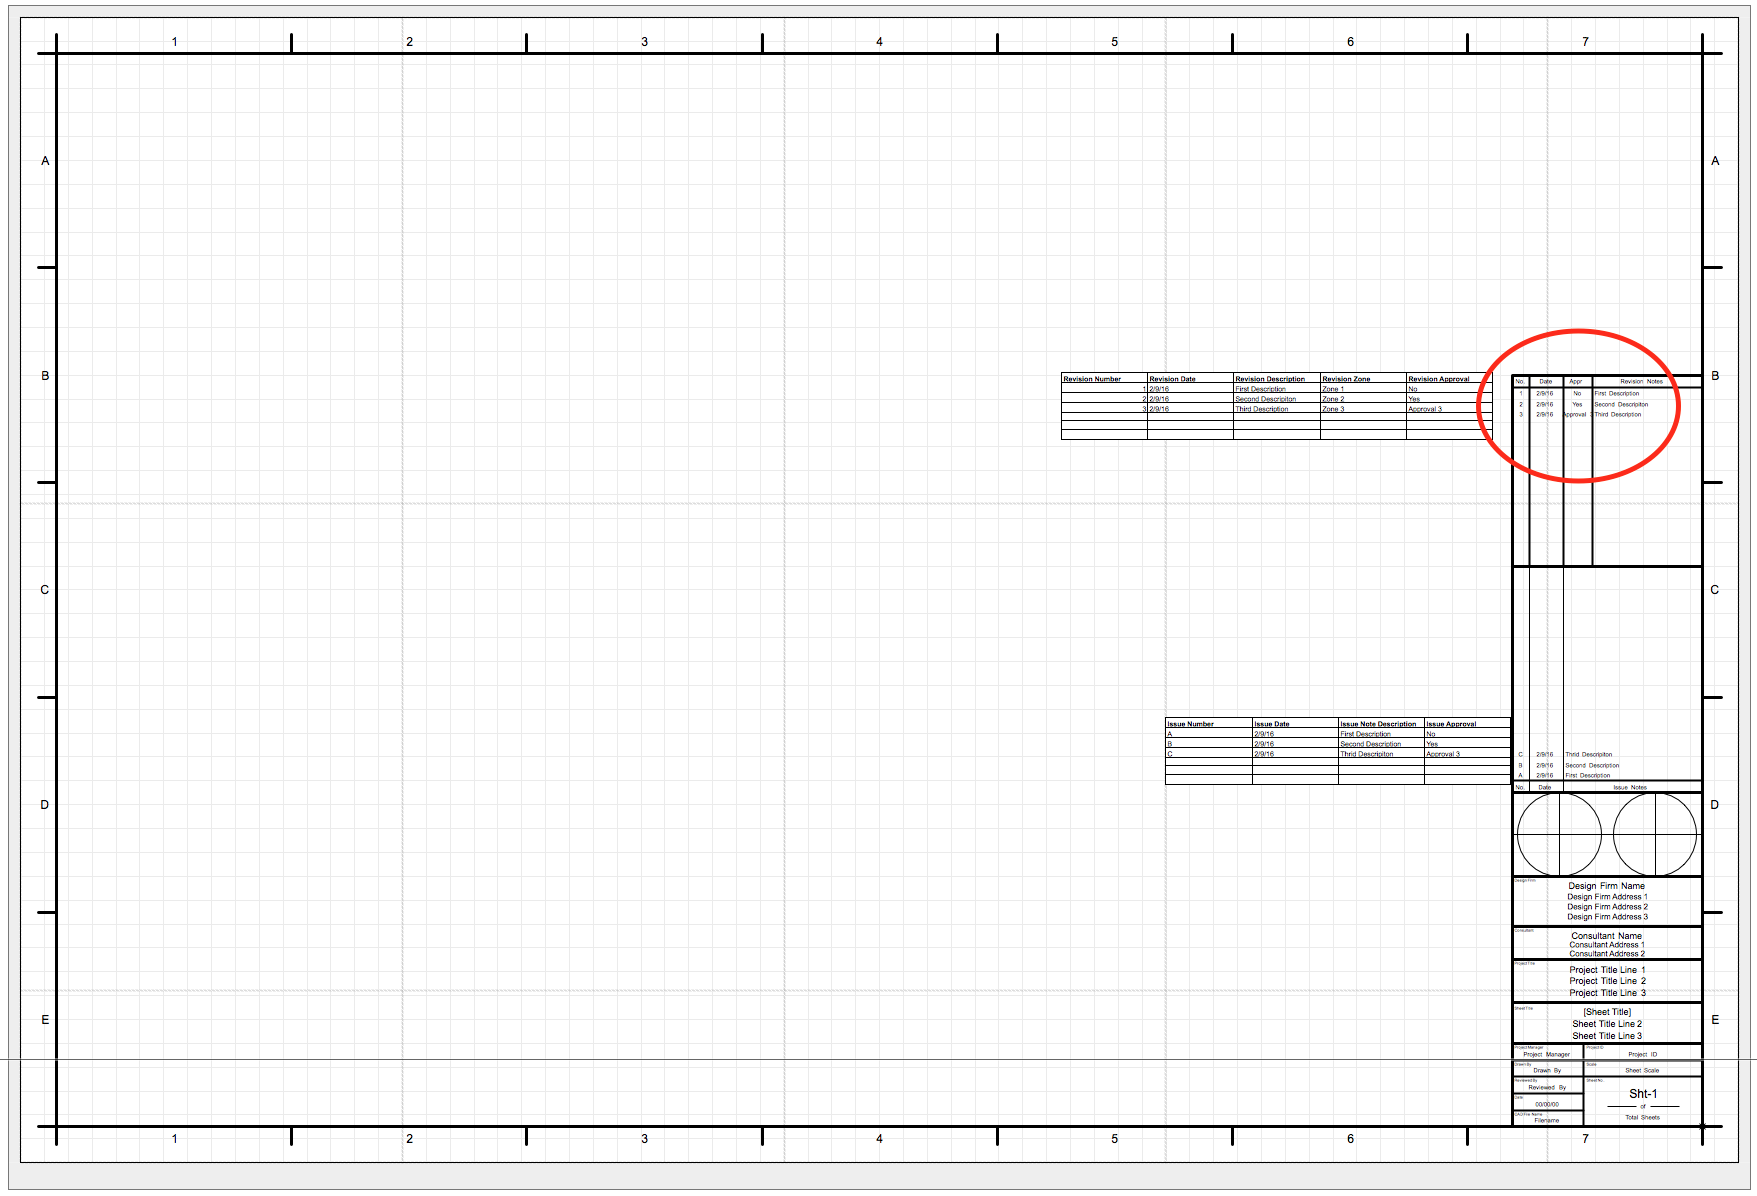
I customized the Sheet Border tool to work off of a Title Block symbol with an area for tracking Revision entries. I followed the tutorials re: record formatting, etc. It all seemed pretty clear. The result is anything but clear. The first Revision Data entry displays in the correct location. The 2nd Revision Data entry is meant to fall into place below the first one. Instead, it appears a third the way up the sheet. Each successive entry keeps moving further north by the same distance. Please see screenshot, and if you can lend a hand, I've attached the file so you can look under the hood. If anyone can tell me what I'm doing wrong here, it would be very much appreciated! Thanks mg Sheet Border - Revisions Text Issue.vwx

-
This last one (v3) is quite beautiful DomC! I agree, drawing the hexagon is not important here. However, the ordering of circles is very important. Each circle must be indexed and belong to a particular "ring" of growth, represented by a group of circles that are all equi-distant from the origin. It is therefore more than a hexagonal grid. In math, it technically would be called a "hexagonal lattice plane", (and so it contains an origin). In this case each point in the lattice is represented by a circle.
-
Notes Manager & Notes Legend - duplicating callouts
mgries replied to mgries's topic in General Discussion
this is a good idea Journeyman! I'm going to try this and see how things unfold... I'm wondering, are there any scripts or marionettes out there that would take all active notes in a file and write them to a separate database in order to address the linkage issue? This could potentially complete the workflow loop, would it not?