Monadnoc
-
Posts
448 -
Joined
-
Last visited
-
Enter/Edit the Solid Subraction (by double clicking on it), then select the wall and copy it, Exit the Solid Subtraction, Paste In Place the Wall, then delete the Solid Subtraction. Solids (Subractions and Additions) maintain their history, so you can go back in and delete stuff, reshape, copy/paste, etc. Then do what Tom W. suggested to make the holes in the wall.
-
I would recommend working through Wes Gardner's tutorials pinned at the top of this Forum, especially "No Stories, No Problem". It will explain a lot (Hopefully they are still available, they are pretty old now). The understanding of how Layers and their settings (Elevation especially) work is essential to working in Vectorworks for any kind of architectural modeling. You probably should investigate a few of the Basic/Beginning tutorials in general on YouTube and the VW Learning site also. It will be well worth the time invested. Vectorworks is a very complicated program, and without some basic understanding of how it works, you will spend many frustrating hours banging your head against the wall.
-
Here on the West Coast of USA some people use Sunset Climate Zones (from the Sunset Western Garden Book), https://www.sunsetwesterngardencollection.com/climate-zones/ , which go up to 24, I believe. They are a lot more detailed and take into account many more factors than the USDA zones. Maybe it's for them? Not sure what the 29-45 could be for?
-
Trouble with extrude along path in 3D
Monadnoc replied to Anita Tripathi's topic in General Discussion
From the link to the Help topic: "Scaling options are available when the path object is a single continuous curve without sharp corners or discontinuities." -
Thanks. Downloaded and opened in v2017 without any problems. Look great. Feel very "light" considering they are high polygon count (of course, if I had fifty of them in one scene it might be different).
-
Thanks for the rock textures. They look very good. And all @VIRTUALENVIRONS rock postings showed up right away for me.
-
No problem. Thanks!
-
I would be very interested in them, if you can post them in VW 2017 format. They would make for great "Hero" rocks for landscape designs. Thanks.
-
Thanks I will give it a try. I'm a Feet and Inches man myself, so that shouldn't be a problem at all.
-
Will this work on VW 2017 by any chance? (I know, it's old and outdated... but I'm retired now, so I'm old and outdated too...)
-
The same thing happens to me. And has been happening... for years. I finally gave up on trying to figure out why, and just formed the habit of manually re-setting it to always be all attributes by class every time I start a session. And then multiple times throughout the session. Although it still bites me in the back every once in a while, as soon as I forget to do that. Ridiculous. But that's just the way it is, and always will be. It just randomly changes back to white fill, black line, all by itself.
-
Glad you were able to get it to work. I agree this is a very useful capability to have, especially for schematic/conceptual designs with hedges, rock walls, some fences, even regular walls, maybe even berms. I'm pretty sure I remember using Extrude Along Path with 3D paths in the past, so it must be a bug that got introduced since v 2016 and somehow broke it. Tamsin, maybe you could report it and get it on the short list to fix? It doesn't seem like that hard of a fix. Thanks.
-
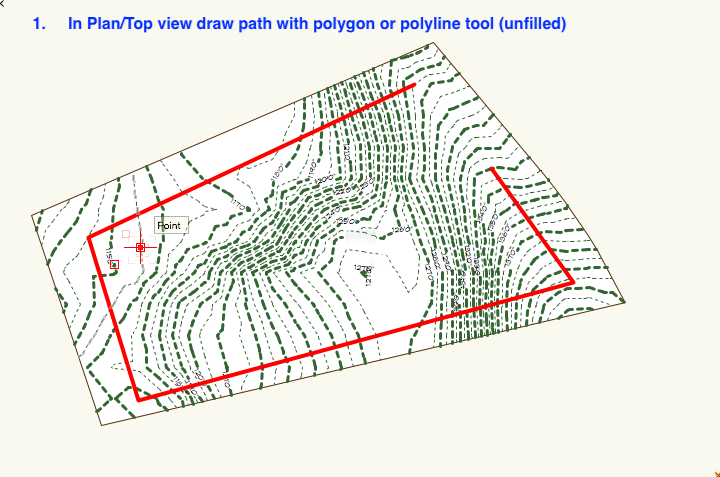
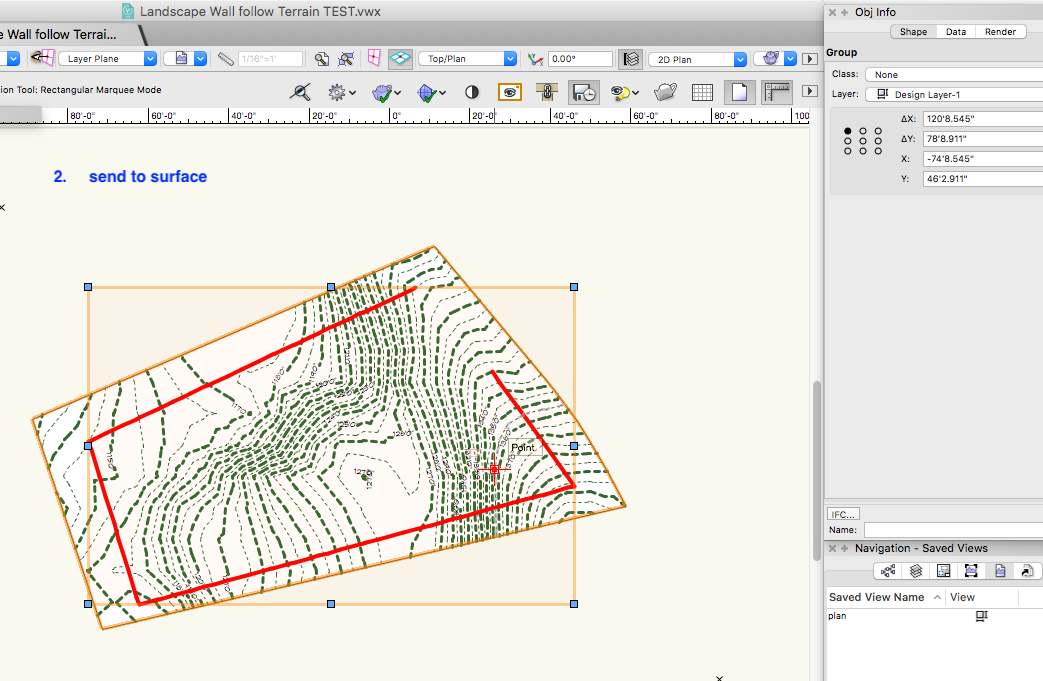
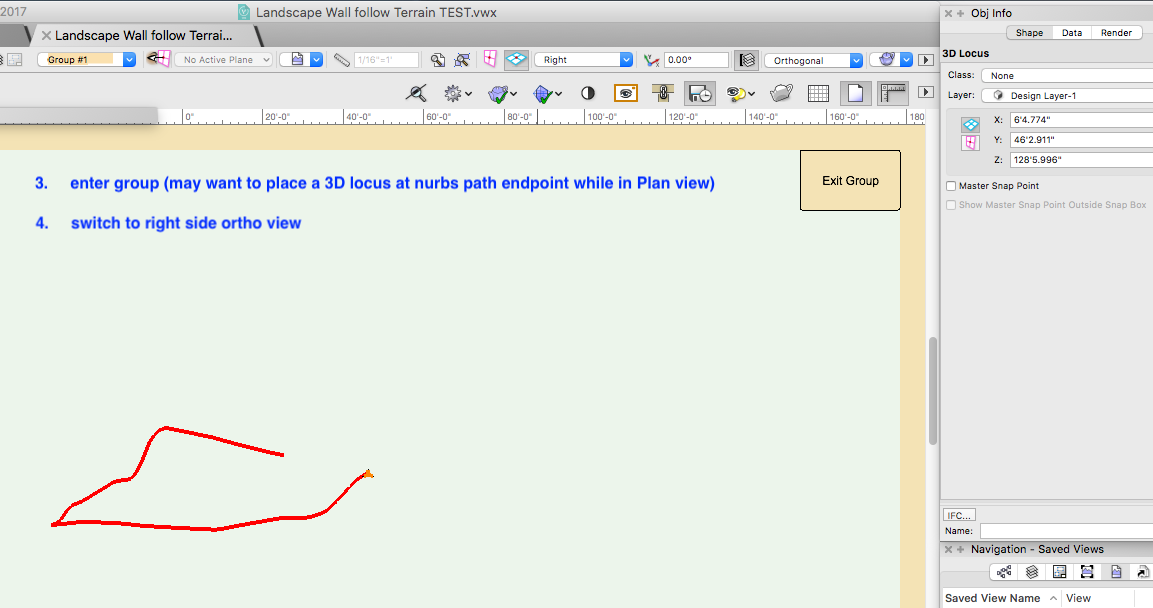
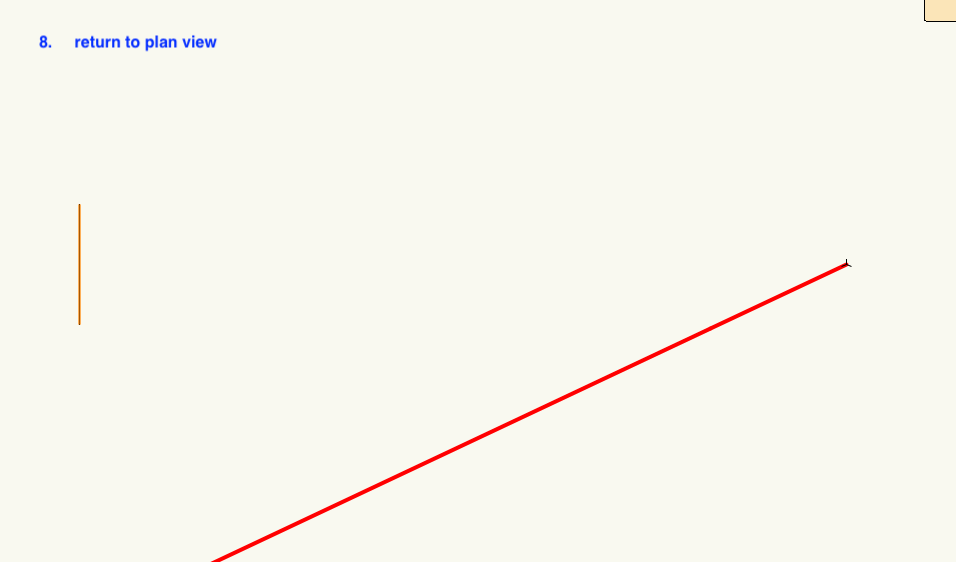
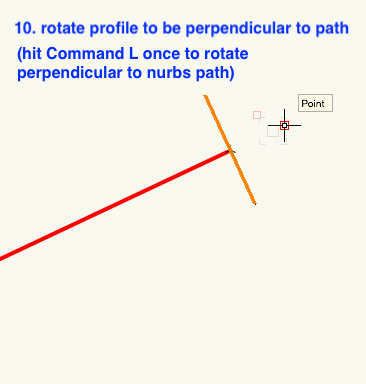
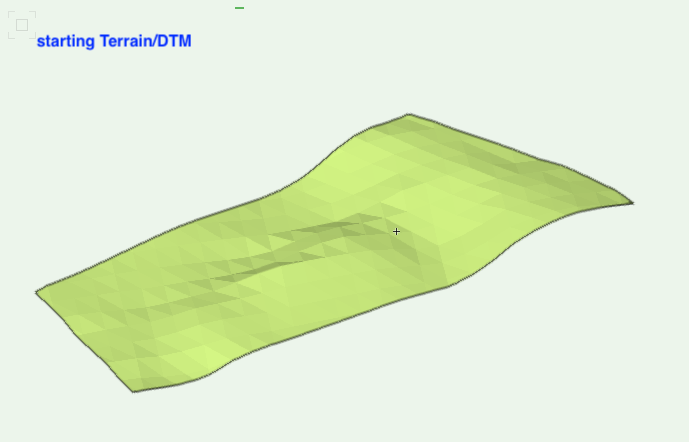
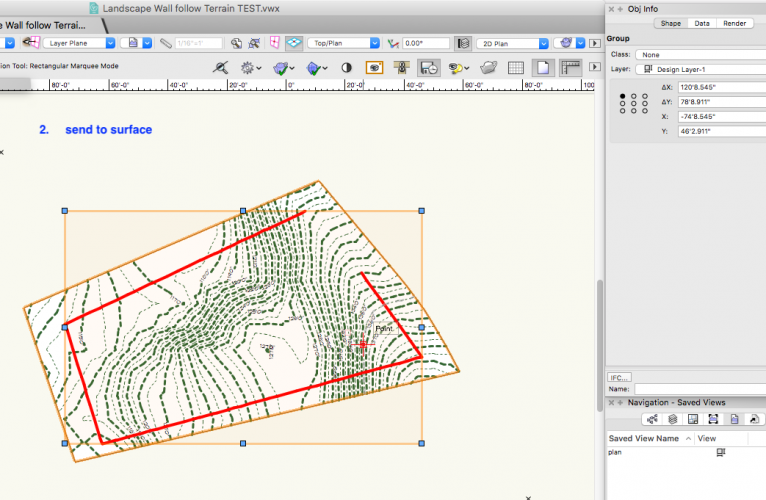
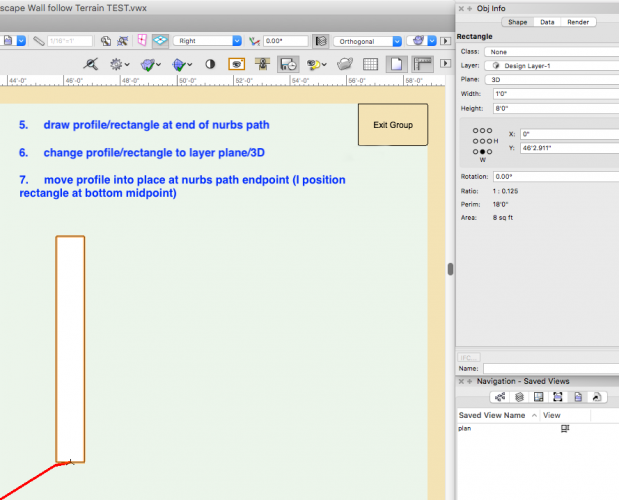
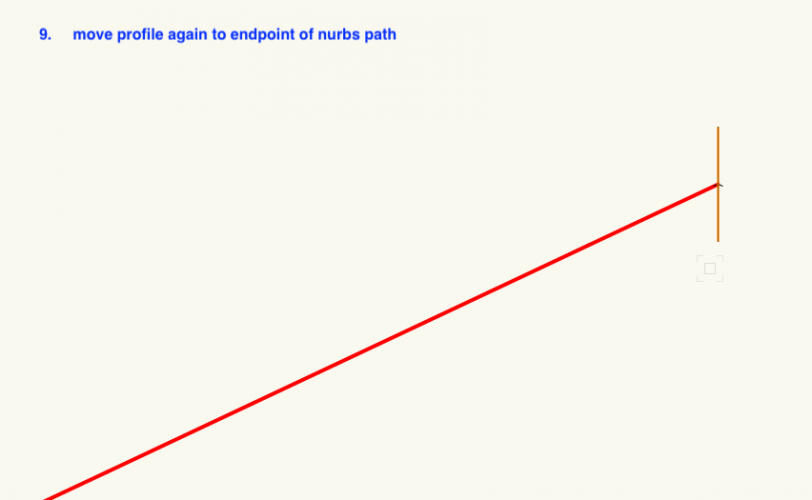
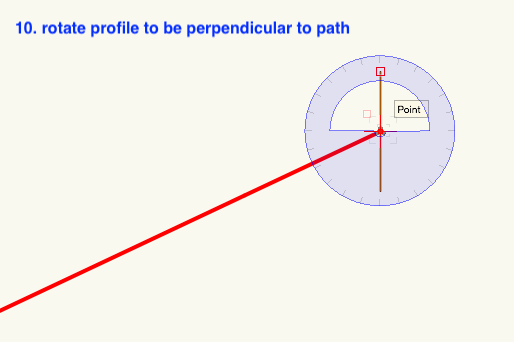
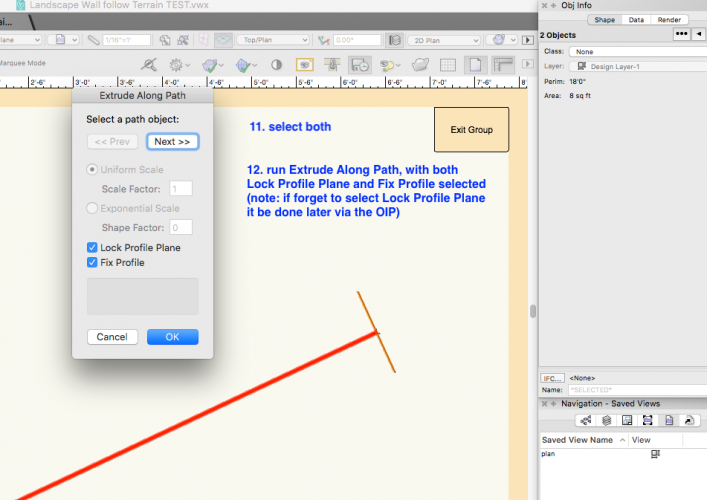
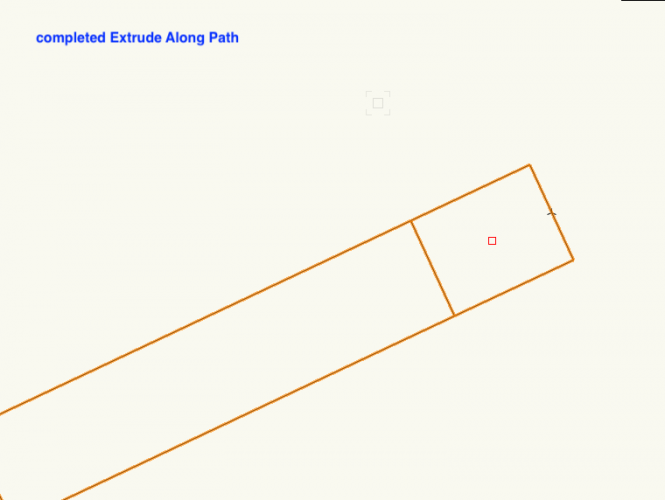
You need both Lock Profile Plane and Fix Profile selected to get proper results. Unfortunately, when I just tried it I got an error message. I am using VW 2017 and I notice that post was from 2016, so all I can think of is VW changed something in the Extrude Along Path code that introduced a bug. Hopefully the bug is fixed in newer versions of VW. If not, I figured out a work around that works consistently, at least with my set up anyway. The fix is to manually position your profile/rectangle at one of the endpoints of your nurbs path, positioned how you want it (I use the bottom midpoint). And the profile/rectangle has to be set to layer or 3D plane. And it has to be manually rotated to be perpendicular to the path. This all sounds complicated but it is actually quite easy and fast once you get the hang of it. After you drop to surface, enter the group it creates, switch to a right ortho view, and draw your profile in place at the endpoint of the nurbs path. Then switch to top view and move it again over to the same endpoint. Then use the rotate tool to rotate in place so it is aligned parallel, and on top of, the path, then just hit command L (control L on Windows) to make it perpendicular to the path. It sounds confusing but really isn't once you wrap your head around it. If it doesn't make sense to you I will whip up a little step by step with pictures to help. Here are a few showing how I rotate the profile/rectangle into place. And the finished product. Here are the steps: Steps to make extrude follow site contours: 1. In Plan/Top view draw path with polygon or polyline tool (unfilled) 2. send to surface 3. enter group 4. switch to right ortho side view 5. draw profile/rectangle at end of nurbs path 6. change profile/rectangle to layer plane/3D 7. move profile into place at nurbs path endpoint (may need to use 3D locus) 8. return to plan view 9. move profile again to end of nurbs path end point 10. rotate profile to be perpendicular to path (align parallel, then hit command L once) 11. select both 12. run Extrude Along Path, with both Lock Profile Plane and Fix Profile selected (note: Lock Profile Plane can be done later if forget via the OIP) 13. ungroup, if desired


-
I think this post explains how to do what you are wanting:
-
Is there an opposite of Double "C" to zoom out?
Monadnoc replied to MartinFahrer's topic in General Discussion
I'm on VW 2017 Designer too, but I must have automatically added it and mapped it to it when I installed and forgot. It's such an old habit of mine to use it I'm sure I put it right back in. It's the "old way" of doing things I guess. I seldom use the Visibility Tool but use the Zoom Out keyboard shortcut all the time. Nice to be able to have the choice ...