


MullinRJ
-
Posts
2,021 -
Joined
-
Last visited
Content Type
Profiles
Forums
Events
Articles
Marionette
Store
Posts posted by MullinRJ
-
-
Hi Michael,
The PIO main loop processes EVENTS, usually in a CASE statement. From that loop all other routines get called. Drawing your geometry is only done when the kResetObj event is issued.
There are only a few events you need to look for. The reset object event, kResetObj (3) is the event where you draw should almost everything. Actually it deletes all existing geometry, then redraws it again based on the state of your parameters. Like a Modern Dialog, there is a setup event, kObjOnInitXProperties (5), where you do setup stuff, and a button event, kObjOnObjectUIButtonHit (35) where you do stuff when buttons get pressed. If you've ever programmed a Modern Dialog, this works in a very similar fashion.
I'm sure this is still too vague. Other people may describe it better than I, so take two aspirin and write back, the fun has just begun.
Raymond
-
 1
1
-
-
Good analogy. Be prepared to hold your nose a lot and swallow your Cod Liver Oil, like a good little programmer.
After you download the SDK look for this file:
/SDK/SDKVW(######)/SDKLib/Include/Kernel/MiniCadHookIntf.h
It's full of headaches you never thought possible, but it's full of answers, too; probably preceded by lots of questions.
Bottom's Up 😝,
Raymond
-
1
-
-
5 minutes ago, michaelk said:
Is it safe to assume that kObjOnWidgetPrep and the other k____ values are constant integer values and they might be listed in an appendix?
NO! - You have to memorize all of the constants! What kind of programmer do you want to be? Spoon fed?!?
Seriously, here are a few:
kResetEventID = 3;
kObjXPropPreference = 4;
kObjOnInitXProperties = 5;
kObjXPropHasUIOverride = 8;
kObjXHasCustomWidgetVisibilities = 12;
kObjXPropAcceptStates = 18;
kObjOnObjectUIButtonHit = 35;
kObjOnWidgetPrep = 41;
kObjOnAddState = 44;
Yes, there is a file in the SDK. You should download a copy if you haven't already. I'll see if I can give you a file name in a minute.
Raymond
-
 1
1
-
-
Michael,
I'm not Josh, but I do have an example straight from the horse's mouth.
{ From VCOR, posted by Charles Chandler Jan 2007, updated 20 Dec 2015 }
PROCEDURE Example3;
CONST
	kResetEventID = 3;
	kObjOnInitXProperties = 5;
	kObjXPropHasUIOverride = 8;
	kWidgetButton = 12;
	kObjOnObjectUIButtonHit = 35;
	buttonID_1 = 1234;					{user-definable index}
VAR
	result :BOOLEAN;
	sourceFieldNumber :INTEGER;
	buttonEventID :INTEGER;
	theEvent, theButton :LONGINT;
	thisDoesNothing :LONGINT;
	displayString :STRING;
BEGIN
	vsoGetEventInfo(theEvent, theButton);
	CASE theEvent OF

		{User has single-clicked the object's icon.}
		kObjOnInitXProperties:		{ 5 }
			BEGIN
				{This tells VW to let the object decide what goes onto the Object Info palette.}
				result := SetObjPropVS(kObjXPropHasUIOverride, TRUE);

				{Now we manually add the "normal" parameters...}

				{One way is to use this single call to add all of the existing parameters.}
				result := vsoInsertAllParams;

				{Alternatively, you can use this to tack individual parameters onto the end of the list
				one at a time. This way, you don't have to use SetParameterVisibility in the reset event
				to hide parameters that you never want to see.}
				sourceFieldNumber := 1;
				displayString := 'My Great Field Name';
				result := vsoAppendParamWidget(sourceFieldNumber, displayString, thisDoesNothing);

				{Finally, we add the button.}
				displayString := 'My Great Button';
				result := vsoAppendWidget(kWidgetButton, buttonID_1, displayString, thisDoesNothing);
			END;		{ 5 }

		{User has clicked a button in the Object Info palette.}
		kObjOnObjectUIButtonHit:		{ 35 }
			BEGIN
				CASE theButton OF
					buttonID_1:
						BEGIN
							AlrtDialog('Custom Button Dialog');
						END;
				END;
			END;		{ 35 }

		{Object reset has been called.}
		kResetEventID:		{ 3 }
			BEGIN
				Rect(0, 1, 1, 0);		{ draw a square }
			END;		{ 3 }

	END;		{ CASE }
END;
RUN(Example3);
Never go on an Event Enabled Trip without directions from Charles Chandler. It looks better with the keywords color coded in my text editor.
Have fun,
Raymond
-
Hidden records, or visible ones for that matter, don't need to be attached to anything. You can add fields dynamically, store your data, and retrieve it at any time, even the next time the file opens (assuming you saved it first.) As to the number of fields a record can handle, I never looked for the limit. I have successfully stored 10K unique fields in one record as a test. I assume the upper limit is 32K fields, if I were to guess. Maybe someday I'll ask myself that question again and try to answer it.
Records are excellent for storing data that persists in your file, but not ideal for data that needs to be accessed by other files, though I've done that with much effort. If you want to read and write from a central source so multiple files have access to it, I suggest you explore using XML. Whether you use records or worksheets to store your local data is a personal choice.
Good luck, and have fun doing it,
Raymond
-
Hello David,
When you do get up to, or beyond VW 2016 (where the WS functions were introduced) you will have to use "=RunScript() instead of "=Run(), as I see in your screen shot.
Raymond
-
I bit the bullet and updated the Wall Openings plug-in object for VW 2020. This was not a trivial exercise which is probably why nobody has done it yet. The code is unlocked so you or anyone else can build on it. When you add it to your workspace, it will be in the "panta rhei" category*. All I ask is that you drop me a line in a week or two, after you've played with it a bit and let me know how it's working for you. If there are any glitches, especially if I've caused them, I'll help you iron them out.
Have fun,
Raymond
* Hello, Petri.
-
2
-
-
Pat, Julian, Thank you both.
Julian, that is indeed the command I was looking for, but it does not work out of the box. On my first attempt using this function my initial excitement was quickly dashed when — nothing happened. Then I reread the thread Pat posted. At the end of his example script he included a ResetObject() command. Together these commands make the wall display as expected, but there was still something missing. Even after the wall height is set at either end, the HEIGHT parameter in the OIP does not update to reflect the change. I don't know if this is normal or not, but it didn't feel right to me, so I dug a little deeper.
I drew two walls of different heights in a blank document and exported the file as VectorScript. The wall heights are set with ObjVars 604 to 607, which are marked as "Not for public use" but they work just fine if you don't tell anybody what you are doing, and you convert everything to mm first. These commands are followed by SetObjectStoryBound(), which sets the OIP fields HEIGHT and TOP OFFSET. Though I am still not fluent in Wall terminology, I feel much better with the output of these combined commands.
Here's a small function I put together. I hope it helps someone get past these small hurdles. It should be pretty easy to modify this script to also set the bottom elevations of the wall, if needed. Comments and criticisms are definitely welcome.
	function SetWallHeights1(H :Handle; StartHt, EndHt :Real) :Boolean;
	{ Set the wall height at the beginning and end of a straight wall and update the OIP. }
	{ Return TRUE if the function works, FALSE otherwise. }
	Var
		B :Boolean;
	Begin
		B := SetWallCornerHeights(H, StartHt, 0, EndHt, 0);
		if B then begin
			SetObjectStoryBound(H, 0, 0, 0, '', 0);				{ affects OIP Top Offset }
			SetObjectStoryBound(H, 1, 0, 0, '', max(StartHt, EndHt));	{ updates OIP Height }
			ResetObject(H);
		end;		{ if }
		SetWallHeights1 := B;
	End;		{ SetWallHeights1 }
A little be of Pat, and a little bit of Julian, makes the world go round. Thanks, guys.
Raymond
-
Thanks, Pat.
I tried setting that ObjVar, but nothing happened. When I looked it up I saw it is READ ONLY.
It seems strange that SetWallHeights() very easily set the wall's height at its beginning and its end. Why would a command like that be removed without another to take it's place? And if one did take it's place, it would be nice to see a note along with the deprecation notice showing which command to use in its stead.
This short script achieves the look of the wall that SetWallHeights() produced, but the Wall Height in the OIP remains unchanged, which doesn't feel right. Is this the way to go?
PROCEDURE xxx;

	procedure SetWallHeightsN(H :Handle; StartWallHt, EndWallHt :Real);
	{ Set the wall heights at the beginning and end of a straight wall. Prior peaks are removed. }
	Var
		P1, P2 :Vector;
	Begin
		ClearWallPeaks(H);
		GetSegPt1(H, P1.x, P1.y);
		GetSegPt2(H, P2.x, P2.y);
		AddWallPeak(H, 0, StartWallHt);
		AddWallPeak(H, Norm(P2-P1), EndWallHt);
	End;		{ SetWallEndHeights }

BEGIN
	SetWallHeightsN(FSActLayer, 8', 9');
	SysBeep;
END;
Run(xxx);
Comments welcome.
Thanks,
Raymond
-
What is the replacement for VS command SetWallHeights()? The DevWIKI documentation says "See architectural category for replacement". So I went to Objects - Architectural and of the 125 commands listed absolutely nothing looked even remotely similar.
In the Objects - Wall section, WallPeak() looks like it could be made to function to set a "peak" at the end of the wall, but it is a MiniCAD 4 command and it doesn't seem like it would be the replacement for a command deprecated in VW 2012.
I assume I'm missing the obvious, so any help would be appreciated.
Thank you,
Raymond
-
Hello Rex,
Try this script on for size. It is a little different from the script Pat posted, and only works on selected objects on a drawing layer. Select everything you want flattened (i.e., Groups and Symbols) then run the script. Please try it on a COPY of your data first to determine its efficacy.
PROCEDURE FlattenSymsInGroups;
{ Flatten selected Symbols, and Symbols inside Groups. }
{ 15 May 2020 - Raymond J Mullin }

{ BE CAREFUL: }
{ Use on a copy of your file first to determine if this script does what you want. }
{ Always wear a mask. This script does not Social Distance in GROUPS. }

	function FlattenNestedSyms(H :Handle) :Boolean;
	Begin
		if (GetTypeN(H) = 15) then
			SymbolToGroup(H, 2);
	End;		{ FlattenNestedSyms }

BEGIN
	ForEachObjectInLayer(FlattenNestedSyms, 3, 2, 0);	{ Vis & Selected, Deep, Active Layer }
	SysBeep;		{ Beep when done }
END;
Run(FlattenSymsInGroups);
HTH,
Raymond
-
1
-
-
You're welcome, Rex.
When a symbol only has simple objects inside, like Lines, and Circles, and Squares (oh my), you won't see the dialog box because there is only one way to decompose it. But if there are nested symbols and or Plug-in Objects inside, then you'll get the dialog asking you how to proceed. Do you want to preserve nested symbols, or flatten everything? If you pick the first option, then you can reselect objects after the operation and proceed "delicately". If you pick the third option, it's like you hit everything with a sledge hammer and everything comes out crumbs – or Lines, and Circles, and Squares (oh my).
Essentially, VW is looking inside your symbols first and only presenting you with the dialog if it will change how they get converted; otherwise it converts everything to primitive shapes, no questions asked. If your symbols only have one primitive object in each of them, then you won't get any groups, just the primitive objects. Symbols containing two or more objects will convert to groups.
HTH,
Raymond
-
Hello @rexwexford,
I am not sure how you are determining if the script works or doesn't, but it is working on my machine in VW 2020. That said, this is a weird script in that it does not convert symbols on the drawing to groups, but it does convert some nested symbols inside the symbols that are on the drawing to a group, but it does not convert ALL nested symbols to groups.
I think it would be more thorough if it used option "2" (Convert all subobjects) in the SymbolToGroup() command. Currently it uses option "1" (Convert plug-in and symbol subjects). But even with this change, the net result would be you still have symbols on your drawing, AND, your symbol definitions may have been modified.
If you want to flatten your drawing, or just a selection of your drawing, why don't you use the VW menu Modify > Convert > Convert to Group (CMD-K)? You will be presented with a dialog box where the third option is "Convert all sub-objects". The net result will be that all your selected symbols will be flattened to Groups, and none of your symbol definitions will be modified. This is a much safer scenario, in my mind. If you don't want the symbol definitions intact, after you flatten everything to your liking, you can copy everything to a new drawing. This way you can always go backwards if you need to,. If you use the above script and save your file, you may do irreparable damage; and as Pat warns – {Use at your own risk. May cause pimples or hysterical blindness}
If you are looking for something that is not addressed here, please write back.
HTH,
Raymond
-
1
-
-
Hello @Eric Mousse ,
As @Peter Vandewalle stated explicitly, and @Pat Stanford implied, the dialog needs to be rewritten from the ground up. It is not a simple case of substituting old commands with new ones as I originally hoped. This is not something terribly difficult for a seasoned VS programmer, but may be a bit daunting for a novice. I'll take another look at in the next few days, but if someone beats me to it, that's okay, too.
You may want to try your hand at it and feel free to write back with questions. Scripting is an incredibly powerful tool. The more you master the more freedom you have to apply your craft.
Raymond
-
Hi Julian,
Do you mean something like this?
PROCEDURE xxx;
CONST
	CR = chr(13);
VAR
	H :Handle;

BEGIN
	H := FLayer;
	while (H <> nil) do begin
		if (GetObjectVariableInt(H, 154) = 2) then
			AlrtDialog(concat('Sheet # = ', GetLName(H), CR,
					'Sheet # [Title] = ', GetObjectVariableString(H, 162)));
		H := NextLayer(H);
	end;		{ while }
END;
Run(xxx);
By Export, do you mean write to a file? If not, how to format it?
Raymond
-
Hello @Eric Mousse ,
Assuming the original code used Modern Dialogs and not Classic Dialogs, this list may help if you want to do the edits yourself. You'll have to look up the syntax in the Script Function Reference (found in the VW application folder VWHelp>Script Reference folder) or the online Developer WIKI (link is at the top of this page.)
Old VS call	New VS call
DelChoice	RemoveChoice
GetChoiceStr	GetChoiceText
GetField	GetItemText
GetSelChoice	GetSelectedChoiceInfo
InsertChoice	AddChoice
ItemSel		GetBooleanItem
NumChoices	GetChoiceCount
SelChoice	SelectChoice
SelField	SelectEditText
SetField	SetItemText (editable text) or SetControlText (static text)
SetHelpString	SetHelpText
SetItem		SetBooleanItem
SetItemEnable	EnableItem
SetTextEditable	EnableTextEdit
Take note: Some calls just add the DialogID to the parameter list, while others also change the parameters around a bit. Making the edits typically isn't very hard, just tedious. Let the error reports from the script compiler be your guide.
Feel free to write back if you have more questions.
HTH,
Raymond
-
Ain't programming fun? Glad you got it working.
Raymond
-
In the Script Editor window, when I have "Language: VectorScript" selected I get this error:
Line #1: vs.Message('Test Tool')
|
{ Error: Identifier not declared. }
When I have "Language: Python Script" selected, the script runs as expected. This is in a Script Palette script, and in a Tool Plug-In.
Also, check in a word processor for any hidden characters in your one-line script, or select all, delete, and retype the line again. One hidden character will crater the simplest of code.
Good luck,
Raymond
-
Sorry Sam,
When I originally modified that routine to show the error numbers after the text, I added Error 8 because that is what VW was returning when I purposely misspelled my file name. I was expecting Error 6, but I got 8, so I duplicated the error text and added the word "still" so I would recognize the difference. I did not expect to ever share this code, and then you asked. When you mentioned Error 8, and I reread the message "The file ... is still not found", I remembered what I had done. It works for me, but it isn't sanctioned by any accepted authority.
You should get an VWI engineer to confirm the meaning of Error 8. My topical search of the SDK did not turn up a list of File IO Error Codes.
Raymond
-
Found it sitting in plain view. The example came from the Script Function Reference - GetLastFileErr() command. Were you looking for something else?
Raymond
-
Sam,
I got these text alerts from an example somewhere and added the numerical error codes to the output. If I find the source, I'll post back.
errorCode := GetLastFileErr;
if (errorCode <> 0) then
	case errorCode of
		 2: AlrtDialog(concat('The file "', FName, '" cannot be processed because the hard drive is full. (', errorCode, ')'));
		 4: AlrtDialog(concat('End Of File "', FName, '" reached prematurely. (', errorCode, ')'));
		 5: AlrtDialog(concat('The file "', FName, '" is locked. (', errorCode, ')'));
		 6: AlrtDialog(concat('The file "', FName, '" is not found. (', errorCode, ')'));
		 8: AlrtDialog(concat('The file "', FName, '" is still not found. (', errorCode, ')'));
		10: AlrtDialog(concat('The file "', FName, '" is currently in use by another program. (', errorCode, ')'));
		13: AlrtDialog(concat('The file path "', FP, '" does not exist. (', errorCode, ')'));
		otherwise AlrtDialog(concat('The file "', FName, '" has encountered an undetermined error. (', errorCode, ')'));
	end		{ case }
Where variables FName, and FP are strings, representing the File Name, and File Path respectively.
Raymond
-
Wow. I didn't really sleep all that well, or walk on the beach, or have breakfast (nice or otherwise). And what cup of tea? Glad your vision is clearing. 8-)
All the best,
Raymond
-
1
-
-
10 hours ago, michaelk said:
In your example the bug still exists. The second text object using SetTextJust(2); - which should have the insertion point at the top of the top line - instead has the insertion point at the bottom of the first line.
Hi Michael,
In the second text object of my example, which is derived from your example, I/you use:
TextJust(2);
TextVerticalAlign(2); { Vert Top Baseline Aligned TextVerticalAlign(2) }{ I think this one has a bug }
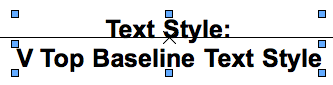
which translates to CENTERED, and TOP BASELINE. That is exactly where the text is getting inserted.
Are you not seeing this? The line in the picture is at Y=0.
Raymond
-
Michael,
6 hours ago, michaelk said:My understanding - dangerous territory here - is that SetTextVerticalAlign() and SetTextVertAlignN() set the alignment of text objects already created.
You are right, but the point I was trying to make is that when you apply a TextStyle, there are two ways to do it – 1) keep the insertion point fixed and move the text block relative to the insertion point (as is done with SetTextVerticalAlign), or 2) keep the text block fixed and move the insertion point relative to the text block (as is done with SetTextVertAlignN). VW uses the latter method of adjusting the Vertical Alignment when a TextStyle is applied. You were probably expecting it to use the first method.
I believe your confusion exists because your example does not show enough detail to see what is really happening with the vertical alignment settings. SetTextVerticalAlign() and SetTextVertAlignN() both work perfectly, but you need more than one line of text to show the difference between "Top Baseline" and "Bottom Baseline" settings. When there is only one line of text, the TOP and BOTTOM Baselines (of the text block) are the same, since the ONE line of text is both the TOP LINE, and the BOTTOM LINE. With two or more lines in a text block, the TOP and BOTTOM Baselines are different. The following example should show the difference.
I modified your second code example to create multiple (2) lines of text, not one. Now when the Vertical Alignment is set you should see a difference for all five vertical alignment values. Forgive me if I removed too many blank lines.Procedure Test; CONST kVTopTextStyle = 'V Top Text Style'; kVTopBaselineTextStyle = 'V Top Baseline Text Style'; kVCenterlineTextStyle = 'V Centerline Text Style'; kVBottomBaselineTextStyle = 'V Bottom Baseline Text Style'; kVBottomTextStyle = 'V Bottom Text Style'; kString = 'Text Style: '; CR = chr(13); VAR h : HANDLE; s : STRING; BEGIN { Create 5 Text Styles. All Left Justified with the same font, font size, and face. } TextFont(GetFontID('Arial')); TextFace([Bold]); TextSize(24); TextJust(1); TextVerticalAlign(1); { Vert Top Aligned TextVerticalAlign(1) } h := CreateTextStyleRes(kVTopTextStyle); MoveTo(0, 0); BeginText; Concat(kString, CR, kVTopTextStyle) EndText; SetTextStyleRef(LNewObj, Name2Index(kVTopTextStyle)); { ******************** } TextFont(GetFontID('Arial')); TextFace([Bold]); TextSize(24); TextJust(2); TextVerticalAlign(2); { Vert Top Baseline Aligned TextVerticalAlign(2) }{ I think this one has a bug } h := CreateTextStyleRes(kVTopBaselineTextStyle); MoveTo(40', 0"); BeginText; Concat(kString, CR, kVTopBaselineTextStyle) EndText; SetTextStyleRef(LNewObj, Name2Index(kVTopBaselineTextStyle)); { ******************** } TextFont(GetFontID('Arial')); TextFace([Bold]); TextSize(24); TextJust(3); TextVerticalAlign(3); { Vert Center Aligned TextVerticalAlign(3) } h := CreateTextStyleRes(kVCenterlineTextStyle); MoveTo(80', 0"); BeginText; Concat(kString, CR, kVCenterlineTextStyle) EndText; SetTextStyleRef(LNewObj, Name2Index(kVCenterlineTextStyle)); { ******************** } TextFont(GetFontID('Arial')); TextFace([Bold]); TextSize(24); TextJust(1); TextVerticalAlign(4); { Vert Bottom Baseline Aligned TextVerticalAlign(4) } h := CreateTextStyleRes(kVBottomBaselineTextStyle); MoveTo(120', 0"); BeginText; Concat(kString, CR, kVBottomBaselineTextStyle) EndText; SetTextStyleRef(LNewObj, Name2Index(kVBottomBaselineTextStyle)); { ******************** } TextFont(GetFontID('Arial')); TextFace([Bold]); TextSize(24); TextJust(2); TextVerticalAlign(5); { Vert Bottom Aligned TextVerticalAlign(5) } h := CreateTextStyleRes(kVBottomTextStyle); MoveTo(160', 0"); BeginText; Concat(kString, CR, kVBottomTextStyle) EndText; SetTextStyleRef(LNewObj, Name2Index(kVBottomTextStyle)); END; RUN(Test);HTH,
Raymond

Formatting OIP?
in Vectorscript
Posted
Michael,
Use vsoAppendWidget() { adds widget to the end of the list }
or vsoInsertWidget() { adds widget before "paramID" }
Raymond