Jump to content

1 Screenshot

About This File

This is my first marionette and it's based on @Marissa Farrell's image processing! 


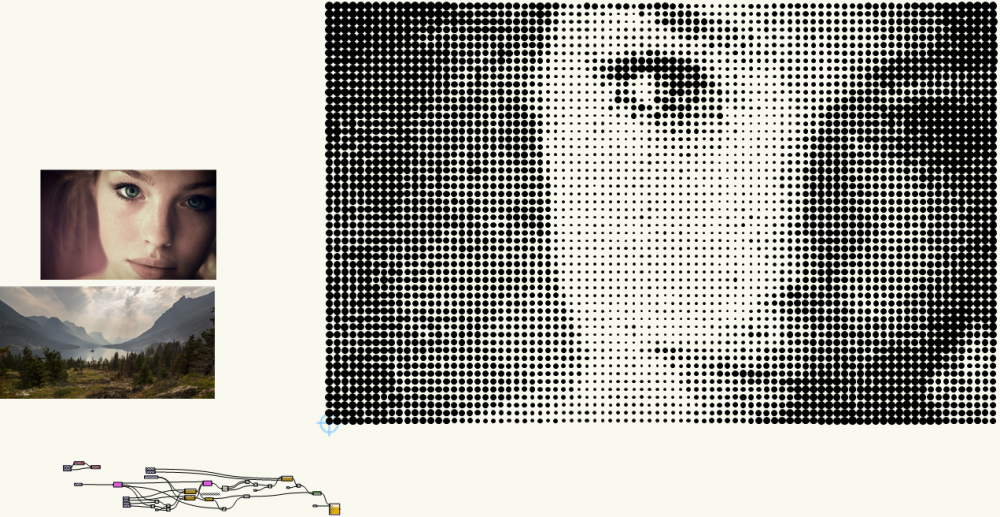
It takes an image and creates a Halftone object of it with black circles:

image.thumb.png.f33b8b71262e2f4b015ec1b976d8746c.png


IMPROVEMENTS:

  • Final objective is that I'll add cnc DXF milling information to this marionette so that it can be milled on a CNC machine.
    (We've milled Halftone parts in the past using Jason Dorie's Halftone program http://jasondorie.com/page_cnc.html)image.thumb.png.9a162eb8e5f5bbe81c141176e68d46ad.png
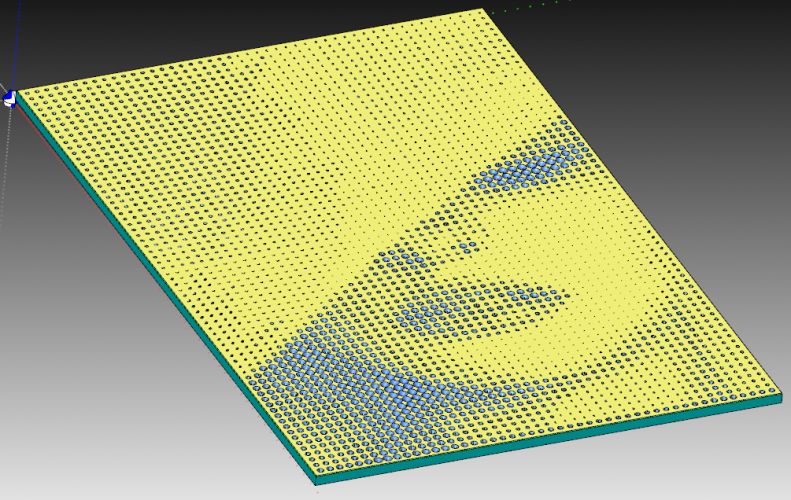
    Result:
    image.thumb.png.afc3f83686c219cf60061661355012ea.png         

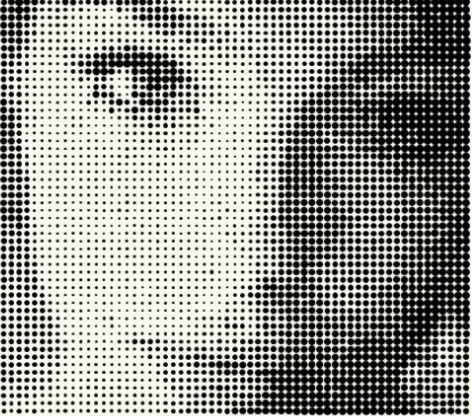
    Detail:
    image.thumb.png.ed54e4580832ce19cef1d53913750ffa.png


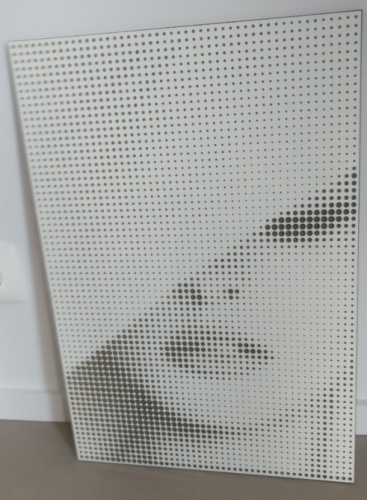
  • Maybe add a line milling. The image below is milled by us in the past with Jason's program.
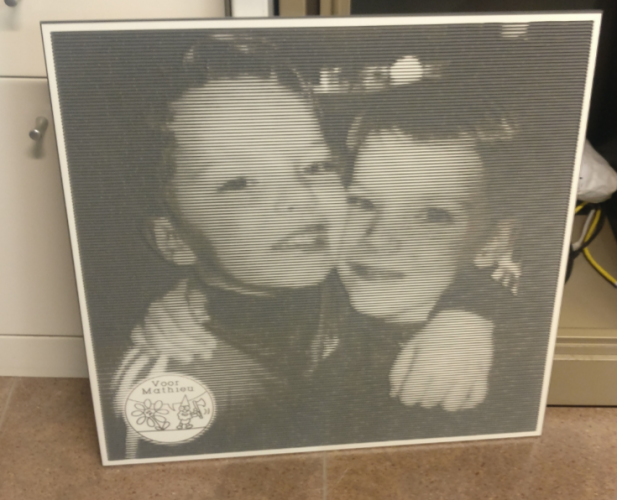
    image.thumb.png.0b17bbb423deac5a5326b90ddd057080.png
     
  • Be able to change the dimensions of the final halftone image. Now it takes the pixel width and height of the image, but I would like this to be some adjustable parameters. Changing the height and width with Set Height and Set Width has no effect. Somebody has a suggestion on how to do this?
    image.thumb.png.228d99f072d912abba5604ab5445c465.png
     
  • Now the marionette looks at the color of each pixel on a grid with step "Distance between Circle Centers". Related to that color, it creates a circle with according radius on the position of that pixel: 
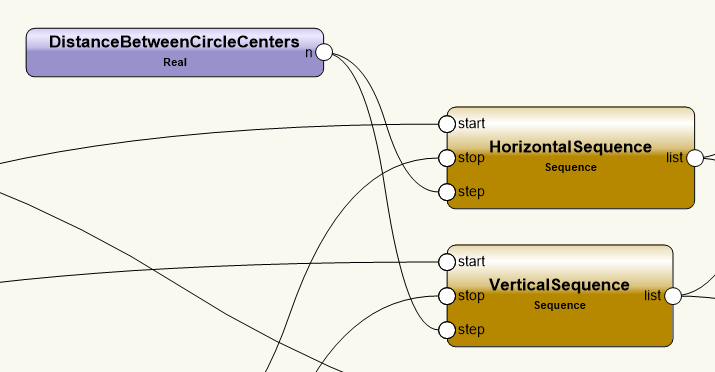
    image.thumb.png.e3ef5e65f8e6a0ff7efe910d1b781559.png
    The problem with this method is that that single pixel on the grid has total control on the radius and the one pixel just next to the chosen one has no relevance. A better mechanisme would be that the size of the circle is related to the average color of all the pixels in the area of the square "Distance between Circle Centers"x"Distance between Circle Centers". Anyone with some advice on handeling this? I got some little progress on it:
    Here we have 2 lists. One with all the pixels. X,Y coordinates of the pixel, Z is the radius of the circle according to the color. The other list has the X,Y values of the centers of where the final circles have to be placed. 
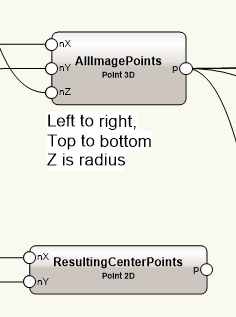
    image.thumb.png.bf7b8ebc4b13a32803902f35c4da6468.png
    Following this we need to check the distance of all the image points to the center points. If this is smaller than a condition, then that point's radius had to be taken into account for calculating the average radius of that centerpoint. Any one has a quick hint on how to create this in marionette?


What's New in Version 1.0.0   See changelog

Released

No changelog available for this version.

  • Like 10

User Feedback

Recommended Comments


  • Marionette Maven

This is great and is actually identical to my first project with Image Processing! (I'll have to see if I can find a photo of my results)


I can definitely help you out with some, if not all of your questions, if you can be patient with me! I'll have to look for my example on the averaging colors, I did some of that when I was working on my triangulation project, but I don't think I ever shared the network here because it was during the pre-release cycle.


Give me some time and I'll get back to you on this!

Link to comment
  • Vectorworks, Inc Employee

Hey Bert, I was wondering how long until you came up with something in Marionette. You know you can use interiorcad's DXF output to get the milling info? Post us some photos when you're done. Nice work!

Link to comment

@Marissa Farrell Thank you!


17 hours ago, Stephan Moenninghoff said:

Hey Bert, I was wondering how long until you came up with something in Marionette. You know you can use interiorcad's DXF output to get the milling info? Post us some photos when you're done. Nice work!

Hi Stephan, Thank you! With which interiorcad tool can you export 3D polylines or which DXF output do you mean?
I've developed our own DXF to NC-Hops converter. It's written in python and we're using this mainly to mill our stairs and worktops. It creates NC-Hops files from a DXF file generated in Brics/Autocad or Vectorworks. With this program I can convert a 3D polyline straight to mill lines, which is how I was thinking to create the mill lines on this marionette.

Edited by Bertf
Link to comment
  • Vectorworks, Inc Employee

Ok, I thought you had VectorWop, our VWX-to-machine interface. It comes with a built-in DXF output (and one for Hops, too, actually). You are the Bert I know from "forest+", right?

Link to comment
12 hours ago, Stephan Moenninghoff said:

Ok, I thought you had VectorWop, our VWX-to-machine interface. It comes with a built-in DXF output (and one for Hops, too, actually). You are the Bert I know from "forest+", right?

Yep Stephan, that's me! :) 
Yes we have VectorWop, which exports to NC-Hops for our cabinets. But for stairs, worktops and other stuff like these millings, we use our own converter. 

For example this Halftone image has to be milled with a 45° point mill. To create a circle with radius R on the surface, we have move the point mill to depth R. To visualize this, I've drawn some mill lines:

image.thumb.png.e9654b1b67e95cf903441f1c3052e412.png


It's a 3D poly which runs over the board at a safe distance of about 2mm. At every circle the mill goes down to the depth -R. I don't think this is doable with InteriorCAD's "Contour 3D" or "2D Contour"? They have a predefined depth for the full line:

image.thumb.png.8e8ab41dd6919934e3e70da2b75d8905.png


So with this tool, I don't think I'm able to "go down" to certain depths with my mill...


We could discuss to try to draw "Drilling 3D" with depth = R at the circles, but then we'd have to adjust interiorcad's NC post processor to convert these drillings to millings. Very important in this case would be that the millings of different circles are all connected, else the machine will pull the mill back to it's default safe distance and have a short break every time. This increases the proces time a lot! 


So if I'm not missing any interiorcad tool, I think the easiest way would be to use the 3D poly. 


Edited by Bertf
Link to comment
  • Vectorworks, Inc Employee

You are right, the contour is not designed to adjust the router's z on the fly. As for the drillings, conversion is done automatically in cases where no matching drill is found for a given diameter. I understand the need to stop the tool to return home between each milling. I'm not totally sure it would do that, actually. AFAIR, it only returns to safe distance between different directions of drillings. There is a setting for that in your machine configuration. Anyway, if this works for you, that's fantastic and the result looks promising!

Link to comment

This is Great Bert


Have you also tried to mill in a line structure? and connect the Points?

Should this work, if I had a 3D Polygon. And can convert this to a 3D Path with the DXF Post-Prozessor?


5abcaa391f25f_Bildschirmfoto2018-03-29um10_54_12.thumb.png.a0e1cda412f997d6df582b96c9815473.png


Bildschirmfoto 2018-03-29 um 10.54.07.png

Link to comment

Thank you @DomC!


50 minutes ago, DomC said:

Have you also tried to mill in a line structure? and connect the Points?

Yes, I've milled multiple line images with the same technique you're showing. I've created them with Jason Dorie's program. (one example is shown in the first post) But as I mentioned in improvements point 2, I hope to implement this in this marionette as well.
 

49 minutes ago, DomC said:

Should this work, if I had a 3D Polygon. And can convert this to a 3D Path with the DXF Post-Prozessor?

If your CNC-machine has a DXF import that supports polygons with varying z-value, you will be able to mill it. Our machines doesn't, that's why we build our own DXF to NC-Hops converter.

Link to comment

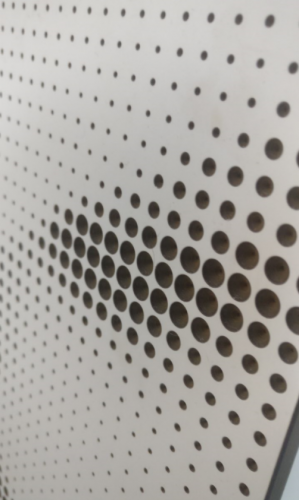
I've found pictures of 2 millings I did in the past:

IMG-20160123-WA0001.thumb.jpg.ff05d8b84f5efc9ad71ad91fcf8c9e7e.jpg


With a detail:

IMG-20160123-WA0004.thumb.jpg.9e81e89091bc3c530ceb6e36bb41c2e2.jpg

Edited by Bertf
  • Like 1
Link to comment

Great @Bertf

Your Screenshots shows a contour in x direction with different z values. My screenshot (found out now) shows simple Drillings (v-fräser). But the x-distance is 10x of the y distance. Thats why we can see lines.

My screenshot shows the variant of 3D contour with a v-fräser. Too bad I have no place for a CNC-Milling machine.


Can be done easy with the chunk node (to get single polygons for every line). EAP created for visualisation.


1.PNG

2.PNG

path extrude.PNG

3.png

Edited by DomC
Link to comment

Wow, thanks for the hint to the Chunk list node! 
I was looking for something similar when i was working on the average pixel color for the halftone circle!


And, yes. I don't use drillings close together for the line milling effect. Just a continuous milling with varying depth:

image.thumb.png.e131f9960a6d7422817a374edb9500f8.png

Edited by Bertf
Link to comment

I got it to work on Windows but not on Mac. I was not able to get a working url for Pillow with Vectorworks 2018 on Macintosh. Reported a Bug for VW 2018 but I am not sure, if this is A Vectorworks issue other modules can be installed without any issues.


Would be glad to got a solution for Pillow on Macintosh. This is the only module for image processing i found. Other image modules also needs pillow as an image library.

Edited by DomC
Link to comment
  • Marionette Maven
12 minutes ago, DomC said:

I was not able to get a working url for Pillow with Vectorworks 2018 on Macintosh

I also haven't found one yet, but most other libraries have been installing fine. I don't think this is a Vectorworks issue.

Link to comment

A Workaround for 2018 Macintosh


1. Unzip and copy the attached Folder into the user folder (Vectorworks Preferences -> User Folder -> Revieal in Finder) into the Folder "Python Externals"

2. You can use with all scripts that uses Pillow. Also the above Script will work.


PIL.zip

  • Like 1
Link to comment
  • Marionette Maven
1 hour ago, Hans-Olav said:

I have tried to open the various files with version 2020 but always getting an error message. Anyone knows how to fix it?166432718_marionetteerror.thumb.png.2de13b1ac2d6e8a654eeba8f020f53d8.png

I have a fix for this. Let me find the revised nodes and I'll get back to you. 

  • Like 1
Link to comment

Join the conversation

You can post now and register later. If you have an account, sign in now to post with your account.
Note: Your post will require moderator approval before it will be visible.

Guest
Add a comment...

×   Pasted as rich text.   Restore formatting

  Only 75 emoji are allowed.

×   Your link has been automatically embedded.   Display as a link instead

×   Your previous content has been restored.   Clear editor

×   You cannot paste images directly. Upload or insert images from URL.

×
×
  • Create New...