Jump to content

Search the Community

Showing results for tags 'image prop'.

  • Search By Tags

    Type tags separated by commas.
  • Search By Author

Content Type


Forums

  • Announcements
    • Announcements
    • News You Need
    • Job Board
  • Feedback
    • Roadmap
    • Wishlist - Feature and Content Requests
    • Known Issues
    • Wishes Granted / Issues Resolved
    • Forum Feedback
  • General
    • Troubleshooting
    • General Discussion
    • Architecture
    • Site Design
    • Entertainment
    • Previsualization
    • Braceworks
    • ConnectCAD
    • Energos
    • Rendering
    • Workflows
    • Buying and Selling Vectorworks Licenses
    • Hardware
  • Customization
    • AI Visualizer
    • Marionette
    • Vectorscript
    • Python Scripting
    • SDK
    • 3rd Party Services, Products and Events
    • Data Tags
  • Solids Modeling and 3D Printing
    • Subdivision
    • Solids Modeling
    • 3D Printing
  • Vectorworks in Action
  • Archive
    • Resource Sharing
    • Machine Design

Calendars

  • In-Person Training - US
  • In-Person Training - UK
  • Coffee Breaks
  • Essentials Seminars
  • Webinars
  • Community Groups

Categories

  • Knowledgebase
    • Tech Bulletins
    • Troubleshooting
    • Workflows
    • How To
    • FAQs

Categories

  • Marionette - Objects
  • Marionette - Networks
  • Marionette - Nodes
  • Marionette - Menu Commands

Product Groups

There are no results to display.


Find results in...

Find results that contain...


Date Created

  • Start

    End


Last Updated

  • Start

    End


Filter by number of...

Joined

  • Start

    End


Group


Occupation


Homepage


Hobbies


Location


Skype

Found 5 results

  1. Version 2025.0

    25 downloads

    How to Use the Marionette Script: Step 1: Install the Pillow Library The script requires the Python library Pillow for image processing. If you’re unsure whether you’ve installed it before, you can safely install it again. To install: 1. Select the Install Pillow node in the script. 2. Click Run in the Object Info Palette (OIP), or 3. Right-click the node and select Run Marionette Script. Step 2: Add Commands to Your Marionette Command Library To make the script easily accessible: 1. Right-click on each wrapper. 2. Select Convert to Menu Command…. 3. Name the command as you want it to appear in the Tools > Marionette Commands menu. Step 3: Use the Commands 1. Select an image (bitmap) on your drawing area. 2. Navigate to Tools > Marionette Commands > [Your Command Name]. 3. Test with sample bitmaps provided in the file’s Sample Images design layer. Special Notes: • Running Commands: Important: These Marionette Wrappers cannot be run directly from the drawing area because they act on selected objects. You must run them from the Tools > Marionette Commands menu. • Installing Pillow: The Pillow library will be installed to your User Folder. If needed, reinstall it using the provided Install Pillow node. • Image Import Settings: For the AI to Prop commands, always import images as JPEG. Importing as PNG will cause display issues. Use the AI to Prop with Dialog command to manually adjust import settings if needed. Once configured, the non-dialog version will reuse the last settings automatically. • Temporary Files: The script creates temporary images in your User Folder. These files can be deleted at any time.
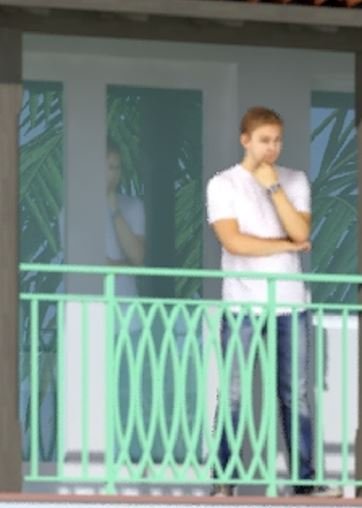
  2. reflection of person on glass door behind him reflects the person's front... Carlos
  3. When you scale an image prop's 3D polygon, it doesn't also scale the image. I understand why that's the case and I know how to solve it fairly easily, but is there a way to scale the image and 3D polygon simultaneously?
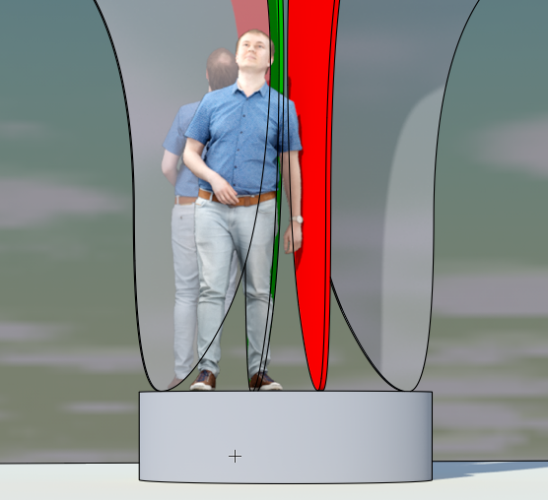
  4. Sheet layer vp: Hidden lines draw over the image prop. I want image prop to hide the edges behind. Description: •Human figure is a group of two image props slightly offset (Adam front view & Adam back view from vwx library) •Prop Textures use Image Mask Color & Transparency Shaders from same images. •In design layer, Image Prop is placed in front of several extrudes. •••••One Extrude has polished metallic texture (reflects Adam's back). Red & green ones have color fill. •VP Background render is RW Style>Realistic Exterior Final •VP Foreground render mode is Hidden Line •Indirect lighting is ON, Background is HDRI Sky Mostly Sunny Why wouldn't an image prop obscure edge lines of objects behind the image prop? Pilot error here in texture or render setup? Or does Hidden Line always override the image transparency masks? Workaround? -B
  5. I'm after a 3D image prop of a Jelly Palm, have looked through some of the resource folders in VW but not having any luck. Can any point me in the right direction.
×
×
  • Create New...