

- Popular Post


Tom W.
-
Posts
5,016 -
Joined
-
Last visited
Content Type
Profiles
Forums
Events
Articles
Marionette
Store
Posts posted by Tom W.
-
-
This...
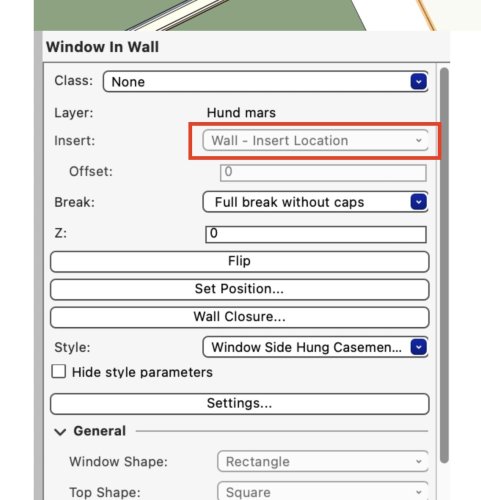
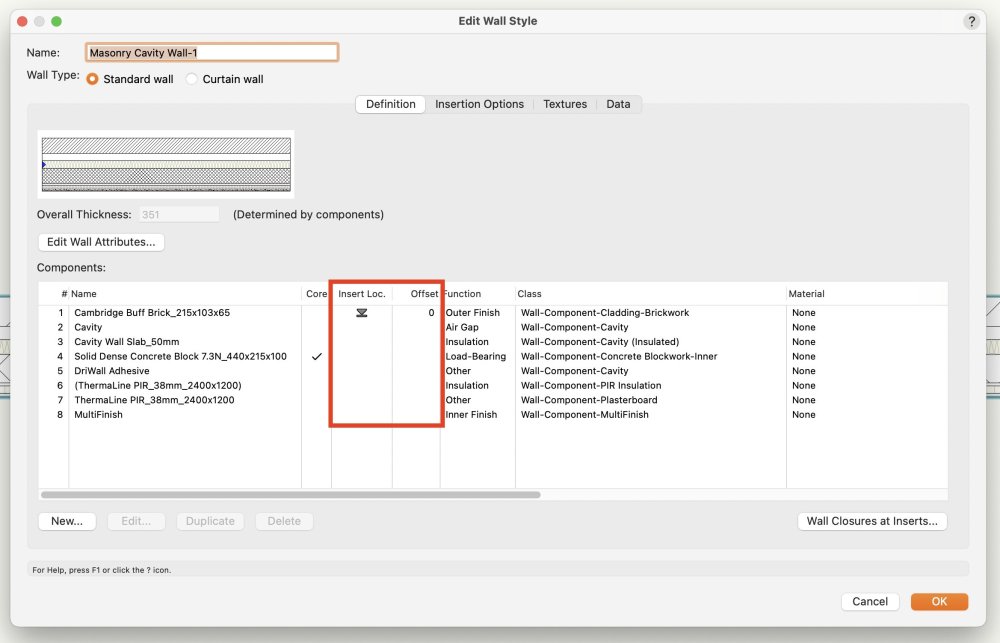
... indicates that the Window is taking its Insert Location from the Wall. So check the Insert Location setting for the Wall + set it to what you want e.g. the exterior of the first component:
Alternatively you can edit the Plug-in Object Style Options for the Window (right-click on the Window Style in the Resource Manager + select 'Plug-in Object Style Options...') + change the Insert Location from 'Wall - Insert Location' to 'Wall - Left Edge'.
The other setting to be aware of is the 'Insertion Relative to' parameter for the Window. If you want the exterior of the Window to be flush with the exterior face of the Wall you need to set 'Insertion Relative to' to 'Exterior Face of Jamb'.
So with the Insert Location set to 'Wall - Left Edge' (or if you are using the Wall Insert Location, the Insert Loc set to the exterior of the first component as per screenshot above) + 'Insertion Relative to' for the Window set to 'Exterior Face of Jamb' you get this:
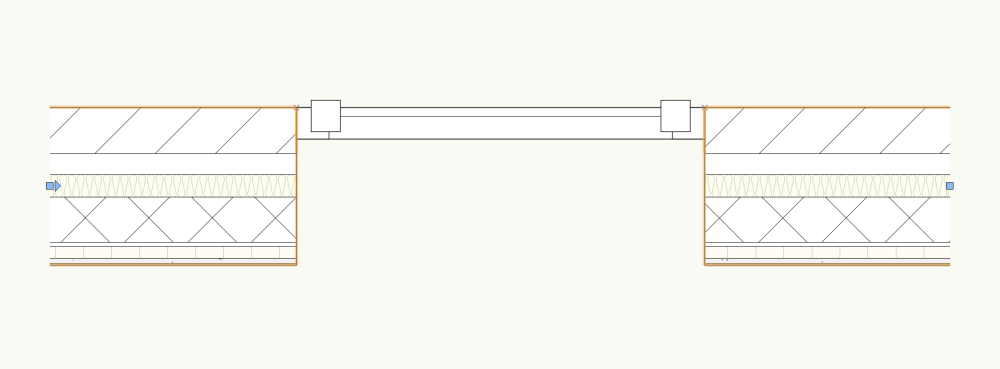
Which I think is what you want?
-
 1
1
-
-
This is a quick way: set up a Saved View for the first Camera view then another Saved View for the second Camera view + set the view transition duration + motion to whatever you want to get the transition you're looking for. Then it's a case of switching between the Saved Views.
You can also do walkthrough animations but I've never done this (+ have heard quite a few complaints about it).
-
1
-
-
14 hours ago, cberg said:
VW2024 now includes an option for gap below leaf
Definitely a great addition! Now I don't need to create an invisible threshold to achieve the same thing... But presumably you wanted to offset the leaf in plan rather than elevation in your original post? Perhaps this is functionality VW should also add. I made a couple of wishes in a similar vein for the Window tool recently:
-
Thanks @line-weight.
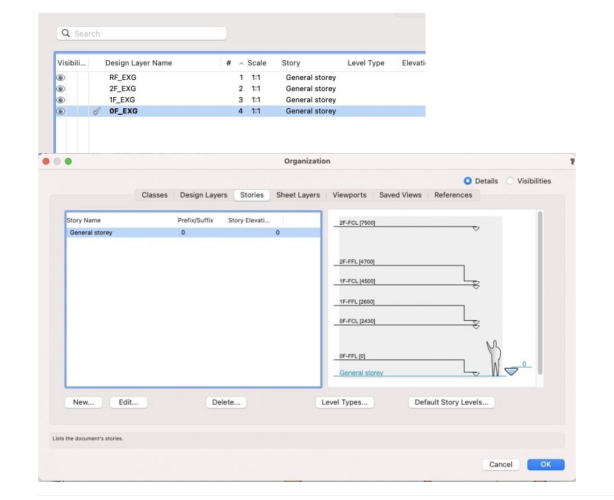
On 4/24/2024 at 4:09 PM, line-weight said:Is it something to do with the difference between a "level" and a "level type"? Because in my setup I think I only use "level types" and disregard what happens to levels that are intended to repeat in multiple stories.
I think it's just the rather convoluted way that VW has designed Stories to work: first you create custom level 'types', then you use these to create your Default Story Levels, then you are finally in a position to put your Story/Stories together by selecting which Default Story Levels you want to include.
On 4/24/2024 at 4:09 PM, line-weight said:I think I must have "layerless levels" but where is it that you make the choice between a layerless level and a story level?
When you create a new Default Story Level you have the option to associate a Layer with it (see 'Create Layer' check box). Or you can edit an existing Default Story Level + create a layer for it after the fact. It's as if you can come at it (structuring the file) from the Story side of things where the Levels have primacy + Layers are added as part of the level-creation process as + when you need them, or you can come at it from the Layer side + add Levels to the Layers which I think is what you are doing. I have kind of done a mish-mash of both. I like the fact that I can have a Design Layer for (for example) all my furniture, kitchen units, etc + link that layer to a Story in the way that you do + then have access to multiple Levels set to the different floor finish elevations (if I have different thickness floor finishes in different rooms). So I can have all my objects on the same Design Layer but (because they are all symbols) set their elevations in the OIP based on the room they are in + the corresponding Level. Previously I used to set up different Design Layers with different layer elevations + place the objects on the relevant layers. By associating the levels to the Design Layer I can keep the layer + the levels separate i.e. I can have an 'objects' layer + 'laminate floor', 'floor tiles', 'carpet', etc levels. I don't want 'laminate floor' or 'floor tiles' design layers which is what I'd end up with if I created the layer in the Stories set-up.
I've probably got all this completely wrong but that's how it looks to me at the moment!
On 4/24/2024 at 4:09 PM, line-weight said:*tick “use elevation benchmark” (what does this actually do? Chooses benchmark style to use by default? This doesn’t seem to happen)
I wondered about this too.
-
7 hours ago, Ed Wachter said:
Sometimes I can; sometimes I can't. This image shows an extrude (to the left) that worked fine. Now, on the right, I've got my 3D polygon, but the radius ("Fillet Tool") does not seem to work.
What happens when it doesn't work? Do you get an error message? I can't get it to fail. Unless it's two 3D Polys instead of one.
I'd probably draw the path as a NURBS Curve (Curve Degree 1) rather than a 3D Poly.
-
- Popular Post
- Popular Post
As long as they are image props they should be able to slide under the door 😄
-
3
-
 2
2
-
Cool!
48 minutes ago, Benson Shaw said:the value defaulted to .083
For me it is 25.4 (mm) = 1"
I guess your units must be feet? (1/12=0.083)
Not the most user friendly value in that context...
-
1
-
-
You know there was a big update to Cabinets in VW2024 if you have access to it? Countertops will be VW2025 I think...
-
You could use a Structural Member to represent a LVL beam but you won't be able to style it in VW2019...
-
Not sure what you mean by a 'Beam'. You can create Structural Member styles since VW2023 (I think) if that's any use? Your signature says you're using VW2012 + VW2013 which is presumably out of date...?
-
It's Shift-Option-8 on a Mac. Don't know about Windows.
°
-
1
-
-
Have you played with the 'Simplification Tolerance' setting in the OIP? This was introduced in VW2023 I think.
-
1
-
 1
1
-
-
7 hours ago, Andrew Lees said:
I have a grid pattern superimposed over my point cloud. The size of this grid (which is manifest as gaps in the point cloud) gets denser and more obscuring the more I zoom in.
I have not seen this before + have no idea what's caused it...
7 hours ago, michaelk said:I've found that if you use the _VW.pts version of the file, the floors will be level, but not necessarily at Z=0.
Yes. Nomad generates a 'xxxxxxxxxxxxxxxxx.pts' version of the point cloud which is designed to be viewed on Nomad (because it is oriented correctly) + a 'xxxxxxxxxxxxxxxxx_VW.pts' version which is the one you are meant to import into VW (which is upended when viewed on Nomad). Make sure you name your scans + save them to a dedicated folder as you create them as it's a nightmare trying to find the files you just created otherwise! (the names Nomad gives them are completely random + they can't be arranged in date-created order... And for the life of me I can't see how you rename them or move them into new folders after the fact!! That could be me though...)
-
1 hour ago, cberg said:
Is there a way to set a keyboard command to activate the transform mode? (preferable to toggle).
I know that U toggles between the different mode groups. But it would be nice to activate it directly somehow.
I don't think so but be interested to know if this kind of thing is scriptable. This kind of relates I think to what I posted about here i.e. being able to more easily switch between the fourth + whatever other mode of the Selection Tool you use rather than having to toggle through all four modes:
It would be great to just be able to toggle Transform Mode on + off.
-
3
-
-
3 minutes ago, line-weight said:
when you say "storey layers" do you mean "storey levels"?
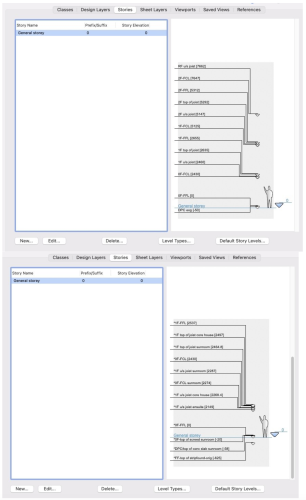
No I meant 'story layers' (or 'layer levels'?) as designated by the stacked layers icon in the stories preview pane:

I was thinking that your set-up according to those earlier screenshots seemed to include story levels only ('layerless levels') + no story layers. But in your new post I can see from the Design Layer tab that you have layers which are 'within' or 'assigned' to a story (as you say) + yet they don't show up as story layers in the Stories tab... So assigning a design layer to a story via the drop-down in the 'Story' column of the Design Layers tab gives objects on those layers access to the story levels right? But that's different to a 'story layer' created within the story settings + designated with the stacked layers symbol?
This is what I've got in my file:
So I've got four 'story layers' plus 23 'normal' layers, none of which have I 'attached' to the story yet...
In the notes I made ages ago when I first looked at stories it says that each story must contain at least one story layer but that doesn't seem to be the case in your set-up?
-
@line-weight thank you for reminding me of this thread.
So do you not use any Story Layers...?:
I think this is what I remain slightly unclear about in my file (the first to incorporate Stories): where to have standard Design Layers + where to have Story Layers. The file started off as a layer bound set-up with all my standard design layers then I added stories midway through, really only to utilise the enhanced Elevation Benchmark functionality discussed elsewhere. So I had existing layers that I converted into story layers because they represented critical elevations like top of subfloor etc. But in your setup would you have just left them as design layers + created a separate story level for that elevation...?
This is a single story building so all I'm really interested in using stories for is 1) using Elev BMs + 2) setting levels I can bind objects to without requiring a dedicated design layer for them.
-
1 minute ago, line-weight said:
Yes I have been doing this for a while now and it's very useful. It's one of VW's best-implemented features. Just waiting for section-elevation lines to be updated to behave as nicely.
Relating elevation benchmarks to storey levels is one of the main reasons I use "storeys" even though I actually just use one storey and put all of my levels (for multiple floor levels) within it.
But this is all a bit off topic for this thread, which is supposed to be about getting by without using storeys at all.
I'd be interested in quizzing you over your set-up as I'm not sure I completely know what I'm doing (with Stories) yet, but like you say probably better in another thread...
It was actually after you clarified for me elsewhere that to get the full benefit of Elev BMs you needed to use Stories that I finally decided to do so on a current project. Although I added them halfway through which wasn't perhaps the most effective way of doing it 🙂
-
46 minutes ago, line-weight said:
you can call it what you want. The name of the storey level is just that, a descriptive name.
Another thing to consider is that you can return the story level names in Elevation Benchmarks so worth thinking about what you want to see in your section VPs when naming them.
I have only just started doing this + it is pretty impressive functionality (having things set up so Elev BMs automatically display in section VPs).
-
1
-
-
My immediate thought was Site Modifiers left on but looking more closely I don't think they are. You might need to post a file for someone to help. Is it only in SLVPs that you're seeing the red lines + not on the design layer? Is it the same with all render modes?
-
2 hours ago, BrynBarker said:
Hi,
I am having trouble taking a custom 3d view and creating a viewport from it. I zoom in on the 3d view that I would like and when I select Create Viewport and try to send it to a sheet, all I get is the WHOLE plan and NOT the custom 3d view.
I have gone to multiple tutorials, some saying that you can make these and not say how to do it and others show it but with the whole plan and not a detail of close of of areas in 3d to include on a sheet. Others on so many details but not the basic. And a lot on viewports, but none on this. I need to show a few 3d rendering of the areas that are designed.
I did it before and now I can't do it. It's not creating one. I have a saved view. It would logically make sense to have it in "create viewport" but it's not doing it. I don't see any other options.
If anyone has the tip for sending a 3d snapshot to the sheet layer.
Thank you!
Once you have zoomed in to your view, hit the 'Align Working Plane with Current View' button on the View Bar...
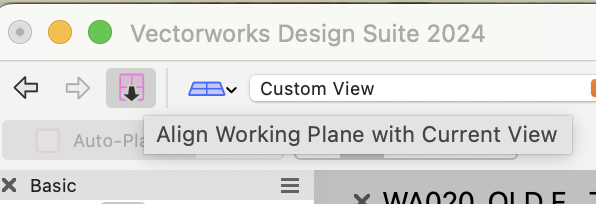
... then draw a Rectangle to define the VP crop. Then run Create Viewport.
Another option is to place a RW Camera in the file then hit 'Match Current View' in the OIP. Then run Create Viewport.
Or if you activate the Walkthrough Tool + navigate to the view you want you can run Create Viewport + the VP will be created from that view.
-
Is it possible you have two Doors in the file that share the 'D-01' ID number + the 'Mark' column is summarised...? (and the Doors have different parameters)
-
47 minutes ago, JuanCarlos said:
@Tom W. On the bottom right set the height and width to 0
I love it! Thank you
-
1
-
-
@JuanCarlos can you post the file? I don't understand how you combined the bottom two sashes into one... Or just explain it. Thanks!
-
1
-
-
10 minutes ago, shorter said:
WinDoor?
That was my thought too but I can't see a way to achieve that configuration...


Slab Drainage = Nightmare
in Architecture
Posted
This is how I would do it:
But I agree, it's not the easiest of tools... The other thing you can do is use the 'Add 3D Object to Slab...' command to add a wedge-shaped 3D solid to the top of an existing Slab.