michaelk
-
Posts
6,389 -
Joined
-
Last visited
Content Type
Profiles
Forums
Events
Articles
Marionette
Store
Everything posted by michaelk
-
Exporting to Old Version without Access to New Version
michaelk replied to EmilyArch's question in Troubleshooting
Rylevang 3B · D 056 · A 7.10 · Oversigt · Skabe v2024 v2021.vwx -
Weird problems in rendering are almost always caused by objects too far away from the origin. I said above that the number was 4km from the origin. Don't quote me on that. It might be 7km. I don't remember exactly.
-
I agree about room plan. It can get confused by soffits, vaulted ceilings, timber frame roof trusses, etc. With point clouds you can usually get a reasonable slope to a vaulted ceiling, number and approximate size of beams, placement of HVAC supplies, light switches, wall thickness, difference in elevation between floors, etc. Not perfect. But so so so much better than spending a day with two people and a tape measure.
-
🤣 6. Enjoy not spending an entire day measuring a building knowing that you will miss getting at least one (but probably more) critical measurements. Nomad point clouds aren't perfect, but they are way better than trying to read hand written measurements off of a crowded, incorrect old drawing two weeks after you measured the building 🙂
-
I see what's going on. You have two exactly coincident rectangles on a 3D plane that are very very very large. 6.5862060122072e192' x 6.5862060122072e192' That's big. VW has issues rendering when objects are more than 4 KM from the origin. This object is way way way beyond that. Delete those two rectangles and the file renders properly.
-
Or if you look in the same place, Vectorworks > Preferences > Interactive Click on Interactive Appearance Settings… is General - Background - 3D Views set to bright green?
-
Thanks for posting the image. That IS bright green. Never seen that before. Do you have any Renderworks Backgrounds? Look in the Resource Manager under Renderworks Backgrounds.
-
@aclymer Welcome to the forum. I'm assuming that you must be in a perspective mode in 3D? If you look at the top left of the VW window there will be a pulldown for view that will say something like Custom View or Right Isometric. Just below that is a view menu pull down perspectives. Yours probably says Narrow, Normal, or Wide Perspective (?). If that's the case the green you are seeing is the default "ground" for perspective views. To test this try setting the the view from a Perspective view to an Orthogonal view. If this makes the green go away then that the issue. You can either work in Orthogonal view or change the color of the ground in perspective views. To change the color of the ground in perspective views: Vectorworks > Preferences > Interactive Click on Interactive Appearance Settings… If you are sorting ascending by Interface Element then General - Background - Perspective Horizon Ground will be about the 7th from the top. There are color pickers on the right side to change the colors. If that's not it, take a screen shot and post it here.
-
Convert to 2022.zip
- 1 reply
-
- 1
-

-
@Andrew Lees This is what I've found to make point clouds from Nomad work successfully. 1. Use a recent, pro version of the iPhone to get better LIDAR. 2. Smaller scans. Only do one room at a time. Maybe two if they are small. The issue is drift. The larger the area of scan the more likely that it will "drift" a little. That's why you are seeing some walls duplicated on a different axis. 3. I like to scan around the other side of connecting wall openings to get wall thickness and to help line up adjacent scans. It's important to always have objects or architectural features that will appear in at least one other scan to help line them up later. 4. Watch the screen as you are scanning. There is a slider on the bottom of the screen. It only controls pass through from the camera to the screen while scanning. It has nothing to do with what gets recorded (AFAIK). Try turning it way down so you are seeing primarily or only the points that are being recorded. Sometimes you will see a "jump" happen while recording. I can't prove it but I think that's the scan losing its place. Discard that scan and start over. 5. In the VW drawing, lay out all the rooms from individual scans. It takes a little while to rotate them all to the same direction. I've found that if you use the _VW.pts version of the file, the floors will be level, but not necessarily at Z=0. But they appear to be close to the same - usually negative - Z value. If you've got one scan of a hallway, then it's easier to align the scans of the rooms off the hallway using the door openings. If you keep each scan on a separate layer it makes it easier to work with and you are less likely to select the wrong scan by accident. 7. When you have all your room scans laid out, use the clip cube to cut the top and bottom so you only have a sliver showing about 3 or 4 feet above the floor. Try looking at it in top/plan view as well as top view in shaded rendering to see what shows up better for you. That will give you a floor plan that looks like all the wall lines are about 5/8" thick. You sort of have to draw it not too zoomed in. The closer you get the more you see the spaces between the points. You will quickly find the sweet spot. 8. Once you draw your walls, guess at window and door sizes and locations. Select one wall, turn on the clip cube and set the visibility to wireframe. Now it's really fast to use the new drag handles on doors and windows align them with then scans. 9. It also works outside. I've had pretty good success using it to get eave overhangs, roof pitches, hardscapes, external columns, existing tree sizes and locations. About half the time on a building the size you are working on it will hold together long enough to scan the exterior of the entire residence well enough to get an accurate footprint. I haven't tried this yet, but I've heard that using a tripod for your iPhone that rotates around 360 and scanning several times in the same room produces better results.
-
Now I see it! I didn't realize you were copying to an already existing database row. I'll write up a bug report. Until it gets fixed (no guarantee when that will be) you'll have to first right click on the row header, choose spreadsheet, then paste.
-
I wonder if this is another Mac OS update issue. Can you post a file to test?
-
Worksheet Test 1.mp4
-
When I copy/paste on your file it works correctly!
-
Do any of your database header cells reference other cells?
-
This is what I see when I do that. WorksheetDatabaseCopyPaste.mp4
-
Are you coping and pasting both rows 1 & 2 together into rows 4 & 5 in one action? (The label didn't advance one column over, but the database headers did)
-
Wow. I do that all the time and I've never see that. Can you post a file with the offending worksheet?
-
That's a new one! Are you clicking on the row header to select the row or selecting all the cells? Are there any merged cells in the worksheet?
-
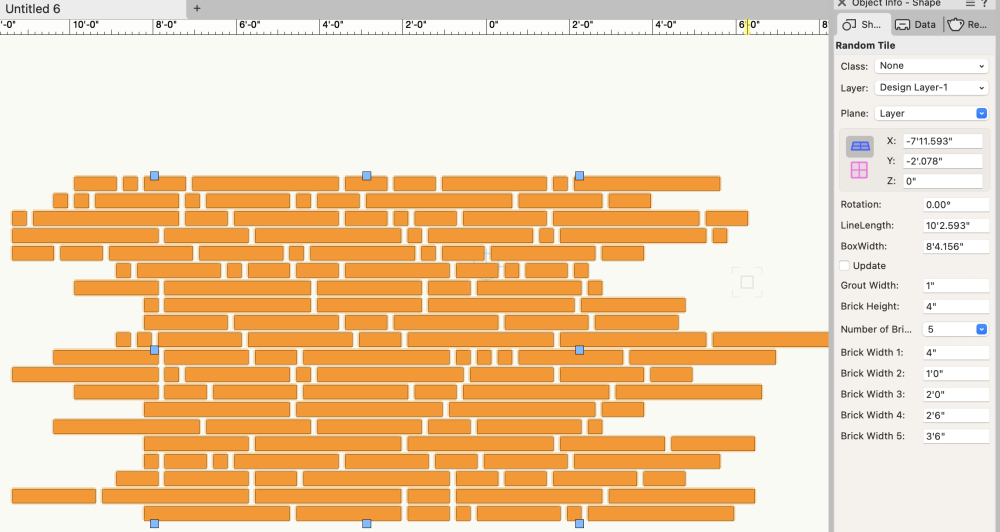
Yeah, I was afraid of that :-). This plug-in is set up as a rectangular object. It could be set up as a path object, but the vector math gets much more complicated. And at every radius some tiles have to be drawn as non rectangles. But I think it can be done. I don't have time to do it at the moment. (And I have a bunch of plug-ins I'm making for my own work that are almost done and need some attention) I'll post the code here if you want to play around with it. Procedure RandomBricks; {Badly Scripted by Michael Klaers.} {April, 2024 Seattle WA} VAR objHd,recHd,wallHd : HANDLE; tempH1, tempH2 : HANDLE; boolResult, resultStatus : BOOLEAN; RowCounter : INTEGER; RandRectWidth, DrawHereX, DrawHereY, RowOffset : REAL; objName, RecName, FieldName, testClass, RadioButtonResult : STRING; {****************************** Pick A Brick Width *************} PROCEDURE PickABrick; VAR BrickNum,RandoI : INTEGER; RandoR : REAL; BEGIN BrickNum := TRUNC(Str2Num(pNumBrickSizes)); RandoR := Random; RandoI := TRUNC(RandoR*BrickNum)+1; CASE RandoI OF 1 : RandRectWidth := pBrickWidth1; 2 : RandRectWidth := pBrickWidth2; 3 : RandRectWidth := pBrickWidth3; 4 : RandRectWidth := pBrickWidth4; 5 : RandRectWidth := pBrickWidth5; END; {CASE} END; {****************************** Set an X Offset *******************} PROCEDURE OffsetX; BEGIN PickABrick; RowOffset := RandRectWidth/2; END; {****************************** Draw A Brick *******************} PROCEDURE DrawABrick; BEGIN RectangleN( DrawHereX,DrawHereY-pBoxWidth/2, 1,0, RandRectWidth,pBrickHeight); DrawHereX := DrawHereX + (pGroutwidth * 2) + RandRectWidth; END; {***** MAIN *****} {***** MAIN *****} {***** MAIN *****} BEGIN resultStatus := GetCustomObjectInfo(objName,objHd,recHd,wallHd); SetObjectVariableBoolean(objHd, 800, TRUE); {Makes text formattable} IF pUpdate THEN SetRField(objhd,GetName(recHd),'Update','FALSE'); OffsetX; RowCounter := 0; DrawHereX := pGroutwidth - RandRectWidth; DrawHereY := pGroutwidth; RectangleN( 0,(0-(pBoxWidth/2)), 1,0, pLineLength,pBoxWidth);} WHILE DrawHereY <= pBoxWidth DO BEGIN While DrawHereX - RandRectWidth <= pLineLength DO BEGIN PickABrick; DrawABrick; END; {X Loop} RowCounter := RowCounter + 1; DrawHereY := DrawHereY + pBrickHeight + pGroutwidth; OffsetX; DrawHereX := pGroutwidth - RandRectWidth; END; {Y Loop} END; RUN(RandomBricks);
-
Will @Sam Jones's label printer tool work? http://autoplotvw.com
-
@FirecrackerRob Glad you like it! There are two versions of the tool. The original version has a the id on the face of the flat. Fast Flats 2 doesn't, because data tags came out between the first and the second versions 🙂
-
The .vso attachment is a plug-in tool. You can install it in your workspace and it runs like any other tool. It lets you draw an area and it fills in with random rectangular tiles using the settings in the OIP for tile size and grout size. When you change the size of the area it just updates. In the image you can see the handles showing the adjustable size of the area to be filled and the settings in the OIP. My thinking was one could use it to get a pattern you liked then convert it to a group and trim away to make if fit the hardscape area. I'm sure there is a cooler way. Maybe draw the exact polygon, but then how do you set the angle of the tiles? This is just a quick test to see if I could generate random tile layouts using 2 to 5 tile widths. I like to do things like this on flights instead of actual work and I had a 2 hour flight yesterday. That's enough time to test this idea, but not enough to make a hardscape path that turns corners 🙂 To install the .vso: Vectorworks > Preferences > User Folders tab > Reveal in Finder This will open up your user folder in the finder. Look for the plug-in folder. Put the .vso file in the plug-ins folder. Restart Vectorworks. Tools > Workspaces > Workspaces… You will see a list of all the workspaces you have. One will be hightlighted and have a checkmark. Duplicate that one. Put the checkmark next to the new duplicate. Edit the duplicate. Give the workspace a meaningful name. I like to use the basic workspace it's based on followed by the date. So it might be Architect 24 1 2 or Landmark 24 5 6. Click on the Tools Tab. On the left side will be all the tools you could be using and many that you are using. On the right are tool palettes. You will see Basic and Tool Sets. Open up Tool Sets and you will see Dims/Notes and Building Shell and Site Planning, etc. Those correspond to the tool sets you are used to seeing in the tool palette. On the left column look for a folder called MK Commands. In there you will find Random Tiles. Drag Random Tile to be inside of one of your tool palettes on the right side. Be careful that you don't set it as a "Sub Tool". If the new tool is offset to the right in the list drag it up or down and move a little left so it lines up with all the other tools. Click OK Now Random Tiles will be a tool in whatever tool set you picked. Click on the tool and draw a rectangle. The first time it runs it will put up a dialog to confirm default settings. Ignore that. Now you have a rectangle with random tiles. Play around with the settings until you get something useful. Post back if you have any problems installing the .vso or using the tool 🙂
-
I see it in your styled doors, but not in generic doors. I couldn't make it happen by creating a styled door. There must be a setting in your door that it doesn't like. I also notice that the handles for the misbehaving door are offset in both 2D and 3D. That must be related.
-
I tried making a quick plug in object that will do something very close to what you are trying to do. Really interesting problem. Does this get close? Random Tile.vso