-
Posts
3,181 -
Joined
-
Last visited
Content Type
Profiles
Forums
Events
Articles
Marionette
Store
Posts posted by Andy Broomell
-
-
The "Glow" option under reflectivity will make the texture appear as if it's 100% illuminated even if light from external light sources is not hitting. Note that you can pump this number above 100% and it'll brighten the image even more (sometimes washing it out).
If you have "Emit Light" checked, the texture will also act as a light source, casting photons onto nearby objects. This will only work if you have Indirect Lighting turned on in whatever render style you're using.
There is no way in Vectorworks (sadly) to make objects have a "halo" type glow - this would be best achieved in Photoshop as Shac suggests. Or this can be done in Cinema4D, a more complex 3D-rendering program.
-
9 minutes ago, JimW said:
"An incident occurred related to everything there ever was."
Definitely just let out a loud snort-laugh in the otherwise quiet design studio.

-
 3
3
-
-
Any news on this front?
Even in 2017 I'm getting an "Edges" phase which adds anywhere from a few seconds to a few minutes to every viewport render, and I render Viewports many many times in a day so it adds up. It's the last phase and it never seems to make the viewport "look" any different.
I don't (purposefully) have any un-filled geometry in my model.
It'd be great if there were more information provided on this phase - why it's necessary and what it actually does. Perhaps a visual example of when it's serving its purpose. And perhaps a way to manually turn it off in RW Styles?
-
47 minutes ago, Kevin McAllister said:
I've had all sort of things vanish using VW2017 on all three compatibility settings.
^This. All the time. For me they don't permanently vanish. They just... don't appear for a while. Particularly when Groups and Symbols are involved.
-
It would be great if the Resource Manager could access resources from files saved from previous versions (I'm thinking particularly when using the "Browse a Document" function). I'm aways pulling resources from previous files and I think this it's one of the selling points of the Resource Manager. But it could definitely be improved.
Here's what I find happening currently:
- Go the RM and choose Browse a Document.
- Navigate a few minutes in the pop-up Finder to locate that old project file you know has the perfect texture. Select the file.
- Get the error message "The file is not in the application version that you are running, so the file cannot be used."
- Open Finder. Repeat step 2.
- Open the file directly; Vectorworks converts to current version.
- Switch back to my current file then point the RM to the file I just opened.
- Pull resources.
- Go back to other file and close it.
It would be great if steps 3, 4, 5, 6, and 8 were eliminated. Since Vectorworks has the ability to seamlessly open files from older versions, I'd think it should be possible to incorporate this functionality into using the Resource Manager as well. (It would be fine if it took a few seconds to convert the file before being able to browse; that's still much better than having to do the steps above).
-
 3
3
-
I aways like the way some of the bug descriptions are worded. My current favorite is "VW will be like a freeze..."
-
Bruce, my RM looked exactly the same as in your original post (Favorites showing in two locations). I recently downloaded SP1 and the issue went away. I noticed the following in the bug fix list which Jim posted:
VB-136273 Resource Manager creates unnecessary, "Favorites" folder under the "User Libraries" So I think you were right that it was a bug.
-
If there is no crop to edit, you should be able to draw one with the rectangle tool.
Perhaps the black background is coming from a RW Background? Check that the Viewport's OIP isn't set to have a RW Background.
-
I'm glad the tutorial helped! If you think of anything that could make it clearer or more helpful, definitely let me know!
-
 1
1
-
-
I've never had excess crashing when using Sheet Borders, so I'm not sure what's up there, but what you're describing about word wrapping isn't a bug as far as I'm aware, but rather is "working as designed"... or "broken as designed." It definitely needs attention because it doesn't function all that well.
-
 3
3
-
-
2 hours ago, Alan Woodwell said:
Do you mean push the drawing around?? If so hold the space bar down and right click and move around the whole drawing moves.. Its the Hand tool.
HTH
***Left button, not right. Just like panning in Photoshop, if you use that.
If you have a three-button mouse you can also click and hold the middle button (scroll wheel), and move around to pan.
Lastly, you could turn on scroll bars under Vectorworks Preferences on the Display tab.
-
Just something to try if you haven't already... in your Design Layer turn on ALL of your classes (Alt-Click the Visible column), and make sure the Class Options is set to Show/Snap/Modify Others. Then do the same thing with Design Layers. Then perhaps the mystery object might appear?
I've had this issue before and doing the above helped. It turned out I had a 2D shape inside of an extrude that was on a different class than the extrude itself (I wish this weren't possible, btw), and although it wouldn't appear in the Design Layer because one class or the other was turned off, it would mysteriously render in the viewport even though the viewport's class settings were the same as on my Design Layer. Very strange.
-
 2
2
-
-
It seems like there should just be a mode button in the dimension tool to turn auto-associate on and off, doesn't it?
-
What Pat said above is absolutely correct - let VW do the math for you. Note that you can do addition +, subtraction -, multiplication *, and division /.
You can even type in other units. For example, 1"+5mm.... Vectorworks will figure it out.
Now if you had a more complex polyline with multiple edges at different angles... a different approach would be to use the Offset tool. Just type in the offset distance in the mode bar then click on the outside of your object to expand it that distance outward, or on the inside of your object to expand it inwards. There are other options in this tool to play around with, but this will get you started

-
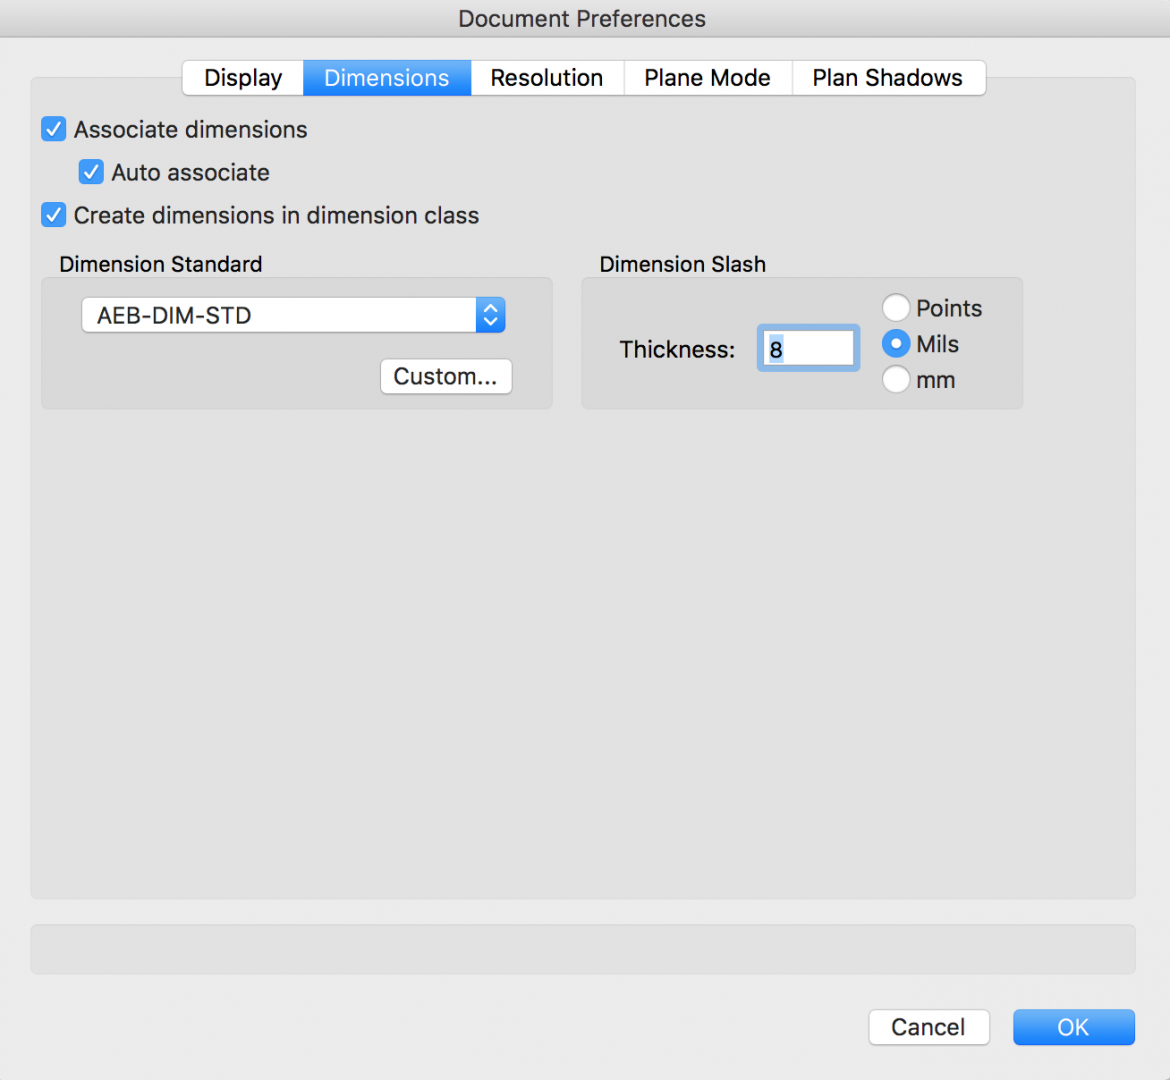
Regarding the dimensions question... That's under File < Document Settings < Document Preferences - see screenshot below. You'll have to turn it off individually in each file you work on. If you want it to automatically be off when you start a new file, you can open the template from which you start new files, turn the setting off, then re-save the template.
-
Just encountered this issue today and confirmed that the switch happens when editing a Viewport Crop.
Is this scheduled to be fixed?
-
This bug is still happening reliably. Again, it's only when using a keyboard with a full number pad - when I hit "0" (Top/Plan) while pushing on the SpaceMouse it messes up screen redrawing until I close and reopen the file.
-
It's been this way for at least a few versions, if not always.
I agree it shouldn't matter if you're on a Sheet Layer before you edit a 3D Component. I've run into this a few times, and would also say Broken As Designed.
-
Just above the line types in the Attributes Palette, there is the "Pen Style" dropdown, which presumably you have set to Line Type. Change that to Solid. (If it says Class Style, then you have a class set up to used dashed lines and you'd change that by editing the class itself).
-
I don't think this is currently possible.
You may already know this, but for anyone else that may be interested - you can ungroup a Dimension object (Convert to Group also works), which will result in individual lines and text objects. Then you could then select the line and change one of its markers. Obviously this is just a workaround...
-
 1
1
-
-
- Popular Post
- Popular Post
This will be especially helpful for the paint bucket mode of the polygon tool. Sometimes using that in area that's not truly closed results in such a long hang that the only option is to force quit.
-
 5
5
-
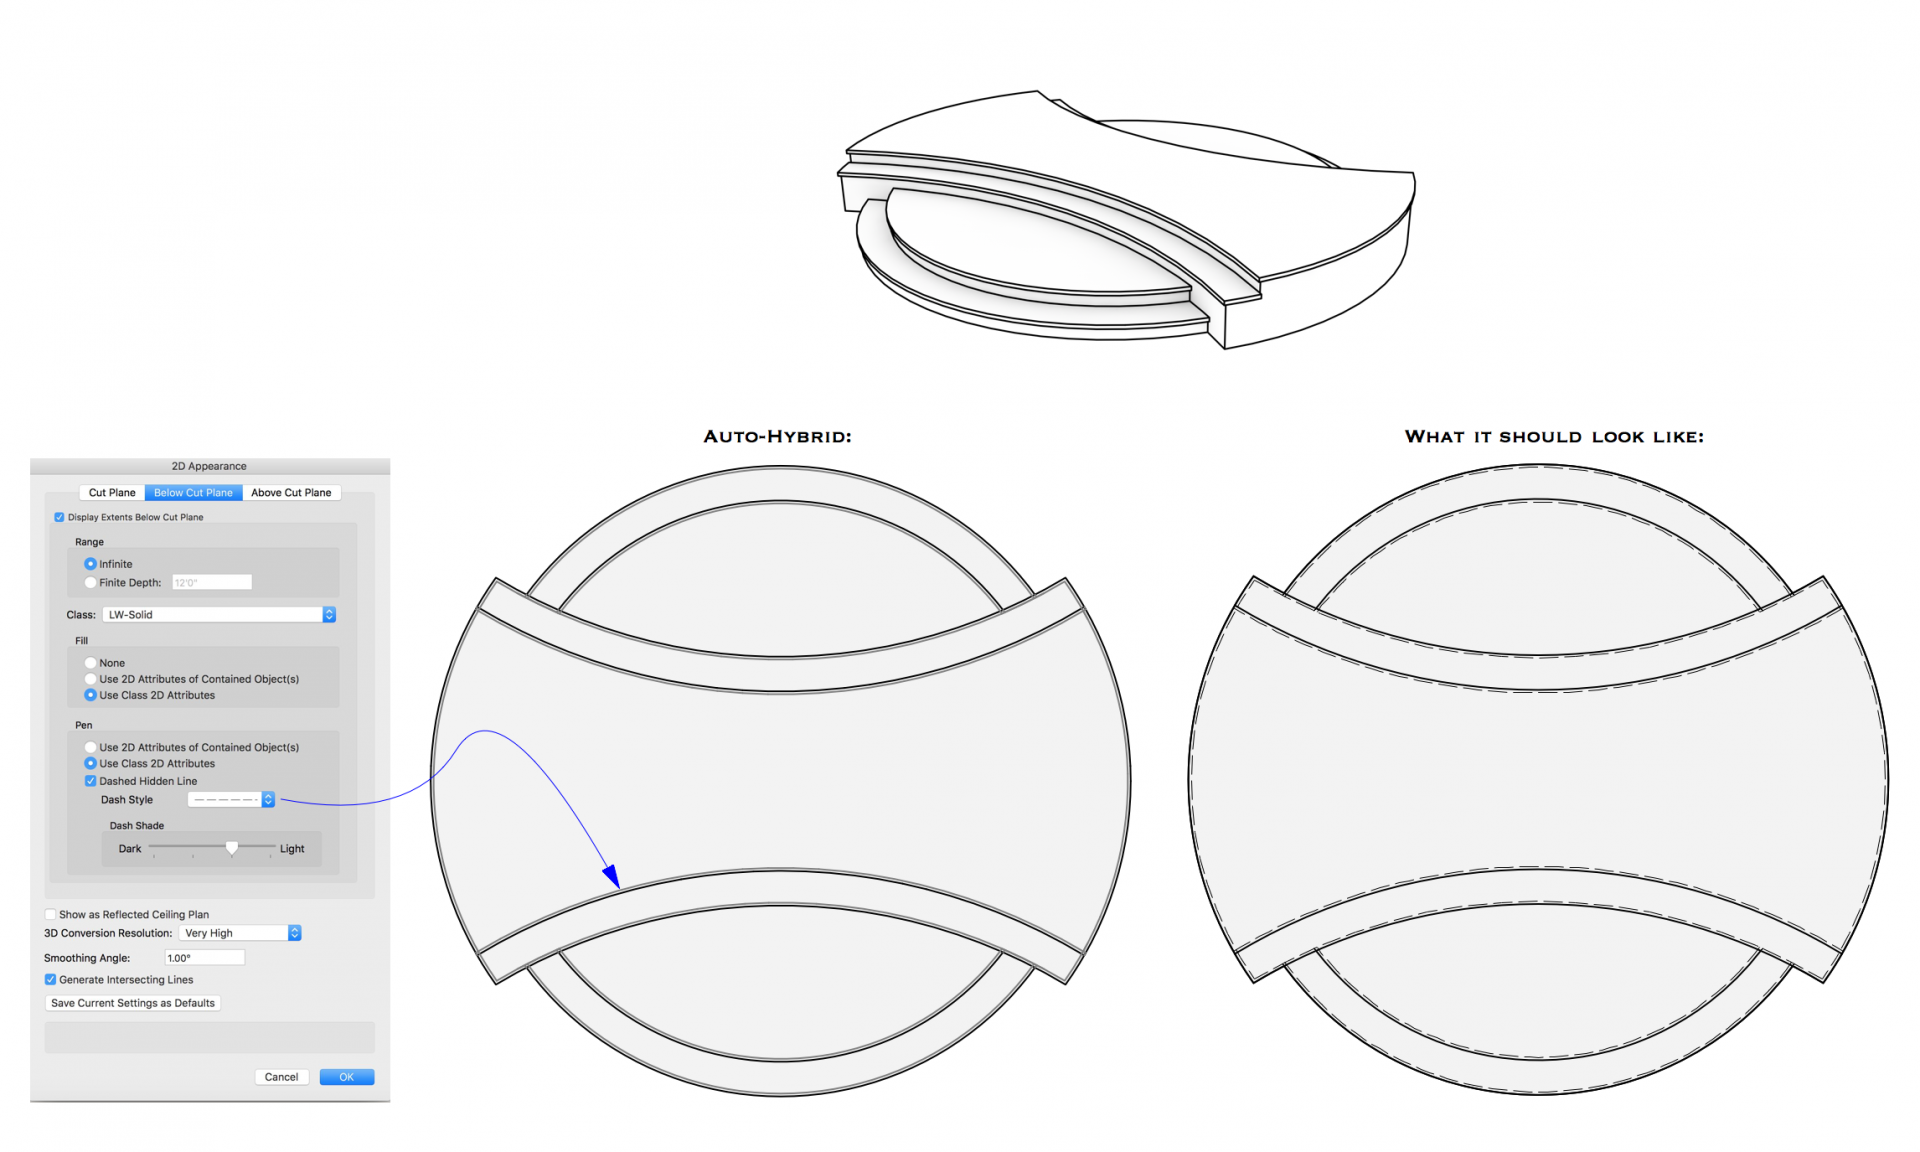
But unfortunately it doesn't work when you want to show objects below the cutting plane as solid plus hidden objects below that as dashed hidden line. I've attached a file showing this bug.
(It would probably be better exemplified with lines that are farther apart, but I happen to be working on this object at the moment)
-
 1
1
-
-
Had this same issue.. definitely needs to be fixed.
And I agree that Dashed Hidden Line (both in Auto-Hybrids and the Render Style itself) needs to have By-Class abilities.
-
 1
1
-
-
2 hours ago, Kevin McAllister said:
I should also be able to cut, switch from one edit space for a symbol (eg. the 3d component to the 2d component) and then paste in place with reliable results.
Definitely. In this case, one would assume the origin/insertion point are the same since it's the same Symbol, so it should work reliably. Should.


Delete function in Right-Click dialog box
in Wishlist - Feature and Content Requests
Posted
Doesn't "Cut" achieve essentially the same thing? Cut already appears in my right-click options.
You can add whatever menu items you want to the right-click menu by going to Tools < Workspaces < Edit Current Workspace < Menus tab, then drag and drop commands from the left into the "Object context" area on the right.
The only issue here is that "Delete" doesn't seem to even be an actual command at all... so it looks like you might be stuck with "Cut" only. If you really want Delete then I guess the wishlist item is for Delete to be an available command.