-
Posts
3,178 -
Joined
-
Last visited
Content Type
Profiles
Forums
Events
Articles
Marionette
Store
Posts posted by Andy Broomell
-
-
1 hour ago, JimW said:
I've been told this is since a rectangle by definition MUST show all 4 sides, or it isn't a rectangle. All geometry that doesn't allow this kind of edge hiding can be converted via Modify > Convert > Convert to Polygons though to save a few steps.
In that case, when attempting to hide the edge of a rectangle, it would be great if Vectorworks automatically converted the rectangle to a polygon and hid the edge, perhaps with a warning dialogue box.
-
One difference between Symbols and Groups is that Symbols have a defined Insertion Point whereas Groups do not. So a Z parameter references a Symbol's Insertion Point, while for a group it would be less clear what that Z-value is actually referring to.
-
Yes to #1!
For #2, I never noticed how the right-click menu changes depending on what resources you're displaying. Interesting. In the meantime, don't forget about the "New Resource" and "New Folder" buttons that are always present in the lower lefthand corner of the RM.
-
 1
1
-
-
Check that the layers all have the same design layer scale - Vectorworks usually doesn't display different layers simultaneously if they have different scales. Also check whether or not you have View < Unified View on, plus the Unified View Options.
-
 2
2
-
-
And if not the Sheet Layer DPI, check the size (width and height) of the viewport itself. Smaller viewports contain fewer pixels. The viewport can be made larger by choosing a larger scale, by typing in a larger width or height, or by grouping it then dragging the blue handles with the selection tool, then ungrouping it.
-
This still happens for me in 2017 as well. The issue arises when you have a 2D shape assigned to a particular class, and have a different Active Class when you go to make the extrude. The parent extrude is assigned to the Active Class while the child 2D shape stays on its original class. This is messy. The child shape(s) should be reassigned to the Active Class as well.
Currently, as soon as you reassign the extrude to another class in the OIP then the child shape follows along and the problem goes away, as Kevin describes.
I just realized this also happens with Sweeps and other container-based objects.
If this is a working-as-designed feature, I'm not fond of it. It's caused me issues as well, particularly when trying to use class attributes on the parent objects.
-
1 hour ago, mattOC said:
If I work on one side, the other changes as well.
Just to make sure, you're not editing the texture itself, are you? In that case, any other objects using that same texture definition will also change.
-
This is a total workaround (ugh) but:
If you delete everything in the URL after the second .htm, the highlighting goes away. For example, delete "&rhsearch=render&rhhlterm=render&rhsyns=%20".
This of course has to be done every time, but if the highlighting is super bothersome this is one way to get rid of it.
-
It would be great if the Edit menu displayed more information about what the available "Undo" and "Redo" commands are. For example - "Undo Delete Layer" or "Redo Modify Text." Sometimes it's helpful to confirm what an operation would be before doing it.
VE-102362
-
Check what mode of the Symbol Insertion tool you're currently set to (after double clicking a Symbol). I believe you're in the "Symbol Pick up Mode" mode instead of "Standard Insertion Mode".
I think there's actually a slight bug related to this. Every once in a while I'll double-click a Symbol in the Resource Manager and find that Vectorworks has somehow switched me into this third mode instead of the first mode. I have NOT hit the U key accidentally, and I can't otherwise figure out what might sporadically cause this...
Anyways, hopefully switching modes fixes your issue.
-
 2
2
-
-
It's been happening to a lot of people, and unfortunately no fix as of yet. Here's one of a few other threads about the issue:
-
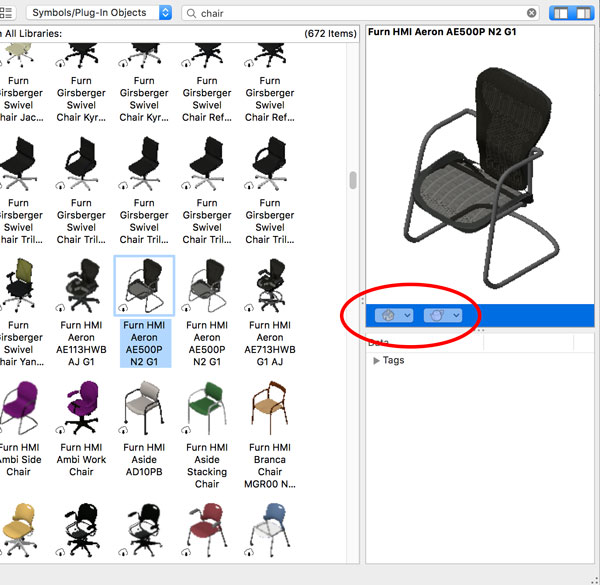
Here's the problem with the new Resource Manager's preview pane... When looking at resources that aren't in your file, you can't change the view or render mode of the preview. You can only change these when working in your own file. This is a major shortcoming in terms of usefulness.

The issue here is that if I already have a Symbol in my file I presumably know what it is since I've already used it. It's when I'm browsing other documents or using the search function that I want to be able to use the view and render mode dropdowns to assess whether the symbol is what I want. These are the symbols I'm not already familiar with.
This issue is particularly true when I happen to be looking for only the 2D view of a symbol, or alternatively only the 3D component, but the symbol's preview was saved with the opposite of what I care about. I want to be able to use the view and render mode dropdown to see different views of the symbol BEFORE downloading it / importing it into my document. That would be much more useful and efficient.

-
 1
1
-
-
I must admit I don't completely understand the cloud rendering thing in Vectorworks. I played around with it once and was a bit confused - hoping some better documentation comes along.
-
I had a Logitech mouse a year or two ago that starting registering single clicks as double clicks. Sounds like the same type of thing perhaps?
-
Whenever I don't know the code for a character I just Google search it (such as "plus minus symbol"), then copy and paste.
-
-
I remember this happening to me a few times in the last year or so. Never really pinned it to a particular cause. I'm pretty sure a complete restart fixed it at the time.
-
@Luis M RuizIs the highlight reflection in the water (second image) from an HDRI background or something else?
-
Yes please! This should also apply to Tools<Custom Selection and any other tools that use this type of criteria list.
-
I updated to Sierra a few days ago and haven't had any VW issues.
Safari, on the other hand, now requires that I enter the "Local Items" keychain password every single time I open the program and I can't figure out why...
-
Once you've created the 3D object, select it and go to the Render tab of the OIP. In the texture dropdown there should(?) be a default texture that is something like "Glass-Mirror," though I'm not sure what VW2012 had.You can also create your own texture. Below is a screencap of 2017's default mirror texture, with the various shader settings, which can of course be adjusted depending on how you want the mirror to look.See below...
-
The shape has been drawn on "Screen Plane" rather than the Layer Plane. Once an object has been drawn, its plane can only be changed in the plane dropdown in the Object Info Palette, so try changing that from Screen Plane to Layer Plane. (The Active Plane dropdown in the upper toolbar is only for objects to be drawn in the future).
Screen plane objects stay glued parallel to your screen and have multiple uses, but since it sounds like they are not a part of your workflow, I'd recommend going to Document Settings and making sure "Plane Mode" is set to "Working Plane Only" to avoid Screen Plane objects being created. (The Working Plane defaults to the Active Layer Plane.)
-
 1
1
-
-
To add on to the above, you specifically want the "Pen Style" of each text object to be set to Solid (rather than Class Style) in order for the text to retain its original font.
Cryptic, for sure.
You're certainly not the first to stumble on this, and I hope Vectorworks comes up with a more elegant and apparent solution to this some day.
-
Agreed! Tangent snaps could certainly be more flexible.
-
 3
3
-


Elevation Marker Linked to Viewport
in General Discussion
Posted
Yeah, it's not currently possible. :-/
I posted a request a while back if you'd like to upvote the thread: https://forum.vectorworks.net/index.php?/topic/45255-reference-marker-link-to-viewport/
It'd be great for this to be implemented!