

Elite Exhibits
-
Posts
585 -
Joined
-
Last visited
Content Type
Profiles
Forums
Events
Articles
Marionette
Store
Posts posted by Elite Exhibits
-
-
Ian Lane
While we are on the subject, I find the Text Field / Search ability in newer versions of VW_RW to be extremely smooth & efficient.
Example: find & change a class or replace a texture through the OIP. As Ian-DO stated, the text indicator/caret is there waiting, vs the need to click the cursor first.
This would be idea in all such locations for efficiency. Always where there is only one option for text. Please Check ... The Organization Palette
Thanks
Peter
-
 1
1
-
-
Andy
Thanks much (Also Pat) love the efficiency track on the TBB How To ...
Peter
-
Nikolay
Excellent - Thanks
In the Organization Palette there are no Page Numbers - Only Stacking Order (Same thing ?)
Your suggestion works
Thanks again
Peter
-
Is there a way to have the Sheet Layer Stacking Order in a Title Block or as a column in a Worksheet ? (along side Sheet Number, Title & Tags)
Peter
-
Pat
Looking to use (for a long time...) the Align Selected Mappings check box in the Object Info Palette.
Used GOOGLE to search the Forum back to 2010 ... No such luck on how it actually works
Created a test file with two textured extrudes and tried as many combinations in the Object Info Palette as I could think of.
¿ Align Selected Mappings check box appears to ALWAYS be greyed out - What is the magic combination (VW_RW Designer 2020) ?
¿ Anyone have any thoughts ?
Peter
On 9/26/2009 at 12:46 AM, Pat Stanford said:From the VW2010 Help:
Use World Z For Origin
Sets the texture?s Z origin to be relative to the world Z origin, rather than to object space. This allows seamless texture application across multiple layers for all mapping types. Multiple objects with this parameter enabled render seamlessly along the Z axis.
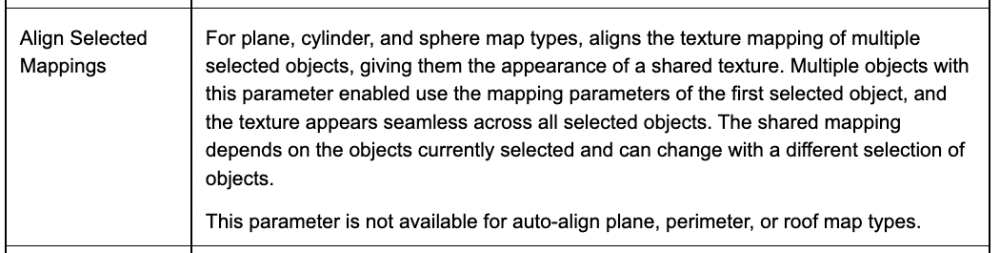
Align Selected Mappings
Aligns the texture mapping of multiple selected objects, giving them the appearance of a shared texture. Multiple objects with this parameter enabled use the mapping parameters of the first selected object, and the texture appears seamless across all selected objects. The shared mapping depends on the objects currently selected and can change with a different selection of objects. This parameter is available for planar, cylindrical, and spherical mapping only. It is not available for perimeter mapping or when Auto-Align Planar Mapping is enabled.
Set the mapping to Planar, Turn on both of the above (and turn off Auto-Align if necessary) and you should get what you are looking for.
-
jolo2881
Start with your selected image. Higher resolution to start with gives a better texture, though there is a happy medium between size and rendering.
Less complexity in the background of this image makes for an easier edit.
Clean up this Image of your desired rail / fence / pattern in a pixel editor. Pixelmator Pro does a great job of removing the background.
What you want to have left is the fence image with a mono color background. It could have the background in green screen or as an Alpha Channel.
These options work for the textures Trans Shader - though I am not sure if one is better than the other - my example was a plain white background.
Save this file as a PNG
Create a texture in VW_RW …with above file as the Color / Image (Shader)
Rotate the image (90 degree). Inside the Texture creation dialog / Edit Image Color panel (ie: so it appears on its side).
You will use this same image for the Transparency / Image Mask (Shader)
For the Transparency / Image Mask (Shader) select Reuse an Image from Another Resource / This Texture's Color and you have the same image for the Color & Trans Mask
Select the Transparent Color option (Or the Alpha Channel if that is available in the image file ...)
I usually push the Color Matching slider to the left / Mask Contrast to the right (You can always go back to these settings)
Check the Anti Alias option, also Infinite repetitions of the image.
Set the size to match the desired height of the fence.
I applied this texture to an extrude of zero thickness, arbitrary length, and the desired height, then rotated the applied texture, on the extrude, 90 degrees. Do this in the Object Info Dialog / Render Tab.
This is so the Texture Size is the same dimension as the height of the fence / height of the extrude, not the width.
You are then able to alter the length of the fence by altering the extrusions length. (Infinite Repetitions of the Texture Image Shader)
Altering the stop / start point is facilitated in the Object Info Dialog / Render Tab, with the Offset V number (Not the Offset H as you may think)
Render in a RenderWorks Mode for the Trans Mask.
If there are white edges on the rendered texture, clean up the image some more, or add additional black to cover this artifact.
What you see in my example started as a screen shot of your FORUM posted image - cleaned up and used for the texture.
A quick clean up trick with any symmetrical item (as your fence example photo is ...) Work hard and clean up half the image, then mirror that half to make the whole image.
How you Render is How you Draw ...
Peter
-
2
-
-
FYI
I have seen this for a long time ... will look for an example. (MacBook Pro)
I believe that it appears when the view is rendered Open GL (Shaded) and a Symbol is edited (Maybe a Hybrid Symbol) on the drawing, NOT through the Resource Manager.
Peter
-
Tom W ..
Many Thanks
Peter
-
FYI
Also had issues when we upgraded to VW_RW 2022 - It often went into automatic APPLY TO FACE mode when that was not desired.
As we already mapped textures to different faces based on geometry & need (How you render, is How you draw...)
Ended up deleting the tool from the workspace and that put an end to the problems / bugs.
One Question left unanswered: What is the easiest way to change from objects with existing Face Override to Texture Overall ?
(My original question : Posted June 14, 2022)
Assistance is appreciated
Peter
-
FYI
Also had issues when we upgraded to VW_RW 2022 - It often went into automatic APPLY TO FACE mode when that was not desired.
As we already mapped textures to different faces based on geometry & need (How you render, is How you draw...)
Ended up deleting the tool from the workspace and that put an end to the problems / bugs.
One Question left unanswered: What is the easiest way to change from objects with existing Face Override to Texture Overall ?
Assistance is appreciated
Peter
-
Pat or Andy
Thanks - Great input from all - Followed this thread and I have what I need for a current drawing, except ...
Have only the Sheet Number & Sheet Title in a Title Block based on a Title Block Style based on a Title Block edited from the Standard Title Blocks.vwx file.
When I edit the Style from the Resource Manager, I am able to see the two linked items - I move them, except they do not move accordingly on the Sheet Layer.
The text NAME for the Sheet Style is in RED in the Resource Manager - Does that indicate a ?
Do I need to make it a Symbol ? - Insert it into a Symbol ?
FYI - Set up the Title block on a single sheet layer till it looked as needed - then copy and paste onto other sheet layers. Location changed Sheet Layer to Sheet Layer
Any assistance is appreciated
Peter
-
fuberator
Is this a similar topic on Light Visibility ?
Peter
-
jolo2881
I tend to find greater realism & simplicity with a masked Image - attached
Peter
-
2
-
-
Visibility script Hides the Light, not the geometry ...
Try it ...
Peter
-
Try a Custom Visibility VW Script - Hide Lights / and One to Show lights ...
Peter
-
2
-
-
lainy1961
Possible option: Workflow for past projects I have done:
In a new drawing, alter the Page Set Up to a grid like 3 pages x 3 pages.
This gives you a large drawing area. Option #1 would be to set the drawing scale to fit this large drawing area.
You are able to Zoom - Fit To Page and see this entire 3x3 grid (KB=4)
In the middle make a rectangle around the center page - Go back to the Page Set Up and turn the Page Breaks off. (Now 3 pages x 3 pages looks like / zooms one large page)
Convert this center page rectangle to a Guide (Modify/Guides/Make Guide) Guides are Locked by default
The overall drawing area is the 3 pages x 3 pages, with the print area inside the middle page (ie: inside this Guide) Option #2 is to set the drawing scale to fit this middle page ie, scale to what you want to print on this one center page.
Hide or Show this Guide in the Modify/Guide menu - If it is the only Guide, then one is able to Select this Guide (From the Modify / Guides Menu) then Zoom - Fit to Objects (KB=6) from any location on the drawing … Alternate is to make a Saved View of this center page / print location, and select it to see the middle page.
(As we use Saved Views for rendered PDF output rather than Sheets / Viewports...) When you print, select Page 5 and only this middle page will print. (Or make a Sheet / Viewport to get the desired print.)
Peter
-
1
-
-
Avoid some VW aggravation - Make sure that the Stacking Order "#" column is selected ...
Peter
-
1
-
-
Phil
I fix any skew / scale in the image file outside VW (GraphicConverter for Mac) then apply as a texture
¿ Assume that your comment on the YouTube distortion process is for CAD other than VW / RW ?
Peter
-
1
-
-
Pat
Please and Thank You
email me a current postal address and I send you a token of my thanks for your efforts
Peter
-
On 4/10/2015 at 10:18 PM, Pat Stanford said:
The Nifty part is that I have added some database integration. After you run the script to create the worksheet, if you change any of the yellow cells in column A from blank to anything (try typing an X), a related database row at the bottom of the worksheet will open showing subrows for every object in the class. Each subrow will show the Class, Layer and Object type. Like with any other database, you can right-click on the sub-row row header (i.e. 40.7) and SELECT that item in the drawing and change views so it is visible.
Pat
¿ You are reference the database option ?
Let Me Know ...
Peter
-
Pat
I am most grateful
Peter
-
On 4/10/2015 at 10:18 PM, Pat Stanford said:
OK, I updated this again. This one is kind of nifty.
It goes through and makes a list of all the Classes (used and unused) in a file along with the number of objects in that class. Just like before, but with better formatting.
The Nifty part is that I have added some database integration. After you run the script to create the worksheet, if you change any of the yellow cells in column A from blank to anything (try typing an X), a related database row at the bottom of the worksheet will open showing subrows for every object in the class. Each subrow will show the Class, Layer and Object type. Like with any other database, you can right-click on the sub-row row header (i.e. 40.7) and SELECT that item in the drawing and change views so it is visible.
Please note that this is a fairly slow script and worksheet. It takes about 25 seconds on my 2008 MacBook Pro to run on a file with about 50 classes and 1300 objects. It has to make a separate database for each class and every object in the drawing will be included in one of those databases.
Use at your own risk.
Procedure Classes_to_Worksheet;
{Make a worksheet listing all of the classes in a VW file}
{Lists both used and unused classes}
{The worksheet is named "Classes:"with and appended date}

{April 10, 2015}
{Updated for formatting and to add database integration}
{Set any of the yellow cells in column 1 to non-blank and the related}
{database row at the bottom of the worksheet will show subrows for each item in that class}
{Set the yellow cell back to blank (select, delete, enter/return, and the database subrows}
{will disapper.  The database rows show the Class, Layer and Object type for the related object}

{October 13, 2010}
{Updated to sort classes in alphabetical order prior to storing in worksheet}
{As of VW2011, there is not way to get the display order of the classes in the Nav Palette}
{October 14, 2008}
{? 2010, 2008, Coviana, Inc - Pat Stanford pat@coviana.com}
{Licensed under the GNU Lesser General Public License}

var	 H1, H2:	Handle;
N1:	LongInt;
ClassSort : Array[1..1024] of string;
Formula : String;
Result : Boolean;
Font,Size,Style:Integer;

Begin
SetCursor(WatchC);

H1:=CreateWS(Concat('Classes:',date(2,1)),(Classnum+2)*2,4);
SetWSCellAlignment(H1,1,1,ClassNum+2,2,5);
SetWSColumnWidth(H1,1,1,20);
SetWSColumnWidth(H1,2,2,200);
SetWSColumnWidth(H1,3,3,200);
SetWSColumnWidth(H1,4,4,200);

Result := WorksheetMergeCells(H1,1,1,1,3);

GetWSCellTextFormat(H1,1,1,Font,Size,Style);

SetWSCellTextFormat(H1,1,1,(ClassNum+2)*2,4,Font,14,Style);
SetWSCellTextFormat(H1,1,1,1,1,Font,18,1);
SetWSCellTextFormat(H1,2,1,2,4,Font,14,1);
SetWSCellTextFormat(H1,Classnum+4,1,ClassNum+4,4,Font,14,1);

SetWSCellBorders(H1,3,1,ClassNum+2,3,True,True,True,True,7);
SetWSCellOutlineBorder(H1,3,1,ClassNum+2,3,2,25,1);
SetWSCellBorders(H1,Classnum+5,1,(ClassNum+2)*2,4,True,True,True,True,7);
SetWSCellOutlineBorder(H1,Classnum+5,1,(ClassNum+2)*2,4,2,25,1);

SetWSCellFill(H1,3,1,ClassNum+2,1,1,5,0,1);
SetWSCellFill(H1,ClassNum+5,1,(ClassNum+2)*2,1,1,1,0,1);


For N1:= 1 to Classnum do ClassSort[N1]:=ClassList(N1);

SortArray(ClassSort,ClassNum,1);

For N1:= 1 to Classnum do
Begin
	SetWSCellNumberFormat(H1,N1+2,2,N1+2,2,13,0,'','');
	SetWSCellFormula(H1,N1+2,2,N1+2,2,Concat(ClassSort[N1]));

	Formula:=Concat('=Count(C=',CHR(39),Classsort[N1],CHR(39),')');

	SetWSCellFormula(H1,N1+2,3,N1+2,3,Formula);

	Formula:=Concat('=Database(C=IF(A',Num2Str(0,N1+2),'<>',CHR(39),CHR(39),', B',Num2Str(0,N1+2),',',CHR(39),'PTS!@#$%^&',CHR(39),'))');

	SetWSCellFormula(H1,ClassNum+4,2,ClassNum+4,2,'Class');
	SetWSCellFormula(H1,ClassNum+4,3,ClassNum+4,3,'Layer');
	SetWSCellFormula(H1,ClassNum+4,4,ClassNum+4,4,'Object Type');

	SetWSCellFormula(H1,N1+ClassNum+4,0,N1+ClassNum+4,0,Formula);
	SetWSCellFormula(H1,N1+ClassNum+4,2,N1+ClassNum+4,2,'=C');
	SetWSCellFormula(H1,N1+ClassNum+4,3,N1+ClassNum+4,3,'=L');
	SetWSCellFormula(H1,N1+ClassNum+4,4,N1+ClassNum+4,4,'=T');

	Message('Number of Classes Processes: ',N1);
	Wait(1);
End;

SetWSCellFormula(H1,1,1,1,1,Concat('Classes in File:',date(2,1)));
SetWSCellFormula(H1,2,2,2,2,'Class Name');
SetWSCellFormula(H1,2,3,2,3,'# of Objects in Class');

RecalculateWS(H1);
SetCursor(ArrowC);

ClrMessage;
ShowWS(H1,True);
End;
Run(Classes_to_Worksheet);
Pat
Is there a version of the script that works in 2020 - 2023 ?
Appreciated
Peter
-
Much appreciated ...
Peter
-
DomC
Is there a way to charge the size to match known geometry
It appears obvious ... change this number - image_size = 10 - except I am unable to change the scrip
Suggestions are welcome
Peter
(¿ Not intended to double post this ?)

Lighting tutorial NOT related to Spotlight
in General Discussion
Posted
MGuilfoile
7. What is "emitter" ...
In the attached (VW_RW 2020) - Open and render with RenderWorks (Custom with all set to low - Anti Alias turned off is faster tan Final RenderWorks)
Select the Saved View 111 if the scene opens in Top / Plan) In the View / Set Lighting Options change the Emitter setting lower number and re render - change again higher number and re render - The three lights all change as they are set to use Emitter Brightness
Peter
408346396_LightsEmitter.vwx