


Pat Stanford
-
Posts
12,705 -
Joined
-
Last visited
Content Type
Profiles
Forums
Events
Articles
Marionette
Store
Posts posted by Pat Stanford
-
-
If you want/need more information about Container Classes, take a look at this post and the posts it links to:
-
Depending on what operating system you server is running on, you can probably create some kind of an alias that will accept the old server name and point to the correct location on the new server.
It may be possible to somehow script opening and changing all of your references, but I think that would be challenging.
For the future could you use relative rather than absolute references so it is not tied to the server name?
-
 1
1
-
-
I believe Opacity is only for 2D objects (lines, circles, arcs, rectangles, polys, etc.). Transparency is part of the Texture and Kevin's comments above are correct.
-
1
-
-
my best suggestion in that case is to copy the criteria from the formula bar (without the initial equals sign) and paste it into a cell in the worksheet. Set it to a white font if you really don't want to see it. Then you can copy and paste it in the next time you need to edit the criteria. Remember to copy and paste out the revision when you are done.
The reorganizing to put all the similar criteria together is required to all the OR logic to work.
-
@Judah WarshawThanks for the confirmations. Makes this solution slightly less beneficial.
Can you confirm the order of file hierarchy? I believe it is User Folder, Workgroup/Project folders, then Application folder.
For files that are identically named, only the first found is used. If multiple resource files with different names are located at different levels of the hierarchy for default content, they are all used.
I understand that the XML files are not resources and only the first to be found will be used, but this was a good chance to get this question answered.
-
@Judah WarshawThose edits to the XML file are only for one user correct? If you have multiple users they would each need to make the same edits, or would need to copy the XML files.
Can these changes be made in the Workgroup or Project folders? Or do they have to be made in the User or Application folder?
What happens when you send a drawing that was created with the edited names to a user who does not have the edits? I assume they just see the original UserFld names, but just want to make sure.
-
Do you really need all of the history in the shape? There are about 50 different additions and subtractions in the history if you dig deep enough. Edit the subtraction and look at an isometric view and you can see some of the extra geometry.
If you don't need the history (to be able to make future changed) you can Convert to Generic Solids and then you can rotate the object as you want. Otherwise, you will have to dig deep into the history and find the hybrid object hiding in the history.
If you keep digging into the history (about 6 or 7 level deep) you will find that there is already a generic solid that has the same profile as your subtraction, but is thinner. Easiest to keep switching to front view while you do this. You can then copy this object, exit the history, paste the object and then use the Push Pull tool to get the thickness you need.
HTH
-
2
-
-
If you manually edit the criteria it SHOULD tell you the criteria can't be edited by the criteria editor the next time you try to edit it.
By default, multiple instances of the SAME criteria (Object type is circle, Object Type is Arc, Object Type is polygon) will be OR'd together. DIFFERENT criteria (Object Type, Line Color, Class, etc.) will be AND'd together.
-
Can you copy and paste the object into a new blank file and post it here or send it to me directly so I can take a look.
It may be that it is not the top level subtraction, but rather something inside the subtraction that is the hybrid object. What does it look like in Top/Plan?
-
1
-
-
I don't think there is a way to change the names. You can create a header row with manually entered text and use whatever name you want there.
The other work around is to create your own custom record with whatever fields you want and store your data there rather than in the UserFlds.
-
Hybrid objects are Symbols/PIOs that have both a 3D representation plus a separate 2D representation. Anything that is Screen Plane is considered to be 2D. When you have both parts you will not be able to rotate them.
Select the object and right click on it. Select Edit 2D and delete whatever is there. You will be asked to confirm that you want to convert to a 3D object. Say Yes. Now you should be able to rotate your object however you need.
If you later need the hybrid back, you can use the AutoHybrid function to "automatically" generate the 2d/screen plane portion of the object.
Ask again if this is not clear.
-
1
-
-
I don't know if VW has enough image manipulation tools to do what you want in a 2D drawn perspective. If you modeled it in 3D and then just set the view and perspective to what you want is would be relatively easy.
Try this. Draw a polygon to represent your floor object and apply the texture to it. Use the Attribute Mapping tool in the Basic tool set to se the angle of the boards to as close as you can get.
You may end up having to export the texture to an image editing program and "taper" it there. Then import the image back into VW and make a new texture. Probably have to go back and forth a few times.
Or it might be easier to just export the line work and then add the textures in something like photoshop that is designed for that type of work.
HTH. Someone else might have a much better idea for you. You probably want to edit your post again. The images are not coming through.
-
It is definitely there. I was thinking more along the lines of a searchable/crossreferenced webpage. There are getting to be so many functions, that we need something more that just what is in the manual. Something more like the Vectorscript Function Reference. Sortable by Name, Category, Object Type, etc.
-
First thing to try is drag your user folder (look in the VW preferences to confirm the location) to the desktop and restart VW. If that fixes it you can then consider putting back some of the items that you need to determine what was causing the crash.
If the user folder is not the problem, delete the new user folder that was created and put the old one back. Then try the same thing with your preferences file. The location will depend on is you are Mac or Windows. On Mac it is something like Your User Name:Library:Preferences:net.nemetschek.vectorworks.2019.plist I would also drag any other plist files that have Nemetschek and 2019 to the desktop as well. Restart VW and see if that fixes it.
-
3
-
-
Even better, but if Julian and I did not know about it, perhaps we need a better way of exposing the worksheet functions.
But always good to refresh my memory on how to do worksheet scripts.
Thanks for pointing it out.
-
1. The page size if set from the File menu under Page Setup. After that set your Layer Scale to some thing appropriate to have your drawing "fill" the paper.
2. You can make the text any size you want. To set the default text size make sure that nothing is selected (OIP Object Info Palette is blank) and then set the text size from the Text menu. This also works with all of the other text and object attributes (color, fill, italics, bold, font, etc.)
3. To change the size of a text object, select it (or multiple text objects you want to be the same size) and then set the size either from the Font menu or from the OIP.
4. To change the grid, double click on the Grid icon in the Snaps palette and set the grid spacing so it makes sense for the scale you are using. Is you are working at 1:50, then a grid of 1 meter might be appropriate, but a grid of 1 mm will be much to small and will not show.
5. Although you want to set the layer scale to something at least close to the final output scale, you don't have to think in scale. Just trust VW to give you the right lengths based on the feedback. To draw a 1 meter line, just start drawing and stop when the heads up display says 1 meter. It does not matter what scale you are in it will be the right length to scale.
-
1
-
-
Try -120 instead of 120 and see what happens.
Based on the documentation, it appears that the Workgroup folder is not supported, but there might be a way around it.
-
The following worksheet script should get you what you need. It returns the scale of the layer of the object in the subrow of a database section of a worksheet.
Procedure GetObjectLScale;

Begin
	WSScript_SetResReal(GetLScale(GetLayer(WSScript_GetObject)));
End;

Run(GetObjectLScale);
Copy and paste the above into a new Vectorscript and name it GetObjectLScale.
Enter a formula in your database header of =RUNSCRIPT(GetObjectLScale)
It will return a number equivalent to the right side of the scale proportion i.e. 1:50 will return 48. 1/4" scale (1:48) will return 48.
See my other recent post on worksheet scripts (GetPIOStyle) for information on how to make this work in different files without having to keep a copy of the script in each file.
-
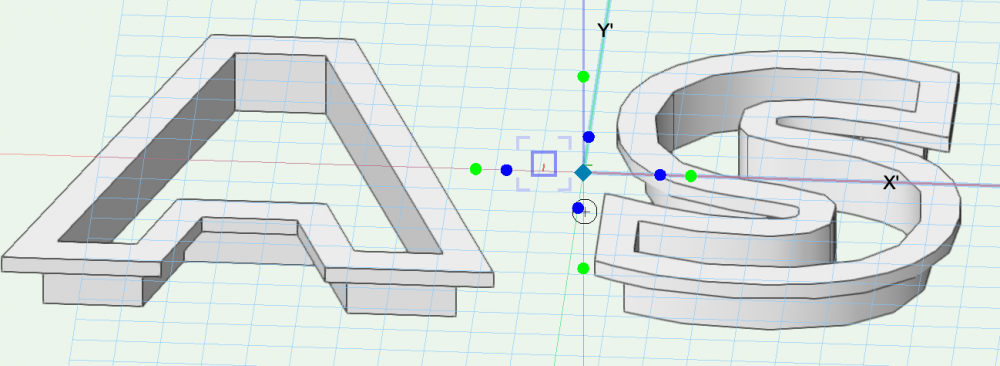
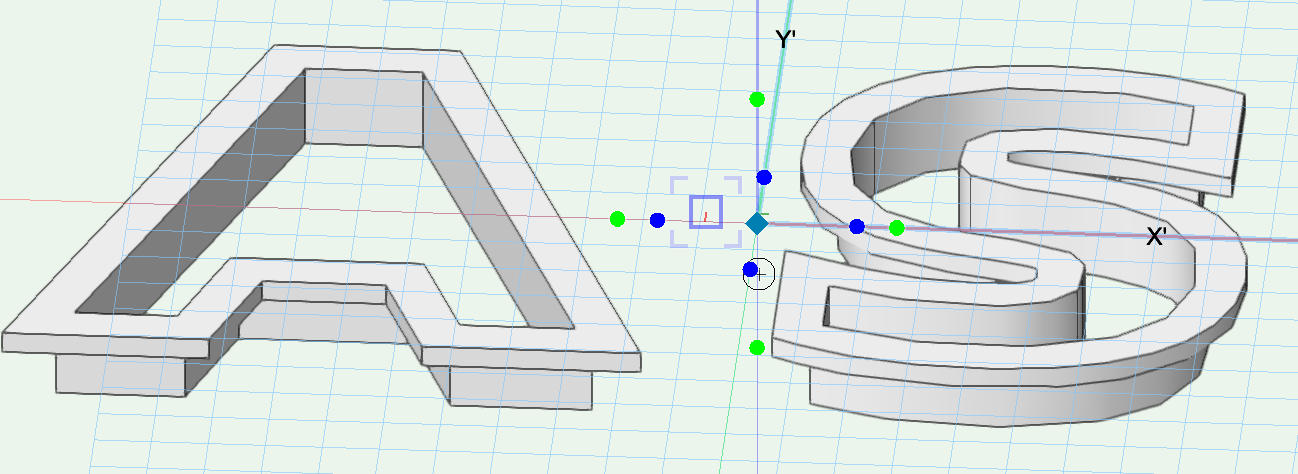
I just did a quick try and it worked OK for me.
I typed in the font I wanted and scaled to size. I think Used the Convert Text to Polylines command from the Text menu. I ungrouped to get the individual letters and used the Extrude Along Path command using a profile similar to yours.
I lost the center cutout of the A, but S seems pretty good.
-
1
-
-
Please go to Vectorworks Preferences:User Folders tab. What is the Folder Location shown for the Workgroup and Project Folders? What is the path to User Data and Preferences Folder?
-
If this is something you want to be able to use in multiple files and not have to maintain the script in each one, take a look at this post. It explains how to make a text file containing the script, where to save that text file, and how to tell the runscript command to look in that location.
-
I am glad it works, but other than the procedure name, I don't see a difference between the scripts. ???
-
Yes, A & C are basically for the same thing. A is just a different way of setting the active class (that you would do in C by setting the check mark to the correct class.
There is also a D, the Organization Dialog Box. This opens when you double click on the classes icon you have circled in C. This is where you create classes and edit their attributes, but you can also change the class visibility and selected class form there also.
-
1
-
-
Turns out that PIO Styles are not stored in a record, but is an actual script property of the object itself. Copy and paste the following script into a blank Vectorscript and name it GetPIOStyle.
Then use the following function in a database row cell where the objects are Title Block Borders (or any other Styled PIO, I think).
=RUNSCRIPT(GetPIOStyle)
Procedure GetPIOStyle;

Begin
	WSScript_SetResStr(GetPluginStyle(WSScript_GetObject));
End;

Run(GetPIOStyle);
Again, I don't have WinDoor, so I think it will work, but I have no way to test.
What's the best way to set parametric values?
in Workflows
Posted
I definitely agree that 3D Constraints would be a great benefit for me. I keep struggling along doing things that would probably be better off in Solidworks or Inventor. Mostly because I know VW and I don't do that much of it.
Please enter a wish. I have already asked for this many times.