


MartinBlomberg
-
Posts
199 -
Joined
-
Last visited
Content Type
Profiles
Forums
Events
Articles
Marionette
Store
Posts posted by MartinBlomberg
-
-
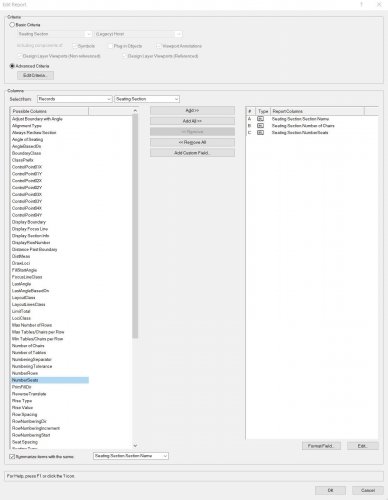
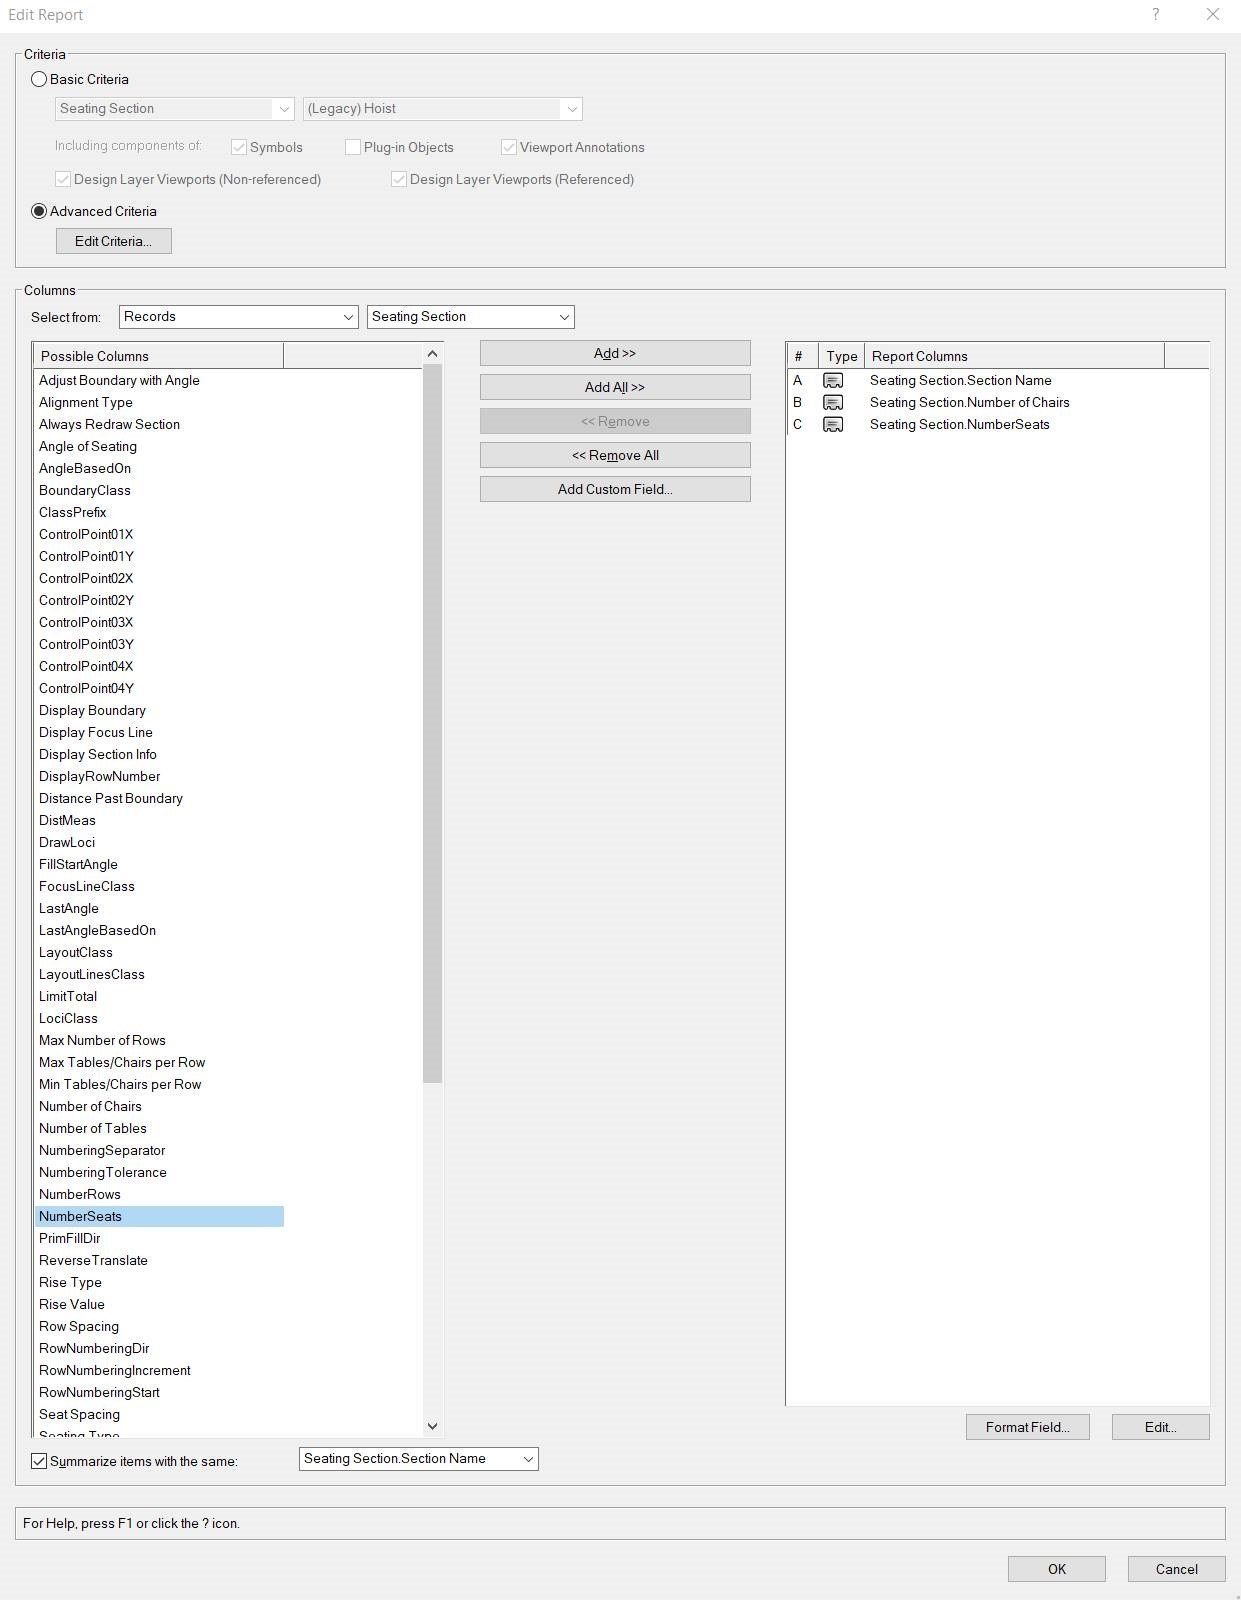
Hi all,
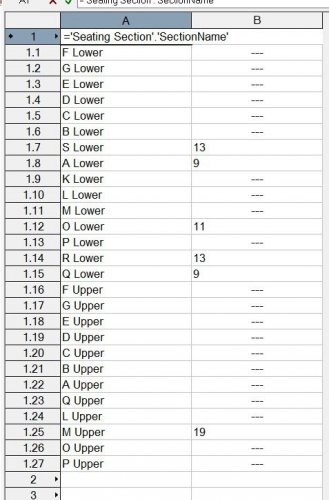
Slowly slowly I'm getting better at VW, still I can't get this thing to work.My goal is to have the following on a worksheet:
- Section names
- Count for all sections
- A total count for all seats
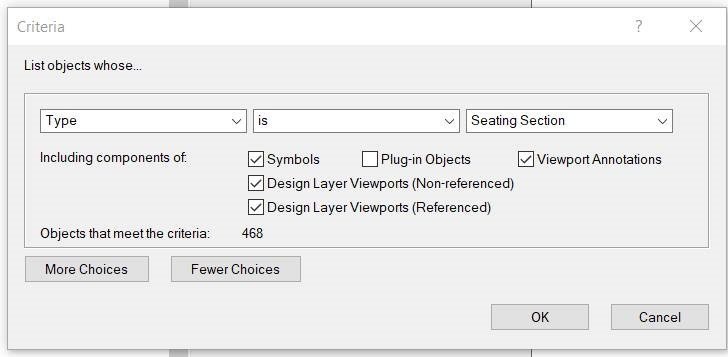
I've tried to create but just won't get the result I want. Please see images 😃
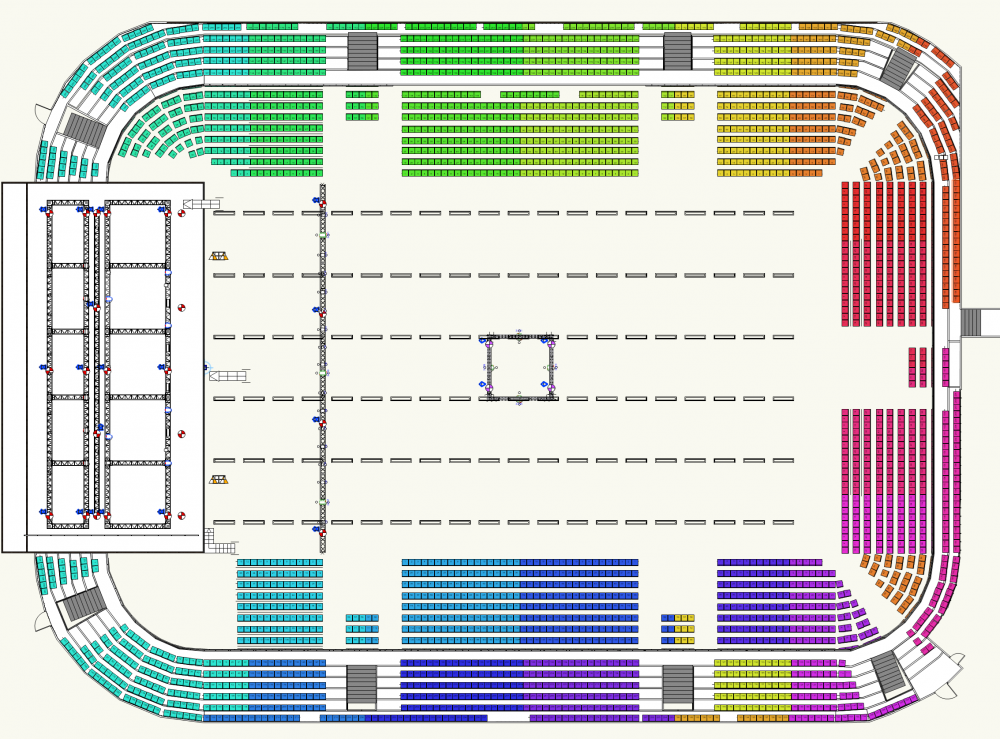
There's also a map over all sections with different colors.
What am I missing? Using VW2021.
Thanks!!

-
6 minutes ago, Tom W. said:
Your video looks to be showing the correct behaviour for the snap loupe. It is really only an aid to ensure you are clicking on the right snap point. Your cursor needs to be pretty close to the point in question when you press Z because the zoom area is quite small. Once you click on the point the loupe disappears + you automatically return to the drawing. It's not designed for doing any more than clicking on a tricky snap point. It is not an alternative to zooming in properly.
You can hit Z more than once to zoom in further still if your snap points are really congested.
Hit ESC to leave the snap loupe without clicking on anything.
Aha, OK I see. I thought this tool was somewhat a quick-zoom or similar.
Now I get it.
Many thanks buddy!
-
Hi,
When I'm trying to use the Z button (snap loupe) this happens. Please watch video attached.
This kinda doesn't work right? I it does, what am I missing. I want to be able to click on small details even though I'm zoomed out.
Thanks!
-
On 10/8/2020 at 9:13 PM, scottmoore said:
I converted the requisite scripts to tools and gave them a short cut key. Unfortunately, I cannot recall how I converted them as I’ve only done it at one time and that was seven months ago. I did not see any info on this in the help menu but it is very do-able and really worth it.
Sounds like a plan! I've downloaded something called Bitfocus Companion which might come in handy, not sure yet what it does. Otherwise I'll go for the tool tip you just gave me. Cheers!
-
18 hours ago, Mark Aceto said:
Does it behave this way when using the Insert Truss tool vs alt-dragging the object?
Yes, the same either way
18 hours ago, Mark Aceto said:What are the modes selected of that tool?
Just the standard insertion. Although, it works with some trusses, and some doesn't.
18 hours ago, Mark Aceto said:Is the truss object flying away to auto-connect to something somewhere else in the drawing?
Nope, just floating in mid air 😃
-
 1
1
-
-
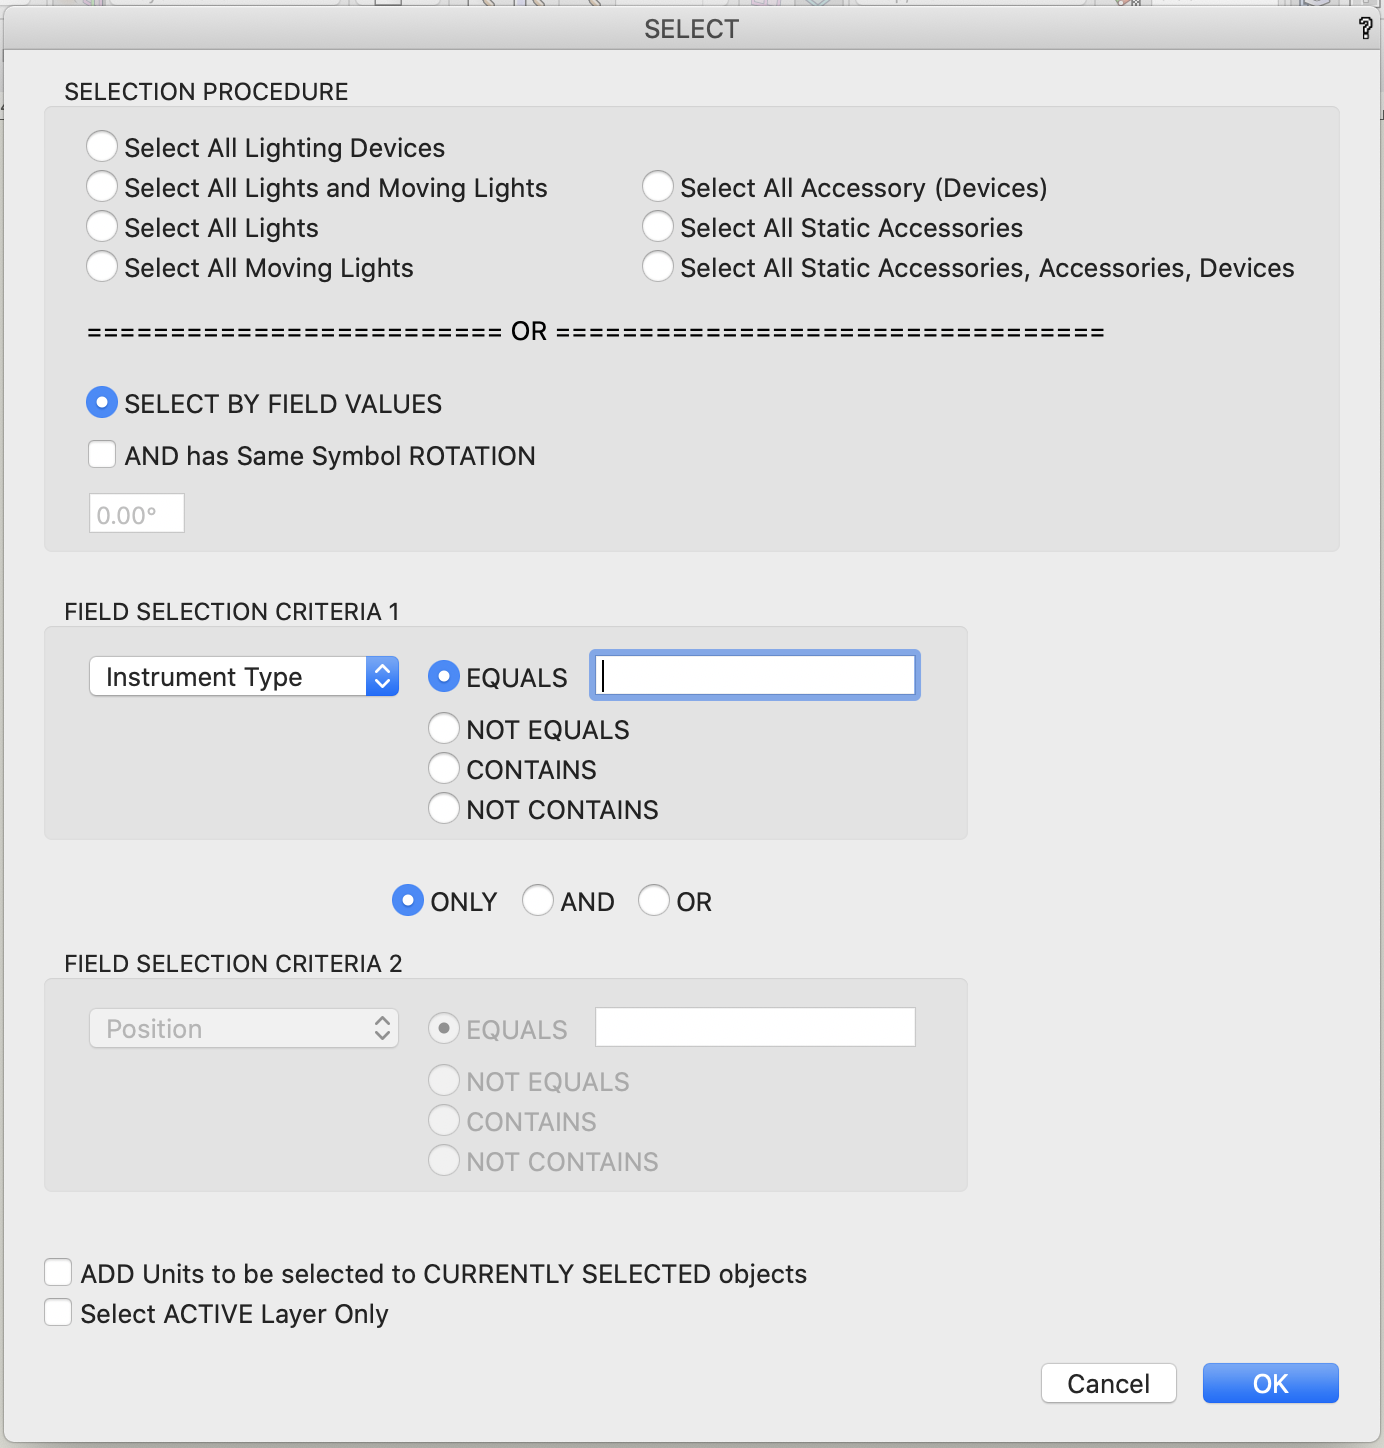
1 hour ago, Cookie_NZ said:
Hi Martin,
I'll put in a plug for AutoPlot Tools for Spotlight. http://autoplotvw.com/
It's a set of really useful commands & tools that I use every day. There are commands to select lights by Position/Type/Channel/Dimmer/Legend/Symbol & Class.
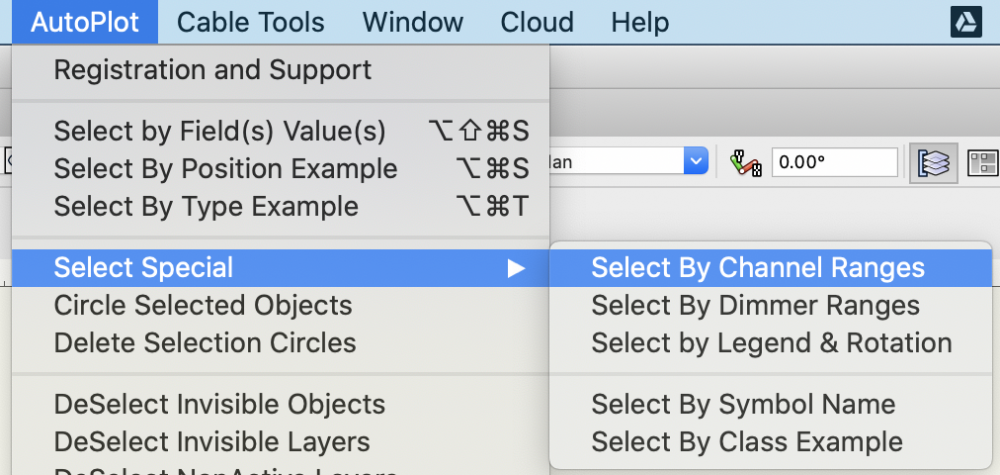
But the one I use the most is 'Select by Field Value'. This opens a dialogue window with loads of configuration options.

Hope that helps!
Cheers!!
-
3 minutes ago, Mark Aceto said:
@MartinBlomberg What about None class? If I turn off the None class, I lose all my truss objects (kind of like the 0 class in ACAD). As a troubleshooting step, I would turn on every class. I've been working with a ton (pardon the pun) of truss in my test file with no issues.
OK, I see that None is turned on 😄
Tried that one too 😃 I tried to edit all the trusses and assign them to another class then "None" but no change...
-
4 minutes ago, Mark Aceto said:
Looks like Rigging-Truss-Truss class is turned off but I can't see that class in the Nav palette in your screen recording. I haven't had any issues with truss on my end.
It's not, it's very very active and visible 😃
-
1
-
-
I think there's a bug in VW2021 that makes some trusses disappear. They're only visible in 2D, but not 3D.
I've exported the very same project into a VW2020 file and the truss is visible again.
If not a bug, what am I doing wrong?
If a bug, now you know 😃
All the best! // martin
-
1 hour ago, jcogdell said:
You can also do this using the select similar tool, if you have used separate classes for your fixtures (I use the automatic classing set up in the Spotlight preferences for this).
That's also an option yes. Nice!
-
I'd like to use my Stream Deck XL to run some scripts. Some single, some multiple.
Does anyone know how to do this?
Cheers!
-
1 hour ago, markdd said:
The Custom Selection command is in the Tools menu. If you can't find it then you will need to add it to your workspace using the Workspace editor.
You should be able to make scripts for selection of specific Lighting Devices based on Field Values or better still, download Joshua Benghiat's excellent Savvy Selection tool which is a must-have.
Ah, I see. Nice to know that people do their own plugins. Nice one!
Thanks!
-
Is it possible to make a script for selecting different lighting fixtures?
I can't find it in the Custom Selection tool.
Cheers! -
23 hours ago, markdd said:
Data Visualisation will change everything inside a wrapper element such as a symbol. To drill further into the symbol, you could put all the 2D elements into a group and name the group say G1
Then make a data visualisation using the Object Name function as the Display Criteria
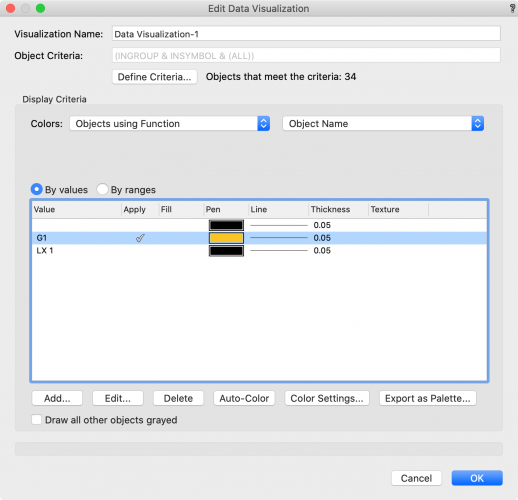
Only the objects inside the group will be changed.
You could also investigate the new Materials resource functionality which would also give you the potential to just change the 2D attributes of an object that uses the same material and leave any 3D geometry alone.
Thanks!
There's so much knowledge in this forum which I'm super thankful for!
All the best!
Martin
-
23 hours ago, TomWhiteLight said:
Hi Martin, Do you need to display differant colour in 2d or 3d or both?
If both - Duplicate the existing symbol the right click edit 2d change colours edit 3d and do the same. Then select the seating sections you wish to change and chose new symbol in the settings dialogue.
If it is just 2d....
https://www.dropbox.com/s/3mlachbe1isfdut/Seating Colours.mov?dl=0
Tom, thanks again for the great piece of advice! Worked out fine, but, it also changed the 3D symbol.
Is there a way to be able to turn this function on and of? Now it looks like this in 3D, which might be fine when showing the different seating sections, but won't really do the trick when presenting the venue.
Thanks!
-
8 hours ago, TomWhiteLight said:
This is very helpful to us Martin. Thank you!
The other video you sent, regarding the upper and lower seating, was so good!
Is it the same procedure with this?
-
49 minutes ago, TomWhiteLight said:
Hi Martin, Do you need to display differant colour in 2d or 3d or both?
If both - Duplicate the existing symbol the right click edit 2d change colours edit 3d and do the same. Then select the seating sections you wish to change and chose new symbol in the settings dialogue.
If it is just 2d....
https://www.dropbox.com/s/3mlachbe1isfdut/Seating Colours.mov?dl=0
Amazing! Thank you so much for taking the time!
I'll try this out straight away!
-
41 minutes ago, TomWhiteLight said:
Mark pipped me to the post!
You only need to do this once. Have you created seating sections or placed individual seats?
If you have individual seats you just need to select the seats and use 'replace with symbol in the object info pallatte.
If you have seating sections then select the section you need and click settings, then choose a new symbol.
If you have too many seating sections and this is taking too long!
Create a new blank file with your new desired seat in it. Make a note of the name of the symbol that is being used by the seating section. Rename your desired seat with the same name as the old incorrect seating symbol, then copy the desired seat from your new blank file and paste it into your old seating file...
When prompted tell Vectorworks to replace the seating symbol in the current document.
Voila!
I've done them as seating sections. Both upper and lower. So, if I delete the symbol I'll delete either upper and lower together with the other one.
I'd like to have different colours on upper and lower, and preferable, small differences between different sections.
Is there a solution for this as well?
Cheers!
-
I want to change my entire seating plan with a new symbol.
Now I need to...
1. mark the small sections of chairs
2. click "Settings"
3. Click the symbol
4. Look up the new symbol
5. Then press OK.
I need to do this around 200 times as far as I'm concerned, but there must be a better way I think.
Thanks!
-
16 hours ago, Pat Stanford said:
You can fully customize the look. Change fonts/sizes, change cell borders, etc.
If you post a file with a few of the symbols you want to use, I can give you a basic worksheet you can use as a starting point to develop what you need.
That's great!
So, this is what I'd like to have (for the time being, I guess there's more to come).

Would be great to understand how this works!
Thank you sooo much!!
-
1
-
-
2 minutes ago, Pat Stanford said:
I would probably consider using a Worksheet to do the count and then include the worksheet as part of your title block.
You could probably also do it using the Data Tag.
How are you identifying each bit of information? Symbol Name? Record.Field? Class? Something else?
Alright, yes, I've been checking that one out but I'm not familiar with it yet 😃
I guess I could use different symbols to begin with, that'll do the trick for now since I havn't started with record formats yet (way above my knowledge) 😃
So, with the worksheet, can I get a nice looking sheet layer with the numbers of each symbol then? Or do I need to use the built in Excel-looking format?
I'll search on YT for Data tag straight away!
Thanks for such swift reply! -
I want to have my titleblock setup so when I add i.e a hoist, the titleblock, which has a field that states "Hoists - Count" shows the accurate number.
I'd like to have it like this:
1000kg hoists Audio - ## (##=the amount of 1000kg Audio-hoists)
500kg hoists audio - ##
1000kg hoists Lights - ##
Seats on upper bleacher
Seats on lower bleacher
... and so on.
Any tips?
Thanks all!!
-
On 9/26/2020 at 4:43 PM, Sebastiaan said:
You’re welcome.
Individual tool icons can be found in the VW installation. Jim Wilson explained in this topic were they can be found. I have not extracted the new 2020/2021 tool icons yet. So you would have to get them yourself.
Also in the topic below you can learn how to get the toolset icons from a workspace file.
hope that helps you!
Now I've found a lot of icons, thanks to the info given, cheers! But still, I lack a lot of tool icons and stuff, are they located some other place?
Cheers! -
11 hours ago, Pat Stanford said:
Or you can use the Custom Selection menu command in combination with the following scripts.
This first one is the most important as it restores the visibility of everything that you hide using the second script;
Show(All);The second one here hides (makes invisible) all selected objects.
Hide(SEL=TRUE);Create New Scripts from the Resource Manager with the text above. Then either select the objects you want to hide, or select the objects you want to show and then use Invert Selection from the Edit menu and run the second script. When you are done, run the first script and you will restore the visibility of everything you hid. Class and Layer visibilities will still apply.
Thanks Pat, the coding thing scares me a bit, but I might try it out eventually 😃
Cheer!


Seating sections vs Worksheet
in Troubleshooting
Posted
Thanks Pat!
Your absolutely right, the colors are a color visualization that works just fine.
Also, another feature that I would just LOVE to have in this drawing is the ability to mark some chairs as "blocked" which the comes up as "Not for sale" in a worksheet.
How do I do that without bend over backwards?
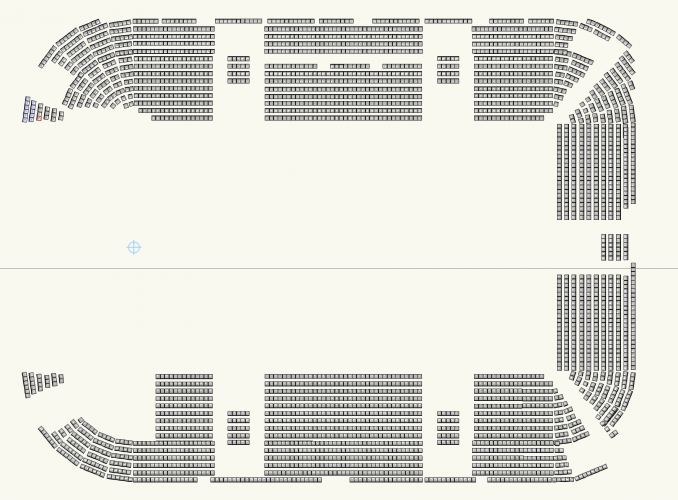
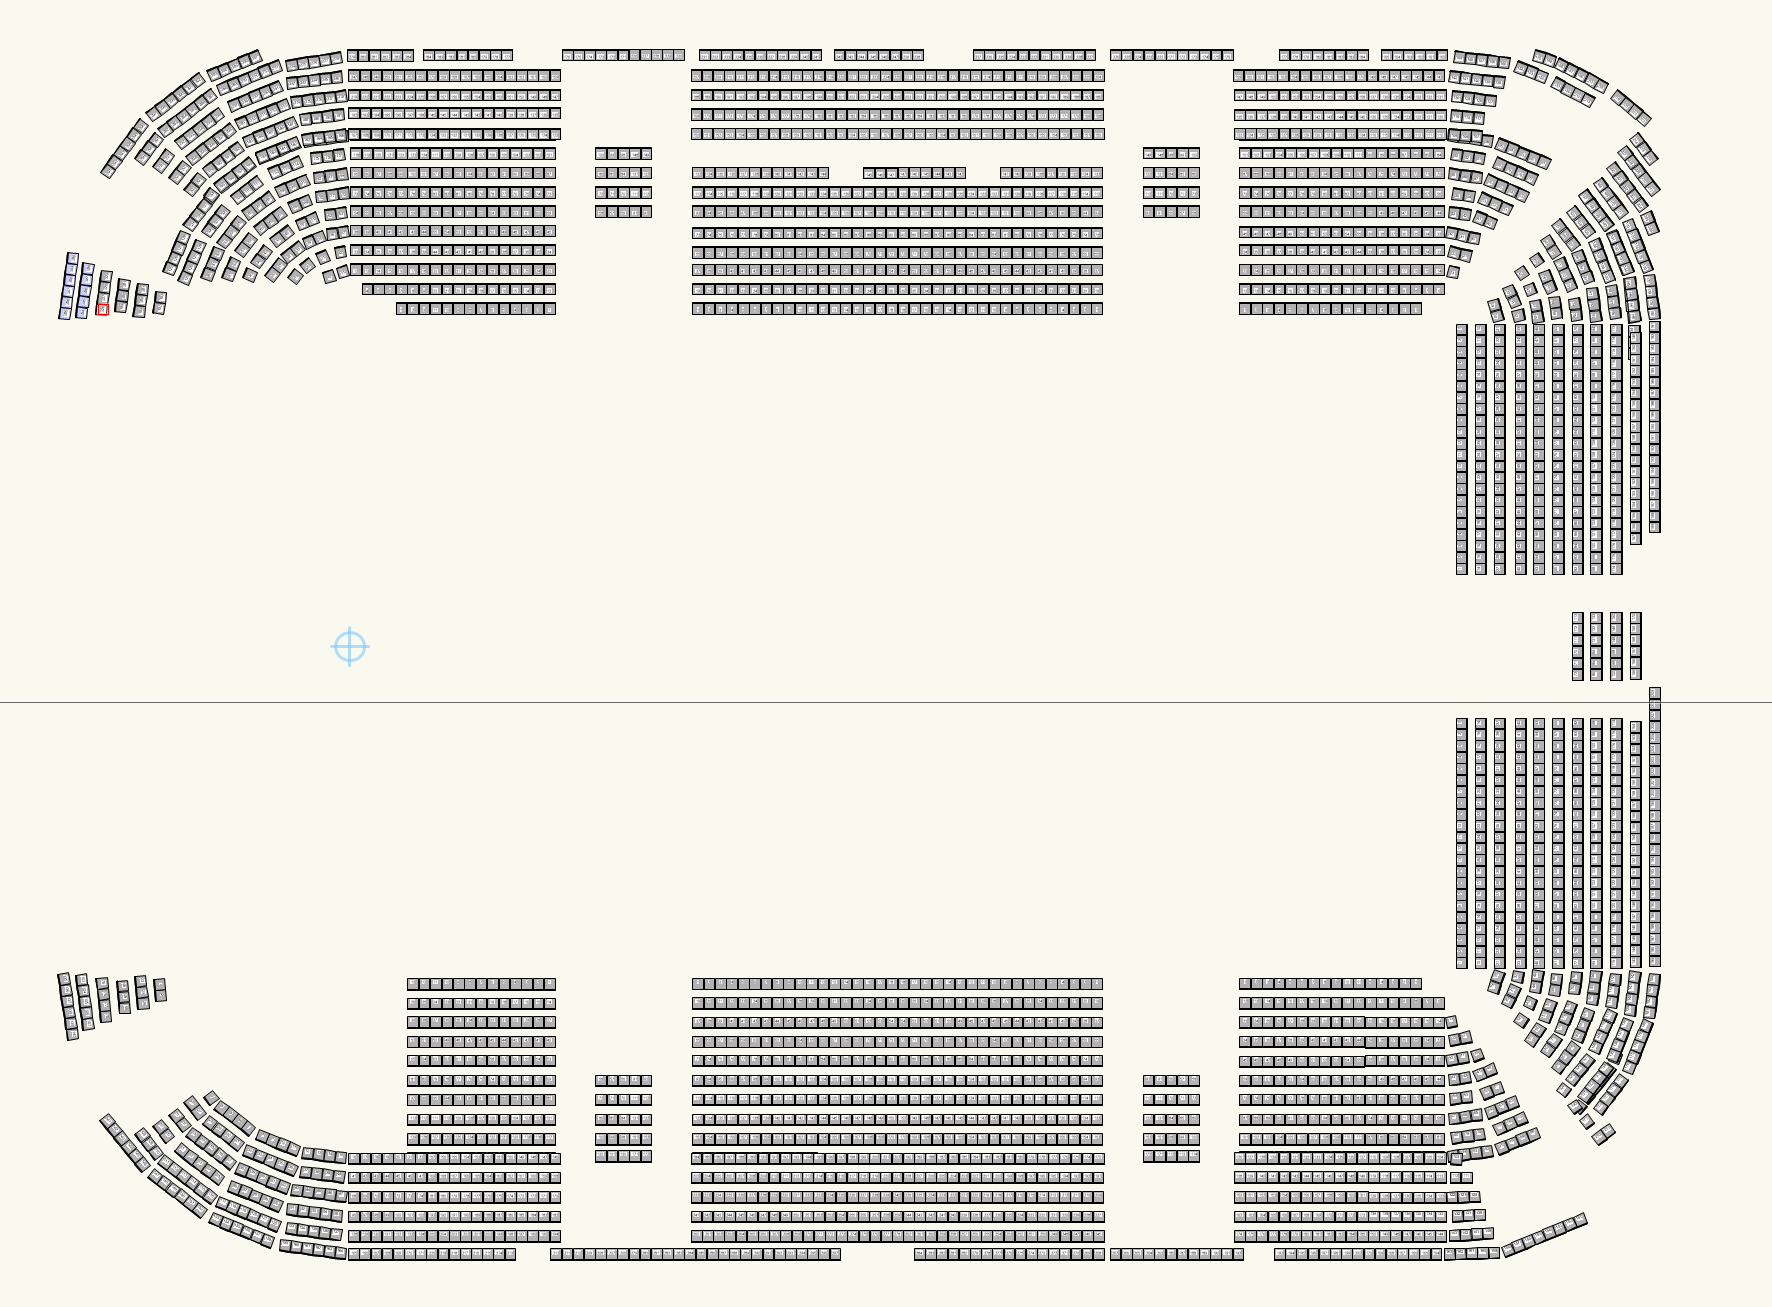
Here's a simplified version of the seating sections. Thank you so much!!
Martin
Only seating sections.vwx