

- Popular Post


mike m oz
-
Posts
4,876 -
Joined
-
Last visited
Content Type
Profiles
Forums
Events
Articles
Marionette
Store
Posts posted by mike m oz
-
-
Vectorworks 2021 has now installed and is up and running on my M1.
A big thanks to Gunther at Vectorworks Inc. for his helpful advice.
I'll post my experiences.
-
 1
1
-
-
I'm not having any monitor issues.
I'm liking most how quickly the applications open, especially Vw.
-
My 16GB + 1 TB M1 Mac mini finally turned up and I've been using it for two days now:
- Vw 2021 won't install (Australian version) and it crashes the computer during the install. I have bug reported that.
- Vw 2020 installs and works fine.
I'm not doing very complex work at the moment - mostly drafting and some simple modelling. So not particularly taxing for the computer.
I did have an issues with some 3D polygons for a DTM repeatedly bringing up the spinning beach ball of death. After I simplified the 3D polygons I didn't have that problem. I checked the more complex 3D polygons on my iMac and had the same spinning beach ball of death behaviour.
Some positives are how quickly Vw starts up and quits on the M1. On my iMac with Catalina both are slow. Start up can be excruciatingly slow.
The M1 also starts up in a fraction of the time it takes my iMac to start up.
-
M5d, I'm looking forward to the transition and will report back on my experiences.
-
1
-
-
Just had an email saying that the ETA is 2-3 weeks. Christmas and New Year shutdowns are likely to blow that timeframe out so I am guessing sometime in January. Early January if I am lucky.
-
Rather than run the risk of being computerless I decided to jump and go with the M1 Mac Mini with 16 GB of unified memory. Hopefully it will turn up this side of Christmas.
-
2
-
-
My oldish iMac is struggling with Vw 2021 and the graphics are starting to degrade so I need to buy a new computer very soon.
I'm tempted to go with a 1 TB + 16 GB of unified memory M1 Mac Mini because for 40% of the price it looks like I can get the same performance as an i9 chip iMac with a good graphics card. I will be up for a monitor as well but the total cost will still be less than half the price of the iMac option.
The proximity to Christmas means I need to order soon.
Therefore further feedback on how your trials are going with the M1 Macs would be greatly appreciated. -
- Popular Post
- Popular Post
That movie has made me reconsider what my next computer buy might be. All of a sudden the humble Mac Mini looks like it might be a viable option.
I hope it is an option that Vw Inc. are looking at and that they are able to give us quick feedback.
-
5
-
Are they separate Plants? ie when selected do they have different names on the OIP?
-
Are they different Plant Resources? If they are:
Try using Replace Plant Style?
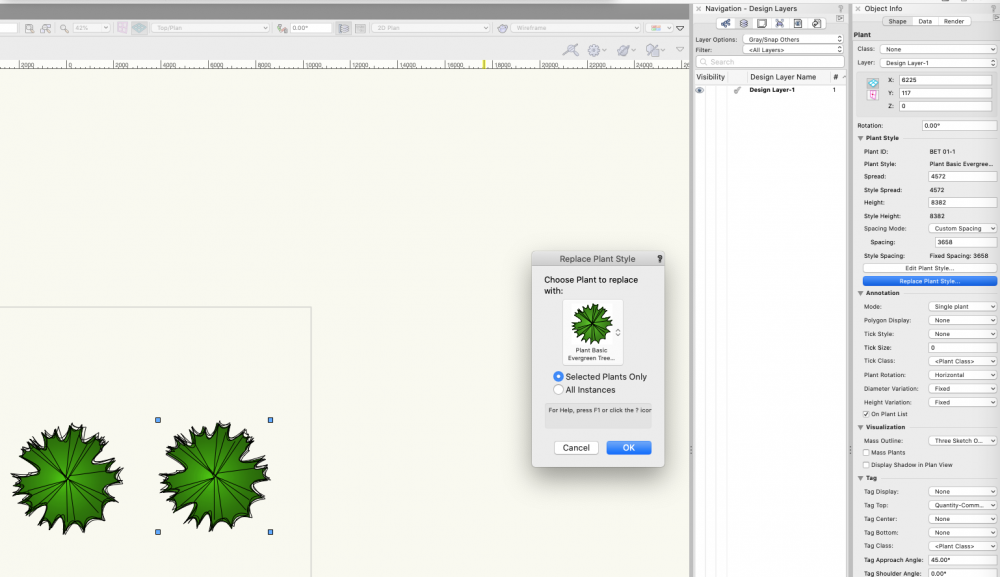
Alternatively you can edit the Plant Resource 2D component.
-
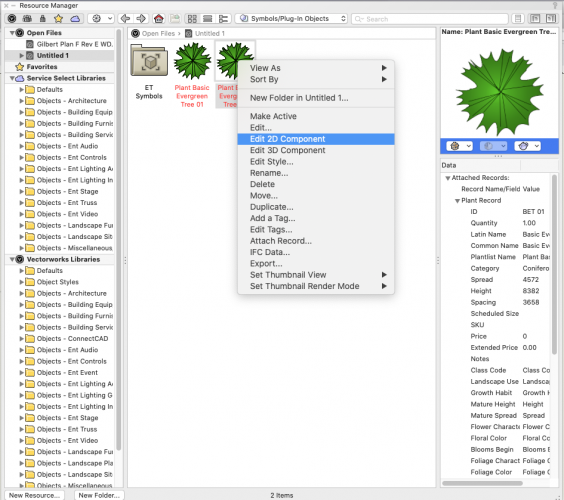
Michael, it is in the Service Select Libraries.
So only available to those who have Service Select.
-
Five or so versions back one of our local Landmark users insisted on having all of the plants installed in one file. The file was very large and it became unwieldy. I tried to talk her into making it a user library file that she accessed but she insisted on it being her Template file. That was not a wise decision.
Making a file with your favourite resources in it is useful, but be frugal and don't include things you rarely use.
-
These grabbed my attention in Rubina's presentation.:
- materials
- 3D structural grid
- custom wall components
- type legends
-
Try this:
- copy the Roof Face object.
- paste in place into a new blank file.
- copy that pasted Roof Face object.
- go back to the original file and delete the Roof Face object.
- paste in place the copied Roof Face object.
This process makes the Roof Space object regenerate and it may solve the problem you are having.
The other thing I would do is check the 2D source geometry of the Roof Face object to ensure that it is closed and doesn't have vertices very close to each other at one of the corners.
-
What happens when you update the viewport?
-
SketchUp recently posted a good explanation of why the problem exists.
In a nutshell, all 3d modeling software are single threaded since 3d model calculation is linear in nature and can then only be processed on a single
thread at the time.
Most calculations necessary to produce a 3d model cannot be made into chunks, independent of each other and then sent to be solved by different
calculators.
Simplifying to the extreme, let’s take a box with a hole in it as an example:
The box needs to exist in order for the hole to affect it. We could not tell one CPU to create the box and another CPU to create the hole in the
meantime because the hole needs to know where the box is and use its dimensions and position as variables of its own calculations. Therefore the
process of creating a hole in a box cannot be made parallel and thus cannot use multithreading.
Or consider the following: (2+2) - 1. You could send 2+2 to be solved on one thread and X - 1 on the other thread but the second thread would need
to wait on the result of the first one to do its own thing. Therefore multithreading is useless.
SketchUp is not an exception: All 3d modeler out there are single-threaded as far as modeling goes. Some part of a 3d application (like physical simulations in SolidWorks for example) will be able to assign specific tasks to other threads but modeling per se will always be done as a single thread. Some other times, parts of the software that rely on the OS will be able to be multi-threaded by the OS itself.
It’s for that very reason anyone will recommend you go for the CPU with the fastest clock you can afford because a 3.4GHz processor will calculate a
model faster than a 2.4GHz processor, regardless of how many cores each one has.
CPU Rendering
Rendering can and will take advantage of all your CPU’s core because it can just break down the entire resolution you are trying to render into an
array of chunks and send each core a chunk, cutting render times by an order of magnitude equivalent to the number of cores available to the
rendering engine. So a 6-core CPU will render faster than a 4-core equally clocked CPU.
The lessons for us:
- Get the fastest CPU you can.
- Keep your models as simple as possible to reduce the number of calculations required.
-
I checked other line types and they all have their geometry centred on the origin in the edit geometry part of the line type.
As soon as I moved your line type's geometry to the origin in the edit geometry part it draws okay. See attached file. Note you can change which side the arcs are on with the reverse direction button at the bottom of the OIP when you have line geometry selected.
The cause of the problem appears to be not having the geometry centred on the origin of the edit geometry window. That origin is where the line geometry you draw is and the line type geometry is placed relative to that.
Having Page units is fine.
-
1
-
-
The line is drawn relative to 0,0. When I first scaled the geometry it showed up well off the edge of the fill. It was near the fill edge when I moved the geometry so it started at 0,0.
Page units appears to be fine. Your line is just 1.5 mm long and your arc has a diameter of 0.6 mm making the whole element just 2.1 mm long and it doesn't want to show. Once it is scaled it shows. In this file I scaled the geometry up by a factor of 25.
-
Two problems:
- the geometry does not start at 0,0 (so the line is offset from where you draw the line by quite some distance).
- the line unit settings are set to page rather than world and your feature is very small (at your drawing scale of 1:50 that makes it just 0.06 mm long).
Edit the line settings and change the units to world.
Edit the line geometry select both elements and scale them by 100. Then locate the start line at 0,0
Note the fill won't fill into the arcs.
If you want a bubble like appearance try using the Revision Cloud tool in concave mode? You can adjust the billow size, variability and height and the fill will be complete.
-
1
-
-
Can you please post a file containing a 2D object drawn with that line type so it can be looked at.
-
New resources are unique to the file they are created in. Do you have your Resource Browser set to that file and to show All Resources?
-
Your Viewports might be in a Class that you have set to Grayed.
Try switching to each of your Classes that is set to Grayed one by one.
Viewports should always be in the None Class and The None Class should always be set to visible.
-
1
-
-
Try setting your Class Options (View menu) to Show/Snap/Modify Others.
-
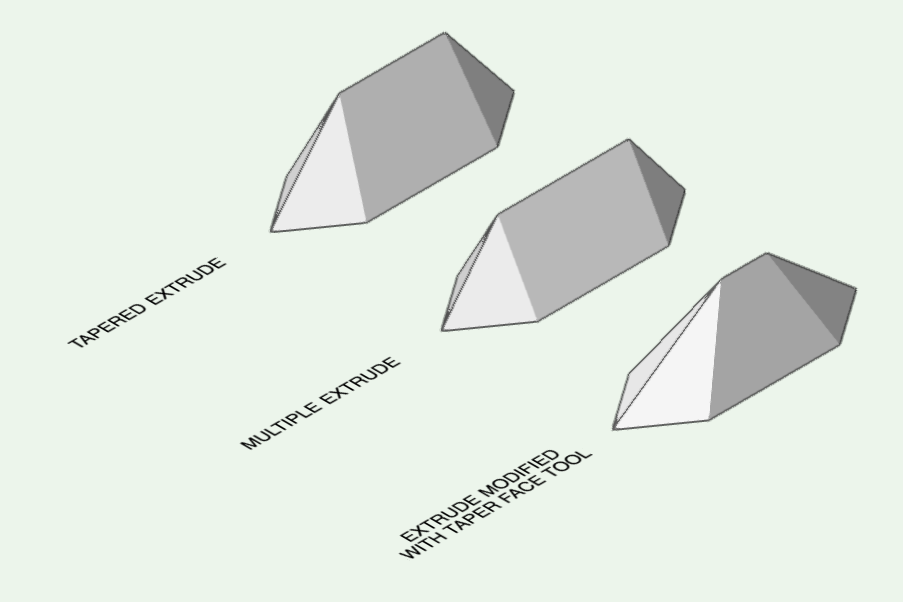
If the angles of incline are all the same draw the base shape and use tapered extrude.
Another quick way to do it is to use multiple extrude. Draw a line where the top edge is in Top/Plan View (both the base shape and the line need to be on the same plane). Select it and the base and make a Multiple Extrude with the required height.
If the angles of incline are different extrude the base to the required height. Go to an isometric view and then use the taper face tool to set the incline of each of the faces. You can set the base as the axis plane using the Option key.
You can get the volume of the final object with Model/Volumetric Properties...

-
2
-


Mac Silicon OS and VW
in Hardware
Posted
I have a file that is 284 Mb with Viewport cache on. It has:
- 49 Design Layers
- 202 Sheet Layes
- 188 regular Sheet Layer View Ports
- 157 section Sheet Layer Viewports
and uses Custom Renderworks rendering.
It took just on half an hour to update all of the viewports and did it without a glitch. My iMac would have stalled if I had tried to do that.
Activity Monitor showed 1600 - 1650 CPU threads and approximately 400 CPU processes.
When Renderworks was working the CPU time hovered around 98%. The system uses just 1.5% of the CPU time.
That is Rosetta performance so pretty impressive. I'm looking forward to seeing how it goes once it has Apple native code.