


yasin2ray
-
Posts
135 -
Joined
-
Last visited
Content Type
Profiles
Forums
Events
Articles
Marionette
Store
Posts posted by yasin2ray
-
-
Provide a dashboard (under a user’s account) that allows a user to track history and see status. A user would be able to delegate access to others (like coworkers) so that everyone within an organization can see the status, actions, and resolution (if available) of a support ticket.
Thanks!
Anna
-
8 minutes ago, Pat Stanford said:
Stake Objects have the following fields available. Use the values from the second column in the database header of the worksheet.
Latitude			'Stake Object'.'Latitude'
Longitude			'Stake Object'.'Longitude'
Latitude WGS84			'Stake Object'.'Latitude WGS84'
Longitude WGS84			'Stake Object'.'Longitude WGS84'
Easting				'Stake Object'.'Easting'
Northing			'Stake Object'.'Northing'
Latitude 'Stake Object'.'Latitude' Longitude 'Stake Object'.'Longitude' Latitude WGS84 'Stake Object'.'Latitude WGS84' Longitude WGS84 'Stake Object'.'Longitude WGS84' Easting 'Stake Object'.'Easting' Northing 'Stake Object'.'Northing'HTH
=Concat('Stake Object'.'Latitude', '- ', 'Stake Object'.'Longitude') should get you both values in a single cell.
Ask again if you need more help.
Can I only get coordinates from a stake object or can I use this method to get the coordinates of an object (a custom symbol)?
-
On 3/19/2022 at 9:59 AM, Piotr Karczewski said:
Interested...!
Please hit the "vote" button to the left side of the original post (an up arrow and a number below it) if you would like to see this feature!
-
I have a symbol that we use to identify specific locations and we need to display the latitude and longitude coordinates of each location. We have been using a Stake as a callout and have it set to display the lat and long coordinates in decimal degrees. I am now trying to show this coordinate information in a worksheet.
I do not know what function to use to get the latitude and longitude into the cells. (or it's not possible.) I tried using =ycoordinate, =xcoordinate, but this returns the x/y location in design space and not GIS coordinates. Since we set our files to be georeferenced and use an Adjusted Origin, the location will not be the distance from 0, 0. The function needs to understand the latitude and longitude coordinates.
Do you know what function I need to use?
Thanks!
Anna
(attachment is a screenshot of a worksheet I was messing around with to try to get this to work. It could have separate columns for latitude and longitude, or one column with both and with a comma between. It is showing the x/y distance from 0,0, not coordinates).
-
On 6/10/2022 at 3:59 PM, jnr said:
Pat + Tom:
Thanks for the pointers. the idea of faking it sounds even better. modifier to make the entrance and either an extrusion or an image will be quicker. Its for a conference and is really for concept.
That's what I did. It was sufficient for my needs at the time. See my reply to Tom W.
-
On 6/10/2022 at 11:45 AM, Tom W. said:
Yes you can create a duplicate DTM to backfill over the top of the tunnel see:
I did not make this tunnel using a duplicate DTM. I ended up using one DTM, a tunnel structure that goes in and back out of it on the other side, and a polygon inside the tunnel on this side (from a tip on the forum) to fake the look of a tunnel opening. (final product not shown).
-
On 3/8/2022 at 8:28 PM, jeff prince said:
Solved with a record field or adding notes to the plant object.
This makes sense. I've done this on a project where we needed to track trees removed (because they died) and replacement trees. Thanks for reminding me of that. I can basically reuse what I made for that.
-
 1
1
-
-
2 hours ago, markdd said:
Color Palettes can't be be shared as a resource, however, you can put Custom Color Palettes into the Libraries>Defaults>Color Palettes folder of a Workgroup Directory and then it will be shared with all those who have added the workgroup to their installation.
I've been doing this for years and it works across a number of machines.
Markdd,
How do you get the custom color palette file saved in that location? How do you update it when a change is made after it has been saved there?
Anna
-
I have made a custom color palette for the company. I would like to share it with the others in my office. Additionally, I work remotely and we share files through Microsoft OneDrive. How do I get the company custom color palette to them?
I used the Help Menu and it states "With the Color Palette Manager, create or import custom color palettes". I am looking at the Color Palette Manager and I do not see a way to import or export a color palette. I've attached a screenshot of what I see in the Color Palette Manager. I also did not find a way to share the custom color palette through the Resource Manager.
Thanks!
Anna

-
On 3/8/2022 at 7:01 PM, jeff prince said:
It’s called “border” in the hardscape settings.
In terms of drawing an edging independent of say a paver bed, I created a steel edging hardscape style in the Path configuration just for this purpose. It’s a pretty nice trick that I have not seen others do yet. I’ll post an example when I’m back in the studio.
I created a nice edging using the Hardscape Tool in path configuration mode. I have not figured out how to create a Boundary configuration hardscape that has a border on only select sides. Is this still not possible?
-
I would like to set company standards for the Plant Style settings for each plant symbol in our plant library. I'm working on making a worksheet that will display the settings (in columns) for each plant.
QUESTION: How do I get the By Style / By Instance setting into the column of a worksheet?
I want to know for each setting if it is set by style or instance. The columns would be, for example (see attached image):
Plant Tag style/instance Scheduled Size style/instance
ACGR by style 2.5" B&B by instance
THANKS!
Anna

-
On 3/8/2022 at 7:01 PM, jeff prince said:
It’s called “border” in the hardscape settings.
In terms of drawing an edging independent of say a paver bed, I created a steel edging hardscape style in the Path configuration just for this purpose. It’s a pretty nice trick that I have not seen others do yet. I’ll post an example when I’m back in the studio.
I see. This is clever. You use the border settings (which I think of when I need a soldier course, for example) for making steel edging. I hadn't thought of that. Alternatively, use the Hardscape Tool in Path mode to create steel edging. I'll try them both!
-
1
-
-
24 minutes ago, Andy Broomell said:
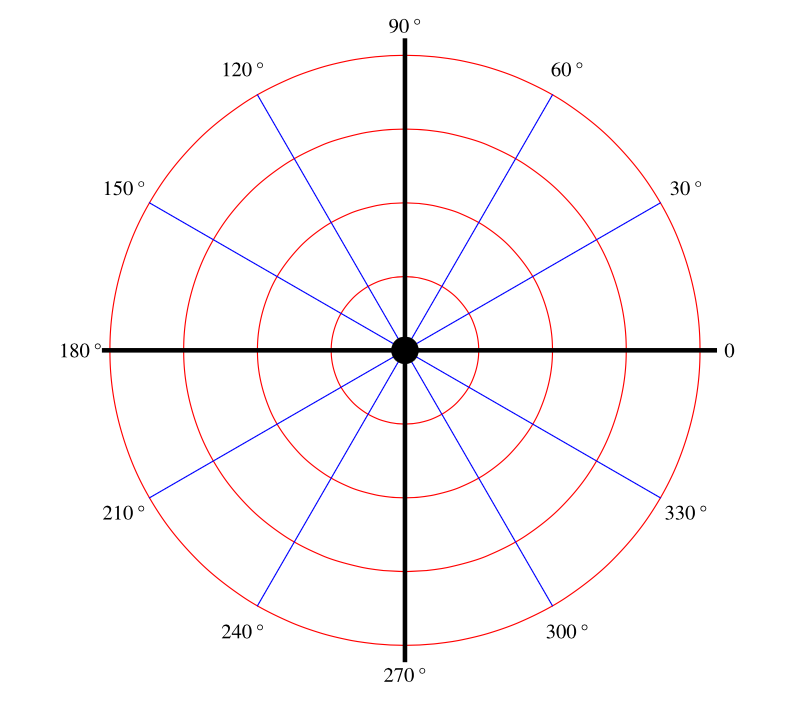
Like Mark said it's based on Polar Coordinates, with 0° equating to the positive X axis. If you look at the 30° line in the graphic above you can start to see why positive values correlate to moving "counter-clockwise." It helps to picture this chart rather than a clock when thinking about rotation.
Hmm! Okay, thank you! I bet I haven't thought about that since high school.
-
11 minutes ago, Andy Broomell said:
Agreed! This reminded me of a post I made EIGHT years ago...
Wow, 8 years ago! I asked for this a few years ago but not through the forum. It really would help me a ton when I'm reshaping a plant group to align to a specific edge. It easy to grab a midpoint thinking it's the next end point.
-
2
-
-
Why?!
Why does a positive number rotate counter-clockwise and a negative number rotate clockwise?
-
Worksheets:
- Add the ability to select multiple objects from a worksheet, not just a single object from a single row.
- I would use this in a “data editing/review/quality control” worksheet to select multiple objects for changing one setting at once for all the objects. One example, to select all Ash trees so that I can mark them as To Be Removed. (I realize there are other ways to select multiple things, such as the custom selection tool, but the worksheet is where I do a lot of review of the project).
-
3
-
Contour labels –
- Automatic contour labels should never land inside a wall. Make it "smarter" so it is aware of structures.
- Ability to select frequency of label (per feature, per feature part, etc) as there are always too many. (so many that attempting to delete them would take hours).
-
1
-
- Popular Post
- Popular Post
- Make midpoint handles a different color or shape than corner/end point handles. Make them in some way obviously identifiable.
- This should apply to polygons and anything that uses a polygon, e.g. a plant group.
-
10
-
Keep record of a substitution for a plant species: what was originally specified and then what was actually planted. Its important to keep track of substitutions and also not lose the original design.
-
A Project Plant Species List:
- This would limit the plant species that can be placed on a project to the species selected for that particular project. When a proposed plant is placed on the project, the species selection must come from that list so that no one can accidentally select a different species that is not supposed to be on that project.
- Perhaps this limit happens through the Plant selection dropdown menu (that accesses the Resource Manager) - You would not see all the plants in the file, you would see only the plants approved for that project.
- We realize there are other ways to do something like this that do not set a hard limit however, plants on a project certainly change over the development of the project and the actual limit/specific list is useful when giving tasks to an intern or new employee.
-
17 hours ago, jeff prince said:
Agree with all your ideas, except for this one. The user should be able to choose the units, not all countries use inches for DBH. If I’m working in decimal feet, I should be able to use inches for DBH. If I’m working in meters, I might want cm or mm, depending on the agency reviewing the information. Or I could just be crazy and working in feet & inches yet want my DBH measured in parsecs 🙂
Fair point - I agree the unit should be appropriate for the county. In the US... it should be inches, not feet and inches.
-
1
-
-
16 hours ago, jeff prince said:
You can do this already by selecting the edges not needing the edging when using the border option. Alternatively, you can draw your edging as a separate object.
I do not see the word "edging" anywhere in the Hardscape Tool. Can you explain your comment? Also, what about when the hardscape does not have a border, can you add edging without having a border?
-
19 hours ago, markdd said:
Have you ever tried making one complete viewport and then using the Split tool to divide them up into individual viewports? Works well for me.
I would still need to move the viewports to where they need to be, any corridor is likely not a straight line. So I still find a viewport creation along a line to be a more useful capability. Also, I did not know it's possible to split a viewport! That's cool and I will test it, thanks.
-
I found the main conflict was when I was trying to work while the program was autosaving. Now, I have the "confirm before save" option checked - that allows me to stop working for the moment it is saving. I have not had issues since then. It's like the program can't handle saving in the background while I continue working.
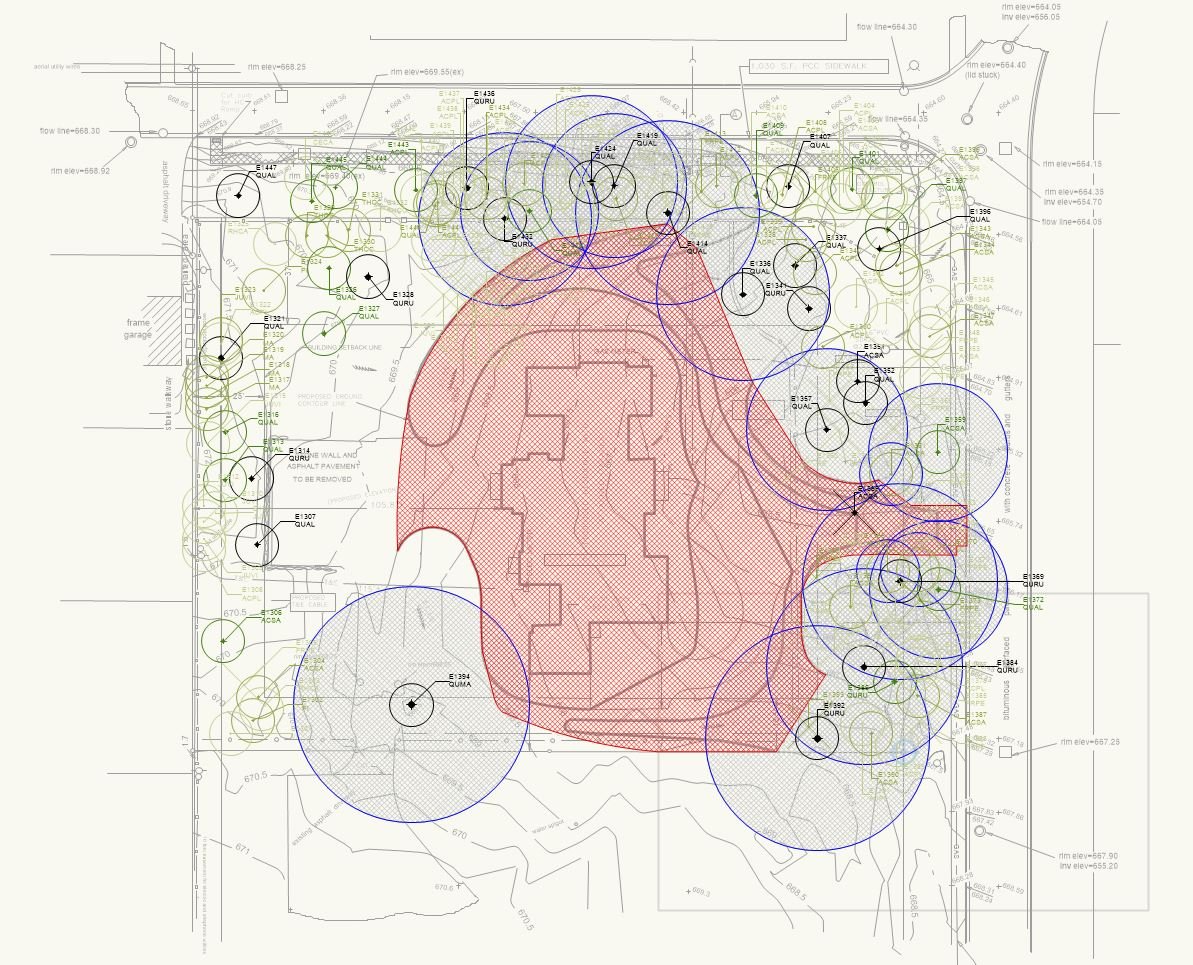
Worksheet Question - How to get 'Location' is within 'Area 1' is 'True' ?
in Troubleshooting
Posted
I hoping to set up this worksheet with columns that indicate location of Site Features instead of using row criteria to group Site Features by location. Currently, I can set the Location in each database row to select criteria that is "Location is within Outfall Area #1" or "Location is within Outfall Area #2". But I'd rather create more of a table with Xs in the cell indicating if a Site Feature is within Outfall Area #1 or 2, or both 1 and 2 (an X in each column).
What do I need to set in the column cell so that it will populate the cells below with an X (for true/yes) or no X (for false/no)?
THANKS! This will help me with so many worksheets in the future.
Anna
ps. Don't worry about what an outfall/outfall area is if you don't know. Just think of this as an area. Having said that, if you are employed by Vectorworks, please learn about outfall areas, drainage areas, watersheds, etc and add knowledge/capabilities to Vectorworks Landmark!!!!!!!!!! Thank you.