


Connecting grandMA3 to Vision 2021
Overview
Vision 2021 SP2.1 and later versions can connect to any type of grandMA3 lighting control system, including grandMA3 consoles and onPC computers. The version of grandMA3 software must be 1.4 or later.
Vision uses MA viz-key technology to connect to the grandMA3 and join an MA-Net3 session. Learn more about the viz-key at www.malighting.com/viz-key
Once you have installed the viz-key driver:
- If the viz-key is not attached, Vision can join an MA-Net3 session and use all granted parameters for visualization.
- If the viz-key is attached, Vision can use all non-granted parameters too.
Install and Update the Viz-Key Driver
Before Vision can join an MA-Net3 session, you need to install the viz-key driver and update Vision to communicate with the grandMA3 software version that you have installed. You only need to do this once per Vision computer, for each version of the grandMA3 software you want to use for visualization. In other words, you will follow these steps to: (1) install the viz-key driver and (2) update Vision to work with a new version of the grandMA3 software that you have installed.
Once you have established (or updated) a connection to the grandMA3 software, you can simply select that software version when setting the DMX provider in Vision. See Connect to Specific Versions of the grandMA3 Software.
To install the viz-key driver or update the grandMA3 software connection:
-
Download the grandMA3 viz-key package from https://www.malighting.com/downloads/.
-
Download the grandMA3 software you need from https://www.malighting.com/downloads/.
-
Install the grandMA3 software either on your grandMA3 console or onPC computer.
-
Unzip the
grandMA3_viz_key_vX.X.X.X.ziparchive.-
When using a USB flash drive: Copy the
mafolder into the root directory of your flash drive. -
On Windows without a USB flash drive: Copy the content of the
mafolder to this folder:C:\ProgramData\MALightingTechnology\installation_packages. -
On Mac without a USB flash drive: Copy the content of the
mafolder to this folder:~/MALightingTechnology/gma3_software_update.
-
When using a USB flash drive: Copy the
-
Launch Vision.
Note: Make sure the viz-key is not attached to Vision during the installation process.
-
Run the menu command
DMX > Change DMX Provider. -
In the Select DMX Provider dialog box, select
MA-Net3from the list, and click OK. -
In the Select MA3 Software Version dialog box, select
Updaterfrom the list, and click OK. The following dialog displays:
-
Launch the grandMA3 console or onPC software.
-
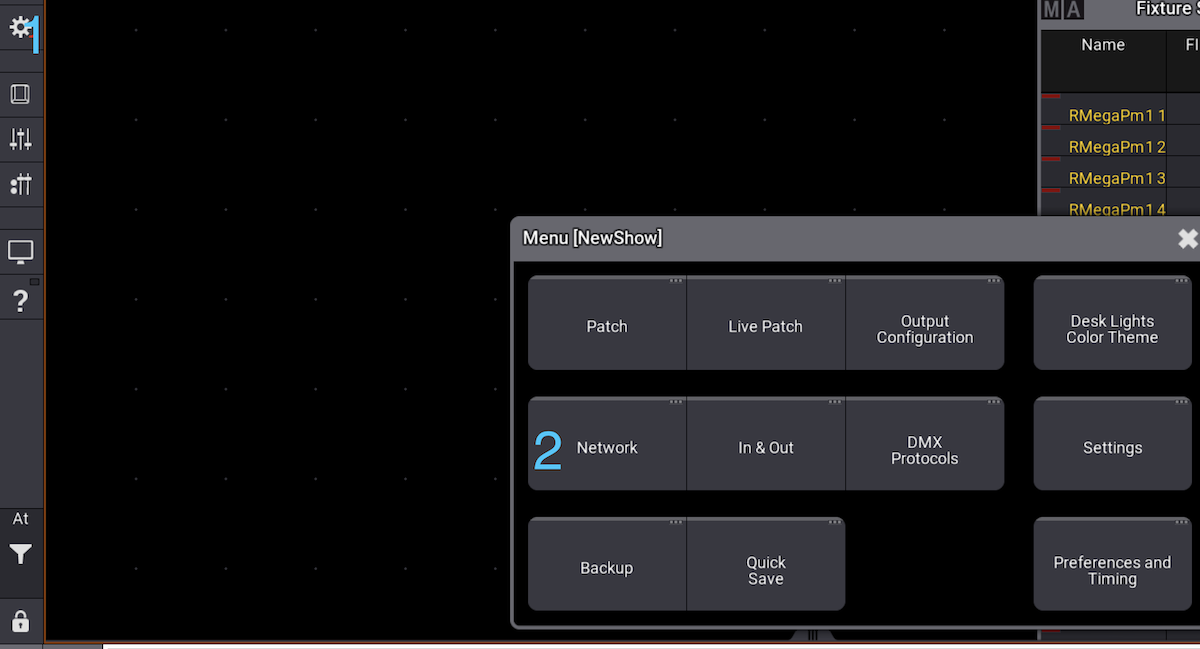
Click the gear icon to open the settings (1). In the Menu dialog box, click
Settings(2), and selectSoftware Update(3).

-
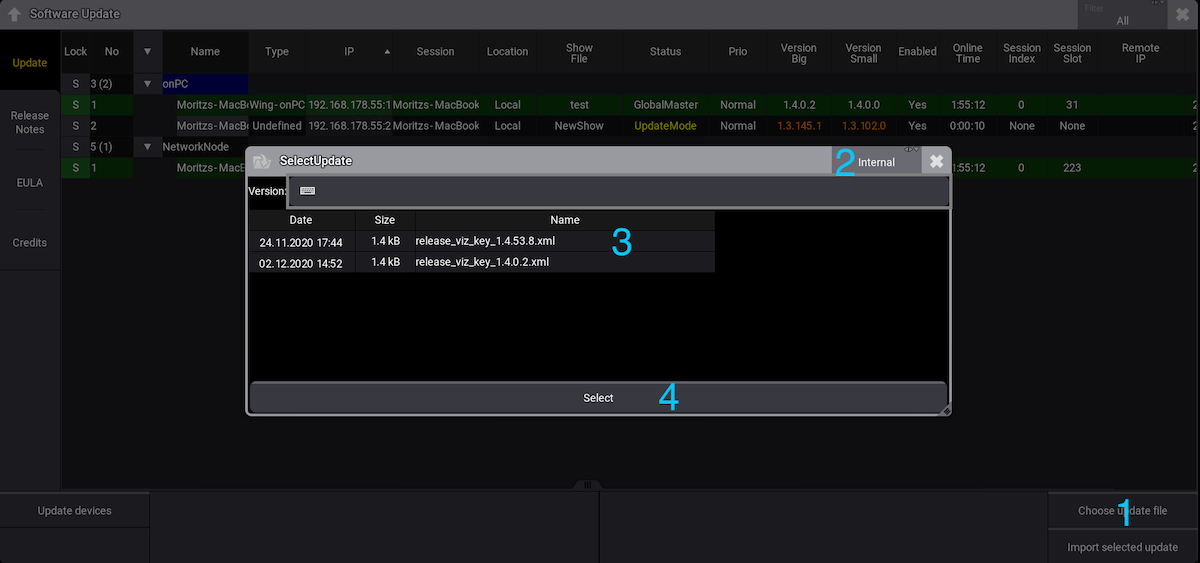
The Software Update window opens. Click
Choose update file(1). At the top right of the SelectUpdate dialog box, select the location of the update file (either Internal or the USB flash drive) (2). Select the update file for the vizkey:release_viz_key_vX.X.X.X.xml(3), and clickSelect(4).
-
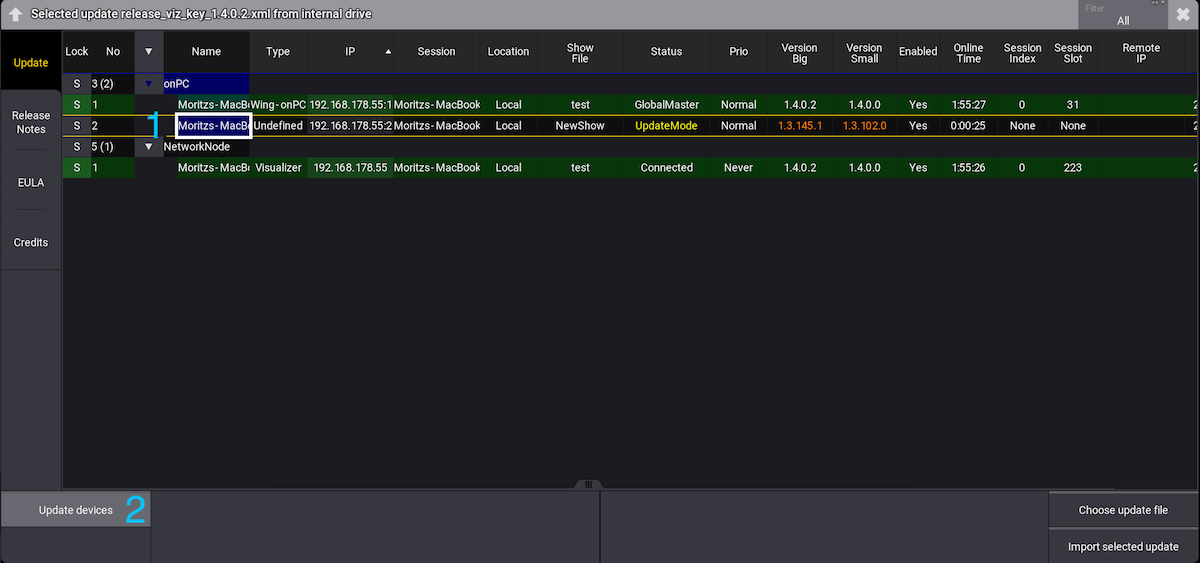
Select the Vision row in the table (1). The Status changes to
UpdateMode. ClickUpdate devices(2).
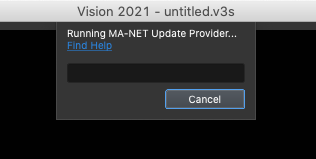
- The grandMA3 sends the needed files to Vision. When the process is complete, Vision displays the following dialog box while waiting to connect with MA-Net3.

Note: You can cancel this operation by pressing the Esc key in Vision.
-
In the grandMA3 console or onPC software, click the gear icon to open the
Settings(1). In the Menu dialog box, clickNetwork(2).
-
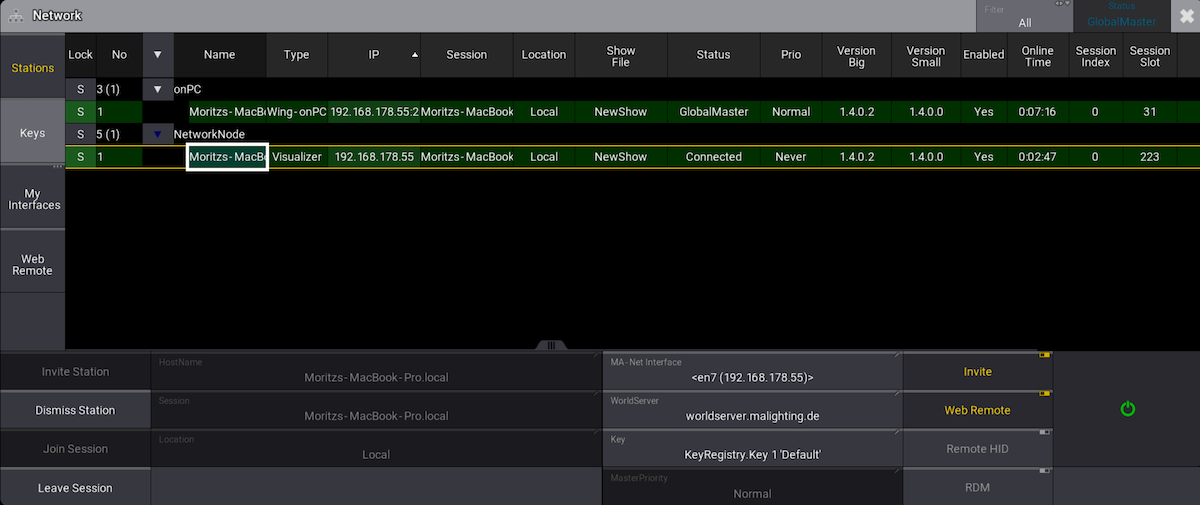
The Network window opens. Select the Vision row in the table (1), and click
Invite Station(2).
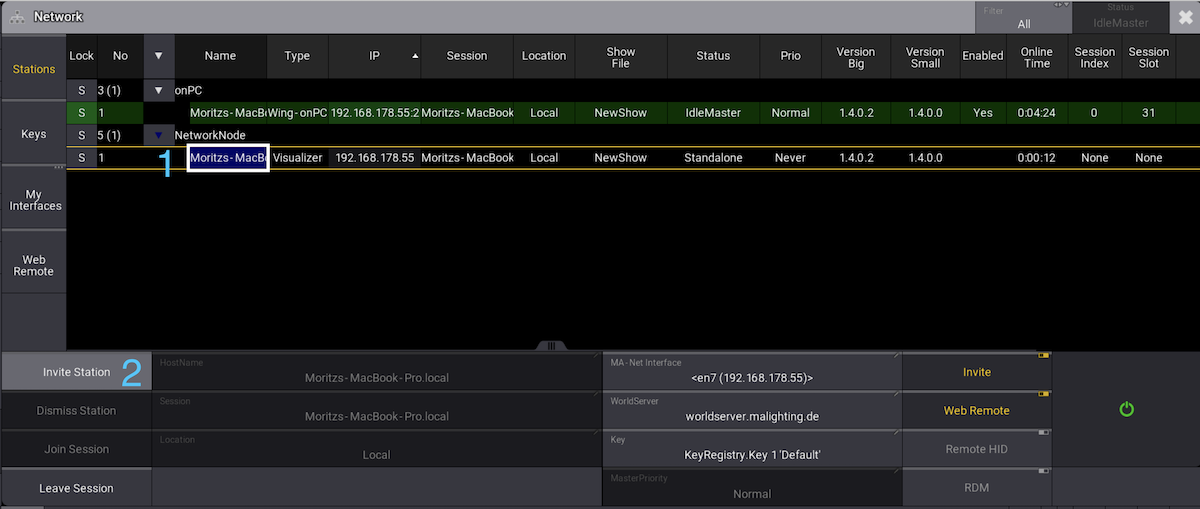
-
When the connection is successful, the row turns green, and the Status changes to
Connected. The Connecting dialog box closes in Vision, and you can receive DMX! 🎉
- If grandMA3 onPC and Vision are running on the same computer, you need to restart both programs in a specific order. See Start-Up order with the Viz-key.
Start-Up Order with the Viz-Key
If you are using grandMA3 onPC version 1.4, and you are running onPC and Vision on the same computer, only one of these programs can use the viz-key at a time.
The start-up order is very important. Whichever program launches first will use the viz-key, and this determines how many universes Vision receives from the grandMA3.
- When grandMA3 onPC uses the viz-key, Vision can only receive one universe from the grandMA3.
- When Vision uses the viz-key, Vision can receive all universes from the grandMA3.
To ensure that Vision uses the viz-key:
- Launch Vision.
-
Run the menu command
DMX > Change DMX Provider. -
In the Select DMX Provider dialog box, select
MA-Net3from the list, and click OK. - In the Select MA3 Software Version dialog box, select the version of grandMA3 software to use for visualization.
- Once the Connecting dialog box displays, launch grandMA3 onPC.
Connect to Specific Versions of the grandMA3 Software
After you have installed the viz-key and updated Vision to communicate with a specific version of the grandMA3 software, Vision can join an MA-Net3 session. Vision and the grandMA3 must use the same version of grandMA3 software to visualize the show.
Note: If you are using grandMA3 onPC and Vision on the same computer, make sure that onPC is not running when you launch Vision. Follow the startup order described in Start-up Order with the Viz-Key.
To select the grandMA3 software version to use with Vision:
-
In Vision, run the menu command
DMX > Change DMX Provider. -
In the Select DMX Provider dialog box, select
MA-Net3from the list, and click OK. -
In the Select MA3 Software Version dialog box, select the desired version from the list, and click OK.
-
The Connecting dialog box displays while Vision waits to connect with the grandMA3.
-
In the grandMA3 console or onPC software, click the gear icon to open the
Settings(1). In the Menu dialog box, clickNetwork(2).
-
The Network window opens. Select the Vision row in the table (1), and click
Invite Station(2).
Auto Interface Selection and Network Setup
The viz-key allows Vision to join an MA-Net3 session. There are special requirements for connecting to an MA-Net3 network.
We recommend that you create a physical network just for the members of your MA-Net3 session.
Note: WLAN is not supported.
For example, we use the following setup at Vectorworks:
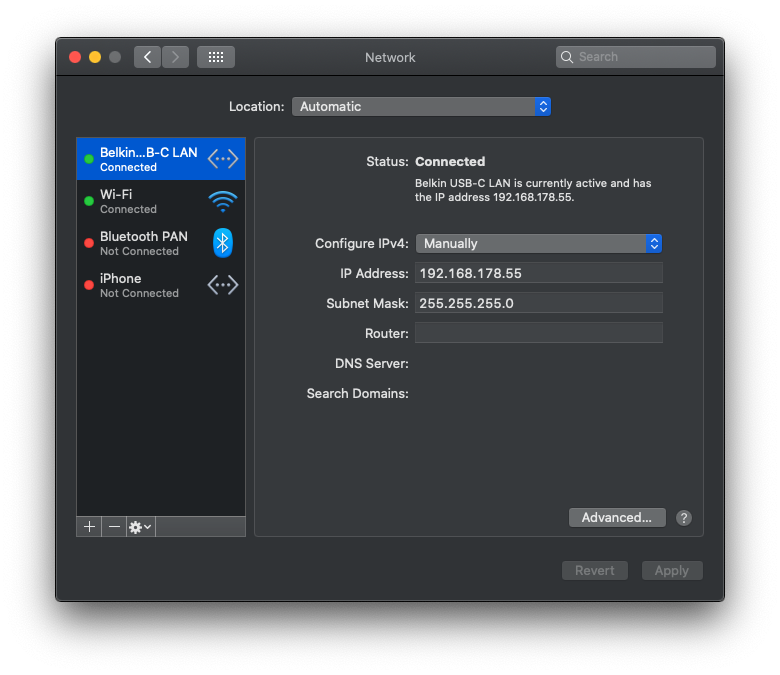
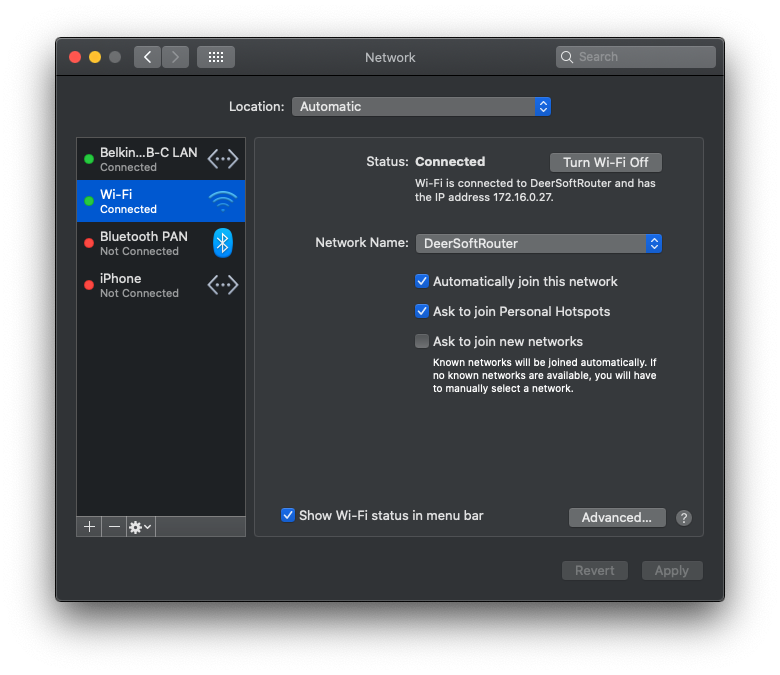
One network interface is used just for the MA-Net3 session. The computer has a static 192.168.X.X class C IP address. A second interface is used for internet access and for other network devices. The computer has a normal Class B IP address with DHCP.
The viz-key uses the Auto interface from the grandMA3. You cannot change this. In the future, MA plans to allow visualizers to change the interface, but this is not currently supported.
The connection from the Auto interface will be assigned in the following order:
* Regardless of connection status: If a 192.168 Class C address is found, this interface will be assigned.
* If interface is connected: And If a 172.x Class B address is found, this interface will be assigned.
* If interface is connected: And If a 10.x Class A address is found, this interface will be assigned.
* If interface is connected: And If a 2.x Class A address is found, this interface will be assigned.
* If none of the above are true, the interface will take the Loopback Address 127.0.0.1.
Note: grandMA3 onPC and Vision can run on the same computer. For best results, run the local loopback. Be sure to follow the auto interface rules. The easiest way to do this is by turning off all network interfaces.
Windows Firewall Issues
If Vision cannot update the grandMA3 software connection or join an MA-Net3 session, make sure your computer’s firewall is disabled.
Report Article
Join the conversation
You can post now and register later. If you have an account, sign in now to post with your account.
Note: Your post will require moderator approval before it will be visible.